Faber MIRROR Скачать руководство пользователя страница 8

Version 8/10 - Page 8

USE AND CARE CONTINUED - CONTROL PANEL

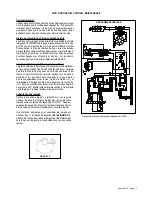
The hood can be operated from the control panel located in the center of the hood , 

FIGURE 10

 is a picture of the 

control panel, With LED display in the center

Key

A

B

C

D

E

F

G

H

I

L

Function

Door closed: press and hold for 2 seconds to open door and 

turn motor onto last used speed. Door open: quick press to 

turn motor on and off

Decreases the vent speed.

Increases the vent speed.

By pressing this key the 

intensive boost function

 is activated 

from any previously selected speed. The intensive boost can 

be activated even when the motor is OFF. After ten minutes of 

intensive power, the hood switches back to the last selected 

speed. This function is recommended for cooking conditions 

where vapors and odors need to be eliminated immediately and 

quickly.  Can only be operated with door open.

By pressing this key the 

24 hr - function 

is set which turns 

the hood on at 60 CFM for 10 minutes every hour with a noise 

level of just .5 sones. This setting can operate all day and 

night to 

refresh and clean your home

.  After 10 minutes 

every hour, the motor switches off automatically. Press the 

button again to turn off the 24 hour function. Can only be 

operated with door open.

By pressing this key the 

30 minute delay shutdown

 mode is 

activated which is used to eliminate any residual odor in the 

kitchen for 30 minutes. After 30 minutes the hood and lights 

turn off automatically. It can be turned on at any speed, and it 

is turned off by pressing the key again. 

By  pressing  this  key,  the  grease  filter  and  charcoal  filter 

saturation alarms are reset when held for 3 seconds, see 

page 9 for more information

Changes the level of lighting, can adjust the lights to 5 different 

levels of intensity 

Door closed: press and hold the light button for 2 seconds, 

and the door opens and lights turn at maximum level, use 

button H to adjust level of lights

Door open: quick press to turn on and off lights 

Door closed: press and hold the hinge button for 2 seconds 

to open the door, turns the hood on speed 3 and turns the 

lights on

Door open: when pressed for 2 seconds, turns off the motor, 

lights and closes the door

LED Display Indicators

The current speed is shown in the center when the 

hood is turned on. Indicated by the number of speed 

bars low to high

The 

i

 symbol flashes and all the speed bars light 

up

24 symbol is lit and speed bars light up and turn off 

in a row

clock  symbol  flashes  and  speed  bars  indicating 

current speed are lit

After 100 hours of operation the droplet symbol is lit, 

indicating saturation of the grease filters

After  200  hours  of  operation,  the  letter  C  is  lit  to 

indicate saturation of the charcoal filters

FIGURE 10

A B C D

E

F

G

H

I

J

The number of speed bars decrease

The number of speed bars increase

Attention: To completely close the upper panel, the user must hold down the (A, I or J) buttons until the door is 

completely closed. If removed before completely closing or if an object is in the way, the panel stops. Simply 

open the panel again with A, I, or J buttons and repeat closure process.

Содержание MIRROR

Страница 1: ... Home Construction and Safety Title 24 HUD Part 280 Four wire power supply must be used and the appliance wiring must be revised See Electrical Requirements LISEZ BIEN CETTE FICHE AVANT D INSTALLER LA HOTTE AVERTISSEMENT POURMINIMISERLERISQUED UNFEUDEGRAISSESURLATABLEDECUISSON a Nejamaislaisser un élément de la table de cuisson fonctionner sans surveillance à la puissance de chauffage maximale un ...

Страница 2: ...he junction box When making the electrical connection cut a 1 1 4 hole in the wall A hole cut through wood must be sanded until smooth A hole through metal must have a grommet WARNING TOREDUCETHERISKOFFIREORELECTRIC SHOCK do not use this fan with any solid state speed control device WARNING TO REDUCE THE RISK OF FIRE ELECTRI CAL SHOCK OR INJURY TO PERSONS OBSERVE THE FOLLOWING Use this unit only i...

Страница 3: ... combustion Suivez les conseils et mesuresdesécuritédufournisseurtelsqueceuxpubliés par l Association Nationale de la Sauvegarde contre l Incendie et l Association Américaine d Ingénieurs de Chauffage Frigorifaction et Air Climatisé ainsi que les codes municipaux En perçant un mur veillez à ne pas perforer un autre fil électrique Une ventilateur à évacuation extérieure doit être raccordée à l exté...

Страница 4: ... Bit Scissors Pliers Phillips Screwdriver Flat Blade Screwdriver Wire Stripper or Utility Knife Metal Snips Measuring Tape or Ruler Level Pencil Caulking Gun Duct Tape PARTS SUPPLIED FOR INSTALLATION 1 Hardware Package 1 Literature Package PARTS NEEDED FOR INSTALLATION 2 Conduit Connectors Power Supply Cable 1 Wall or Roof Cap All Metal Ductwork OPTIONAL ACCESSORIES AVAILABLE Replacement Charcoal ...

Страница 5: ...Version 8 10 Page 5 INSTALLATION DIMENSIONS FRONT SIDE VIEW PRODUCT DIMENSIONS with rear venting chimney ...

Страница 6: ...ck lead of the rangehood with a twist on type wire connector Using the 4 holes provided screw the Field Wiring Compartment to the wall as dictated by your Power Supply Cable location screws not provided Replace the cover WARNING THE SCREWS PROVIDED FOR MOUNTING THIS RANGEHOODMUSTBEINSERTEDINTOSOLIDWOOD THESE MUST NOT BE INSERTED INTO SHEET ROCK B F F 1 Adjust the two screws on the mounting hardwar...

Страница 7: ...ver screws I in FIGURE 8 3 Attach one charcoal filter to each end of the blower Each charcoal filter attaches to the grid on the side of the blower Rotate the filter clockwise to install and counterclockwise to remove as indicated in FIGURE 9 FIGURE 9 USE AND CARE INFORMATION Thisrangehoodsystemisdesignedtoremovesmoke cooking vapors and odors from the cooktop area For Best Results Start the rangeh...

Страница 8: ...an be turned on at any speed and it is turned off by pressing the key again By pressing this key the grease filter and charcoal filter saturation alarms are reset when held for 3 seconds see page 9 for more information Changestheleveloflighting canadjustthelightsto5different levels of intensity Door closed press and hold the light button for 2 seconds and the door opens and lights turn at maximum ...

Страница 9: ...al Filter Saturation Alarm Thecharcoalfiltersshouldbereplaced asindicatedinFIGURE 9 on page 8 when the C symbol appears on the LED screen or at least every 4 6 months depending on heavy usage To replace the charcoal filter open the ducting panel remove the metalgreasefiltersandremovetheoldcharcoalfiltersandreplace with the new ones Then replace the metal grease filters Press and hold the G button ...

Страница 10: ... replacement as shown in FIGURE 12 Remove the cover on the top left side of the hood Press the panel release lever with a screwdriver to enable the release of the panel pull the panel out at the same time After opening the panel remove the grease filters and replace the fuse located on the right side of the hood with the same type of fuse Put the fuse holder and grease filters back into place and ...

Страница 11: ...lumbing 2 Service calls to repair or replace range hood light bulbs fuses or filters Those consumable parts are excluded from warranty coverage 3 Repairs when your range hood is used for other than normal single family household use 4 Damage resulting from accident alteration misuse abuse fire flood acts of God improper installation installation not in accordance with electrical or plumbing codes ...

Страница 12: ...re de documentation PIÈCES NÉCESSAIRES POUR L INSTALLATION 2 connecteurs de conduit Câble d alimentation 1 capuchon de mur ou de toit Conduit en métal ACCESSOIRES POUR L INSTALLATION REMPLACEMENT DU FILTRE AU CHARBON Pour installation sans conduit seulement Remplacer le filtre au charbon lorsque nécessaire pièce 6093034 COUVERCLEDELACHEMINÉE OPTIONNEL Pour installation où la ventilation arrière re...

Страница 13: ...Version 8 10 Page 13 DIMENSIONS D INSTALLATION AVANT VUE DE CÔTÉ DIMENSIONS DE PRODUIT avec la cheminée arrière de mise à l air libre ...

Страница 14: ... verte Replacer le couvercle du comparti ment de câblage Avertissement Les Vis Fournies Pour Le Montage De Cette Hotte De Cuisinière Doivent Être Insérées Dans Du Bois Solide Elle Ne Doivent Pas Être Insérées Dans Un Mur Ou Un Plafond De Plâtre B F F 1 Ajustez les deux vis sur le matériel de support B sur le SCHÉMA 5 au plus bas point 2 Arrêtez le capot sur les supports 3 Connectezlecapotàl alimen...

Страница 15: ... un filtre à charbon à chacune des extrémités du ventilateur Chaque filtre à charbon doit être reliée au côté de la grille du ventilateur Tourner le filtre dans le sens des aiguilles d une montre pour fixer et tourner dans le sens contraire des aiguilles d une montre pour enlever tel qu indiqué au Schéma 9 FIGURE 9 UTILISATION ET ENTRETIEN Cette hotte est conçue pour enlever la fumée les vapeurs d...

Страница 16: ...r cette touche les alarmes de saturation de filtre de graisse et de filtre de charbon de bois sont remises à l état initial une fois tenues pendant 3 secondes voient la page 9 pour plus d information Change le niveau de l éclairage peut ajuster les lumières sur 5 niveaux différents d intensité Porte fermée appuyez sur et tenez le bouton léger pendant 2 secondes etlaportes ouvreetleslumièrestournen...

Страница 17: ...de charbon de bois Les filtres de charbon de bois devraient être substitués comme indiqué sur le SCHÉMA9 à la page 8 quand le symbole C écran de DEL ou au moins tous les 4 6 mois selon l utilisation lourde Pour substituer le filtre de charbon de bois ouvrez le panneau de canalisation retirez les filtres de graisse en métal et retirez et remplacez par les neufs Substituez alors les filtres de grais...

Страница 18: ...pour le remplacement de fusible suivant les indications de le SCHÉMA 12 Retirez la couverture de l aile gauche supérieure du capot Appuyez le levier de version de panneau avec un tournevis pour permettre la version du panneau tirent le panneau en même temps Aprèsouverturedupanneau retirezlesfiltresdegraisseetremplacezlefusiblesituéducôtédroitducapotparlemême type de fusible Mettez le support de fu...

Страница 19: ...les fusibles de votre maison ou pour corriger votre câblage ou votre système de plomberie 2 Les appels de service pour remplacer ou réparer les ampoules les fusibles ou les filtres de votre hotte de cuisinière 3 Les réparations lorsque votre hotte de cuisinière a été utilisée plus que la normale c est à dire plus que pour une famille par foyer 4 Les dommages résultant d un accident de l altération...

Отзывы: