


Version 8/10 - Page 6
PREPARE THE WALL
1.
Disconnect and move freestanding range from cabinet
opening to provide easier access to rear wall. Put a thick,
protective covering over cooktop, set-in range or countertop to
protect from damage or dirt.
2.
Determine and clearly mark with a pencil the center line on the
wall where the rangehood will be installed.
3.
Draw a horizontal line at 38 5/16" above the cooktop
(as indicated
in FIGURE 4).
Mark two points (1)
(in FIGURE 4)
on the horizontal
line, 11 1/2" away from the center line on each side. Make sure
both marks are level.
4. Mark two points (2)
(in FIGURE 4)
which are 18 9/16" above the
cooktop, and are 7 7/8" on either side of the center line. Make sure
both marks are level. Drill holes in marks 1, 2 and 3
FIGURE 5
FIGURE 4
INSTALL THE RANGEHOOD
FIGURE 6
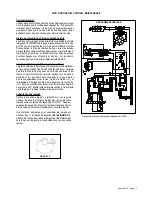
CONNECTING POWER SUPPLY
Remove the cover from the Field Wiring Compartment with a
phillips screwdriver. Feed the Power Supply Cable through the
electrical knockout (located on top or back of the hood.
Connect the Power Supply Cable to the rangehood cable.
Attach the Power Supply Cable grounding lead to the green
screw provided. Attach the White lead of the power supply to the
White lead of the rangehood with a twist-on type wire connector.
Attach the Black lead of the power supply to the Black lead of
the rangehood with a twist-on type wire connector. Using the
4 holes provided screw the Field Wiring Compartment to the
wall as dictated by your Power Supply Cable location (screws
not provided). Replace the cover.
WARNING: THE SCREWS PROVIDED FOR MOUNTING THIS
RANGEHOOD MUST BE INSERTED INTO SOLID WOOD. THESE
MUST NOT BE INSERTED INTO SHEET ROCK.
B
F
F
1. Adjust the two screws on the mounting hardware
(B in FIGURE 5)
to the lowest point
2. Hang the hood onto the mounting brackets
3. Connect the hood to the power supply (SEE CONNECTING POWER
SUPPLY ON RIGHT SIDE OF THIS PAGE)
4. Open the upper panel by pressing the L button (see Control Panel
on page 8). Using two hands, remove the grease filters one at a time
by pushing the filter forward and and pulling the handle down.
(FIGURE 6)
5. From the inside of the hood, adjust the mounting screws to make
the hood level
(B in FIGURE 5)
. Install safety screws
(11 IN FIGURE
5)
and reinstall the grease filters and close the upper panel
6. Turn off the power supply to the hood until finished with the
installation.
7. For ducted installations
, the DAMPER
(I in FIGURE 1)
must be
attached to the exhaust opening at the top of the CANOPY SECTION.
Connect the ductwork and seal all connections with duct tape.
If the rangehood does not operate, check that the circuit
breaker is not tripped or the house fuse blown. If the unit still
does not operate, disconnect the power supply and check
that the wiring connections have been made properly.


