


90
EN
77
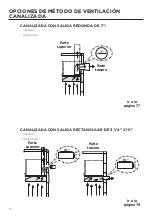
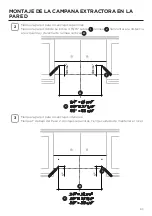
INSTALLATION
Fitting the Hood canopy
BEFORE FITTING THE HOOD TO THE WALL UNIT, PROCEED AS FOLLOWS:
• Disconnect the wires to the Commands at the connectors.
• Disconnect the wires to the Light at the con-
nectors.
• The Hood can be installed directly on the
underside of the wall unit (Minimum 650 mm
from the Cooker Hob).
• Create an opening in the bottom of the wall unit,
as shown.
• Insert the hood until the side supports snap into
place.
• Fasten using the 10 screws
12a
provided.
• Lock in position by tightening the screws
Vf
from
underneath the hood.
• Open the suction panel by turning the specific knob.
• Disconnect the panel from the hood canopy by sliding the
fixing pin lever.
• Remove grease filters.
• Screw the Frame into place
using the 6 screws
12f
, re-
connect the wires to the
Commands and Light, re-
place the metal grease filter
and the Panel.
260
13
495 - 675
CUIDADO DE LOS FILTROS
Retire el filtro, empujando la palanca hacia la
parte posterior de la unidad mientras tira hacia
abajo.
Lave el filtro sin doblarlo. Déjelo secar
completamente antes de reemplazarlo. Si la
superficie del filtro cambia de color con el
tiempo, la eficiencia no se verá afectada.
Para reemplazar el filtro, empuje el filtro hacia
arriba en su posición mientras sostiene la
palanca hacia atrás, luego suelte la palanca
para bloquearla en su lugar.
1
2
3
EN
77
INSTALLATION
Fitting the Hood canopy
BEFORE FITTING THE HOOD TO THE WALL UNIT, PROCEED AS FOLLOWS:
• Disconnect the wires to the Commands at the connectors.
• Disconnect the wires to the Light at the con-
nectors.
• The Hood can be installed directly on the
underside of the wall unit (Minimum 650 mm
from the Cooker Hob).
• Create an opening in the bottom of the wall unit,
as shown.
• Insert the hood until the side supports snap into
place.
• Fasten using the 10 screws
12a
provided.
• Lock in position by tightening the screws
Vf
from
underneath the hood.
• Open the suction panel by turning the specific knob.
• Disconnect the panel from the hood canopy by sliding the
fixing pin lever.
• Remove grease filters.
• Screw the Frame into place
using the 6 screws
12f
, re-
connect the wires to the
Commands and Light, re-
place the metal grease filter
and the Panel.
260
13
495 - 675
LIMPIEZA DE LOS FILTROS DE GRASA METÁLICOS
Los filtros de grasa metálicos se pueden limpiar en solución de detergente
caliente o lavarse en el lavavajillas.
Se deben limpiar cada 2 meses de uso, o más frecuentemente si el uso es
particularmente pesado.
NOTAS:
• La limpieza en un lavavajillas puede opacar el acabado de los filtros de
grasa metálicos.
• Asegúrese de que los filtros estén completamente secos antes de volver
a instalarlos en la campana extractora.
LIMPIEZA DE SUPERFICIES EXTERIORES
Tenga en cuenta que los abrasivos y los agentes de limpieza pueden rayar
los acabados de la campana extractora y no deben usarse para limpiar
superficies acabadas.
Instrucciones de limpieza del acabado de acero inoxidable:
Limpie las superficies exteriores con un limpiador de acero inoxidable
disponible en el mercado.
Содержание LEVANTE 1
Страница 6: ...6 RANGE HOOD DIMENSIONS 24 30 36...
Страница 7: ...7 MIN 24 OVER ELECTRIC MIN 30 OVER GAS Min 24 Min 30 INSTALLATION HEIGHT REQUIREMENTS...
Страница 37: ...37 DIMENSIONS DE LA HOTTE 24 30 36...
Страница 68: ...68 DIMENSIONES DE LA CAMPANA EXTRACTORA 24 30 36...
Страница 69: ...69 Min 24 Min 30 REQUISITOS DE ALTURA DE INSTALACI N M N 24 SOBRE PLACA EL CTRICA MIN 30 SOBRE PLACA DE GAS...
Страница 94: ...94...
Страница 95: ...95...
Страница 96: ...991 0602 698_01 200120 D00000525_00...


