


59
EN
77
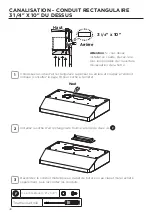
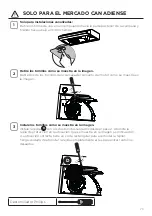
INSTALLATION
Fitting the Hood canopy
BEFORE FITTING THE HOOD TO THE WALL UNIT, PROCEED AS FOLLOWS:
• Disconnect the wires to the Commands at the connectors.
• Disconnect the wires to the Light at the con-
nectors.
• The Hood can be installed directly on the
underside of the wall unit (Minimum 650 mm
from the Cooker Hob).
• Create an opening in the bottom of the wall unit,
as shown.
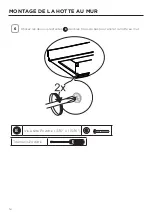
• Insert the hood until the side supports snap into
place.
• Fasten using the 10 screws
12a
provided.
• Lock in position by tightening the screws
Vf
from
underneath the hood.
• Open the suction panel by turning the specific knob.
• Disconnect the panel from the hood canopy by sliding the
fixing pin lever.
• Remove grease filters.
• Screw the Frame into place
using the 6 screws
12f
, re-
connect the wires to the
Commands and Light, re-
place the metal grease filter
and the Panel.
260
13
495 - 675
ENTRETIEN DES FILTRES
Retirez le filtre, en poussant le levier vers
l'arrière de l'appareil tout en tirant vers le bas.
Lavez le filtre sans le plier. Laissez-le sécher
complètement avant de le réinstaller. Un
changement de la couleur de la surface du
filtre au fil du temps n'a aucun effet sur son
efficacité.
Pour remettre le filtre en place, poussez-le dans
son emplacement tout en tenant le levier vers
l’arrière, puis relâchez le levier pour verrouiller
en place.
1
2
3
EN
77
INSTALLATION
Fitting the Hood canopy
BEFORE FITTING THE HOOD TO THE WALL UNIT, PROCEED AS FOLLOWS:
• Disconnect the wires to the Commands at the connectors.
• Disconnect the wires to the Light at the con-
nectors.
• The Hood can be installed directly on the
underside of the wall unit (Minimum 650 mm
from the Cooker Hob).
• Create an opening in the bottom of the wall unit,
as shown.
• Insert the hood until the side supports snap into
place.
• Fasten using the 10 screws
12a
provided.
• Lock in position by tightening the screws
Vf
from
underneath the hood.
• Open the suction panel by turning the specific knob.
• Disconnect the panel from the hood canopy by sliding the
fixing pin lever.
• Remove grease filters.
• Screw the Frame into place
using the 6 screws
12f
, re-
connect the wires to the
Commands and Light, re-
place the metal grease filter
and the Panel.
260
13
495 - 675
NETTOYAGE DES FILTRES À GRAISSE MÉTALLIQUES
Les filtres à graisse métalliques peuvent être lavés dans une solution d'eau
chaude savonneuse ou dans le lave-vaisselle.
Ils devraient être nettoyés tous les 2 mois d'utilisation, ou plus fréquemment
en cas d'utilisation particulièrement intensive.
REMARQUES:
• Le lave-vaisselle pourrait ternir le fini des filtres à graisse métalliques.
• Assurez-vous que les filtres sont complètement secs avant de les
réinstaller dans la hotte.
NETTOYAGE DES SURFACES EXTÉRIEURES
Veuillez noter que l’utilisation de produits abrasifs ou solvants peut
endommager la superficie de la hotte; ils ne devraient pas être utilisés pour
le nettoyage des surfaces.
Instructions pour le nettoyage de l’acier inoxydable :
Nettoyez les surfaces extérieures avec un agent nettoyant pour l’acier
inoxydable disponible sur le marché.
Содержание LEVANTE 1
Страница 6: ...6 RANGE HOOD DIMENSIONS 24 30 36...
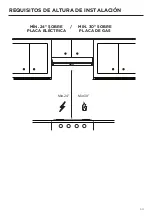
Страница 7: ...7 MIN 24 OVER ELECTRIC MIN 30 OVER GAS Min 24 Min 30 INSTALLATION HEIGHT REQUIREMENTS...
Страница 37: ...37 DIMENSIONS DE LA HOTTE 24 30 36...
Страница 68: ...68 DIMENSIONES DE LA CAMPANA EXTRACTORA 24 30 36...
Страница 69: ...69 Min 24 Min 30 REQUISITOS DE ALTURA DE INSTALACI N M N 24 SOBRE PLACA EL CTRICA MIN 30 SOBRE PLACA DE GAS...
Страница 94: ...94...
Страница 95: ...95...
Страница 96: ...991 0602 698_01 200120 D00000525_00...


