background image

holder until it latches itself.


ƒ

Check the latching by pulling the tool.

OPERATION

INSERTING THE BATTERY


f

Use only original FF GROUP lithium-ion batter-

ies with the voltage listed on the nameplate of 

your power tool. 

Using other batteries can lead to 

injuries and pose a fire hazard.


ƒ

Set the rotational direction switch 

(3) 

to the cen-

tre position to protect the power tool against ac-

cidental starting.


ƒ

Insert the charged battery from the front into the 

base of the power tool. Push the battery com-

pletely into the base.

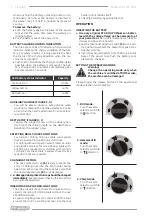
SETTING THE OPERATING MODE

Warning!

Change the operating mode only when 

the machine is switched off! Otherwise, 

the machine can be damaged

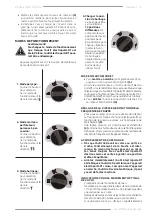
Please trigger the release button of the operational 

mode selection switch slightly.

1. Drill mode:

Turn the mode 

selector switch 

to   direction.

2. Hammer drill 

mode:

Turn the mode 

selector switch 

5


to 

 direction.

3. Chisel mode

Turn the mode 

selector switch 

5


to   direction.

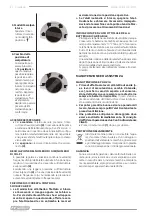
when pushing the battery unlocking button unin-

tentionally. As long as the battery is inserted in 

the power tool, it is held in position by means of 

a spring.

To remove the battery:


ƒ

Push the battery against the base of the power 

tool and at the same time press the battery un-

locking button.


ƒ

Pull the battery out of the power tool.

BATTERY CHARGE-CONTROL INDICATION

The three green LEDs of the battery charge-control 

indicator indicate the charge condition of the bat-

tery. For safety reasons, it is only possible to check 

the status of the charge condition when the ma-

chine is at a standstill. 


ƒ

Push button to indicate the charge condition (also 

possible when the battery is removed). The bat-

tery charge-control indicator automatically goes 

out after approx. 5 seconds.

LED battery status indicator

Capacity

Green LED on

>100%

Yellow LED on

>67%

Red LED on

>30%

AUXILIARY HANDLE (FIGURE F, G)

You will be able to obtain a safe position when 

working by rotating the handle attachment. Loos-

en and turn the handle attachment in an anticlock-

wise direction.

DEPTH STOP (FIGURE H, I)

Loosen the winged screw on the auxiliary han-

dle. Adjust the drilling depth on the depth stop. 

Retighten the winged screw.

SELECTING DRILL CHUCKS AND TOOLS

For hammer drilling, SDS-plus tools are required 

that are inserted in the SDS-plus drill chuck.

For drilling without impact in wood, metal, ceramic 

and plastic as well as for screwdriving, tools with-

out SDS-plus are used (e.g., drill bits with cylindri-

cal shank). For these tools, a keyless chuck or a key 

type drill chuck are required.

CHANGING THE TOOL

The dust protection cap 

(8)

 largely prevents the 

entry of drilling dust into the tool holder during 

operation. When inserting the tool, take care that 

the dust protection cap 

(8)

 is not damaged.


f

A damaged dust protection cap should be changed 

immediately. 

We recommend having this carried out 

by an authorized service.

INSERTING SDS-PLUS DRILLING TOOLS

The SDS-plus drill chuck allows for simple and con-

venient changing of drilling tools without the use 

of additional tools.


ƒ

Clean and lightly grease the shank end of the tool.


ƒ

Insert the tool in a twisting manner into the tool 

CRH/2-20-BL 20V PLUS

|   English

10

Содержание 43 203

Страница 1: ...ORIGINAL INSTRUCTIONS EN NOTICE ORIGINALE FR ISTRUZIONI ORIGINALI IT EL ORIGINALNO UPUTSTVO ZA RAD SR INSTRUC IUNI DE FOLOSIRE ORIGINALE RO BG CRH 2 20 BL 20V PLUS ORIGINALNE UPUTE ZA RAD HR...

Страница 2: ...MBOLA OBJA NJENJE SIMBOLA EXPLICAREA SIMBOLURILOR 6 CORDLESS ROTARY HAMMER 8 FR VISSEUSE CHOC SANS FIL 12 IT AVVITATORE A IMPULSI A BATTERIA 16 EL 21 SR AKUMULATORSKI UDARNI UVRTA 25 HR AKUMULATORSKI...

Страница 3: ...4 7 1 9 10 2 8 6 11 5 3 3 www ffgroup tools com CRH 2 20 BL 20V PLUS...

Страница 4: ...C D E 4 CRH 2 20 BL 20V PLUS...

Страница 5: ...E F G H 5 www ffgroup tools com CRH 2 20 BL 20V PLUS...

Страница 6: ...ettes de protection Indossare protezioni per gli occhi Damage to hearing if effective hearing pro tection is not worn Dommages l audi tion si une protection auditive efficace n est pas port e Danni al...

Страница 7: ...titu za o i Nosite za titu za o i Purta i protec ii pentru urechi O te enje sluha ako se ne koristi efikasna za tita sluha O te enje sluha ako se ne nosi u inkovita za tita za sluh Deteriorarea auzul...

Страница 8: ...wer tool Use the correct power tool for your application The correct pow er tool will do the job better and safer at the rate for which it was designed f f Do not use the power tool if the switch does...

Страница 9: ...r tool is intended for hammer drilling in concrete brick and stone It is also suitable for drilling without impact in wood metal ceramic and plastic Power tools with electronic control and right left...

Страница 10: ...the status of the charge condition when the ma chine is at a standstill Push button to indicate the charge condition also possible when the battery is removed The bat tery charge control indicator aut...

Страница 11: ...inst moisture and water Store the battery only within a temperature range between 10 C and 30 C As an example do not leave the battery in the car in summer Occasionally clean the venting slots of the...

Страница 12: ...e de l outil peut donner lieu des blessures de personnes f f Ne pas se pr cipiter Garder une position et un quilibre adapt s tout moment Cela permet un meilleur contr le de l outil dans des situations...

Страница 13: ...ositifs de serrage appropri s ou dans un tau est fix e de mani re plus s re que te nue dans les mains f f Avant de d poser l outil lectroportatif at tendre que celui ci soit compl tement l arr t L out...

Страница 14: ...er des blessures et des risques d incendie Valeurs d missions sonores d termin es selon la norme EN 60745 1 EN 60745 2 6 Les mesures r elles A des niveaux sonores de l appareil sont Niveau de pression...

Страница 15: ...ssibleparceque l lectronique de l outil lectroportatif doit d abord se configurer Afind conomiserl nergie nemettezl ou til lectroportatif en marche que quand vous l utilisez Pour arr ter l outil lectr...

Страница 16: ...alimentati dalla rete con linea di allacciamento ed ad uten sili elettrici alimentati a batteria senza linea di allacciamento SICUREZZA DELL AREA DI LAVORO f f Tenere la postazione di lavoro sempre pu...

Страница 17: ...Utilizzare l elettroutensile gli accessori op zionali gli utensili per applicazioni specifiche ecc sempre attenendosi alle presenti istru zioni Cos facendo tenere sempre presente le condizioni di lavo...

Страница 18: ...ofondit 7 Impugnatura superficie di presa isolata 8 Protezione antipolvere 9 Led 10 Impugnatura supplementare superficie di presa isolata 11 Guida di profondit TECHNICAL DATA Article number 43 203 Mod...

Страница 19: ...SILI La protezione antipolvere 8 ha la funzione di impe dire in larga misura che la polvere provocata forando possa arrivare a penetrare nel mandrino portautensile durante la fase di funzionamento App...

Страница 20: ...bloc cata si provocano alti momenti di reazione INDICAZIONI PER L USO OTTIMALE DELLA BATTERIA RICARICABILE Proteggere la batteria ricaricabile da umidit ed acqua Conservare la batteria ricaricabile e...

Страница 21: ...f f f f f f f f f f f f f f f f f f f f f f f f f f f f f f f f f f f f www ffgroup tools com 21 CRH 2 20 BL 20V PLUS...

Страница 22: ...f f f SERVICE f f f f f f f f H f f f f f f f f f f f f f f f f FF GROUP f f H 1 SDS plus 2 3 4 ON OFF 5 6 7 8 9 Led 10 11 TECHNICAL DATA Article number 43 203 CRH 2 20 BL 20V PLUS V 20 22 CRH 2 20 B...

Страница 23: ...745 2 6 dB A 86 4 dB A 96 6 K dB 3 ah EN 60745 1 EN 60745 2 6 ah m s2 6 052 K m s2 1 5 Electronic Cell Protection ECP f f ON OFF C D E 5 LED battery status indicator Capacity LED 100 LED 67 LED 30 F G...

Страница 24: ...8 f f Service SDS PLUS SDS plus f f FF GROUP 3 1 5 2 5 3 5 4 12 ON OFF 4 ON OFF 4 ON OFF 4 ON OFF 4 f f f f 24 CRH 2 20 BL 20V PLUS...

Страница 25: ...ve avarizikodelektri nogudara SIGURNOST OSOBLJA f f Budite pa ljivi pazite na to ta radite i idite razumno na posao sa Va im elektri nim ala tom Ne koristite elektri ni alat ako ste umor ni ili pod ut...

Страница 26: ...iza i napolje mo e voditi nadra ajima ko e ili opekotinama SERVISI Neka Vam Va elektri ni alat popravlja samo kvalifikovano osoblje i samo sa originalnim re zervnim delovima Tako se obezbedjuje da os...

Страница 27: ...oziciji opruga Za vadjenje akumulatora Pritisnite akumulator prema podno ju elektri nog alata i istovremeno na taster za deblokadu Izvla ite akumulator iz elektri nog alata POKAZIVANJE STANJA PUNJENJA...

Страница 28: ...ata pritisnite preki da za uklju ivanje isklju ivanje 4 Pri prvom uklju ivanju elektri nog alata mo e do i do ka njenja u kretanju jer se elektronika elektri nog alata prvo mora konfigurirati Da bi te...

Страница 29: ...plinovi ili pra ina Elektri ni alati proizvode iskre koje mogu zapaliti pra inu ili pare f f Tijekom uporabe elektri nog alata djecu i osta le osobe dr ite dalje od mjesta rada U slu aju skretanja po...

Страница 30: ...u za uvijanje vijaka mo ete elektri ni alat bolje kontrolirati u neo eki vanim situacijama f f Nosite prikladnu odje u Ne nosite iroku odje u ili nakit Kosu odje u i rukavice dr ite dalje od pomi nih...

Страница 31: ...sklju ivanje Aku baterija bi se mogla o tetiti VA ENJE AKU BATERIJE VIDJETI SLIKU B C D E Aku baterija raspola e sa dva stupnja blokiranja koji tre baju sprije iti da aku baterija ispadne van kod neho...

Страница 32: ...dleta Dlijeto se mo e zaklju ati u 12 polo aja Na taj se na in za svaku primjenu mo e prilagoditi opti malni polo aj rada Umetnite dlijeto u prihvat alata Prilagodite polo aj dlijetanja na eljeni kut...

Страница 33: ...tiliz rilor vii toare Termenul de scul electric folosit n indica iile de avertizare se refer la sculele electrice alimentate de la re ea cu cablu de alimentare i la sculele electrice cu acumula tor f...

Страница 34: ...se rote te poate duce la r niri f f Evita i o inut corporal nefireasc Adopta i o pozi ie stabil i men ine i v ntotdeauna echi librul Astfel ve i putea controla mai bine ma ina n situa ii nea teptate...

Страница 35: ...a trei direc ii i incertitudinea K au fost determinate conform EN 60745 1 EN 60745 2 6 Nivelul vibra iilor ah m s2 6 052 K m s2 1 5 MONTARE NC RCAREA ACUMULATORULUI Acumulatorul se livreaz par ial nc...

Страница 36: ...suplimentare Cur a i regulat cap tul de introducere al acce soriului i gresa i l u or Introduce i accesoriul prin rotire n sistemul de prindere a accesoriilor p n c nd se blocheaz automat Verifica i b...

Страница 37: ...em peratur de la 10 C la 30 C Nu l sa i acumulatorul n autovehicul de exemplu pe timpul verii Ocazional cur a i fantele de ventila ie ale acumu latorului cu o pensul moale curat i uscat Un timp de fun...

Страница 38: ...f f f f f f f f f f f f f f f f f f f f f f f f E f f F f f f f f f 38 CRH 2 20 BL 20V PLUS...

Страница 39: ...f f f f f f f f f f f f f f f f f f f f f f f f f f f f f f f f f f f f 39 www ffgroup tools com CRH 2 20 BL 20V PLUS...

Страница 40: ...3 203 CRH 2 20 BL 20V PLUS V 20 bpm 0 4 500 rpm 0 1 420 SDS PLUS mm 22 mm 13 mm 28 kg 2 3 EN 60745 1 EN 60745 2 6 dB A 86 4 dB A 96 6 K dB 3 ah K EN 60745 1 EN 60745 2 6 ah m s2 6 052 K m s2 1 5 Elect...

Страница 41: ...67 30 F G H I SDS plus SDSplus SDS plus 8 8 f f SDS PLUS SDS plus f f FF GROUP 1 5 2 5 3 5 41 www ffgroup tools com CRH 2 20 BL 20V PLUS...

Страница 42: ...4 12 4 4 4 4 f f f f 10 C 30 C f f f f f f 1 42 CRH 2 20 BL 20V PLUS...

Страница 43: ...edaba i da su u skladu sa slede im standardima AKUMULATORSKI UDARNI UVR TA Broj pred meta HR EU IZJAVA O SUKLADNOSTI Pod punom odgovorno u izjavljujemo da navedeni proizvodi odgovaraju svim relevantni...

Страница 44: ...www ffgroup tools com info ffgroup toolindustries com 30 210 55 98 400 19300 Athens Greece 9 5 Km Attiki Odos Aspropyrgos FF Group Tool Industries...

Отзывы: