background image

Opladen van het toestel 

/ Ładowanie urządzenia

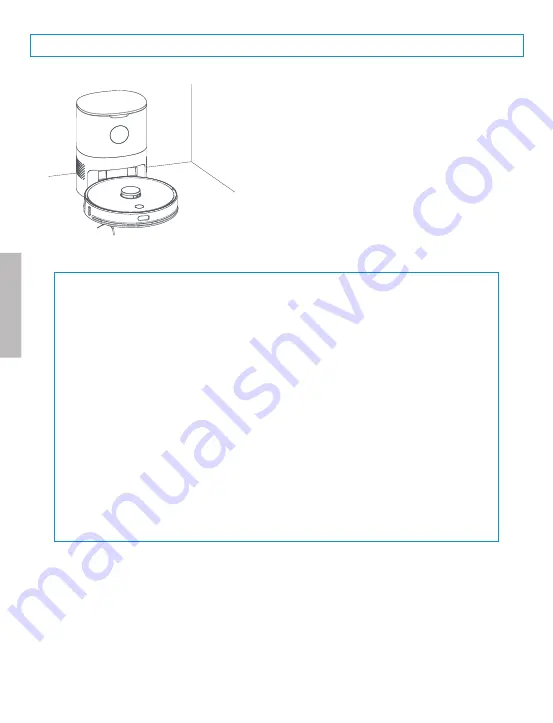
Druk enkele seconden op de startknop van de robot en druk 
vervolgens kort op de knop «Terug naar basis». De robot wordt 
automatisch opgeladen.

Naciśnij przez kilka sekund przycisk uruchamiania robota,
a następnie naciśnij krótko przycisk powrotu do bazy.
Robot naładuje się automatycznie.

- Voordat u uw robot voor de eerste keer gebruikt, is het noodzakelijk om hem volledig op te laden.
- Alvorens uw robot te starten dient u zich ervan te vergewissen dat er geen voorwerpen op de vloer liggen 
die door de robot kunnen worden opgezogen.
- Het wordt aanbevolen de reinigingscyclus te starten wanneer de robot op zijn laadstation staat, zodat hij 
de positie van zijn station correct kan onthouden.
- Als de batterij van uw robot leeg raakt tijdens de schoonmaakcyclus, wordt deze automatisch opgeladen. 
Zodra het opladen klaar is, keert hij terug naar de exacte plaats waar hij gebleven was.
- Tijdens de reinigingscyclus kunt u ook kort op de toets «Terug naar basis» drukken om het apparaat terug 
te laten keren naar de basis.

- Przed pierwszym użyciem robota należy go w pełni naładować.
- Przed uruchomieniem robota upewnij się, że na podłodze nie ma żadnych przedmiotów, które mogą
zostać zassane.
- Zaleca się rozpoczęcie cyklu czyszczenia, gdy robot znajduje się w stacji ładującej, aby mógł
prawidłowo zapamiętać jej położenie.
- Jeśli akumulator robota wyczerpie się podczas sprzątania, zostanie on automatycznie naładowany. Po
zakończeniu ładowania urządzenie powróci dokładnie w to samo miejsce, w którym przerwało
czyszczenie.
- Podczas cyklu czyszczenia można również nacisnąć na krótko przycisk «Powrót do stacji», aby
urządzenie powróciło do bazy.

NEDERLANDS - POL

SKI

Содержание Aqua connect x1200

Страница 1: ...or your connected robot vacuum cleaner Bedienungsanleitung f r Ihren vernetzten Saugroboter manual de usuario de su robot aspirador conectado manuale utente per il tuo robot aspirapolvere connesso geb...

Страница 2: ......
Страница 3: ...onttherobotwith itemsthatburn suchascigarettes matches ashesandotheritems that may cause a fire Do not place items near the suction nozzles Do not use the product when the suction nozzle is blocked Cl...

Страница 4: ...resione brevemente este bot n para pedirle a su robot que regrese a su base de carga Marche arr tetnettoyageautomatique On offandautomaticcleaning Limpiezaon offyautom tica Appuyer bri vement sur ce b...

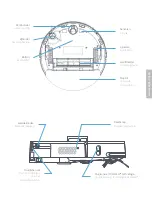
Страница 5: ...t bin release button Trampilla de vaciado de contenedores Capteur de murs Technologie FOLLWALLTM Wall sensor FOLLWALLTM technology Sensor de pared tecnolog a FOLLWALLTM Roue centrale Center wheel Rued...

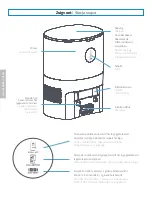
Страница 6: ...le sac n est pas install le logo clignote When the dust bag is full the logo is highlighted When the bag is not installed the logo flashes Cuando la bolsa para el polvo est llena el logotipo se resal...

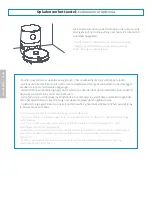
Страница 7: ...wer outlet La base de succi n debe colocarse contra una pared Enchufeelcargadorenlabasedelaaspiradorayluegoconecteel cargador a una toma de corriente Retirertouslesplastiquesetprotectionsenmousse de l...

Страница 8: ...ent sur le bouton de retour en base pour lui demander de retourner sur sa base Before first use it is necessary to fully recharge your robot Before launching your robot make sure that there are no ite...

Страница 9: ...ce is charging it is not possible to turn it off Pulse el bot n de encendido apagado del dispositivo durante unos segundos para encenderlo El indicador LED parpadear y luego se volver azul durante 5 s...

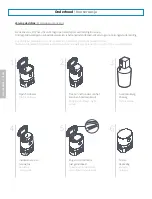
Страница 10: ...rillar y aparecer una notificaci n en su aplicaci n Para garantizar el correcto funcionamiento de su dispositivo se recomienda cambiar r pidamente la bolsa una vez recibida la notificaci n Ouvrir le c...

Страница 11: ...Se recomienda limpiarlos una vez al mes Nettoyer le tuyau du bac Clean the dust passage Limpiar el pasaje de polvo Nettoyer les capteurs du bac Clean the bin sensors Limpiar los sensores del dep sito...

Страница 12: ...h from its housing D la vuelta al robot teniendo cuidado de no da ar el l ser al colocarlo Presione las muescas en la cubierta del cepillo principal y retire el cepillo de su alojamiento Nettoyer le f...

Страница 13: ...es Afin de garantir le bon fonctionnement de votre produit les brosses lat rales doivent tre nettoy es au moins une fois par semaine et remplac es tous les 3 6 mois suivant la fr quence d utilisation...

Страница 14: ...unebatterielithium ionrechargeable Afindeprofiterd une performanceoptimale il est recommand de recharger votre robot continuellement Si vous n utilisez pas votre robot pendant une longue p riode il e...

Страница 15: ...agua presionando el bot n trasero 1 Ouvrir l habitacle du filtre en appuyant sur le loquet Open the filter housing by pressing the latch Abra la carcasa del filtro presionando el pestillo 2 Retirer le...

Страница 16: ...ll the new mop and reinstall the kit on the water tank Retire el juego de trapeador del tanque de agua instale el trapeador nuevo y vuelva a instalar el juego en el tanque de agua 7 Afin d assurer la...

Страница 17: ...tre site internet www eziclean com afin de b n ficier d une 3 me ann e de garantie offerte Don t forget to register your product on our website www eziclean com in order to benefit from a 3rd year of...

Страница 18: ...ot per evitare che vengano risucchiate Pulireilprodottoquando non sotto carico Nonpiegareifiliomettere oggettipesantie otaglienti sulla macchina Questo prodotto un prodottodomesticointerno Non usare a...

Страница 19: ...uo robot di tornare alla sua base di ricarica Automatischer Start Stopp und Reinigung Accensione spegnimento e pulizia automatici Dr cken Sie diese Taste kurz um die automatische Reinigung zu starten...

Страница 20: ...ungsluke des Tanks Portello di drenaggio del serbatoio Wandsensor FOLLWALLTM Technologie Sensore a parete Tecnologia FOLLWALLTM Vorderrad Ruota centrale Seitenb rste Spazzola laterale Akku Batteria Ha...

Страница 21: ...r Staubbeutel voll ist wird das Logo angezeigt Wenn die Staubbeutel nicht installiert ist blinkt das Logo Quando il sacchetto della polvere pieno il logo evidenziato Quando la borsa non installata il...

Страница 22: ...vuoto deve essere posizionata contro una parete Inserisciilcaricatorenellabasedelvuotoepoiinserisciilcaricatore in una presa elettrica Entfernen Sie alle Kunststoffe und Schaumstoffsch tzer vom Ger t...

Страница 23: ...irderautomatischwiederaufgeladen Sobald der Ladevorgang abgeschlossen ist kehrt er genau an die Stelle zur ck an der er aufgeh rt hat W hrend des Reinigungszyklus k nnen Sie auch kurz die Taste Zur ck...

Страница 24: ...de di blu per 5 secondi Il robot ora attivo Premere nuovamente il pulsante on off per avviare la pulizia Quando il robot fermo premi il pulsante on off per alcuni secondi per spegnerlo L indicatore LE...

Страница 25: ...raccomanda di cambiare rapidamente la borsa una volta ricevuta la notifica ffnen Sie den Deckel Aprire il coperchio ZiehenSieamKartongriffund nehmenSiedenBeutelheraus Tirarelamanigliadicartoneed estr...

Страница 26: ...nda di pulirli una volta al mese Reinigen Sie die Verrohrung des Staubbeh lters Pulire i tubi del serbatoio Reinigen Sie die Sensoren in der Ablage Pulire i sensori nel vassoio Warnung Wenn sie den St...

Страница 27: ...attenzione a non danneggiare il laser quando lo rimuovete Premere le tacche sul coperchio della spazzola principale e rimuovere la spazzola dal suo alloggiamento Reinigen Sie den Filter Pulire il filt...

Страница 28: ...ole laterali Um sicherzustellen dass Ihr Produkt ordnungsgem ss funktioniert m ssen die Seitenb rsten mindestens einmal pro Woche gereinigt und alle 3 bis 6 Monate ausgetauscht werden je nachdem wie o...

Страница 29: ...eraufladbarenLithium Ionen Akkuausgestattet UmeineoptimaleLeistung zu erhalten wird empfohlen den Roboter kontinuierlich aufzuladen Wenn Sie Ihren Roboter ber einen l ngeren Zeitraum nicht benutzen so...

Страница 30: ...acqua premendo il pulsante posteriore 1 ffnen Sie das Filtergeh use durch Dr cken des Riegels Aprire l alloggiamento del filtro premendo il fermo 2 Entfernen Sie den Filter aus seinem Geh use Rimuover...

Страница 31: ...Sie das Kit wieder auf den Wassertank Rimuovere il kit del mop dal serbatoio dell acqua installare il nuovo mop e reinstallare il kit sul serbatoio dell acqua 7 Umeineordungsgem sseNutzungIhresGer tsz...

Страница 32: ...ssane Czy produkt gdy jest roz adowany Niewolnozgina przewod w aniumieszcza naprodukcie ci kich i lub ostrych przedmiot w Tenproduktjestproduktem przeznaczonymdou ytku w pomieszczeniach Nie stosowa na...

Страница 33: ...zycisk aby nakaza robotowi powr t do stacji aduj cej Automatische start stop en reiniging Automatyczny start stop i czyszczenie Druk deze toets kort in om de automatische reiniging te starten Houd dez...

Страница 34: ...kafvoer luik Przycisk zwalniaj cy zbiornik na zanieczyszczenia Muursensor FOLLWALLTM technologie Czujnik cienny technologia FOLLWALLTM Centraal wiel Ko o centralne Zijborstel Szczotka boczna Batterij...

Страница 35: ...stofzak vol is wordt het logo gemarkeerd Als de tas niet is ge nstalleerd knippert het logo Kiedy worek jest pe ny logo jest pod wietlone Kiedy nie ma worka logo miga Terwijl de container wordt geleeg...

Страница 36: ...ct Stacja odkurzacza powinna by umieszczona przy cianie Pod cz adowark do stacji a nast pnie w wtyczk adowarki do gniazdka elektrycznego Verwijder alle kunststoffen en schuim schuimbeschermers van het...

Страница 37: ...de batterij van uw robot leeg raakt tijdens de schoonmaakcyclus wordt deze automatisch opgeladen Zodra het opladen klaar is keert hij terug naar de exacte plaats waar hij gebleven was Tijdens de reini...

Страница 38: ...aktywny Naci nij ponownie przycisk w czania aby rozpocz czyszczenie Kiedy robot jest zatrzymany wci nij przycisk w czania wy czania przez kilka sekund aby go wy czy Wska nik LED zacznie miga na niebi...

Страница 39: ...ni prawid owe dzia anie urz dzenia zaleca si wymian worka od razu po otrzymaniu powiadomienia Open het deksel Otw rz pokryw Trek aan het handvat van het karton en haal de zak eruit Poci gnij za uchwyt...

Страница 40: ...a si czyszczenie ich raz w miesi cu Reinig de leidingen van de tank Czyszczenie kana u zbiornika Reinig de sensoren in de lade Oczy ci czujniki w zasobniku Let op Als alle lampjes gaan branden en gloe...

Страница 41: ...zijn behuizing Odwr robota uwa aj c aby nie uszkodzi lasera podczas demonta u Naci nij naci cia na pokrywie szczotki g wnej i wyjmij szczotk z jej obudowy Reinig het filter Czyszczenie filtr w Maak de...

Страница 42: ...ijborstels schoon Czyszczenie szczotek bocznych Voor een goede werking van uw product moeten de zijborstels ten minste eenmaal per week worden gereinigd en om de 3 tot 6 maanden worden vervangen afhan...

Страница 43: ...k w mi kk czyst i such szmatk Uwrobotstofzuigerisuitgerustmeteenherlaadbarelithium ionbatterij Vooroptimaleprestatieswordtaanbevolen de robot continu op te laden Indien u uw robot gedurende een lange...

Страница 44: ...rnik wody naciskaj c tylny przycisk 1 Open het filterhuis door Drukken op de vergrendeling Otworzy obudow filtra poprzez naci ni cie zatrzasku 2 Verwijder het filter uit zijn behuizing Wyj filtr z jeg...

Страница 45: ...nieuwe mop en plaats de kit terug op het waterreservoir Zdejmij zestaw mopuj cy ze zbiornika na wod zainstaluj nowy mop i za zestaw na zbiornik 7 Vooreengoedgebruikvanuwmachinewordtaanbevolendatudemop...

Страница 46: ...obex ch info mobex ch EZIclean est une marque de la soci t E ZICOM EZIclean is an E ZICOM company brand EZIclean es una marca de la empresa E ZICOM EZIclean is een handelsmerk van E ZICOM EZIclean jes...

Отзывы: