background image


45 | 

P a g e


2.


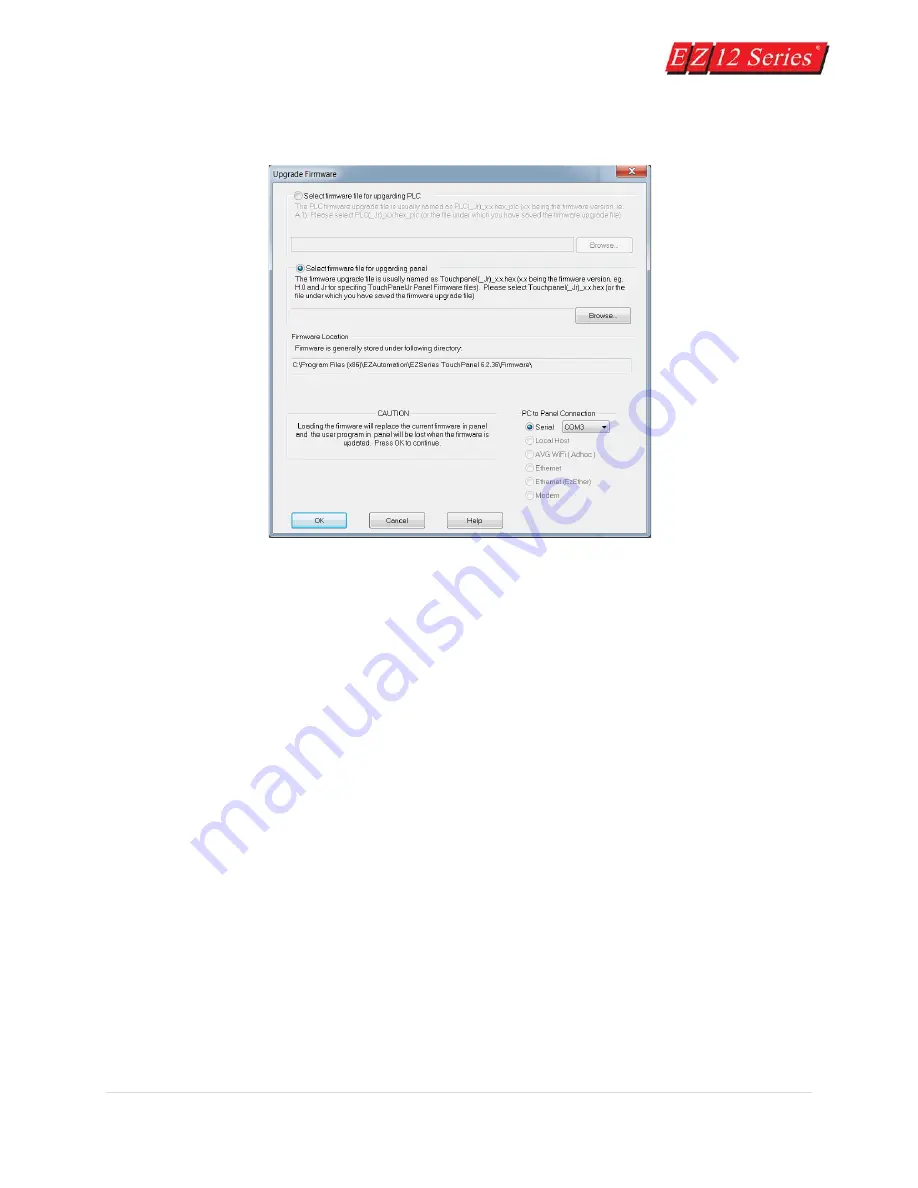
Click on 

Upgrade Firmware

 and navigate (click on Browse button) to the new firmware file (.hex 

file). 


Note:

 If the EZPanel is connected to a PLC (other than the EZPLC), you will not see the option for EZPLC 

f/w upgrade. 

3.


Please make sure to use serial communication to upgrade firmware. In serial communication 
select the appropriate COM port and click on the 

OK

 button to begin the upgrade.  A status bar 

will let you know when the upgrade is complete. 
 

4.


The dialog box will show the 

File Revision

 number of the firmware and the 

Panel Revision

 of the 

Firmware. Check these revision numbers.  If they are the same (no upgrade is needed) you may 
click on the 

Abort

 button to exit. If the file you have selected is not the right one, click on the 

Select a different file...

 button. 


Содержание EZ 10 Series

Страница 1: ......

Страница 2: ...i P a g e Getting Started EZ12 EZTouch Editor 2 0...

Страница 3: ...ii P a g e Manual EZ12 USER M...

Страница 4: ...iii P a g e EZ12 Getting Started Revision History Issue Date Description of changes First Edition May 2018 Original...

Страница 5: ...ult in equipment damage or personal injury The operator must be made aware of this hazard and appropriate precautions must be taken The diagrams and examples in this user manual are included for illus...

Страница 6: ...14 EZ12 Analog Resistive Touch Pixel Level Accuracy 15 EZ12 Private Labeling 16 EZ12 Models 20 EZ12 Drivers Supported 21 EZ12 Access Setup Menu 22 Setup Menu Functionality 24 EZTouch Editor 2 0 27 Cre...

Страница 7: ...to be pixel level sensitive allowing full use of all the screen for touch objects Finally the design has been created with Private Labeling in mind This includes a simple and easy way to change the EZ...

Страница 8: ...to the operators and maintenance personnel It is important tomakesurethatallother sourcesofpower includingpneumaticandhydraulic arede energized before starting the work on a machine or process contro...

Страница 9: ...ations Our products have been designed and tested for operation in the most demanding industrial environments Modern solid state industrial controls are complex electronic equipment that operate at lo...

Страница 10: ...the cabinet is cooler than the top area Install heat sensitive components in the lower section Provide enough space between components to allow a free flow of air for better heat dissipation Provide...

Страница 11: ...ps is recommended It is vital for the reliable operation of any electronic device to have any of its metallic surfaces well grounded to Earth This not only provides for safe operation it will also dra...

Страница 12: ...wires from the equipment chassis terminals to the main safety ground connection The safety ground terminal of each component can and should be connected with the shortest wire possible to the cabinet...

Страница 13: ...7 P a g e EZ12 Dimensions Units inches millimeters...

Страница 14: ...which size panel you have NOTE The maximum torque force that should be applied is 2 to 3 inch pounds Mounting directions 1 When looking at the back of the unit please look at the screws in the corner...

Страница 15: ...ses battery to retain retentive tags and clock over a power cycle The battery will not work till the plastic battery tab is removed For replacement please use 3 6 V AA batteries Recommended to replace...

Страница 16: ...onnect to the 15 pin D Sub with a cable specific to the PLC type Pin Number Connection 1 Chassis GND 2 PLC TXD RS 232 3 PLC RXD RS 232 4 5 V 100 5 Logic GND 6 LE 7 PLC CTS RS 232 8 PLC RTS RS 232 Pin...

Страница 17: ...2C cable P N EZ PGMCBL for programming the unit through a PC It serves as the default programming port on the EZ12 Series Since COM1 has fixed communication parameters you can always connect the progr...

Страница 18: ...C simultaneous communications It can also be used for Internet access and email alerts Micro SD slot A Micro SD slot is available to allow for additional storage or data transfer Insert a Micro SD int...

Страница 19: ...ve for program upload by simply using our EZ Editor Software to create a USB Loader file hmi It also allows the user to upgrade firmware mme enter the Setup menu set and calibrate the HMI cal if need...

Страница 20: ...o calibrate the panel from the Setup Menu in the EZ12 Touch Panel Also in case the calibration is such that you cannot access the Setup menu you can use a calibration file on USB cal to initiate calib...

Страница 21: ...r Panels EZ12 Panel Minimum Touch Object Size needs to cover of Touch cell for it function No Minimum Touch Object Size Note The EZTouch Editor still includes a Guiding Grid only on PC and Snap to Gri...

Страница 22: ...ation Logo inserted when shipped Customers can replace this logo by making their own Below are the dimensions and materials needed to print your own label Also directions on how to remove and insert l...

Страница 23: ...Also the Power Up Message Text can be moved to certain locations Center Upper Left Upper Right Lower Left and Lower Right To Add Private Label Image please see below To modify a private label image y...

Страница 24: ...le Show Custom Image Then click the Go to Image Database 4 In the Image Database you can hit Add Edit to add your image to the Database If you have already added an image you can skip this step 5 In t...

Страница 25: ...e than 1 Image exist in the library the drop down can be used to change the Private Label Image 9 You also have the option to change the position of the Power up Text as well as disable the seeing the...

Страница 26: ...20 P a g e EZ12 Models...

Страница 27: ...EtherNet IP DF1 over Ethernet Micro800 Ethernet KOYO AutomationDirect Modbus Koyo addressing Modbus RTU Direct NET ADC K Sequence Do More Serial Productivity Modbus TCP IP ECOM Ethernet Do More Ethern...

Страница 28: ...Setup Menu is not disabled you will see the screen above Select the language to be used in the setup menu Note If setup screen is disabled then it can still be accessed To access Setup Screen when it...

Страница 29: ...ccessed Also it is the screen which will tell you some troubleshooting information such as Firmware revision USB Setup Screen Access You can use any file with the extension set on a USB to have the pa...

Страница 30: ...up menu you can still use USB or EZTouch Editor Menu to access the setup menu if even if it is disabled EZ12 Screen Calibration You can now calibrate all EZ12 panels using the Setup Screen calibrate o...

Страница 31: ...w are the communications options you can use Computer For communicating to the PC default 9 pin PLC Driver 1 PLC driver for PLC 1 in project default 15 pin PLC Driver 2 PLC driver for PLC 1 in project...

Страница 32: ...This will bring up a touch screen test screen where every location becomes a button for touch testing Test Color Display You can at any point test that the entire display is working correctly by enter...

Страница 33: ...e the ability to make changes Also we have added new features such as encrypted email functionality Private Label Images discussed in the EZ12 section before this section and Improved the Image Databa...

Страница 34: ...ng these items onto the programming screen allows you to have input and control over what is being displayed on the panel The Screen now allows a working area around the display area which is equivale...

Страница 35: ...the programming window Just click on the bar at the top hold the left mouse button and drag it to where you want it to appear If you double click on the bar at the top it will change to a floating win...

Страница 36: ...e of the more commonly used EZTouch Panel functions This includes Write to Panel Transfer current project to EZTouch Panel Panel Information Get current setup information about a connected Panel Displ...

Страница 37: ...These objects are grouped by category and multiple categories can be open at the same time They can also be listed in alphabetical order and even searched through to find the object you are looking fo...

Страница 38: ...g on any tag will bring it up and allow you to Edit Tag Details Screen Info Tables The Screen Info Tables will provide detailed information on all object and tags in the current screen The Screen Info...

Страница 39: ...pping Objects Table will only list the currently open screen s object which are overlapping It will also give the position of the objects which is there rank The higher the rank the more in front the...

Страница 40: ...ils Double clicking any of these tags allows you to enter the Edit Tag Details screen and make changes to that tag Tags in Selected Objects The Tags in Selected Objects Table will list all the tags th...

Страница 41: ...USB B cable printer cable Connect the EZTouch unit to your PLC using the appropriate panel to PLC cable Step 1 In Step 1 you will be setting up your project by entering project information 1 From Proj...

Страница 42: ...eens In Step 2 we will place 4 objects on the screen You have already configured your PLC ladder logic for this Demo Project in the first part of the tutorial The EZTouch Editor working environment is...

Страница 43: ...n Numeric Entry Press Enter The following screen will appear 4 In the field next to Address String type in V2002 as shown above Select BCD_INT_16 for the Data Type Click OK 5 A crosshair cursor will a...

Страница 44: ...pear In the field next to Address String type in V2003 as shown above Select BCD_INT_16 as the Data Type Click OK 12 A crosshair cursor will appear on the programming screen Position crosshair where y...

Страница 45: ...tring type in C0 as shown above The Data Type should remain as DISCRETE Click OK 19 A crosshair cursor will appear on the programming screen Position where you want the object to appear under the Nume...

Страница 46: ...Address String type in C1 as shown above The Data Type should remain as DISCRETE Click OK 26 A crosshair cursor will appear on the programming screen Position the crosshair where you want the object t...

Страница 47: ...Start button at the bottom of the Write Program to Panel dialog box to begin transferring the project to the panel 3 Your user program Demo should now be written to the EZTouch Panel unit and the scr...

Страница 48: ...our Program to Panel You have now successfully configured a PLC created a user program transferred it to the EZTouch Panel unit and established communication between the PLC and panel This simple tuto...

Страница 49: ...nother USB A USB with firmware will only ever allow firmware upgrade Creating Firmware Upgrade files for use with USB Flash Drive To create the USB firmware file follow the direction below Please be c...

Страница 50: ...ill tell you Done Please take out the USB at this point 6 After about 5 seconds after firmware upgrade is done the panel will restart Note if you have not taken out the USB then the panel will check t...

Страница 51: ...ware In serial communication select the appropriate COM port and click on the OK button to begin the upgrade A status bar will let you know when the upgrade is complete 4 The dialog box will show the...

Страница 52: ...ease see the Setup Menu Section Note If nothing is pressed for 15 20 seconds during calibration mode then previous calibration is used and panel will restart Therefore if you accidentally enter calibr...

Страница 53: ...f you would like to save to flash select yes if you would like to have your program retain over power cycle 3 Insert the USB stick into the panel s USB port You might need to power cycle before the ne...

Страница 54: ...d Programming the panel using USB Drive To program the panel from USB Drive insert the USB flash directly into the panel s USB port The panel would display a list of files available in the root direct...

Страница 55: ...c files directly to the project screen 2 You may also click on AVG Image Library to gain access to a library of over 3 000 symbols for industrial automation These images have been formatted to allow e...

Страница 56: ...following objects 1 Bitmap Objects In the EZ Touch Main Programming Window click on Main Menu Objects Bitmap Objects Dynamic Bitmap Bitmap Button Object Multi state Bitmap 2 Animation In the EZ Touch...

Страница 57: ...he dialog box below Once you use a library image in an object and then you want to embed the image within the object itself for some reason for example to resize the object modify the image click the...

Страница 58: ...are detailed both when small size and when become larger The other image library has also been left in just in case you need it but as a comparison see below To use AVG Image Library use the AVG Imag...

Страница 59: ...ar with 4 tabs Email Server Setup The main tab for setup is the Email Server Setup Here you will need to input all the parameters for your email client for example your gmail account It is usually bes...

Страница 60: ...t Number SMTP Every Server will have a specified Port No that is used with it Please enter the number here Note Based on encryption the Port No might change Encryption Type For most Email Servers you...

Страница 61: ...er register SMTP Authentication For most Email Servers each email address will have its own Username and Password If the Email address to be used as the Sender email requires a Username and Password P...

Страница 62: ...Email recipient tab If everything works correctly the recipient should receive the test email If the recipient does not get the email please check all your settings Unsent Email FIFO Sending email tak...

Страница 63: ...ipients Recipients can be tag based but if an email recipient address is incorrect you will not receive any indication from the panel The panel cannot receive emails from server that an email was not...

Страница 64: ...or and the alarm message details right after your Subject Line and the Email Text Appending the alarm message allows inserting of tags to the email since Alarm messages can include tag data NOTE Subj...

Страница 65: ...hly or at specifically chosen times The email can also be sent to one or several email recipients and include variables in the body of the email such as date time numeric tag discrete tag or ASII tag...

Страница 66: ...eway for the Panel Also for Domain Name functionality you can configure your DNS server IP Addresses For easier troubleshooting a DNS Error Tag is provided in the Panel Attributes This tag will displa...

Страница 67: ...ime Offset from UTC Below is a simple chart of some UTC times Note Current daylight savings is not implemented so might need to change the offset to allow for daylight saving Time Zone GMT time offset...

Страница 68: ...62 P a g e For troubleshooting there does exist a NTP Error Tag in Panel Attributes Error Code Error Cause 0 No Error 0 Cannot connect to NTP Server please check IP of server...

Страница 69: ...ettendorf IA 52722 1327 Phone 1 877 774 3279 Fax 1 877 775 3279 www EZAutomation net EZAutomation net A Division of ilVG If you need assistance please call our Technical Support at 1 877 774 3279 Emai...

Отзывы: