background image


4

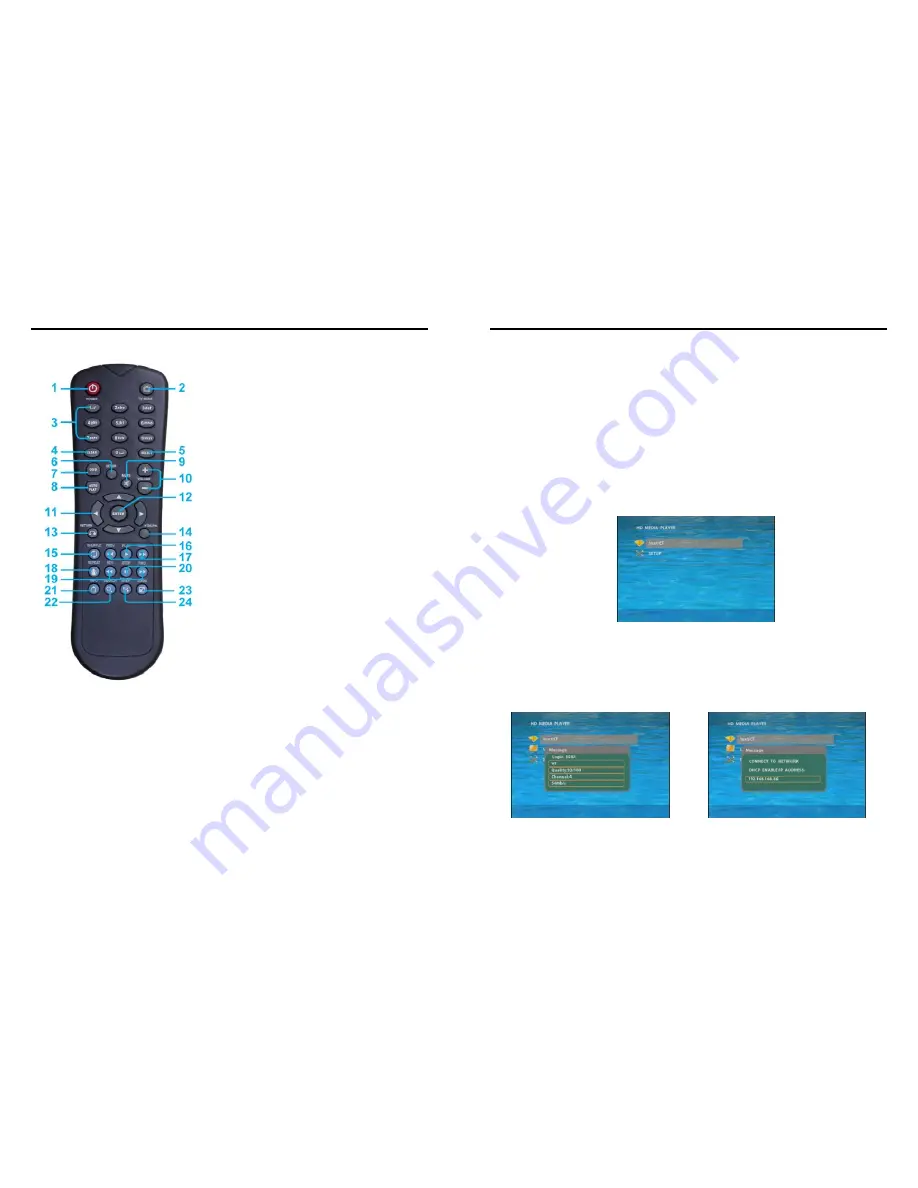
5. REMOTE CONTROL                                           


10 

11 

12 

13 

14 

15 

16 

17 


18 

19 

20 

21 

22 

23 

24 


Power on/ off 
Select the output mode 
Numeric Key 
Delete last entry 
Select a function or to play the selected file 
Open the setup menu Mute sound 
OSD display function on/ off 
Auto-play function on/ off 
Mute sound 
Volume up/ down 
Move the cursor 
Confirm the selection/ entry 
Go back one layer   
Select the TV type (NTSC/ PAL) 
Shuffle on & off 
Play the file selected 
View the previous/ next file 
Play the previous/ next file if in playback 
Select the repeat mode 
Rewind/ forward movie or music files 
Stop playback 
Show the information of the file selected 
Search video (movie) timeframe 
Zoom in/ out on the movie or picture 
Pause the playback or play frame by frame 


5.1 ENTERING TEXT OR IP ADDRESS 

„


Keys need to be pressed multiple times to enter the letter corresponding to that key.   

For Example: 

To enter the letter “a”. you would press the “2” button twice. 

„


Enter The IP Address 

For Example: 

To enter the IP address”192.168.100.100”,.


Step 1: 

Press “1” once, then “1” is displayed, and the color of “1” is orange.


Step 2: 

When the color of “1”turns white, press “9” once, then “9” is displayed.   

Step 3: 

Repeat steps 1 and 2 to enter and complete the IP address.   


5

6. START THE B1080PW-2                        

„


Power On 

z

  Insert the CF memory card that has Picture, Music, Movie or WMV9 files. 

z

  Press the “POWER” button to power on the B1080PW-2, then press the “TV MODE” button to 

select the output mode. 

„


Status After Power On 

z


Status 1: 

If the “AUTOPLAY (Movie or Picture)” function is enabled and there are movie or 

picture files on the CF card, the B1080PW-2 will auto play movie or picture files on the CF 

card after power on. 

z


Status 2: 

If the “AUTOPLAY” function is disabled, after power on the main menu will appear 

as shown in the following figure. There are two groups in the main menu (“/mnt/CF” and 

“SETUP”). 


NOTE


1. 

The pop-up window that shows the state of wireless will appear later, if the wireless network


is 

enabled when the B1080PW-2 is turned on. 

2. 

The pop-up window that shows the IP address will appear later, if DHCP mode is selected when 

the B1080PW-2 is turned on. 


„


Power Off: 

Press the “POWER” button again to power off. 


Содержание B1080PW-2

Страница 1: ...ul interference to radio communications However there is no guarantee that interference will not occur in a particular installation If this equipment does cause harmful interference to radio of televi...

Страница 2: ...ing 39 1 1 PACKAGE CONTENTS 1 B1080PW 2 2 Remote Control 3 Audio Cable 4 Y Pb Pr Cable 5 S Video Cable 6 Power Adapter 7 User Manual 8 Schedule Software 2 INTRODUCTION The B1080PW 2 is a digital media...

Страница 3: ...y Lock function Exports the Configuration Value You can export the configuration value to the CF card The configuration can be modified on your PC and can be applied to the B1080PW 2 or others Compati...

Страница 4: ...IP address 192 168 100 100 Step 1 Press 1 once then 1 is displayed and the color of 1 is orange Step 2 When the color of 1 turns white press 9 once then 9 is displayed Step 3 Repeat steps 1 and 2 to...

Страница 5: ...e IP address Mask Gateway and DNS check the network information of your PC Please follow the steps below to get the network information of your PC Step 1 Click on Start Run and type in command then pr...

Страница 6: ...land Samoa GMT 03 00 Nairobi GMT 10 00 Hawaii GMT 03 00 Moscow Saint Petersburg Volgograd GMT 09 00 Alaska GMT 03 00 Baghdad GMT 08 00 Pacific GMT U S Canada Tijuana GMT 03 00 Kuwait Raid GMT 07 00 Co...

Страница 7: ...ay device connected and set the correct resolution automatically SD Video Select the SD output mode Video S Video or Y Cb Cr VGA 60Hz Select the VGA output resolution 640 480 800 600 1024 768 1280 102...

Страница 8: ...matically Play Button Only for used with play buttons The B1080PW 2 supports two options Repeat Default Repeat All when the demo file finishes playing 13 8 USING THE B1080PW 2 8 1 PLAY MEDIA FILES ON...

Страница 9: ...e volume while the movie or music is playing SHUFFLE Turn on off the shuffle function PREV NEXT Play the previous next file REPEAT Select the repeat mode REV FWD Rewind forward movie or music file STO...

Страница 10: ...2 Auto Download Function If there are more than one B1080PW 2 you can use ftp tools to divide them into different regional group 17 For example Use the ftp tool Serv U to divide into three groups and...

Страница 11: ...pt to resume downloading in 2 minutes The user can terminate the download by pressing the RETURN button 19 8 3 PLAY THE MEDIA FILES ON THE PC Using Windows Media Player Version 11 Windows XP Vista onl...

Страница 12: ...nected to the network In the list of devices below the Share my media to check box select the device B1080PW 2 and click Allow to share the media files Step 9 The shared folder will appear on the scre...

Страница 13: ...router or firewall and open a port 21 for the B1080PW 2 The following figure is an example please refer to your user s manual of router for opening ports Step 4 Start IE on PC and type the FTP site o...

Страница 14: ...control the B1080PW 2 with ASCII command NOTE 1 Baud Rates Firmware Updating Set up the baud rate as 115200 ASCII Command The available baud rates is 38400 2 The reaction time of B1080PW 2 is around t...

Страница 15: ...ntrol the B1080PW 2 to play file stop playback pause the playback play the previous file play the next file rewind movie forward movie Play File Enter the file name that you want play and click Send t...

Страница 16: ...e Disable the HTTP Server function You can also change the User ID Password and port of the HTTP Server Media Player 11 Enable disable the Media Player 11 server WiFi Encryption Mode Disable enable th...

Страница 17: ...hedule and Advance Schedule in the window 31 10 2 1 Basic Schedule In the Basic Schedule mode you can select files that you want to play and the set up the play times of each file Add Click this butto...

Страница 18: ...vance Schedule In the Advance Schedule mode you can select files that you want to play and can also set up the play times and the initial and end time of each file There are Time Setup and File Setup...

Страница 19: ...hedule or Advance Schedule can be saved Please add and edit a new schedule file first 35 Date Setup Error There are some errors in the Advance Schedule Check the date time of the schedule for conflict...

Страница 20: ...2 will automatically play the default file when the demo file finishes playing Repeat All The B1080PW 2 will automatically play all the demo files when the demo file finishes playing 11 2 IR Cable The...

Страница 21: ...t file when the demo file finishes playing Repeat All The B1080PW 2 will automatically play all the demo files when the demo file finishes playing 39 12 TROUBLESHOOTING Situation Check Point No Pictur...

Отзывы: