


FOXBOX 4G Tx/Rx • Installation and Operation
Installation and Operation, cont’d
2-8
FOXBOX 4G Tx/Rx • Installation and Operation
2-9
f
Fiber optic connectors and LEDs —
W
These units output continuous invisible light,
which may be harmful and dangerous to the eyes;
use with caution. For additional safety, plug the
attached dust caps into the optical transceivers
when the fiber optic cable is unplugged.
N
Ensure that you use the proper fiber cable for your
transmitter/receiver pair. Typically, singlemode fiber has
a yellow jacket and multimode cable has an orange jacket.
N
Only one fiber optic cable, transmitter Tx to receiver
Rx, is required for video, audio, and serial command
transmission. But, if you connect only one fiber optic
cable, or if your transmitter is configured to daisy-chain
the optical signal, system functionality is reduced.
You will
not
receive RS-232 reports from the controlled
device, and some Windows-based control program
functions and RS-232 commands will not work. To
receive responses from the controlled device and for full
functionality, you need to install both fiber optic cables
and leave the FOXBOX receiver in normal configuration
(the receiver's Mode DIP switch 1 down).
Tx (required) —
For all one-way video,
audio, and serial communications from the
transmitter to the receiver, connect a fiber
optic cable to the Tx LC connector.
Connect the free end of this fiber optic cable
to the Rx connector on the FOXBOX 4G Rx
receiver (item
o
on figure 2-6) or to any
other compatible Extron FOX device.
Rx (optional) —
Connect a fiber optic cable
for all one-way return serial communications
from the receiver to the transmitter.
Connect the free end of this fiber optic cable
to the Tx connector on a FOXBOX 4G Rx
receiver in normal configuration (item
o
on
figure 2-6) or to any other compatible Extron
FOX device.
Tx Link and Rx Link LEDs —
When lit, the
link is active (light is received).
g
Configuration port —
Connect a controlling device, such as
a PC, to this port via a 2.5 mm mini jack TRS RS-232 cable for
RS-232 protocol control of all FOXBOX functions. See "Front
panel Configuration ports", on page 2-16, for more details on
the adapter cable. See chapter 3, "Remote Control", for SIS
commands and Windows
®
-based program control.
N
The TRS RS-232 cable is included with the Tx models.
h
DC power connector —
Plug the included external 12 VDC
power supply into this connector. See "Power supply wiring,"
on page 2-17, to wire the connector.
i
Indicators —
Power LED —
This LED lights to indicate that power is
applied to the unit
.
Over Temp LED —
This LED lights to indicate that the unit is
operating at a dangerously high temperature (approximately
167° F [75° C]) and that equipment damage is imminent.
RGB (FOXBOX 4G VGA) or DVI (FOXBOX 4G DVI) LED —
This LED lights when the transmitter detects a signal on its
video input, as follows:
RGB LED —
Horizontal sync (H) (for RGBHV video) or
Green (Sync on green) (G) (for RGsB or RsGsBs video)
DVI LED —
DVI video input
Audio LED —
This LED lights when the transmitter detects a
low level audio signal for a short period of time. It goes dark if
the audio signal drops below the minimum threshold for a short
period of time.
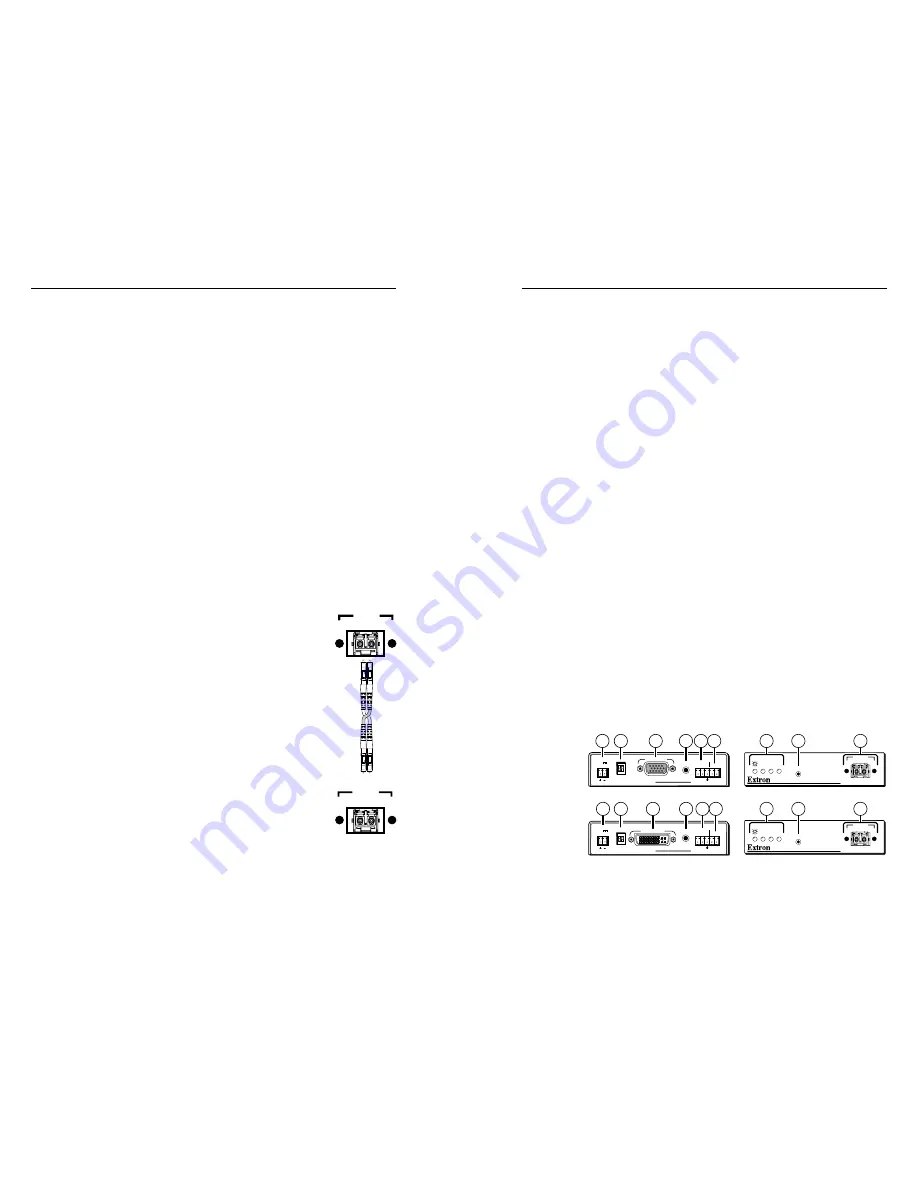
Receiver connections and indicators
FOXBOX 4G Rx VGA Rear Panel
FOXBOX 4G Rx DVI Rear Panel
Front Panel
Front Panel
FOXBOX 4G Rx DVI
DVI
OVER
TEMP
AUDIO
CONFIG
OPTICAL
Rx
Tx
LINK
LINK
AUDIO
DVI-D OUTPUT
FOXBOX 4G Rx DVI
RS-232
OVER FIBER ALARM
Tx Rx
1 2
12V
1.0A MAX
POWER
MODE
FOXBOX 4G Rx VGA
RGB
OVER
TEMP
AUDIO
CONFIG
OPTICAL
Rx
Tx
LINK
LINK
AUDIO
RGB OUTPUT
FOXBOX 4G Rx VGA
RS-232
OVER FIBER ALARM
Tx Rx
1 2
12V
1.0A MAX
POWER
MODE
10
15
11
18
18
12
12
16
16
17
17
13 14
13 14
Rx
Tx
15
19
19
Rx
Tx
Figure 2-6 — FOXBOX 4G Rx receiver’s connectors
OPTICAL
Transmitter
to
Receiver
Tx Rx
LINK
LINK
OPTICAL
Tx RX
LINK
LINK


