


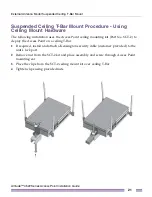


External Antenna Suspended Ceiling Tile (Plenum) Mount
Altitude™ 4522 Series Access Point Installation Guide
22
5
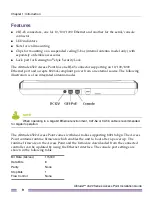
Attach an Ethernet cable from the Access Point to a controller with an 802.3af compatible
power source or use the PWRS-14000-148R power supply to supply power to the
Altitude 4522 Access Point (once fully cabled).
6
Attach appropriate antennas to the connectors.
7
Attach an Ethernet cable from the Access Point to the controller with an 802.3af
compatible power source.
8
Verify the unit has power by observing the LEDs.
CAUTION
If you are not using a 802.3af capable controller to power the Altitude 4522 Access Point,
ensure that only the Altitude 4522 Access Point’s designated power supply (PWRS-14000-148R) is
used. Using an incorrectly rated power supply could damage the unit and void the product warranty.
Do not actually connect to the power source until the cabling portion of the installation is complete.
External Antenna Suspended Ceiling Tile
(Plenum) Mount
Ceiling mount requires placing the Altitude 4522 Access Point above suspended ceiling tile.
NOTE
Notes or warnings about suspended ceiling mounts apply to all installations where the unit is
placed on suspended ceiling tile.
CAUTION
Extreme Networks does not recommend mounting the Altitude 4522 Access Point directly to
any suspended ceiling tile with a thickness less than 12.7mm (0.5in.) or a suspended ceiling tile with
an unsupported span greater than 660mm (26in.). Extreme Networks strongly recommends fitting the
Altitude 4522 Access Point with the supplied mounting ears and hanging the Access Point on a pipe
or beam.