71
70
EN
EN
V. Work with the nail/
staple gun
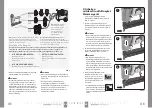
1. Place the nail/staple gun with the contact switch
against the surface of the workpiece (fig. 5a, step 1).
2. Push the nail/staple gun against the surface of the
workpiece without pressing the trigger, so that the
contact switch is compressed (fig. 5b, step 2).
•
ATTENTION
y
The nail/staple gun is not intended for driving nails/
staples into hard surfaces such as steel or concrete!
When driving nails/staples into materials on a steel,
concrete, etc. base, it is necessary to apply a greater
downward force due the greater recoil and to pre-
vent the gun from slipping.
3. When the contact switch is compressed, pull the
trigger of the nail/staple gun, which will result in the
nail/staple being shot out (fig. 5c, step 3).
•
ATTENTION
y
When pulling the trigger, it is necessary to properly
push down the nail/staple gun against the work
surface and when the nail/staple is shot out to hold
it down with sufficient downward force, otherwise
the nail/staple nay not be properly driven into the
material as a result of a loss of impact force when
the nail/staple gun is kicked off the work surface.
4. Lift the nail/staple gun off the surface of the workpie-
ce and move it to the required loca-
tion where the nail/staple is to be
driven and drive in the nail/staple
according to the procedure descri-
bed above.
y
The drive depth can be set using the
control knob (fig. 1, position 9) as
necessary, and a practical test can be
performed on a piece of sample
material.
Fig. 5a
1.
Fig. 5b
2.
Fig. 5c
3.
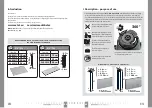
(1
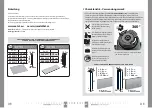
USING THREE COMPONENTS
• Oil lubricator
(8865102)
• Pressure regulator with pressure gauge
(8865103)
• Filter
(8865101)
(2
USING TWO COMPONENTS
• Oil lubricator
(8865102)
• Pressure regulator with pressure gauge
and filter
(8865104)
(3
USING ONE COMPONENT
• Pressure regulator with filter and oil lubricator
(8865105)
Possible methods of connection
The required mixtures of air and pneumatic oil with the correct pressure can be
achieved using three different methods according to diagram 1)-2)-3) with the
specified order of the individual components, which must be adhered to:
(1
(2
(3
8865105
8865102
8865102
8865103
8865101
8865104
Pressure regulator
enables
air pressure to be set
correctly, which is essential
for the optimal and safe
operation of the pneumatic
tool.
Filter (condensate separator)
removes water
(condensate) from compressed air, which forms in
the compressor as a result of water vapour being
compressed in air. Water inside the tool causes
rapid corrosion of its components.
Oil lubricator
adds pneumatic oil to the current of
compressed air, which then enters into the equipment
where it protects its components against jamming
and rapid wear.
8865040
Fig. 4
y
Thoroughly seal the threaded connections on the
connected elements of the air system using Teflon tape.
•
ATTENTION
y
For lubrication of pneumatic tools and for the oil lubri-
cator (oiler) always use only oil intended for pneumatic
tools, which does not froth, is not aggressive against
sealing elements and which has a special viscosity (sui-
table physical characteristics) for lubricating pneumatic
tools. Using other types of oils, e.g. food grade oil,
motor oil, etc. is forbidden.
•
ATTENTION
y
Prior to connecting the nail/staple gun to the source of
compressed air, inspect the machine thoroughly for any
faults and check that no parts are missing.
y
After connecting the nail/staple gun to the source of
compressed air, first check that no compressed air is
leaking from the air system. In the event that air is lea-
king, turn off the compressor, bleed the pressure of the
air system and seal the location of the leak with tape or
by tightening the connection.


