


6
When installing an air regenerating filter the customer may experience, under
certain conditions, small amounts of air (cloudy water) at the taps. This is
normal. On rare occasions, this may result in “shots of air” at a particular
fixture. By installing a loop or “U” on the outlet side of the unit, this will act as
an air trap and improve this situation.
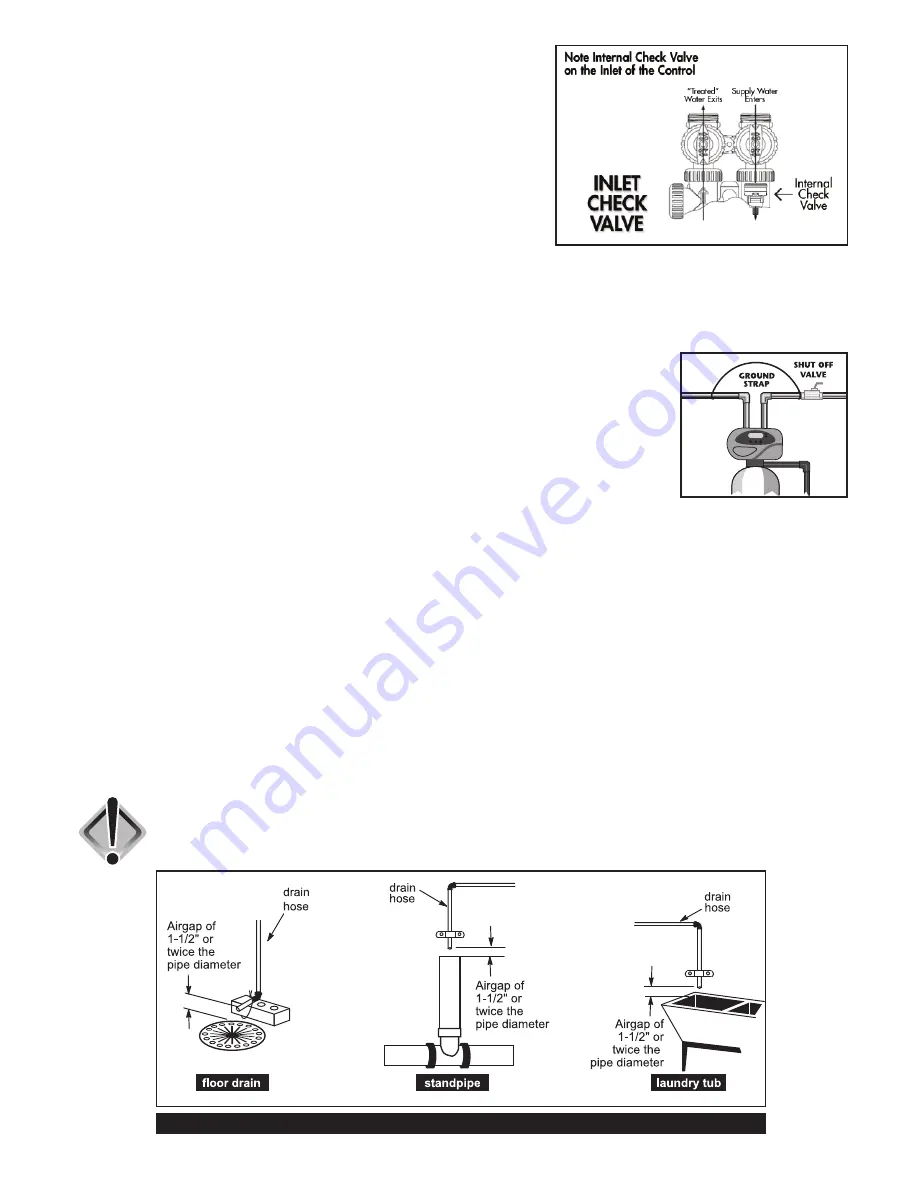
Located inside the inlet is an internal check valve
(see diagram at right)
.
This check valve holds the air in the system, preventing its escape from the
tank. Plumbing codes may require the installation of a thermal expansion tank
on the outlet side of the system to prevent a water heater backup condition.
(See Installation Diagrams on page 5.)
Provisions should be made to bypass outside hydrants that are not to have filtered water. It is also advisable to install
hose bibs on the inlet and outside of the filter for future testing and service of the equipment. Where heavy sediment from
the well is observed, it is advisable to install a cartridge or bag-style filter immediately upstream from the filter. A nominal
micron rating of 50 to 100 is recommended. The purpose of this is to protect the control valve of any debris from the well.
If desired, a cartridge filter may be used after the system as a polishing filter.
6.
INSTALLING GROUND:
To maintain an electrical ground in metal plumbing of a home’s cold
water piping (such as a copper plumbing system), install a ground clamp or jumper wiring. If
replacing an existing filter, also replace the ground clamps/wire. If removing a filter, replace the
piping with the same type of piping as the original to assure plumbing integrity and grounding.
7.
DRAIN LINE:
First, be sure that the drain can handle the backwash rate of the system. Solder
joints near the valve must be done prior to connecting the drain line flow control fitting. Leave
at least 6” between the drain line flow control fitting and solder joints. Failure to do this could
cause interior damage to the flow control.
Backwash of an automatic filter can be directed into a septic tank in most cases, but because of the higher volume of
water discharged, care should be taken. The backwash discharge can be directed to a subsurface drainage system or
other safe location. Remember to follow all local codes.
When installing the drain line on any backwashing filter, especially Evolve filters that utilize air as the regenerant, hard
piping such as PVC, Schedule 80 Plastic or copper is recommended. Remove the drain line nut (if included) and discard.
A 3/4” NPT connection on the elbow is provided.
During backwash, high volumes of water (more than a softener) and
air can be expelled. This release of air can cause a thrashing or movement of the drain line causing it to dislodge from the
drain, resulting in water damage. In order to prevent this, it is recommended to use other means of securing the drain line
to the floor, wall or ceiling to avoid this thrashing of piping.
Our patent pending Backwash Air cycle greatly reduces the
chance of this occurring but should not be the only means of protection.
Where the drain line is elevated but empties into a drain below the level of the control valve, form a 7” loop at the
discharge end of the line so that the bottom of the loop is level with the drain connection on the control valve. This will
provide an adequate anti-siphon trap. Piping the drain line overhead <10 ft is normally not a problem. Be sure adequate
pressure is available (40-60 psi is recommended). Where the drain empties into an overhead sewer line, a sink-type trap
must be used. Run drain to its discharge point in accordance with plumbing codes. Pay special attention to codes for air
gaps and anti-siphon devices.
CAUTION:
Never insert a drain line into a drain, sewer line, or trap. Always allow
an air gap between the drain line and the wastewater to prevent the
possibility of sewage being back-siphoned into the conditioner.
(Air charge
models only)
TYPICAL DRAIN LINE INSTALLATIONS


