


EZN3160/3260
65
【
Trigger Options Settings
】
Pre-trigger Buffer second:
Select the duration for the buffer. This will determine the
amount of footage (length of time) before the event trigger moment that will be included in an
event-triggered video recording, if that buffer and video recording has been enabled in the
Event Management field.
Post-trigger Buffer second:
Select the duration for the buffer. This will determine the
amount of footage (length of time) after the event trigger moment that will be included in an
event-triggered video recording, if that buffer and video recording has been enabled in the
Event Management field.
Click
Apply
to apply the changes or
Cancel
to cancel the changes and return to the previous settings.
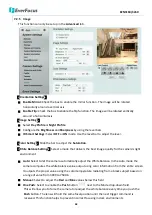
【
Schedule Settings
】
Users can configure the recording schedule here. Select the desired recording
types among the options below. Click and drag the cursor on the time block, which will be applied
with the selected recording type.
Event (Red):
Select for the camera to activate all the Event Recording set up in the Event
Management field (Event Trigger Type), except the Schedule Recording.
Schedule (Green):
Select for the camera to activate only the Schedule Recording set up in the
Event Management field (Event Trigger Type).
Event + Schedule (Yellow):
Select for the camera to active both of the configured Event and
Schedule Recordings.
Deselect (Grey):
Select for the camera to stop recording.
Click
Apply
to apply the changes or
Cancel
to cancel the changes and return to the previous settings.
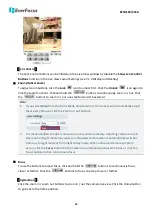
【
Motion Settings
】
Use this page to configure up to four areas in which motion will be detected.
When a motion is detected by the camera, the motion detection icon
will appear at
the top right corner on the Live View Window to alert the user. This function can also be linked
with correctly configured Events to trigger Event reactions like the activation of video recording
periods, snapshots, etc.
To set up the Motion area:
1.
Check the
Enable
box to enable the selected area.
2.
Select a sensitivity value of the motion detection sensor function.
3.
Click the
Draw
button
and move the cursor on the left-side live image.
4.
Move the cursor to the position where you want the motion rectangle to start and then click.
Move the cursor to the position (diagonally opposing corner) where you want the motion
rectangle to end and then click.
5.
Click the
Apply
button to apply the settings, or click the
Cancel
button to reset without saving
the settings.


