background image

EQ610s


4.    CONNECTIONS 


1.


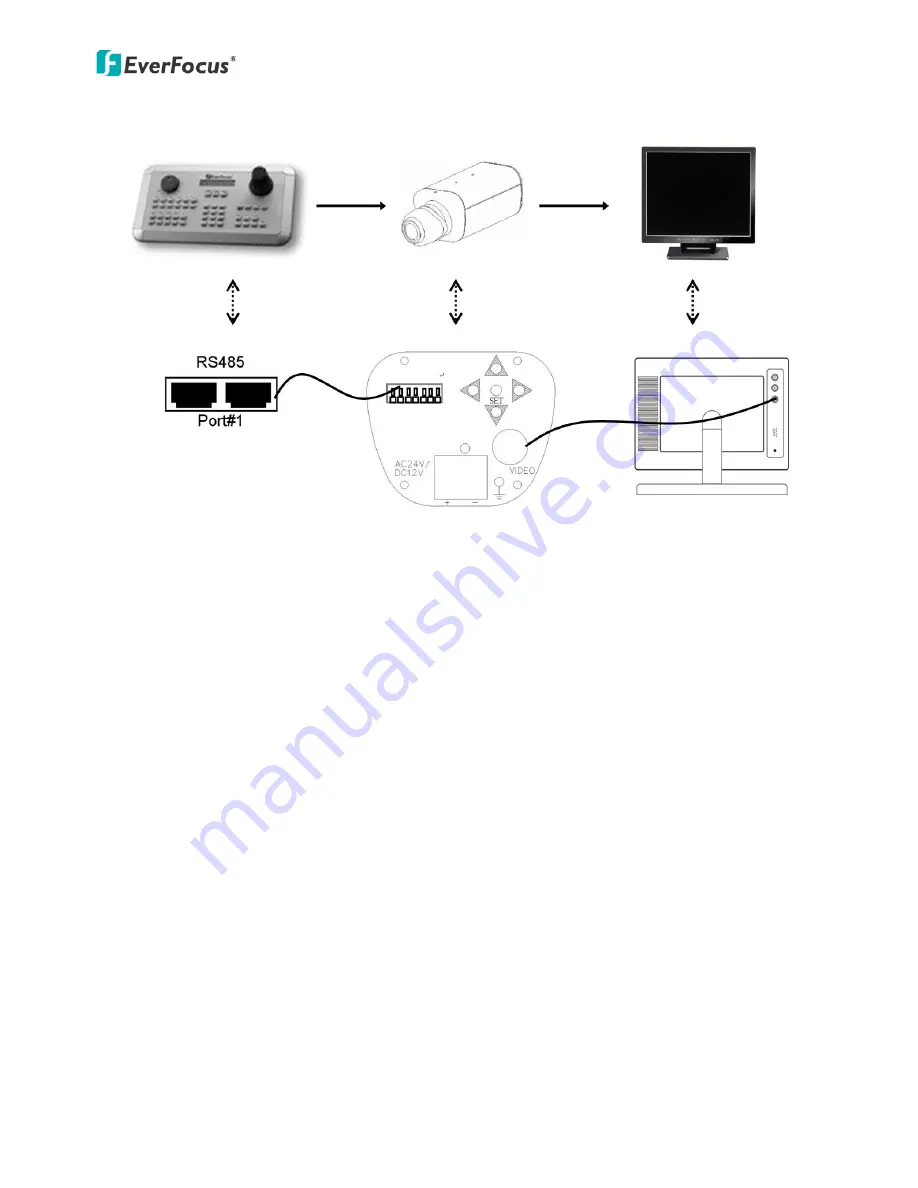
Connect the cable from the keyboard’s RS485 port to the camera’s two 

corresponding RS485 terminal block connectors. 

2.


Connect the cable from the video output jack of the camera to a 

monitor’s input jack. 

3.


The RS485 ID has to be the same as the CAM ID of the keyboard. (Please 

refer to the


“6.9 System” section.) 

4.


The Baud rate has to be the same as the keyboard’s Baud rate. (Please 

refer to the “6.9 System” section.) 


Содержание EQ610s

Страница 1: ...EQ610s Indoor Box Camera 700TVL True Day Night Super Low Light D WDR User s Manual V2 1 Lens not included Copyright EverFocus Electronics Corp Release Date January 2013 ...

Страница 2: ...toward the sun 4 Keep the power cable away from water and other liquids and never touch the power cord with wet hands 5 Never install the camera in areas exposed to oil gas or solvents 6 Do not operate the camera beyond the specified temperature or humidity Use the camera at temperatures within 10 C 50 C 14 F 122 F and humidity between 20 80 this device is not rated as submersible 7 The input powe...

Страница 3: ...EXview HAD CCD II 960H sensor Starlight super high sensitivity of 0 00006Lux F 1 2 is achieved by Digital Slow Shutter Sens Up 512x The Sony Effio S platform performs advanced camera functions and delivers excellent picture quality True Day Night function with ICR module Supports 3D 2D Noise Reduction High sensitivity low smear high anti blooming and high S N ratio for high performance video Easy ...

Страница 4: ...AL Sync Mode Internal Day Night Mode External Auto DN IN Color B W OSD Menu OSD Control English Simplified Chinese Traditional Chinese DNR 3DNR OFF ON MIDLOW MID MIDHIGH HIGH D WDR Extended ATR OFF BLC WDR Digital Slow Shutter Sens Up 512x Digital Image Yes Digital Zoom Yes RS 485 Control Yes Digital I O Control D N In D N Out Motion Alarm Out Mirror Normal Vertical Mirror Rotate Motion Detection ...

Страница 5: ...EL 2 1 2 BRACKET POSITIONS The bracket in the package can be fitted to the screw holes on the top or bottom of the camera for either suspending the camera or supporting it Light Sensor Microphone Reserved for Audio supporting models Top bracket position Bottom bracket position ...

Страница 6: ...he D N limit switch to OFF so that the camera can receive an external Day Night signal for example from a device on the housing and synchronize the external device s Day Night mode with that of the camera Motion Alarm output for in case motion is detected If the alarm output is connected and a motion is detected the message MOTION DETECTED will appear on the screen and the camera will also send ou...

Страница 7: ...Drv Drv 3 INSTALLATION 1 Unscrew the protection cap from the mouth of the lens mounting 2 If a C mount lens is to be used please screw the C mount adaptor ring the 5mm thick ring in the accessory pack on to the mouth of the lens mounting 3 Mount the lens by turning it clockwise on the lens mounting of the camera 4 If you use an Auto Iris lens connect the lens s cable to the Auto Iris lens connecto...

Страница 8: ...erminal block connectors 2 Connect the cable from the video output jack of the camera to a monitor s input jack 3 The RS485 ID has to be the same as the CAM ID of the keyboard Please refer to the 6 9 System section 4 The Baud rate has to be the same as the keyboard s Baud rate Please refer to the 6 9 System section ...

Страница 9: ...ubmenu Use the and buttons to toggle between value options R RIGHT Press this button by pressing the control stick to the right to move the on screen cursor to the right to select items or to adjust the level intensity of a selected function The level intensity increases when this button is pressed L LEFT Press this button by pressing the control stick to the left to move the cursor to the left to...

Страница 10: ... right hand menu title is SET it means that there are no modes to choose from only a settings submenu for the left hand main menu item 4 Open submenus Right hand items or modes with a symbol at the end contain submenus For adjusting submenu items select the desired menu item with the and buttons then select the desired submenu title or mode to the right of the menu item with the and buttons then p...

Страница 11: ...sponses of the Iris lens Push the LEFT and RIGHT buttons to decrease or increase the number 6 2 EXPOSURE Once you have opened the OSD s main menu on your screen use the UP and DOWN buttons to scroll to the EXPOSURE menu item Press the ENTER button to open the Exposure submenu Main Menu MAIN MENU LENS AUTO EXPOSURE SET WDR OFF WHITE BALANCE ATW 2DNR 3DNR SET DAY NIGHT AUTO IMAGE SET EFFECT SET SYST...

Страница 12: ...GHT buttons to adjust the shutter speed or to select the maximum shutter speed SHUT MAX for when the camera is in SHUT AUTO IRIS mode The shutter speed and maximum shutter speed can be set to be anything from a 50th of a second up to a 100 000th of a second LOW LUX BRIGHT Low Lux Brightness Use the LEFT and RIGHT buttons to adjust the Low Lux Brightness value The options are x0 25 x0 5 x0 75 x1 0 ...

Страница 13: ...and dark areas selecting this mode evens out the contrast and makes these contrasting areas distinctive LEVEL Use LEVEL to adjust the brightness of the whole area 000 255 DARK Use DARK to only adjust the brightness of the dark areas LOW to HIGH BRIGHT Use BRIGHT to only adjust the brightness of the bright areas 000 255 Submenu of the WDR function The WDR modes are WDR BLC and OFF WDR LEVEL 185 DAR...

Страница 14: ...will be the brighter area using the middle level of brightness AREA BOTTOM 1 3 TOP 2 3 BOTTOM 2 3 LEFT 2 3 and RIGHT 2 3 MANUAL LEVEL HIGH MID and LOW 6 4 WHITE BALANCE The screen color can be adjusted by using the WHITE BALANCE function 1 Scroll to WHITE BALANCE on the main menu and use the LEFT and RIGHT buttons to toggle between this menu item s seven mode options 2 Select the desired mode and ...

Страница 15: ...ling incidents Follow the instructions on the screen Note The WHITE BALANCE can not function effectively under the following conditions When the following occurs please select PUSH LOCK Mode When the color temperature in the surveillance area is high When darkness surrounds a surveillance area When there s a fluorescent light in the surveillance area or the light changes all the time MANUAL This m...

Страница 16: ...deal for NIGHTTIME In this mode the camera is forced to deliver a B W feed during daytime and nighttime AUTO mode switches to a B W feed in the nighttime and then switches back to a Color feed in the daytime The switch over moments for this mode are triggered when the correct AGC level is reached EXTERNAL mode works the same as Auto mode The difference is that the switch over moments are based on ...

Страница 17: ... are 0 63 NIGHT DAY When the camera detects the current light level is higher than this value it ll switch from NIGHT mode to DAY mode Selectable values are 0 63 Note 1 The difference in the selected values of DAY NIGHT and NIGHT DAY should be more than 5 or else the camera might keep switching from DAY NIGHT and NIGHT DAY constantly 2 It is not recommended to use an infrared illuminator when the ...

Страница 18: ...video image becomes cleaner and more distinguished as the level of SHARPNESS increases If the level goes up very much it may affect the video image and cause noise SHARP SUP SHARPNESS SUPPRESSION Level 000 015 Adjusts the value of the sharpness in a Low Lux environment CONTRAST Level 032 031 Adjusts the value of the contrast SATURATION Level 050 050 Adjusts the value of the gain The IMAGE SET subm...

Страница 19: ...e pixels of the CCD Decrease the THRESHOLD value to find more white pixels or increase the value to reduce the number of white pixels 6 8 EFFECT 1 Scroll to EFFECT on the main menu and press the ENTER button to enter the settings submenu 2 In the settings submenu click the LEFT and RIGHT buttons to switch menu items ON and then press ENTER to access their respective submenus MOTION DETECTION If yo...

Страница 20: ...t as many blocks as you want on any part of the screen MONITOR AREA Press ENTER to enter the submenu and set the Monitor Area AREA SEL Use your LEFT and RIGHT buttons to choose one of a maximum of four possible Monitor Areas on screen blocks MODE Once you have selected a monitor area set the Mode to ON to set this area s parameters in the setting bars below this menu item TOP BOTTOM LEFT RIGHT ALA...

Страница 21: ...the corners of the blocks Press ENTER to switch between the four corners Pressing ENTER a fifth time will close the submenu Press ENTER again to open the same area block s submenu again or select another area block to edit COLOR Use the LEFT and RIGHT buttons to adjust the color of the selected Privacy Mask The options are BLACK RED GREEN BLUE YELLOW CYAN MAGENTA and WHITE TRANSP Use the LEFT and ...

Страница 22: ...menu and use your Direction and Enter buttons to select and confirm letters numbers etc After entering a name highlight the POS option and press ENTER to see where the name will be placed then use your direction buttons to drag it to the position you want it to be CLR Select to clear one letter of the input POS Adjust the position of the camera ID MAIN MENU LENS AUTO EXPOSURE SET WDR OFF WHITE BAL...

Страница 23: ...he camera model INT means Internal Sync LL means Line Lock Sync If you select LL go into the LL submenu to select the Phase value LANGUAGE Use the LEFT RIGHT buttons to select your language preference The options are ENGLISH Simplified Chinese Traditional Chinese FIRMWARE This line displays the firmware version currently installed on the camera RESTORE Select NO to exit or select YES to restore al...

Страница 24: ...3 5625 8189 www everfocus co jp info everfocus co jp EverFocus Europe UK Unit 12 Spitfire Business Park Hawker Road Croydon Surrey CR0 4WD UK TEL 44 20 8649 9757 44 845 430 9999 FAX 44 20 8649 9907 www everfocusuk co uk salesuk everfocus com EverFocus India Suite 803 Housefin Bhavan C 21 Bandra Kurla Complex Bandra East Mumbai 400051 India TEL 91 22 6128 8700 FAX 91 22 6128 8705 www everfocus in s...

Отзывы: