Page | 5
AP1004WRe Installation Guide
Connecting AP 1004WRi
Perform this procedure to connect the AP1004WRi Wireless Access Point to the network.
1.
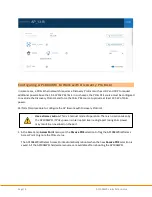
For Access Points powered from a Network Switch with PoE+ capabilities, Attach the two
cables directly to the Eth0 and ETH1 RJ45 receptacle on the back side of the AP1004WRi
Wireless Access Point chassis.
Locate Ethernet Ports
Connect Primary Port
Connect Secondary Port
2.
For Access Points powered from the optional AC/DC Adapter, Attach the Power Connector
first, then attach the Ethernet cables to the Eth0 and ETH1 RJ45 receptacle.
Connect Power Adapter
Connect Primary Port
Connect Secondary Port
3.
Connect the opposite ends of the Ethernet cables to a Ethernet Switch. If using Network
power, Verify the network power source (PSE) is configured to supply PoE+ power (30
Watts/Port) and supports 2-Event Classification, or the AC/DC Adapter is plugged into a AC
Source.
When injectors or mid-span are used, connect the access point to the “Data + Power” port
and the Ethernet Switch to the “Data” port of the injector or midspan.
4.
Verify the PoE+ source is providing power and the Ethernet switch port has established link with both
the ports. Note: Eth1 is normally disabled in the access point, so while it will link, no packets will be
transferred unless the access point is configured to support link aggregation.


