EUROSTER Q7TXRX
GW
–
INSTALLATION AND OPERATION MANUAL
20
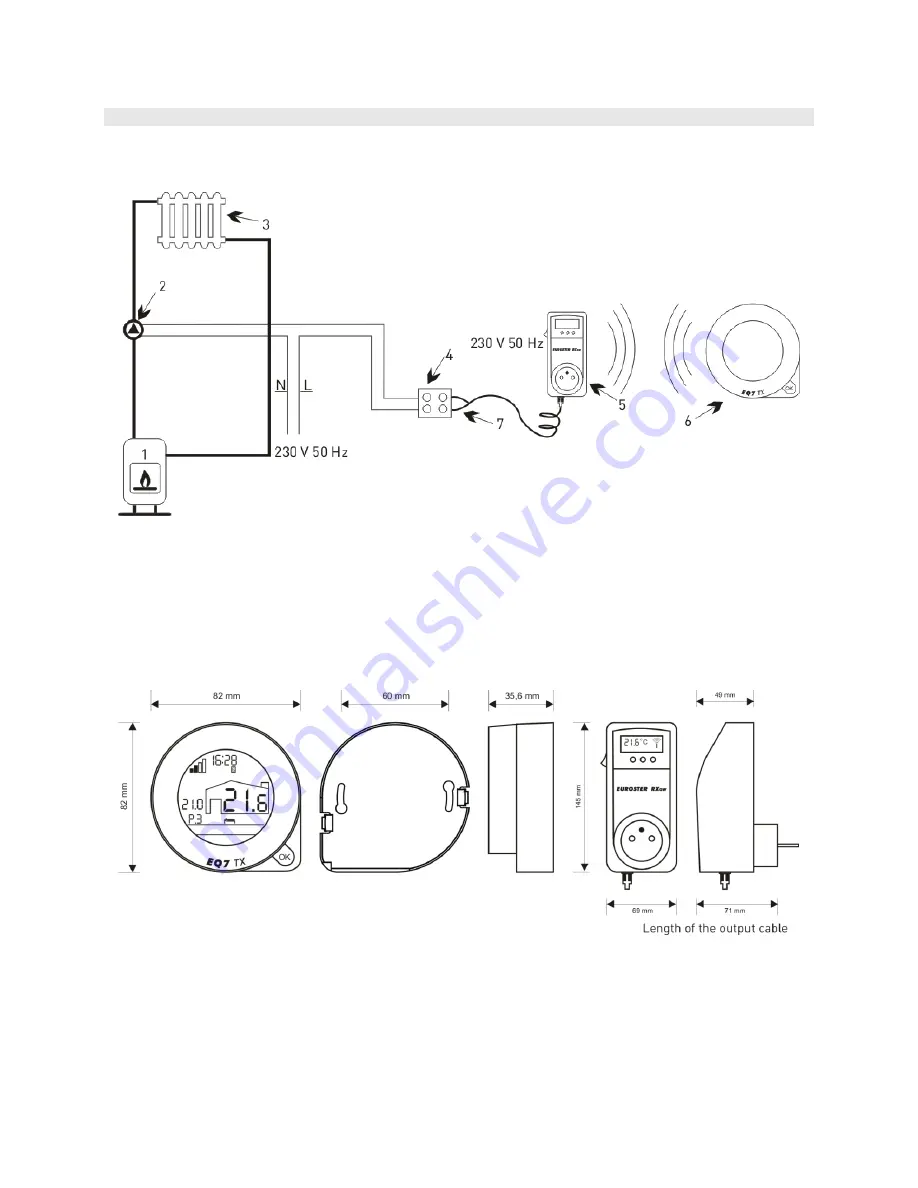
In arrangement with a central heating pump
1. CH boiler 2. CH pump 3. Heat consumer
radiator
4. Electrical connection block 5. Euroster RXGW 6. Euroster Q7TX 7. Output cable
4.
DIMENSIONS
Страница 1: ...TAT MAINTENANCE Do not use the thermostat in rooms with excessive humidity significant dustiness or with presence of caustic or flammable vapors If necessary wipe it carefully with a damp cloth Do not...
Страница 2: ...e battery compartment II USER FUNCTIONS 1 CONTROL OF THE THERMOSTAT a Display icons and operating window 1 Hour 2 Strength of radio communication between the thermostat and the receiver 3 Text box 4 C...
Страница 3: ...fter pressing OK shortly when the display backlight is switched off If the thermostat cooperates with several receivers then the displayed signal strength is the signal strength of the most distant th...
Страница 4: ...sensor only e RX receiver The receiver is equipped with a pass through socket enabling connecting a boiler or other device to the power supply It is not a controllable socket It is a simple 230 V soc...
Страница 5: ...A will be displayed and the connected device will be switched on for 20 minutes every 3 h 2 BASIC SETTINGS The main menu consists of three basic items MODES 1 PROGRAMS 2 SERVICE 3 The menu items with...
Страница 6: ...P1 23 C 06 00 am 08 30 am P2 28 C 08 30 am 03 00 pm P3 22 C 03 00 pm 11 00 pm P4 25 C 11 00 pm 06 00 am Sat Sun P1 23 C 06 00 am 11 00 am P2 22 C 11 00 am 04 00 pm P3 23 C 04 00 pm 11 00 pm P4 25 C 1...
Страница 7: ...24 h The thermostat provides two methods of manual temperature setting a First method selecting an exact temperature for one of the three preset duration values It enables selecting the exact temperat...
Страница 8: ...ll days of the week 1 2 3 4 5 6 7 are flashing Select the proper day or group of days and confirm After selecting the device will automatically proceed to the next item EDIT item 202 b EDIT item 202 p...
Страница 9: ...se remember there will be a pause in heating in the place of the deleted range Adding a new range with starting and ending hours completely overlapping another range also deletes the previous one A ra...
Страница 10: ...TO mode Detection of a rapid drop of ambient temperature switches the heating device off for the preset time If frost protection temperature is not switched on item 308 NO then airing mode limits the...
Страница 11: ...mes and temperatures to be selected with the button see II User functions point 3 TEMPERATURE three temperatures of manual setting factory setting 18 C 20 C and 22 C DURATION three duration values of...
Страница 12: ...as established and repeated When learning is active item 306 YES the thermostat records the temperature and time when it was modified If similar temperatures differing by no more than 0 4 C will be se...
Страница 13: ...g days to properly calculate times for various temperatures thus for the first days the calculated times may not be enough to achieve precisely the preset temperatures at established times Usually the...
Страница 14: ...he settings entered in the technician s menu neither does it reset the date and time It deletes all settings in the SERVICE menu along with the programmed ranges 12 AIR CONDITIONING item 312 switch fr...
Страница 15: ...y algorithms to the particular configuration without the need to modify them manually in the service menu RADIO item 3 enables pairing devices establishing number of transmitters or receivers assignin...
Страница 16: ...mperature drops below the preset one in the three rooms with thermostats no 1 2 and 3 When turn off if any is set and no 4 is selected then the receiver will switch on the heating if the preset temper...
Страница 17: ...sh the priorities and possibly select a channel In order to pair Enter PAIR item and press OK WAIT will be displayed Then hold the left button of the RX receiver for 3 s PROG will be displayed Then ho...
Страница 18: ...he need to change over the cables push the right button shortly To switch on pairing hold the middle button longer To exit hold the left button longer V INSTALLATION AND CONNECTION 1 PROPER PLACE OF I...
Страница 19: ...rate the front panel and the base 3 SAMPLE CONNECTION DIAGRAMS The following diagrams are simplified and do not cover all the elements necessary for the correct installation In arrangement with a 230...
Страница 20: ...INSTALLATION AND OPERATION MANUAL 20 In arrangement with a central heating pump 1 CH boiler 2 CH pump 3 Heat consumer radiator 4 Electrical connection block 5 Euroster RXGW 6 Euroster Q7TX 7 Output c...
Страница 21: ...e Mounting method thermostat stand receiver 230 V 50 Hz socket Thermostat weight without batteries thermostat without batteries 114 g receiver 359 g Warranty period 2 years Dimensions W H D mm the the...
Страница 22: ...may be repaired exclusively by the manufacturer or by other party clearly authorized by the manufacturer 5 Warranty becomes invalidated in case of any mechanical damage incorrect operation and or maki...