background image


540mm Upright Cooker with GAS oven User manual 

13 


U

U

s

s

i

i

n

n

g

g


t

t

h

h

e

e


h

h

o

o

t

t

p

p

l

l

a

a

t

t

e

e


b

b

u

u

r

r

n

n

e

e

r

r

s

s


o

o

f

f


y

y

o

o

u

u

r

r


g

g

a

a

s

s


c

c

o

o

o

o

k

k

e

e

r

r


T

T

h

h

e

e


h

h

o

o

b

b


c

c

o

o

n

n

t

t

r

r

o

o

l

l


k

k

n

n

o

o

b

b

s

s


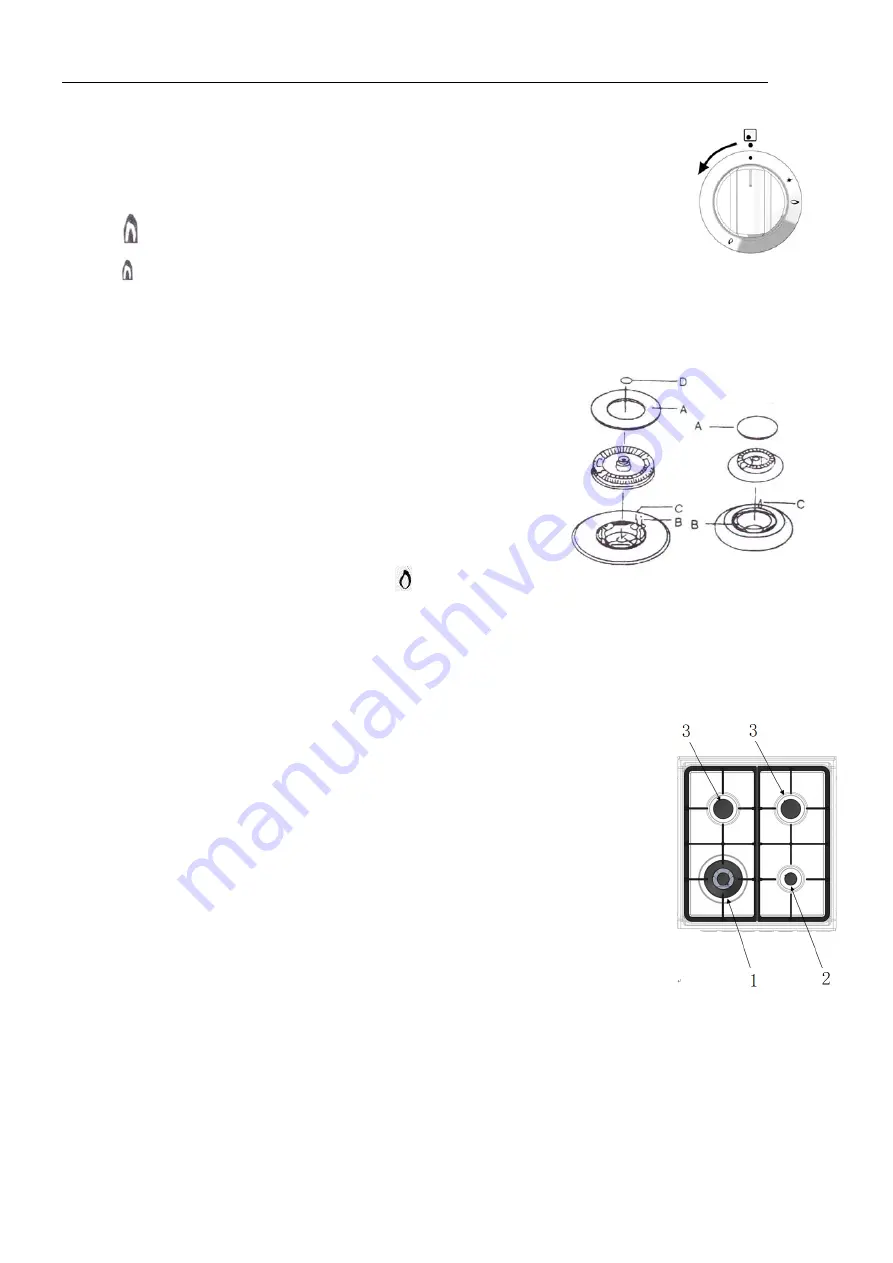
The symbols on the control knobs mean the following: 


    No gas flow   


Maximum gas flow   


Minimum gas flow 


NOTE: 

All operating positions must be set between the maximum and minimum flow settings, and never 

between the maximum setting and the closed position. 


I

I

n

n

t

t

r

r

o

o

d

d

u

u

c

c

t

t

i

i

o

o

n

n


t

t

o

o


t

t

h

h

e

e


b

b

u

u

r

r

n

n

e

e

r

r


A-Burner cap                      

B-Lighting plug 

C-Thermocouple 
D- Wok burner cap 
 

H

H

o

o

t

t

p

p

l

l

a

a

t

t

e

e


I

I

g

g

n

n

i

i

t

t

i

i

o

o

n

n


To light these hotplates: 

1. Choose the hotplate you want to use. 

2. Turn the hotplate burner control knob to “

”. 

3. Press electronic igniter switch to release spark to the burner. 


B

B

u

u

r

r

n

n

e

e

r

r

s

s


1

Wok burner   


Used for fast heating. 


Used with large size pots and pans. 

2

Small Burner   

  Used for simmering.   

  Used with small pots and pans. 

3

Semi-rapid Burner (2 of) 

  Used for normal cooking . 

  Used with middle size pots and pans. 

To conserve gas, place the pan centrally over the burner and adjust the flame so that it does not go past 

the edges of the cookware. 


Содержание FGO54W

Страница 1: ...540mm Upright Cooker with GAS oven User manual 1 ...

Страница 2: ...en 7 Using the oven of our gas cooker 7 Set the cooking time 7 Oven cooking guide 8 Understanding baking problems 9 Using the grill 10 Handling Grilling problems 10 Using the hotplates of your cooker 11 Fitting oven accessories and cleaning 12 Cleaning the upright cooker 12 Cleaning the oven door 13 Replacing the lamp 14 Solving problems 15 Installing cooker power connections 16 Installing anti ti...

Страница 3: ...al surfaces when in use Use oven gloves Install cooker shelving and fittings in accordance with this Manual Ensure all specified vents openings and airspaces are not blocked To ensure your safety all electric appliance should only be installed or service by qualified staff If the supply cord is damaged it must be replaced a service agent or similarly qualified person in order to avoid a hazard To ...

Страница 4: ... oven which are very difficult to remove N NO OT TE E C Co on nd de en ns sa at ti io on n o on n o ov ve en n d do oo or r i is s n no or rm ma al l e es sp pe ec ci ia al ll ly y w wh he en n k ki it tc ch he en n i is s c co ol ld d Also spacing and size of food on trays and the number of baking dishes in the oven can affect air circulation D Di is sp po os sa al l o of f p pa ac ck ka ag gi in...

Страница 5: ...elf 7 Baking tray 8 Oven Door Glass 9 Oven Door 10 Splashback 1 supplied 11 Grill hidden Oven Element 12 Rack in grill tray 1 supplied 13 Grill tray 1 supplied 14 Fan 15 Oven burner cover plate 16 Oven burner 17 Anti slip feet 18 Anti tilt bracket 19 Kick panel 20 Anti slip feet D De es sc cr ri ip pt ti io on n o of f f fr ro on nt t p pa an ne el l C Co on nt tr ro ol ls s 1 Hotplate Burner Cont...

Страница 6: ... n no ot t a a s sh he el lf f p po os si it ti io on n P Pr re ep pa ar ri in ng g y yo ou ur r a ap pp pl li ia an nc ce e f fo or r t th he e f fi ir rs st t t ti im me e Please wipe out the oven interior prior to operation with warm soapy water and polish dry with a soft clean cloth New appliances can have an odour during first operation It is recommended to run in your oven before you cook fo...

Страница 7: ...540mm Upright Cooker with GAS oven User manual 7 Shelf position is counted from the bottom shelf up Bottom shelf position is 1 ...

Страница 8: ... te e R Ri in ng ge er r T Ti im me er r To set the timer simply turn the knob clockwise to the required number of minutes Turn knob counterclockwise to use the oven with no cooking time control Note For any time below fifteen minutes turn the knob past the fifteen then turn it back to the required number of minutes When the timer returns to zero the timer gives a short ring U Us si in ng g t th h...

Страница 9: ...own in brackets For best results when baking preheat your oven for 15 20 minutes Food Fan forced oven Time in minutes Temperature Oven shelfposition Plain or fruit scones 210 Any 10 15 Rolled biscuits 150 170 Any 10 15 Spooned biscuits 180 Any 12 15 Shortbread biscuits 150 Any 30 35 Hard individual meringues 100 Any 90 Soft individual meringues 165 Any 15 20 Pavlova 100 Any 75 Patty cakes 180 Any ...

Страница 10: ...too large diameter Use correct size tins Baking tins are dark metal or glass Change to shiny light tins or lower the temperature by 10 20 C Food too low in oven Cook one shelf higher Oven door opened too frequently during baking Don t open the oven door until at least half the cooking time has passed Baking temperature too high Lower the temperature Oven tray blocking heat below thermostat Use hig...

Страница 11: ...ire Do not store flammable materials near the grill G Gr ri il ll l i in nf fo or rm ma at ti io on n The grill function is suitable for tender cuts of meat steak chops sausages fish bread cheese tootsies and other quick cooking foods Preheat for 3 minutes on 7 setting This will help seal natural juices of steak chops etc for a better flavour The grill drawer door must be closed during grilling U ...

Страница 12: ...540mm Upright Cooker with GAS oven User manual 12 chops buckling ...

Страница 13: ...t ti io on n t to o t th he e b bu ur rn ne er r A Burner cap B Lighting plug C Thermocouple D Wok burner cap H Ho ot tp pl la at te e I Ig gn ni it ti io on n To light these hotplates 1 Choose the hotplate you want to use 2 Turn the hotplate burner control knob to 3 Press electronic igniter switch to release spark to the burner B Bu ur rn ne er rs s 1 Wok burner Used for fast heating Used with la...

Страница 14: ... by carefully lifting them from the hob Clean by washing in warm soapy water Dry thoroughly Take care when replacing the trivets as dropping them onto the hob may damage the enamelled surface R Re em mo ov vi in ng g t th he e b bu ur rn ne er rs s The burner caps and crowns are removable for cleaning Flame port blockage should be removed by means of a match stick or brush If the caps crowns and c...

Страница 15: ...e oven door Proceed as follows Oven door structures 1 remove and assemble procedure Open the door to the full extent fig 1 Open the lever A completely on the left and right hinges fig 2 Hold the door as shown in fig 3 Gently close the door fig 3 until left and right hinge levers A are hooked to part B of the door fig 4 Withdraw the hinge hooks from their location following arrow C fig 4 Rest the d...

Страница 16: ...he surface which may result in shattering of the glass R Re ep pl la ac ci in ng g t th he e O Ov ve en n L La am mp p Disconnect the oven from the power supply at the fuse box by means of the switch used to connect the appliance to the electrical mains or unplug the appliance gas Remove the glass cover of the lamp holder by rotating anti clockwise Remove the lamp and replace with a lamp resistant...

Страница 17: ...wn Check fuses Circuit breaker tripped Check circuit breaker Lamp blown or loose in socket Replace or tighten globe Oven not hot enough Heat escaping through incorrectly sealed door Check shelves or dishes are not preventing door closing properly Check that door is fitted properly after door removal for cleaning Door seal is worn or has moved Replace seal or refit it The burner has not lit Stop tr...

Страница 18: ... n a ac cc co or rd da an nc ce e w wi it th h t th he e i in ns st tr ru uc ct ti io on ns s l li is st te ed d i in n t th he e t ta ab bl le e b be el lo ow w Wire cross sectional area mm2 Connection mode L L1 1 L L2 2 L L3 3 N N E E 1 1N N Min1 5 Min1 5 Min1 5 2 2N N Min1 5 Min1 5 Min1 5 Min1 5 3 3N N Min1 5 Min1 5 Min1 5 Min1 5 Min1 5 C Co on nn ne ec ct ti in ng g t th he e s su up pp pl ly ...

Страница 19: ...540mm Upright Cooker with GAS oven User manual 19 ...

Страница 20: ...i tilt plate and then mark the position of the stability bolt hole Pull the cooker back out and drill the bolt location hole Use a 10mmmasonry or wood drill When drilling into concrete ensure a minimum hole depth of 30mm Reposition the cooker back into the anti tilt plate aligning the stability bolt bracket with the 10mm drilled hole Then slide the bolt through the bracket and into the hole Connec...

Страница 21: ...ide clearances Measurements B C Where B measured from the periphery of the nearest burner to any vertical combustible surface or vertical combustible surface covered with toughened glass or sheet metal is less than 200 mm the surface shall be protected to a height C of not less than 150 mm above the hob for the full dimension width or depth of the cooking surface area Where the gas cooking applian...

Страница 22: ...read When making the connection take care not to apply stresses of any kind to the appliance A Gas Inlet B Gasket C Gas installation Natural Gas the supplied regulator must be fitted to the appliance inlet connection Gas pressure must be adjusted to 1 0 kPa when the auxiliary semi rapid and rapid burners are set to high flame the appliance test point is located on the regulator LPG the supplied te...

Страница 23: ...ht Cooker with GAS oven User manual 23 When the installation is complete always performance a gas leakage check that all the unions are absolutely tight using a soapy solution Never use a flame to make this check ...

Страница 24: ...e door handles Power socket if provided for gas models and electricity isolation switch for electric models and gas models without a 20A plug is to be installed in an accessible position near the cooker but not behind cooker If the supply cord or cable is damaged it must be replaced by an approved service agent or a similarly qualified person in order to avoid a hazard N No ot te e T To o e en ns ...

Страница 25: ...f each hotplate control cock This is accessible when the control knob and the control panel are removed Check the ignition on all burners both separately and in combination Check the operation of the electrical components if applicable If you are satisfied that the cooker is operating correctly then turn it off and show the customer how to use it Make sure you ask the customer to operate the clock...

Страница 26: ... 0 ULPG 2 75kPa Test Point Pressure Burner Injector Size mm N G C MJ h Wok 1 10mm 13 68 Semi rapid 0 71mm 6 30 Auxiliary 0 57mm 3 60 Oven 0 82mm 9 0 Model Natural Gas MJ h ULPG MJ h Hob Model 29 88 29 88 Oven Model 38 88 38 88 Model FGO54W GG54GOW oven capacity L 70 grill capacity L 20 voltage v 220 240 frequency Hz 50 60 circuit breaker A 10 grill power W 1650 1800 product dimension mm 540 630 91...

Страница 27: ...oker with GAS oven User manual 27 THIS SECTION HAS BEEN LEFT BLANK INTENTIONALLY Distributed by Home Appliance Pty Ltd 20 Carlotta Street Artarmon NSW 2064 AUSTRALIA After Sales Service 1800 444 357 www euromaid com au ...

Страница 28: ...540mm Upright Cooker with GAS oven User manual 28 ...

Отзывы: