background image


5


SAMENSTELLING 


Zet de ventilator in elkaar volgens de onderstaande beschrijving. 
Bewaar de verpakking om die in de toekomst te kunnen gebruiken 
wanneer u de ventilator op wilt ruimen. 
 

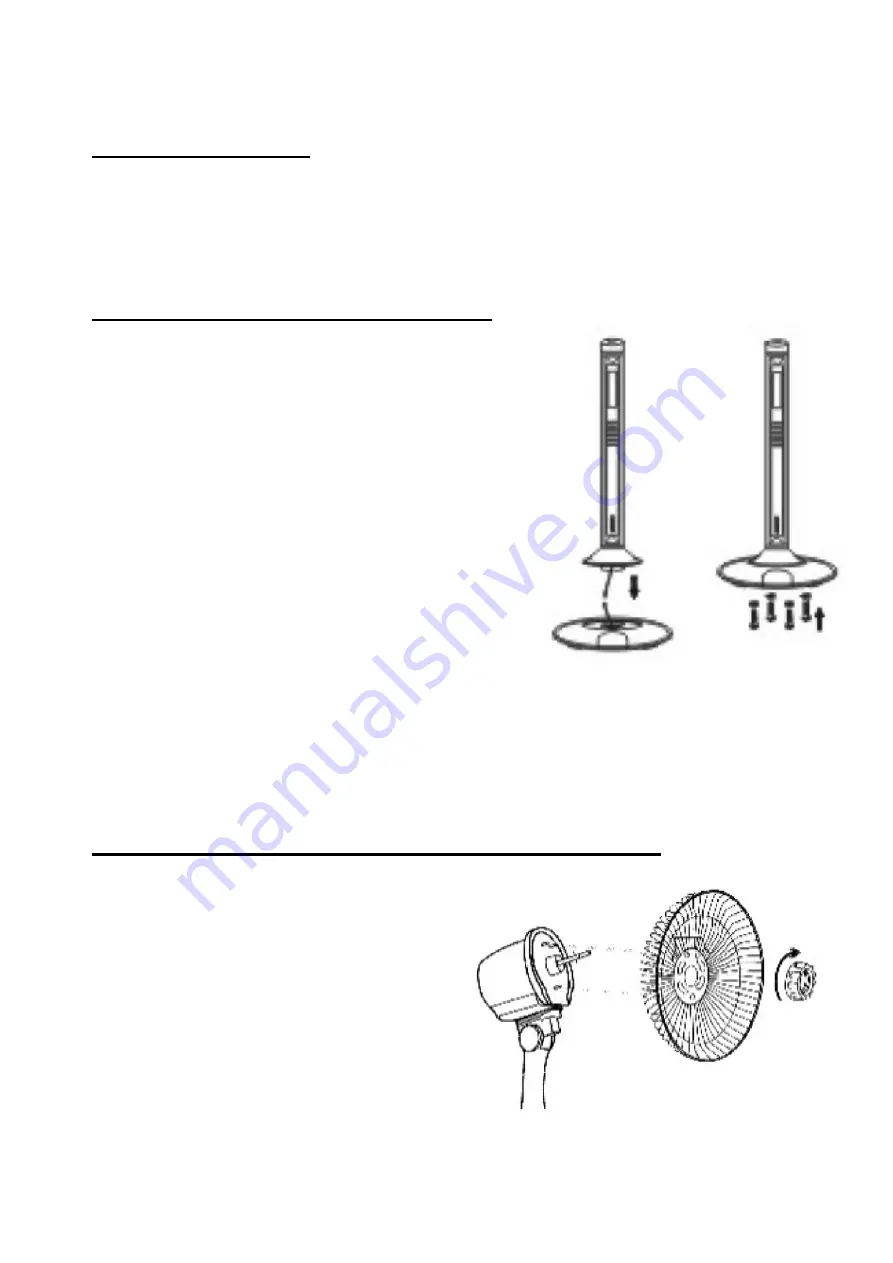
1. opbouwen van de basisstandaard   

 Schuif eerst de decoratiering en 

vervolgens de decoratieve voetkap op  
hun plaats over de onderzijde van de 
basisstandaard. 

  Verbind het stekkertje dat uit de basis-

standaard komt met het stopcontactje 
dat uit de voet komt. 

  Steek vervolgens de basisstandaard in 

de voet. 

  Gebruik 4 ringetjes en schroeven om 

standaard en voet aaneen te 
bevestigen (zie tekening). 

  Draai de draaischroef op de basisstandaard los (maar niet 

helemaal uit de standaard!) , trek vervolgens de instelbare 
standaard omhoog tot de gewenste hoogte en zet hem daarop 
vast met de draaischroef. 


2. bevestiging van het beschermrooster achterzijde 

 Draai het kapje van het 

vinnenblad met de klok mee los 
en draai de roostersluiting 
tegen de klok in open. 
Installeer nu het achterste 
beschermrooster door het over 
de drie pennetjes op het motor-
kapje voorzijde te plaatsen. Let 
op: handvat naar boven! 

  Zet het geheel vast door de roostersluiting met de klok mee weer 

vast te draaien.  

Содержание MILANO de LUXE

Страница 1: ...NL Instructieboek GB Manual FR Manuel d instructions MILANO de LUXE Ventilator op standaard met afstandsbediening Fan on standard with remote control Ventilateur sur pied avec télécommande ...

Страница 2: ...the best from your fan it is important to read and understand this manual attentive and in total before use Pay special attention at the safeguards they are in this booklet to protect you and your environment Safe this manual so that you can consult it in the future if necessary RECONNAISSANCE Nous vous remercions d avoir choisi le ventilateur EUROM MILANO de LUXE Vous avez fait là un bon choix No...

Страница 3: ...door slecht functioneren of oververhitting tot gevolg hebben Gebruik de ventilator niet bij té hoge temperaturen boven de 40 niet in ruimtes met een hoge luchtvochtigheid badkamers enz en niet in stoffige ruimtes Gebruik de ventilator niet in ruimtes waar zuren alkali of olie staat opgeslagen Deze materialen kunnen vervormingen of erosie van de materialen en daardoor slecht functioneren veroorzake...

Страница 4: ...nnenblad 7 roostersluiting 8 beschermrooster achterzijde 9 motor as 10 pen 11 motorkap voorzijde 12 motorkap achter 13 verbinding 14 afstandsbediening 15 hals 16 instelbare standaard 17 kap basisstandaard 18 controlepaneel 19 basisstandaard 20 voet basisstandaard 21 decoratiering 22 decoratieve voetkap 23 aan uit schakelaar ...

Страница 5: ...in de voet Gebruik 4 ringetjes en schroeven om standaard en voet aaneen te bevestigen zie tekening Draai de draaischroef op de basisstandaard los maar niet helemaal uit de standaard trek vervolgens de instelbare standaard omhoog tot de gewenste hoogte en zet hem daarop vast met de draaischroef 2 bevestiging van het beschermrooster achterzijde Draai het kapje van het vinnenblad met de klok mee los ...

Страница 6: ...ct de beide rooster omsluit Druk de transparante roosterclip onderaan de roosterring stevig om het achterrooster en borg de clip met de schroef Om het voorrooster te verwijderen dient u eerst de schroef voor de roosterclip los te draaien en dan de clip te openen Drijf nu handmatig het voorste en het achterste rooster uit elkaar links en rechts gelijktijdig te beginnen onderaan bij de clip AFSTANDS...

Страница 7: ...em de batterijen er dan uit DISPLAY Het display toont de ingestelde functies Bovenaan is een elektronische thermometer geïnstalleerd Zodra de ventilator wordt ingeschakeld toont die de kamertemperatuur met een maximale afwijking van 2 De thermometer kan temperaturen van 0 C tot 40 C weergeven BEDIENINGSPANEEL Alle functies van de ventilator zijn zowel met de afstandsbediening als met de knoppen va...

Страница 8: ...nelheid die een natuurlijk windeffect benadert De ventilator wisselt zwakke middelmatige en sterkere windstoten af Door gelijktijdig met de SPEED knop de snelheid te verhogen of te verlagen zijn van deze functie ook drie varianten in te stellen zwakke gemiddelde en sterke natuurlijke wind Drukt u nogmaals op de MODE knop dan schakelt de ventilator over op SLEEP de slaapstand die d m v de SPEED kno...

Страница 9: ...ntilator uitschakelen en dan pas de stekker uit het stopcontact nemen SCHOONMAAK EN ONDERHOUD Schakel de ventilator uit en neem de stekker uit het stopcontact wanneer u hem wilt reinigen of onderhoud wilt uitvoeren De ventilator vraag alleen wat algemeen uitwendig onderhoud Stof hem regelmatig af met een zachte doek of plumeau of zuig hem schoon met een zacht stofzuigerborsteltje Is hij erg vuil o...

Страница 10: ...ich wellicht fijne braampjes rond het vinnenblad bevinden Controleer of het vinnenblad misschien een vervorming van het beschermrooster raakt Waarschuwing Reparaties dienen door daarvoor opgeleide monteurs te worden uitgevoerd Dat geldt ook voor vervanging of reparatie van de elektrokabel en de stekker Vraag bij reparatie altijd om originele onderdelen In het apparaat aangebrachte wijzigingen en o...

Страница 11: ...therwise the motor will stall and operate abnormally Please do not use the fan at high temperature above 40 C and high humidity area shower rooms and dusty areas Do not use the fan at the place where acid alkali or oil is stored otherwise the above conditions will cause deformation and malfunctions Do not use the fan in a room where inflammable explosive or gaseous materials are stored A sparkle f...

Страница 12: ...lade cap 6 Fan blade 7 Guard lock 8 Rear guard 9 Motor shaft 10 Pillar 11 Front motor cover 12 Rear motor cover 13 Connector 14 Remote controller 15 Neck 16 Adjustable stand 17 Upper corer 18 Control panel 19 Base stand 20 Base plate 21 Decorative ring 22 Decorative base cap 23 Switch ...

Страница 13: ...f the base Insert the fan into the base Use four pieces of cushions fixing base and base stand Unscrew the turn screw on the base stand a little not in total and pull out the adjustable stand as far as you want Fasten it by tightening the turnscew again 2 assembly of the rear guard Draw out the blade cap clockwise and take out the guard lock anti clockwise and then install the rearguard by positio...

Страница 14: ...ircles perfect the both gurads Close the transparent guard clip under the front guard ring and lock the locking screw To remove the front guard you have to open at first the screw then open the guard clip Pat the right and left part of the guards at the same time with your hands to start at the downside at the clip THE REMOTE CONTROL Battery assembly instruction 1 Open the cover of battery compart...

Страница 15: ...is left unused for a long time DISPLAY The display shows the functions which have been set Above the icons an electronic thermometer is installed As soon as the power is switched on it will show the indoor temperature The tolerance is about 2 The electronic thermometer can show the range of temperature from 0 C to 40 C CONTROL PANEL All function of the fan can be set by the remote control as well ...

Страница 16: ...three variants of this mode weak middle and strong natural wind By pressing the MODE button another time you change to the SLEEP mode which you by the SPEED button also can set in three variants sleep mode high SPEED on high MODE on SLEEP The first 30 minutes the fan will produce strong natural wind after that 30 minutes a middle natural wind and than it switches to weak natural wind till the fan ...

Страница 17: ...VICE Always switch off and unplug the fan before you clean it or do some service The fan only needs some general external maintenance Remove dust with a soft cloth or use a vacuum cleaner with a soft brush Is the fan very dirty then you can open the front guard and wipe the blades and guards with a damp not wet cloth and a soft kitchen detergent Then wipe it dry and let the fan dry very good befor...

Страница 18: ... the rotor pin Check or there are fine burrs around the fan blade Check or the blade touches a deformation of the guards Warning Repairs should be done by authorized service personnel also repairs or replacing of the electric cable and plug Ask always for the original spare parts Alternations carried out at the equipment and repairs not carried out by authorized people do expire the guarantee and ...

Страница 19: ...u une surchauffe N utilisez pas le ventilateur en cas de température trop élevée au dessus de 40 de même que dans des locaux où règne une forte humidité salle de bain etc et pas non plus dans des locaux poussiéreux N utilisez pas le ventilateur dans des locaux où sont entreposés des acides des bases ou de l huile Ces produits peuvent occasionner des déformations ou de l érosion des matériaux et pr...

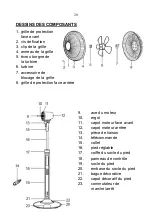
Страница 20: ...e de blocage de la grille 8 grille de protection face arrière 9 axe du moteur 10 ergot 11 capot moteur face avant 12 capot moteur arrière 13 pièce de liaison 14 télécommande 15 collet 16 pied réglable 17 coiffe du socle du pied 18 panneau de contrôle 19 socle du pied 20 embase du socle du pied 21 bague décorative 22 capot décoratif du pied 23 commutateur de marche arrêt ...

Страница 21: ...n embase voir le dessin Desserrez le manchon vissé en haut du socle du pied mais sans le détacher complètement faites ensuite sortir la partie réglable du pied jusqu à atteindre la hauteur souhaitée et bloquez la à cet endroit en revissant le manchon 2 fixation de la partie arrière de la grille de protection Faites tourner l écrou borgne de la turbine dans le sens des aiguilles d une montre et ouv...

Страница 22: ...précision autour de la grille arrière au moyen des cales incorporées et contrôlez que la bague enserre exactement les deux grilles Enfoncez fermement le clip transparent de la grille par dessous l anneau de celle ci autour de la grille arrière et assurez le clip avec la vis Pour enlever la grille avant il vous faudra d abord desserrer la vis du clip de grille et ensuite ouvrir le clip Séparez main...

Страница 23: ...ant de la laisser tomber Si vous restez longtemps sans utiliser le télécommande enlevez en les piles AFFICHEUR L afficheur montre les fonctions engagées Un thermomètre électronique est installé à la partie supérieure Dès que le ventilateur est enclenché celui ci indique la température de la pièce avec un écart de 2 Le thermomètre peut indiquer des températures de 0 C jusqu à 40 C LE PANNEAU DE COM...

Страница 24: ...lateur qui se rapproche de l effet d un vent naturel Le ventilateur opère les changements entre bouffée de vent faible moyenne et forte En augmentant ou diminuant en même temps la vitesse au moyen du bouton SPEED il y a aussi trois variantes à régler avec cette fonction vent naturel faible moyen ou fort Si vous pressez encore une fois sur le bouton MODE le ventilateur passe en SLEEP la position de...

Страница 25: ...nière fonction utilisée à l exception du timer et des fonctions de position de veille Attention Mettre toujours d abord le ventilateur à l arrêt et ensuite retirer la fiche hors de la prise NETTOYAGE ET ENTRETIEN Arrêtez le ventilateur et retirez la fiche hors de la prise lorsque vous voulez le nettoyer ou procéder à l entretien Le ventilateur n a besoin que d un entretien général extérieur Epouss...

Страница 26: ... soit entièrement en ligne avec l ergot rotatif Vérifiez s il n y aurait pas peut être des ébarbures autour de la turbine Vérifiez si la turbine ne touche pas éventuellement une déformation de la grille de protection Avertissement Les réparations doivent être effectuées par des monteurs formés à cet effet Cela vaut aussi pour le remplacement ou la réparation du cordon électrique et de la fiche En ...

Страница 27: ... Fan on standard Ventilateur sur pied In overeenstemming is met de eisen van de EMC Directive 2006 95 EC en de Low Voltage Directive 2006 95 EC Complies with the requirements of the EMC Directive 2006 95 EC and the Low Voltage Directive 2006 95 EC Est conforme aux exigences de la Directive EMC et de la Directive Basse Tension Testnormen Test standards standards EN 55014 1 2006 EN 55014 2 1997 A1 E...

Страница 28: ...28 EUROMAC BV Kokosstraat 20 8281 JC Genemuiden tel 038 3854321 fax 038 3856464 e mail info euromac nl www euromac nl ...

Отзывы: