background image

110

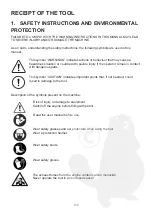
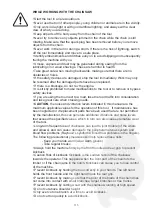
Open flames prohibited.

Smoking prohibited.

Flammable. Never fill the fuel tank in an enclosed space or during operation. 

Allow the engine to cool for 2 minutes before topping up fuel.

Add oil to the oil tank to lubricate the chain.

Hot surface. Do not touch the exhaust or engine components until they have 

cooled down.

Stop the engine.

Guaranteed sound power level

Speed

CE: Meets the requirements of European safety directives.

The safety devices on the tool must NOT be removed or modified.

Do not dispose with household waste

Содержание CN-38

Страница 1: ...ower Chainsaw 38 cm3 CN 38 XGSCN38 Gebruikershandleiding zorgvuldig lezen en op een veilige plaats bewaren 3 Notice de montage et informations lire et conserver 38 Gebrauchsanleitung sorgf ltig lesen...

Страница 2: ...2...

Страница 3: ...TIES EN OMGEVING 5 2 PRODUCTOMSCHRIJVING 13 3 MONTAGEHANDLEIDING 14 INSTRUCTIES VOOR GEBRUIK EN ONDERHOUD 18 1 GEBRUIKSINSTRUCTIES 18 2 ZORG EN ONDERHOUD 25 TECHNISCHE HULP 31 1 PROBLEMEN EN OPLOSSING...

Страница 4: ...l en een veiligheidsgreep die hem in staat stelt het apparaat te starten en te stoppen zonder zichzelf daarbij te verwonden Zonder de aanwezigheid van een bediener die beide bedieningselementen tegeli...

Страница 5: ...e zeer ernstig letsel kunnen veroorzaken Dit AANDACHT symbool geeft de belangrijke punten aan die kunnen leiden tot de schade aan uw apparaat als u deze niet respecteert Omschrijving van de symbolen a...

Страница 6: ...ten afkoelen voordat u tankt Voeg motorolie toe Hete zone Raak uitlaatsystemen of motor niet aan voordat deze zijn afgekoeld Motor stoppen Gegarandeerd geluidsvermogenniveau Toerental CE voldoet aan d...

Страница 7: ...sel Kettingoliereservoir Bedien de machine steeds met twee handen Zet de rem in de voorwaartse positie om het draaien van de ketting te stoppen Zet de rem in de achterste positie om de ketting vrij te...

Страница 8: ...moet u extra voorzichtig zijn omdat onderdelen eruit kunnen worden gegooid Gebruik de kettingzaag nooit als het regent en nooit bij slecht zicht Stel het apparaat niet bloot aan regen Gebruik het appa...

Страница 9: ...te hoeveelheden olie en benzine in een jerrycan volgens de aanbevolen verhouding en meng alles door middel van schudden Schud de jerrycan een minuut lang Zorg ervoor dat de brandstoftank en jerrycan g...

Страница 10: ...egen spanen en rondvliegend materiaal Ter bescherming tegen het geluid van het apparaat dient u gehoorbescherming of oordopjes te dragen Draag kleding en beschermingsmiddelen in overeenstemming met de...

Страница 11: ...wijderen of buiten werking te stellen Als u het apparaat op een weg gebruikt wees u dan bewust van het verkeer en kijk goed uit voordat u een weg oversteekt LET OP de in deze handleiding aangegeven ge...

Страница 12: ...en omklemd Positioneer uw lichaam en armen zodanig dat ze bestand zijn tegen de krachten van een terugslag Het is mogelijk dat het gebruik van dit apparaat wordt beperkt door lokale en nationale voors...

Страница 13: ...r toegang tot de luchtfilter 7 Vergrendelen van de gasgeef functie 8 Handvat 9 Gashendel 10 Start Stop schakelaar 11 Olietank 12 Brandstoftank 13 Aanpassing luchttoevoer 14 Instellen stationair 15 Wer...

Страница 14: ...an de verpakkingsonderdelen door Controleer de verpakking grondig om er zeker van te zijn dat er geen vervangende onderdelen samen met de verpakking worden weggegooid Controleer of het product in goed...

Страница 15: ...15 Deze machine is deels geassembleerd De volgende onderdelen dienen aanwezig te zijn bij het uit de doos halen...

Страница 16: ...daarvoor bestemde plaats op de motoreenheid Plaats de bout van de kettingspanschroef d tegenover het gat b 3 Positioneer de ketting op de kettinggeleider Let op de richting van de ketting Positioneer...

Страница 17: ...17 Denk eraan om de toestand en spanning van de ketting regelmatig te controleren Denk eraan de ketting regelmatig na te spannen...

Страница 18: ...art of na een volledige leging van de brandstoftank meerdere malen op de pompbalg van de handbrandstofpomp ook als de balg nog gevuld is met brandstof Stel de motorschakelaar in op positie I 1 Activee...

Страница 19: ...is c Tijdens het gebruiken van de machine Wanneer de motor onmiddellijk na stilstand weer wordt opgestart brengen zij de choke in stand b vertrek positie bezet Hou de zaag stevig met n hand op de voo...

Страница 20: ...an de klok in tot de ketting volledig tot stilstand is gekomen en vervolgens nog eens 1 4 slag in dezelfde richting Als deze afstelling met behulp van schroef T ook bij fijnafstelling niet voldoende i...

Страница 21: ...EL GEMAAKT Wees zeer voorzichtig bij het schudden van het mengsel Doseer de hoeveelheden olie en benzine die moeten worden gemengd Vul een deel van de gedoseerde benzine in een voor brandstof goedgeke...

Страница 22: ...okkeerd is en of de remhendel goed werkt Om de werking van de kettingrem te controleren gaat u als volgt te werk Zet de motor uit Houd het apparaat horizontaal en neem uw hand weg van de voorste houdb...

Страница 23: ...stevig staat Wees bijzonder alert bij het werken op een helling Selecteer de valrichting van de boom afhankelijk van de windsituatie Het is belangrijk dat de bediener op de plaats van gebruik veilig...

Страница 24: ...cht bij het zagen maar begeleid de ketting Als u het apparaat for ceert kan het beschadigd raken waardoor de ketting en de kettinggeleider zich in de tak vast klemmen Als de ketting en de kettinggelei...

Страница 25: ...r aan Als u afzonderlijke onderdelen wilt vervangen gebruik dan uitsluitend onderdelen die door de fabrikant zijn goedgekeurd Draag tijdens reinigings of onderhoudswerkzaamheden geschikte kleding en b...

Страница 26: ...het hout dringen evenals de grootte van de geproduceerde spanen Een te grote diepte zorgt voor terugslag terwijl een te geringe diepte de spaanafmetingen en de zaageffici ntie vermindert Kettingschake...

Страница 27: ...r 30 op het platte deel van de tand en oefen een stevige druk uit door de vijl naar de voorste hoek van de tand te verplaatsen Maak een paar vijlbewegingen voor elke tand beginnend met alle linkertand...

Страница 28: ...or de kettingspanningsschroef met de klok mee te draaien Zorg ervoor dat de ketting langs de kettinggeleider op zijn plaats blijft 6 Til het uiteinde van de kettinggeleider op om de speling tussen ket...

Страница 29: ...deren Reinig het filter met benzine of vervang het indien nodig Zet het filter weer terug Let er bij het verwijderen van het filter op dat er geen vezels of stof in de opening terecht kunnen komen HET...

Страница 30: ...gen niet worden gerepareerd Neem contact op met de klantenservice om originele onderdelen te bestellen welke een volledige pasvorm en veiligheid garanderen Neem voor alle afstellings en onderhoudswerk...

Страница 31: ...maken en terugplaatsen 3 Contact opnemen met een gespecialiseerde monteur Brandstoffilter verstopt storing in de carburateur ontsteking defect klep geblokkeerd Vervanging of reparatie MOTOR DRAAIT NIE...

Страница 32: ...troleren De ketting is beschadigd of zit te los in de geleider Ketting vervangen of deze op de kettinggeleider vastdraaien INEFFICI NT ZAGEN MOGELIJKE OORZAKEN OPLOSSINGEN Toestand van de ketting cont...

Страница 33: ...anderd Bij elke wijziging aan het apparaat vervalt de garantie Het volgende valt niet onder de garantie De gevallen van niet naleving van de instructies in deze handleiding met betrekking tot het gebr...

Страница 34: ...34 3 TECHNISCHE GEGEVENS Uitgeklapte tekening van het product met nummering van de afzonderlijke onderdelen...

Страница 35: ...ieningsplaats volgens ISO norm 22868 104 9 dB A A gewogen geluidsvermogensniveau volgens ISO norm 22868 111 8 dB A Meetonzekerheid 3 dB A Gegarandeerd geluidsvermogensniveau 113 dB A Maximale equivale...

Страница 36: ...GLIN ZLA 12 45 507P HAOYU HY JL9D 0 050 45 1 27 0 050 9 52 3 8 ZHONGLIN ZLA 14 52 507P HAOYU HY JL9D 0 050 52 1 27 0 050 9 52 3 8 ZHONGLIN ZLA 16 56 507P HAOYU HY JL9D 0 050 56 1 27 0 050 9 52 3 8 ORE...

Страница 37: ...37...

Страница 38: ...IRONNEMENT 40 2 DESCRIPTIF DU PRODUIT 48 3 GUIDE DE MONTAGE 49 NOTICE D UTILISATION ET DE MAINTENANCE 52 1 CONSIGNES D UTILISATION 52 2 ENTRETIEN ET MAINTENANCE 59 SUPPORT TECHNIQUE 65 1 PROBL MES ET...

Страница 39: ...mains L op rateur dispose d une poign e de s curit et d une poign e de maintien lui permettant de mettre en route et d arr ter l appareil afin d viter de se blesser Cet appareil ne peut fonctionner sa...

Страница 40: ...engendrer des blessures tr s graves Ce symbole ATTENTION indique les points importants pouvant conduire la d t rioration de votre appareil si vous ne les respectez pas Description des symboles pr sent...

Страница 41: ...nt de refaire le plein Ajouter de l huile moteur Zone chaude Ne pas toucher les syst mes des gaz d chappement ou le moteur avant qu ils aient refroidi Moteur l arr t Puissance acoustique garantie Vite...

Страница 42: ...ange R servoir d huile pour la cha ne Toujours tenir l appareil des deux mains Mettre le frein en position avant pour arr ter la rotation de la cha ne Mettre le frein en position arri re pour rel cher...

Страница 43: ...s et la capacit de d cision Manipulation du carburant et de l huile Ne pas fumer proximit de l appareil Utiliser un entonnoir pour verser le carburant ou l huile dans le r servoir de l appareil Si de...

Страница 44: ...et de l essence Mesurer la quantit d huile et d essence en suivant le ratio recommand dans un r cipient adapt l essence et agiter Agiter pendant 1 min Veiller bien refermer le r servoir essence et le...

Страница 45: ...de protection Porter des v tements et quipements de protection r glementaires Porter des chaussures ad quates avec garniture anti coupures semelle antid rapante et calotte en acier Porter une visi re...

Страница 46: ...ation et du trafic et tre extr mement prudent avant de traverser une voie emprunt e pas des automobilistes ATTENTION le niveau de bruit et de vibrations indiqu sur ce manuel sont des valeurs maximales...

Страница 47: ...entations locales et nationales limitent l utilisation de cet appareil Protection de l environnement Cet appareil a t livr dans un emballage garantissant sa non d t rioration pendant le transport Ne p...

Страница 48: ...ge de la commande d acc l rateur 8 Poign e arri re 9 G chette d acc l rateur 10 Interrupteur Marche Arr t 11 R servoir d huile 12 R servoir d essence 13 Vis de r glage du d but d air 14 Vis de r glage...

Страница 49: ...riel d emballage et couper tous les liens retenant les pi ces V rifier l emballage consciencieusement pour ne pas perdre d ventuelles pi ces d tach es suppl mentaires V rifier que le produit est en b...

Страница 50: ...50 Cet appareil est partiellement assembl Les pi ces suivantes doivent tre pr sentes la sortie du carton...

Страница 51: ...a tension de cha ne d en face de l orifice b 3 Positionner la cha ne sur le guide cha ne Faire attention au sens de la cha ne Mettre les dents vers l ext rieur Sens du mouvement des dents 4 Remettre l...

Страница 52: ...che r servoir compl tement vid Enfoncer plusieurs fois le soufflet de la pompe d amor age manuelle m me si le soufflet est encore rempli de carburant Mettre l interrupteur marche arr t du moteur en po...

Страница 53: ...chaud DEPART c Quand l appareil a d j t allum COURSE Lorsque l appareil est red marr directement apr s un arr t Mettre le starter dans la position b avec l embrayage en position de d part Tenir d une...

Страница 54: ...le sens inverse des aiguilles d une montre jusqu ce que la cha nes arr te puis ex cuter encore1 4 de tour dans le m me sens Si le r glage de la vis T ne suffit pas en agissant avec finesse tourner la...

Страница 55: ...L ESSENCE Faire tr s attention lors de l agitation du m lange Mesurer les quantit s d huile et d essence m langer Mettre une partie de la quantit d essence mesur e dans un r cipient propre et pouvant...

Страница 56: ...e fonctionne correctement pour des questions de s curit Afin de v rifier que le frein de cha ne fonctionne faire les tapes suivantes teindre le moteur Tenir l appareil horizontalement enlever la main...

Страница 57: ...o l op rateur est stable sur ses pieds Faire une entaille de coupe n 1 dans le tiers de la largeur du tronc Faire un trait d abattage n 2 au cot oppos l entaille de coupe et la direction d abattage de...

Страница 58: ...ous de la pi ce de bois couper puis terminer la coupe par le dessus Ne jamais forcer la coupe accompagner la cha ne Si la coupe est forc e cela peut potentiellement d grader l appareil la cha ne et le...

Страница 59: ...t toyage ou de maintenance est r alis e En cas de changement de composants utiliser uniquement les quipements approuv s pas le fabricant de la machine Porter des v tements appropri s et des gants pour...

Страница 60: ...a profondeur de p n tration de la cha ne dans le bois et la taille des copeaux qui en r sultent Une profondeur trop importante favorise le rebond A l inverse une profondeur trop faible diminue la tail...

Страница 61: ...me vers le coin avant de la dent Effectuer le retour de la lime sans tre en contact avec la dent Effectuer quelques coups de lime pour chaque dent en commen ant par toutes les dents gauches Proc der e...

Страница 62: ...ion dans le sens des aiguilles d une montre tout en s assurant que la cha ne demeure dans son logement le long du guide cha ne 6 Soulever l extr mit du guide cha ne pour v rifier le jeu entre la cha n...

Страница 63: ...iltre n 1 de l orifice de remplissage Laver le filtre avec de l essence ou le remplacer avec un nouveau si besoin Remettre en place le filtre carburant Lors du retrait du filtre faire attention ne pas...

Страница 64: ...ces sont us es ou endommag es Les pi ces endommag es ne doivent pas tre r par es S adresser au service apr s vente pour obtenir les pi ces de rechange d origine vous garantissant une conformit et une...

Страница 65: ...aller la bougie 3 Prenez contact avec un m canicien sp cialiste Filtre essence obstru d faut de fonctionnement du carburateur d faut de foncti onnement d allumage valve coinc e Remplacer ou r parer LE...

Страница 66: ...ha ne est endommag e ou sa fixation sur son support est l che Remplacer la cha ne ou res serrer la cha ne sur le guide cha ne LA COUPE N EST PAS EFFI CACE CAUSES POSSIBLES SOLUTIONS V rifier l tat de...

Страница 67: ...odifier l appareil Toute modification de l appareil entra ne la suppression de la garantie La garantie ne couvre pas Les cas de non respect des conditions d utilisation d entretien de maintenance et d...

Страница 68: ...68 3 CARACT RISTIQUES TECHNIQUES Vue clat e du produit et num rotation des pi ces...

Страница 69: ...ssion pond r e A ou quiva lent au poste de l op rateur d termin conform ment la norme ISO 22868 104 9 dB A Niveau de puissance acoustique pond r A d termin conform ment la norme ISO 22868 111 8 dB A A...

Страница 70: ...e Jaug KETTING STEEK Marque R f rence Marque R f rence mm in mm in 38CC ZHONGLIN ZLA 12 45 507P HAOYU HY JL9D 0 050 45 1 27 0 050 9 52 3 8 ZHONGLIN ZLA 14 52 507P HAOYU HY JL9D 0 050 52 1 27 0 050 9 5...

Страница 71: ...71...

Страница 72: ...TSHINWEISE UND UMWELTSCHUTZ 74 2 PRODUKTBESCHREIBUNG 82 3 MONTAGEANLEITUNG 83 ANDWENDUNGS UND WARTUNGSANLEITUNG 87 1 ANWENDUNGSHINWEISE 87 2 PFLEGE UND WARTUNG 93 TECHNISCHE HILFE 99 1 PROBLEME UND L...

Страница 73: ...einen Halteb gel sowie einen Sicherheitsgriff durch welche er die Maschine starten und stoppen kann ohne sich dabei zu verletzen Ohne Anwesenheit einer Bedienperson die gleichzeitige beide Bedienelem...

Страница 74: ...ef hrlichen Teilen zu schweren Verletzungen f hren k nnen Dieses Symbol VORSICHT weist auf wichtige Punkte hin durch welche das Ger t bei Nichtbeachtung zerst rt werden kann Beschreibung der auf der M...

Страница 75: ...Kraftstoff einf llen Geben Sie l zum Schmieren der Kette hinzu Hei er Bereich Die Teile des Auspuffs und des Motors nicht anfassen bevor diese abgek hlt sind Stoppen des Motors Garantierter Schalleis...

Страница 76: ...h ltank f r die Kette Das Ger t mit beiden H nden festhalten Die Bremse in die vordere Position bringen um die Drehung der Kette zu stoppen Durch die hintere Position der Bremse wird diese freifgegebe...

Страница 77: ...besondere Vorsicht geboten da Teile herausgeschleudert werden k nnen Die Motors ge niemals bei Regen einsetzen und niemals bei schlechter Sicht Das Ger t nicht dem Regen aussetzen Das Ger t nicht inne...

Страница 78: ...ichen Mengen l und Benzin in einen f r Kraftstoff geeigneten Kanister gem dem empfohlenen Verh ltnis und mischen Sie das Ganze durch Sch tteln Sch tteln Sie den Kanister eine Minute lang Achten Sie da...

Страница 79: ...dem L rm der Maschine tragen Sie bitte einen Kapselgeh rschutz oder Ohrst psel Tragen sie Kleidung und Schutzvorrichtungen gem Vorschrift Tragen sie passende Sicherheitsschuhe mit Schnittschutz Belag...

Страница 80: ...den Motor nicht beschleunigen Es ist strengsten untersagt nderungen am Ger t vorzunehmen und haupts chlich die Schutzvorrichtungen zu entfernen oder unwirksam zu machen Wenn Sie das Ger t an einer Str...

Страница 81: ...ten Halten Sie die Kettens ge fest mit beiden H nden wobei die Griffe des Ger tes durch Daumen und Finger umschlungen werden Positionieren Sie Ihren K rper und Ihre Arme so dass Sie den Kr ften eines...

Страница 82: ...ng zum Luftfilter 7 Verriegelung der Beschleuniger funktion 8 Griff hinten 9 Beschleunigerhebel 10 Start Stopp Schalter 11 ltank 12 Kraftstofftank 13 Einstellschraube Luftzufuhr 14 Einstellschraube Le...

Страница 83: ...das gesamte Verpackungsmaterial und schneiden Sie die Befestigungen der Verpackungsteile durch Pr fen Sie die Verpackung eingehend damit keine eventuell darin enthaltenen Zusatzteile verloren gehen V...

Страница 84: ...ilweise zusammengebaut Beim ffnen des Karton m ssen folgende Teile vorhanden sein Tragen Sie passende Schutzkleidung f r die Handhabung der Werkzeuge Seien Sie vorsichtig hinsichtlich der scharfen Kan...

Страница 85: ...pannschraube d gegen ber der Bohrung b ein 3 Positionieren sie die Kette auf die Kettenf hrung Achten Sie auf die Richtung der Kette Positionieren Sie die Z hne nach au en 4 Befestigen Sie die Kettena...

Страница 86: ...86 Denken Sie daran den Zustand und die Spannung der Kette regelm ig zu berpr fen Denken Sie daran die Kette regelm ig festzuziehen...

Страница 87: ...rheitsbremse Beim ersten Start oder nach einer vollst ndigen Entleerung des Kraftstofftanks dr cken sie mehrmals den Pumpenbalg der Kraftstoffhandpumpe selbst wenn der Balg noch mit Kraftstoff gef llt...

Страница 88: ...STARTEN c Bei laufender Maschine IM BETRIEB Wenn das Ger t unmittelbar nach einem Abschalten erneut gestartet Bewegen um die Drossel in der Position b mit der Kupplung in der Startposition Halten Sie...

Страница 89: ...Stillstand gekommen ist und dann noch eine weitere 1 4 Umdrehung in die gleiche Richtung Wenn diese Einstellung mittels Schraube T auch bei feiner Justierung nicht ausreicht dann drehen sie die Gemis...

Страница 90: ...GEMISCH HERGESTELLT Seien Sie sehr vorsichtig wenn Sie das Gemisch sch tteln Dosieren Sie die zu mischenden Mengen l und Benzin F llen Sie einen Teil des dosierten Benzins in einen f r Kraftstoff zuge...

Страница 91: ...lich Sicherheit korrekt funktioniert Zum berpr fen der Kettenbremsen Funktion gehen Sie in folgenden Schritten vor Machen Sie den Motor aus Halten Sie das Ger t waagerecht und nehmen Sie Ihre Hand weg...

Страница 92: ...1 die ein Drittel der Breite des Stammes ausmacht Machen Sie den Fallschnitt Nr 2 auf der von der Kerbe und der Fallrichtung entgegengesetzten Seite des Baumes Nr 3 Benachrichtigen Sie Ihre Nachbarsch...

Страница 93: ...eiden Sie dann von oben Niemals beim Schnitt berm ige Kraft anwenden vielmehr die Kette begleiten Wenn Sie forcieren kann das Ger t Schaden nehmen was dann die Kette und die Kettenf hrung im Ast verkl...

Страница 94: ...et sind Wenn Sie Einzelteile austauschen wollen nehmen Sie ausschlie lich Teile die vom Hersteller zugelassen wurden Tragen Sie bei Reinigungs oder Wartungsarbeiten geeignete Kleidung und Schutzhandsc...

Страница 95: ...efe des Eintauchens der Kettenmesser in das Holz bestimmt sowie die Gr e der entstehenden Sp ne Eine zu gro e Tiefe beg nstigt ein R ckschlagen w hrend eine zu geringe Tiefe die Sp ne verkleinert und...

Страница 96: ...schieben sie diese dann mit gutem Druck in Richtung der vorderen Zahn Ecke Beim Zur ckziehen der Feile soll diese keinen Kontakt zum Zahn zu haben F hren Sie einige Feilbewegungen f r jeden der Z hne...

Страница 97: ...e Kettenspannungsschraube im Uhrzeigersinn drehen Achten Sie darauf dass dabei die Kette in deren Aufnahme l ngs der Kettenf hrung bleibt 6 Heben Sie das Ende der Kettenf hrung an um das Spiel zwische...

Страница 98: ...alls erforderlich Setzen Sie den Filter wieder ein Achten Sei beim Herausnehmen des Filters darauf dass keine Fasern und kein Staub in die ffnung gelangen k nnen DER KRAFTSTOFFFILTER berwachen Sie die...

Страница 99: ...d rfen nicht instand gesetzt werden Wenden Sie sich an den Kundendienst von um Original Teile zu erhalten die eine vollst ndige Passgenauigkeit und Sicherheit gew hrleisten F r alle Einstell und Wartu...

Страница 100: ...rze trocknen und er neut einsetzen 3 Sich an einen spezialisier ten Mechaniker wenden Kraftstofffilter verstopft Fehler im Vergaser Z ndung defekt Ventil eingeklemmt Austauschen oder Instandset zen MO...

Страница 101: ...De Kette ist besch digt oder lose auf deren Halterung befestigt Austauschen der Kette bzw Festziehen derselben auf der Kettenf hrung UNEFFIZIENTER SCHNITT M GLICHE URSACHEN L SUNGEN Zustand der Kette...

Страница 102: ...urch jede nderung am Ger t erlischt die Gew hrleistung Folgendes wird durch die Gew hrleistung nicht abgedeckt Die F lle der Nicht Einhaltung der in diesem Handbuch aufgef hrten Hinweise bez glich Geb...

Страница 103: ...103 3 TECHNISCHE DATEN Explosionszeichnung des Produktes mit Nummerierung der Einzelteile...

Страница 104: ...enplatz gem der Norm ISO 22868 104 9 dB A A bewerteter Schalleistungspegel gem der Norm ISO 22868 111 8 dB A Messunsicherheit 3 dB A Garantierter Schalleistungspegel 113 dB A H chster quivalenter Gesa...

Страница 105: ...HONGLIN ZLA 12 45 507P HAOYU HY JL9D 0 050 45 1 27 0 050 9 52 3 8 ZHONGLIN ZLA 14 52 507P HAOYU HY JL9D 0 050 52 1 27 0 050 9 52 3 8 ZHONGLIN ZLA 16 56 507P HAOYU HY JL9D 0 050 56 1 27 0 050 9 52 3 8...

Страница 106: ...106...

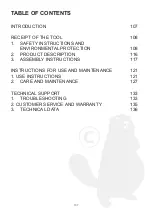
Страница 107: ...NS AND ENVIRONMENTAL PROTECTION 108 2 PRODUCT DESCRIPTION 116 3 ASSEMBLY INSTRUCTIONS 117 INSTRUCTIONS FOR USE AND MAINTENANCE 121 1 USE INSTRUCTIONS 121 2 CARE AND MAINTENANCE 127 TECHNICAL SUPPORT 1...

Страница 108: ...tor has a handle and safety throttle that they can use to start and stop the machine without risk of injury The machine cannot run without the operator present to actuate both controls simultaneously...

Страница 109: ...r could lead to severe injury if the operator comes in contact with dangerous parts This symbol CAUTION indicates important points that if not heeded could result in damage to the tool Description of...

Страница 110: ...before topping up fuel Add oil to the oil tank to lubricate the chain Hot surface Do not touch the exhaust or engine components until they have cooled down Stop the engine Guaranteed sound power level...

Страница 111: ...or the engine mixture Chain oil reservoir Always hold the tool with both hands Move the brake into the front position to stop the chain rotating Moving the brake to rear the position releases it Lengt...

Страница 112: ...ol When cutting small branches great care must be taken as parts may be ejected Do not use the chain saw in the rain or in conditions of poor visibility Do not expose the tool to rain Do not use the t...

Страница 113: ...l the required quantities of oil and petrol into a can specifically designed for petrol according to the recommended ratio and shake it to mix it all Shake the can for one minute Make sure that the fu...

Страница 114: ...of the machine please wear ear defenders or earplugs Wear clothes and protective equipment according to regulations Wear suitable safety boots with a cut protection coating non slip sole and steel to...

Страница 115: ...the noise and vibration levels indicated in this manual are the maximum applicable values for the operation of this tool If maintenance has been neglected or if replacement parts have been used that...

Страница 116: ...regulations ENVIRONMENTAL PROTECTION This tool has been supplied in packaging which is intended to protect it during transport Do not dispose of the packaging before you have checked that the tool is...

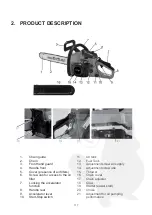
Страница 117: ...for access to the air filter 7 Locking the accelerator function 8 Handle rear 9 Accelerator lever 10 Start Stop switch 11 Oil tank 12 Fuel Tank 13 Adjustment screw air supply 14 Adjustment screw idle...

Страница 118: ...the packaging and cut any fastenings holding the packaging together Check the packaging thoroughly to make sure you have not missed any additional parts Check that the product is in good condition If...

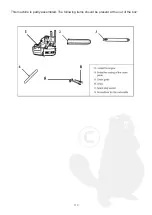
Страница 119: ...119 This machine is partly assembled The following items should be present at the out of the box...

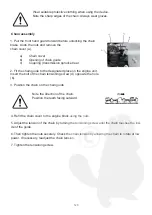
Страница 120: ...nated place on the engine unit Insert the bolt of the chain tensioning screw d opposite the hole b 3 Position the chain on the chain guide Note the direction of the chain Position the teeth facing out...

Страница 121: ...121 Remember to check the condition and tension of the chain at regular intervals Remember to tighten the chain at regular intervals...

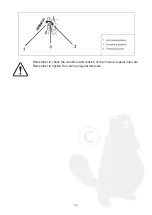
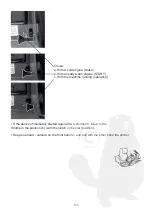
Страница 122: ...When starting the tool for the first time or after the fuel tank has been completely emptied press the pump bellows of the manual fuel pump several times even if there is still fuel in the bellows Ac...

Страница 123: ...ne START c With the machine running operating If the device immediately started again after a shutdown Move to the throttle in the position b with the clutch in the start position Keep one hand camera...

Страница 124: ...T anti clockwise until the chain stops then turn it a further 1 4 turn in the same direction If this adjustment using screw T is not sufficient even with fine adjustment turn the idling mixture adjust...

Страница 125: ...which could damage the tool HOW DO YOU CREATE THE OIL PETROL MIXTURE Take great care when shaking the mixture Dose the quantities of oil and petrol to be mixed Fill part of the dosed petrol into a de...

Страница 126: ...e lever is working properly and safely To check the functioning of the chain brake proceed as follows Switch off the engine Hold the tool horizontally and take your hand off the front handle Touch the...

Страница 127: ...unk Make a felling cut No 2 in the tree on the opposite side to the notch and in the direction of fall No 3 Inform your neighbours in advance if you are planning to cut down a tree or cut back branche...

Страница 128: ...al machine specifications First make a cut from the bottom and then a cut from the top Never apply excessive force when cutting simply guide the chain If you force it this may damage the tool which in...

Страница 129: ...aning or maintenance work is complete If you want to replace individual parts only use parts that have been approved by the manufacturer Wear suitable clothing and protective gloves for the cleaning o...

Страница 130: ...f the chain blade into the wood as well as the size of the resulting chips Too high a depth stop increases the risk of backlash while a low depth to reduce the wood chips and reduces the cutting effic...

Страница 131: ...t of the tooth and apply firm pressure by the file to the front corner of the tooth to be moved Take a couple of strokes for each tooth starting with any teeth left Follow the same steps for all the r...

Страница 132: ...ing the chain tensioning screw clockwise Make sure that the chain stays lengthwise to the chain guide in its slot 6 Lift the end of the chain guide to check the play between the chain and guide 7 Rele...

Страница 133: ...rom the filling opening Clean the filter with petrol or replace it if necessary Refit the filter When removing the filter make sure that no fibres or dust can get into the opening FUEL FILTER Monitor...

Страница 134: ...rts are worn or damaged Damaged parts must not be repaired Contact Customer Service to obtain original replacement parts which guarantee absolute safety and fit exactly For any adjustment or maintenan...

Страница 135: ...spark plug engine flooded Dry the spark plug and insert again 3 Contact a specialist mechanic Fuel filter clogged fault in carburettor ignition defective valve jammed etc Replace or repair ENGINE DOES...

Страница 136: ...ion of the chain The chain is damaged or loosely attached to its support Replace the chain or tighten it on the chain guide INEFFICIENT CUT POSSIBLE CAUSES SOLUTIONS Check the condition of the chain C...

Страница 137: ...to the tool The warranty is invalidated if modifications are made to the tool The following is not covered by the warranty In case of non compliance with the instructions listed in this manual concer...

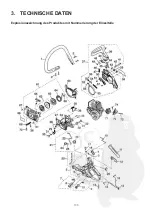
Страница 138: ...138 3 TECHNICAL DATA Exploded diagram of the product with individual parts numbered...

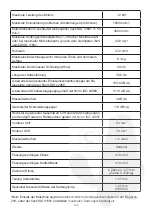
Страница 139: ...e rating site in accordance with standard ISO 22868 104 9 dB A A weighted sound power level in accordance with standard ISO 22868 111 8 dB A Measurement uncertainty 3 dB A Guaranteed sound power level...

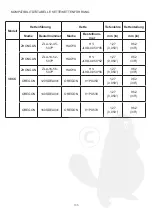
Страница 140: ...NGLIN ZLA 12 45 507P HAOYU HY JL9D 0 050 45 1 27 0 050 9 52 3 8 ZHONGLIN ZLA 14 52 507P HAOYU HY JL9D 0 050 52 1 27 0 050 9 52 3 8 ZHONGLIN ZLA 16 56 507P HAOYU HY JL9D 0 050 56 1 27 0 050 9 52 3 8 OR...

Страница 141: ......

Страница 142: ...142...

Страница 143: ...143...

Страница 144: ...IMPORTED BY EUROGARDEN NV SA SINT TRUIDENSESTEENWEG 252 3300 TIENEN BELGIUM info eurogaren be www eurogarden be...

Отзывы: