


These operating instructions are a publication by Conrad Electronic SE, Klaus-Conrad-Str. 1,
D-92240 Hirschau (www.conrad.com). All rights including translation reserved. Reproduction by
any method, e.g. photocopy, microfi lming, or the capture in electronic data processing systems
require the prior written approval by the editor. Reprinting, also in part, is prohibited. These ope-
rating instructions represent the technical status at the time of printing. Changes in technology
and equipment reserved.
© Copyright 2013 by Conrad Electronic SE.
The reception attempt for the daily automatic synchronisation with the DCF time is
done several times a day. One successful reception per day is suffi cient to keep the
deviation to less than one second.
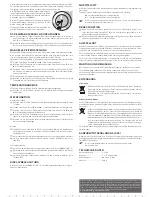
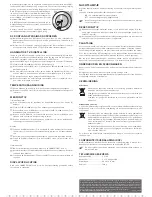
The DCF signal is transmitted via a transmitter in
1500 km
2000 km
Mainfl ingen (near Frankfurt am Main). Its range is up
to 1,500 km and, under ideal reception conditions,
even up to 2,000 km.
Among other things, the DCF signal includes the pre-
cise time (theoretical deviation of 1 second in a million
years!) and the date.
Naturally, this also eliminates the hassle of manually
setting summer and winter time.
TO MAKE A DCF RECEPTION ATTEMPT
-
To perform a manual search for the DCF signal (e.g., if you have placed the radio
alarm clock in a different location), press the RCC button (9) for three seconds.
-
This will start a new reception attempt. Then, as described above, wait for a few
minutes until the current time is displayed.
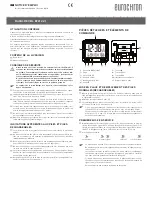
SETTING THE TIME MANUALLY
If no DCF reception is possible, the time setting may also be performed manually.
However, the clock keeps searching for the DCF signal several times a day, and auto-
matically adjusts to the DCF time after a successful reception.
-
Press and hold the CLOCK button (3) until the year (2) fl ashes.
-
Set the year with the buttons
F
(6) and
S
(7).
-
Press the CLOCK button (3) again and set the month with the button
F
(6) and
S
(7).
-
Proceed as described above to set the date, the time format (12/24 h), the hours,
the minutes, the seconds and the language for the calendar day display.
-
The weekday display is set automatically.
-
After completion of the settings press the CLOCK button (3) or wait 30 seconds
to save the settings.
TEMPERATURE DISPLAY
-
The room temperature is displayed on the bottom right of the display (2).
-
Press the RCC button (9) briefl y to toggle the unit for the temperature display.
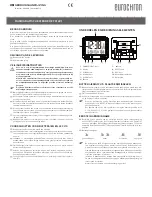
ALARM FUNCTION
Setting the alarm:
-
Press and hold the ALARM button (4) until the alarm time fl ashes on the bottom
left of the display (2).
-
Set the hours for the alarm time with the buttons
F
(6) and
S
(7).
-
Press the ALARM button (4) again and set the minute display of the alarm time
with the buttons
F
(6) and
S
(7).
-
Press the ALARM button (4) or wait for 30 seconds to save your settings and
return to the normal display.
-
Press the ALARM button (4) in normal operating mode briefl y to display the
alarm time for several seconds.
Alarm modes:
-
Move the ALARM switch (5) to the ON position, to activate the alarm function. A
corresponding symbol and the set alarm time will be indicated on the display (2).
-
The alarm sounds at the set alarm time, if the alarm function is activated.
-
To switch the alarm off, move the ALARM switch (5) to the OFF position.
Snooze function:
-
To activate the snooze function, press the SNOOZE/LIGHT (1) button.
-
The alarm is repeated up to fi ve times in fi ve-minute intervals. The alarm sounds
for two minutes.
-
To deactivate the alarm function, move the ALARM switch (5) to the OFF position.
DISPLAY LIGHTING
Press the SNOOZE/LIGHT button (1) to turn on the back light for a few seconds.
NIGHT LAMP
With this function, the display light is switched on and strongly dimmed in the dark.
Move the night light switch (10) to the desired position:
ON = the night light function is switched on
OFF = the night light function is switched off
This function consumes more power so that the operating time is reduced if
the device is powered by batteries.
RESET FUNCTION
-
If the device no longer functions or shows meaningless symbols or characters
on the display (2), press the RESET button (8) with a sharp-pointed object (e.g. a
bent paper clip).
-
The device will be reset to factory settings and should work properly again, pro-
vided there is no other error.
LOCATION FOR USE
Select a levelled, fl at and stable location for use. Protect valuable furniture surfaces
by using an appropriate underlay; otherwise, it may cause scratches.
Set up the radio-controlled alarm clock to prevent it from falling.
To ensure correct DCF reception, the radio-controlled alarm clock should not be
placed next to electronic devices, cables, metal parts, etc.
In order for the radio alarm clock to display the correct temperature, do not place it
near heat sources and do not expose it to direct sunlight.
MAINTENANCE AND CLEANING
Apart from replacing the batteries, the product does not require any maintenance
and should never be disassembled.
Please use a soft, dry, clean cloth for cleaning.
Do not use any chemical cleaning agents, as they can discolour the plastic casing.
DISPOSAL
a) Product
Electronic devices are recyclable waste materials and must not be dis-
posed of in the household waste!
Dispose of an unserviceable product in accordance with the relevant
statutory regulations.
Remove any inserted battery and dispose of it separately from the pro-
duct.
b) Batteries and Rechargeable Batteries
As end user, you are required by law (Battery Regulation) to return used batteries
and rechargeable batteries. Do not dispose of used batteries in the household waste!
Batteries/rechargeable batteries contain harmful materials and are
labelled with the symbol shown to indicate that disposal in the house-
hold waste is forbidden. The symbols of the relevant heavy metals are:
Cd=cadmium, Hg=mercury, Pb=lead (marking can be seen on the bat-
tery/rechargeable battery, e.g. underneath the refuse bin symbol shown
on the left).
You can return your used batteries/rechargeable batteries free of charge
at the offi cial collection points of your community, in our stores, or at
places where batteries or rechargeable batteries are sold!
You thereby fulfi l your statutory obligations and contribute to the protection of the
environment.
DECLARATION OF CONFORMITY (DOC)
The manufacturer hereby declares that this product conforms to the fundamental
requirements and the other relevant regulations of Directive 1999/5/EC.
You can view the conformity declaration for this product at
www.conrad.com.
TECHNICAL DATA
Operating voltage: ...................... 3 V/DC
Batteries: ...................................... 2 x 1.5 V AA/Mignon
Dimensions: ................................. 96 x 81 x 32 mm
Weight: .......................................... 140 g


