Eureka Vacuum System Cleaner Скачать руководство пользователя страница 5

Inlet Valves

Each inlet valve has electrical contacts which activate the power unit motor when the hose is connected and in use. The sys-
tem shuts off as soon as the hose is removed or turned off. 

An obstruction in the inlet valve may cause the power unit to continue to run after the hose is removed from the inlet. Check
all the inlet valves and remove any obstruction to shut down the power unit.

When unplugging the hose from the inlet valve, hold the inlet cover open for a few seconds to allow the suction to decrease
and protect the inner seal.

Message Center Liquid Crystal Display (Some Models)

Performance Indicators - Power unit motor is operating at peak or optimum performance when all five power bars
are illuminated. Normal operating performance is when three to five bars are shown. Fewer bars will be illuminat-
ed as performance decreases. Display will illuminate operating performance of the last operating cycle during sleep
mode. Note: It is normal to see changes in performance when specialty cleaning tools are used. Performance lev-
els will decrease as the filter is loaded with debris or as the motor has significant wear.

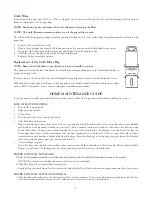
Clean Filter Indicator - The cloth filter installed in the power unit may require occasional cleaning based on the
amount of usage and type of debris vacuumed. The Clean Filter Indicator will light when the power unit senses a
loss in power that will affect cleaning performance. When Clean Filter Indicator is lit, remove and clean filter as
shown in “How to Maintain” section of Owners Manual.

Call for Service Indicator - The Call For Service Indicator will light when the power unit reaches a period in the
life cycle when motor brushes and filter should be checked for wear. Contact your nearest service station/dealer for
proper service to avoid major maintenance costs.

Hours of Service Indicator - The Hours of Service Indicator shows hours of machine usage. When the last bar is
flashing service is urgently required.

HOW TO MAINTAIN

The instructions given in the booklet serve as a guide to routine maintenance. Proper airflow or suction can be maintained
by keeping the dirt receptacle and filter clean and the plastic pipe and hose free from clogs. Check the Home Maintenance
Guide at the end of this booklet for suggestions before calling for service. 

Dirt Receptacle and Filter

Reduced airflow or suction indicates the built-in vacuum system is not operating at maximum efficiency: If the dirt recepta-
cle is full and the filter is clogged, no air can pass through the unit and no cleaning can take place.

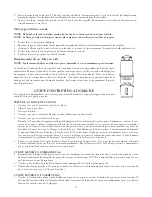
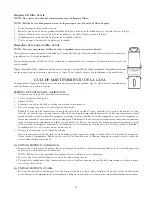
Empty The Dirt Receptacle

NOTE: Disconnect power cord from electrical outlet before removing the dirt receptacle.

Some models feature see-through windows on the receptacle to tell at a glance when the receptacle needs to be emptied; on
other models the receptacle must be removed. To remove the receptacle, grasp the handles and turn the receptacle to the
left. Remove and empty the contents. Return the receptacle and turn to the right. Be sure the receptacle is securely attached
to avoid any suction leakage.

Filter and Disposable Bag

If the disposable paper bag is full or a filter is clogged, no air can pass through the unit and no cleaning will take place.
Remove and dispose of the paper bags.

SOME MODELS FEATURE A DISPOSABLE PAPER FILTER BAG WITH CLOTH FILTER

NOTE: Disconnect power cord from electrical outlet before cleaning the filter.

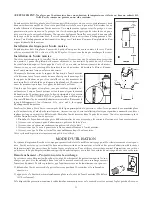
The elbow with the paper bag adapter must be installed, locked in its L slots, in the body facing downward as shown for the paper bag.

1.

Hold the bag collar with fingertips and align the bumps in the adapter with the bump cutouts in the collar.

2.

Insert adapter and push the bag collar all the way up to the lip on the elbow.

3.

Rotate the bag collar 45˚ counter clockwise so the bumps on the adapter

DO NOT align with the collar bump cutouts. Replace the bucket, turn to lock.

4.

To remove, rotate the bag collar 45˚ clockwise and gently lower the collar

off of the bag adapter.

5

Содержание Vacuum System Cleaner

Страница 1: ...Invented for the way you clean TM Owner s manual Manuel du propri taire Manual del propietario Model No de mod le N de modelo Serial No de s rie N de serie...

Страница 2: ...nnect to a properly grounded outlet only refer to Grounding Instructions Do not use extension cords or outlets with inadequate current carrying capacity Turn off all controls before unplugging Do not...

Страница 3: ...ousehold dirt and dust Avoid picking up hard or sharp objects with the system to prevent hose and plastic pipe damage or clogs Service Information The instructions in this booklet serve as a guide to...

Страница 4: ...th the unit on the wall align the power unit intake fitting with the main pipe projecting from the wall and connect these together DO NOT GLUE At this point the utility valve can be installed in the o...

Страница 5: ...of machine usage When the last bar is flashing service is urgently required HOW TO MAINTAIN The instructions given in the booklet serve as a guide to routine maintenance Proper airflow or suction can...

Страница 6: ...TION POWER Be sure lid is on properly Empty dirt receptacle Clean filter Be sure each inlet valve is properly closed Check for hose obstruction Plug hose coupling into any inlet valve Then as you chec...

Страница 7: ...Station or for service information telephone toll free USA 1 800 282 2886 Further Limitations and Exclusions This is the sole and exclusive warranty of The Eureka Company Any warranty that may be impl...

Страница 8: ...is covered for a period of one year 7 YEAR MOTOR AND ELECTRICAL GUARANTEE The electrical components and the motor of your Eureka central vacuum including the carbon brushes will be free from material...

Страница 9: ...la section Instructions de mise la terre N utilisez pas de cordons de rallonge ou de prises dont l intensit de courant admissible est inad quate Mettez toutes les commandes de l appareil arr t avant d...

Страница 10: ...durs ou pointus afin de ne pas bloquer ou endommager le boyau ou la tuyauterie en plastique Information concernant le service Les directives contenues dans ce manuel servent de guide pour l entretien...

Страница 11: ...principale de tuyauterie et raccordez les NE COLLEZ PAS ce point la prise utilitaire peut tre install dans l autre raccord d admission non utilis Raccordez le tuyau d chappement ou silencieux s il y...

Страница 12: ...u une v rification et un entretien appropri s soit faits afin d viter d avoir payer pour des frais d entretien ou de r paration majeurs Indicateur d heures de service L indicateur d heures de service...

Страница 13: ...ettoyez le filtre Assurez vous que le couvercle de chaque prise d admission est bien ferm Assurez vous que rien n obstrue le boyau Branchez le boyau dans n importe quelle prise d admission Puis chacun...

Страница 14: ...ion sont couverts pour une p riode d un an GARANTIE DE 7 ANS SUR LE MOTEUR ET LES COMPOSANTES LECTRIQUES Les composantes lactriques at le moteur de votre syst me central d aspiration Eureka incluant l...

Страница 15: ...lo a un tomacorriente debidamente puesto a tierra consulte las instrucciones para la puesta a tierra No utilice cables de extensi n ni tomacorrientes con una capacidad de corriente incorrecta Apague t...

Страница 16: ...pl stico Informaci n de servicio Las instrucciones que aparecen en este manual sirven como gu a para el mantenimiento de rutina Para m s informaci n p ngase en contacto con el centro de servicio de g...

Страница 17: ...or Ubique los dos cables de bajo voltaje cerca de la tuber a principal y con ctelos al tablero de control de la unidad motriz utilizando los bornes provistos Aseg rese de cumplir con los c digos y reg...

Страница 18: ...adecuado y una aspiraci n adecuada si el recept culo de polvo y el filtro se mantienen limpios y la tuber a de pl stico y la manguera se mantienen libres de obstrucciones Consulte la Gu a de mantenimi...

Страница 19: ...nexi n de la manguera en cualquier v lvula de entrada Luego a medida que revise cada una de las otras v lvulas levante la tapa y ponga la mano sobre la abertura para comprobar la aspiraci n Si hay una...

Страница 20: ...Part 460390 07 07...

Отзывы: