Eureka Vacuum System Cleaner Скачать руководство пользователя страница 3

SAVE THESE INSTRUCTIONS

Grounding Instructions
This appliance must be grounded. If it should malfunction or break down, grounding provides a path of least resistance for
electric current to reduce the risk of electric shock. This appliance is equipped with a cord having an equipment-grounding
conductor and grounding plug. The plug must be plugged into an appropriate outlet that is properly installed and grounded
in accordance with all local codes and ordinances.

DANGER

Improper connection of an equipment-grounding conductor can result in risk
of electric shock. Check with a qualified electrician or service person if you are
in doubt as to whether the outlet is properly grounded. Do not modify the plug
provided with the appliance. If it will not fit the outlet, have a proper outlet
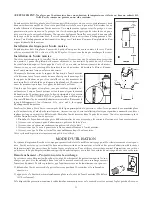
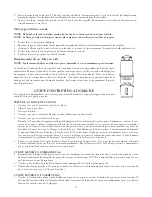
installed by a qualified technician. This appliance is for use on a nominal 120
volt circuit and has a grounding plug that looks like the plug illustrated in
Figure A.

NOTE: In Canada, the use of a temporary adapter is not permitted by the

Canadian Electrical Code.

To reduce the risk of electric shock, the hose with electrical wires has a polarized plug (one blade is wider than the other).
This plug will fit in a polarized outlet only one way. If the plug does not fit fully in the outlet, reverse the plug. If it still does
not fit, contact a qualified electrician to install the proper outlet. Do not change the plug in any way.

GENERAL INFORMATION

The built-in vacuum system is designed for dry pick up of household dirt and dust. Avoid picking up hard or sharp objects
with the system to prevent hose and plastic pipe damage or clogs.

Service Information

The instructions in this booklet serve as a guide to routine maintenance. For additional information, contact your nearest

Authorized Warranty Station.

DO NOT OIL THE MOTOR AT ANY TIME. IT IS PERMANENTLY LUBRICATED AND SEALED.
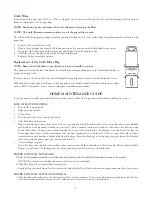
Rating Plate

The model, type and serial numbers are indicated on the rating plate located on the
control panel or motor hood. For prompt and complete service information, always
refer to these numbers when inquiring about service.

PLANNING

If your home already has the system of plastic pipes and inlet valves, you are ready to install the power unit (refer to Install
Power Unit section below). If not, you can contract to have the system installed by a professional or you may choose to do-
it-yourself. If you plan to install the system yourself, it is important to carefully plan the location of each inlet valve, the
power unit, and the network of plastic pipes. This booklet only deals with the installation of the power unit; “How-To” book-
lets are generally included with installation kits. Careful planning will help you determine the installation kits to buy. The
kits should contain enough plastic pipe and fittings, and inlet valves for your needs. Check with your dealer if you have any
questions.

Power Unit Location

NOTE: 

Mount power unit at least 12 inches from the ceiling and any adjacent wall, at least 28 inches from the
floor and within 6ft. of an electrical outlet.

WARNING:

Do not block the hood ventilation openings on the top of the power unit. Lack of ventilation will cause
the motor to overheat.

FIGURE A

3

CV3120D

Содержание Vacuum System Cleaner

Страница 1: ...Invented for the way you clean TM Owner s manual Manuel du propri taire Manual del propietario Model No de mod le N de modelo Serial No de s rie N de serie...

Страница 2: ...nnect to a properly grounded outlet only refer to Grounding Instructions Do not use extension cords or outlets with inadequate current carrying capacity Turn off all controls before unplugging Do not...

Страница 3: ...ousehold dirt and dust Avoid picking up hard or sharp objects with the system to prevent hose and plastic pipe damage or clogs Service Information The instructions in this booklet serve as a guide to...

Страница 4: ...th the unit on the wall align the power unit intake fitting with the main pipe projecting from the wall and connect these together DO NOT GLUE At this point the utility valve can be installed in the o...

Страница 5: ...of machine usage When the last bar is flashing service is urgently required HOW TO MAINTAIN The instructions given in the booklet serve as a guide to routine maintenance Proper airflow or suction can...

Страница 6: ...TION POWER Be sure lid is on properly Empty dirt receptacle Clean filter Be sure each inlet valve is properly closed Check for hose obstruction Plug hose coupling into any inlet valve Then as you chec...

Страница 7: ...Station or for service information telephone toll free USA 1 800 282 2886 Further Limitations and Exclusions This is the sole and exclusive warranty of The Eureka Company Any warranty that may be impl...

Страница 8: ...is covered for a period of one year 7 YEAR MOTOR AND ELECTRICAL GUARANTEE The electrical components and the motor of your Eureka central vacuum including the carbon brushes will be free from material...

Страница 9: ...la section Instructions de mise la terre N utilisez pas de cordons de rallonge ou de prises dont l intensit de courant admissible est inad quate Mettez toutes les commandes de l appareil arr t avant d...

Страница 10: ...durs ou pointus afin de ne pas bloquer ou endommager le boyau ou la tuyauterie en plastique Information concernant le service Les directives contenues dans ce manuel servent de guide pour l entretien...

Страница 11: ...principale de tuyauterie et raccordez les NE COLLEZ PAS ce point la prise utilitaire peut tre install dans l autre raccord d admission non utilis Raccordez le tuyau d chappement ou silencieux s il y...

Страница 12: ...u une v rification et un entretien appropri s soit faits afin d viter d avoir payer pour des frais d entretien ou de r paration majeurs Indicateur d heures de service L indicateur d heures de service...

Страница 13: ...ettoyez le filtre Assurez vous que le couvercle de chaque prise d admission est bien ferm Assurez vous que rien n obstrue le boyau Branchez le boyau dans n importe quelle prise d admission Puis chacun...

Страница 14: ...ion sont couverts pour une p riode d un an GARANTIE DE 7 ANS SUR LE MOTEUR ET LES COMPOSANTES LECTRIQUES Les composantes lactriques at le moteur de votre syst me central d aspiration Eureka incluant l...

Страница 15: ...lo a un tomacorriente debidamente puesto a tierra consulte las instrucciones para la puesta a tierra No utilice cables de extensi n ni tomacorrientes con una capacidad de corriente incorrecta Apague t...

Страница 16: ...pl stico Informaci n de servicio Las instrucciones que aparecen en este manual sirven como gu a para el mantenimiento de rutina Para m s informaci n p ngase en contacto con el centro de servicio de g...

Страница 17: ...or Ubique los dos cables de bajo voltaje cerca de la tuber a principal y con ctelos al tablero de control de la unidad motriz utilizando los bornes provistos Aseg rese de cumplir con los c digos y reg...

Страница 18: ...adecuado y una aspiraci n adecuada si el recept culo de polvo y el filtro se mantienen limpios y la tuber a de pl stico y la manguera se mantienen libres de obstrucciones Consulte la Gu a de mantenimi...

Страница 19: ...nexi n de la manguera en cualquier v lvula de entrada Luego a medida que revise cada una de las otras v lvulas levante la tapa y ponga la mano sobre la abertura para comprobar la aspiraci n Si hay una...

Страница 20: ...Part 460390 07 07...

Отзывы: