background image

8

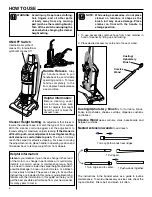
To Clear Blockages in Hose

CAUTION: Turn  off  the  switch  and  unplug  the 

electrical cord before clearing hose.

1.  Firmly pull the end of the hose from the hose retainer on 

the hood of the vacuum.

2.  Check for blockages in the hose and hose retainer. Flexing 

the hose may help loosen any blockage. 

If no blockage 

is found, continue to step 4.


If blockage is found, clear the blockage and replace the 

hose in the hose retainer. 

If the blockage is in the hose 

retainer and cannot be cleared, continue to step 3.

3.  Remove  the  hood  from  the  cleaner  and  check  for  a 

blockage in the brush roll area. Make sure the hose inlet 

is clear.

 If no blockage is found, continue to step 4.

  After the blockage is found and cleared, replace the hood 

on the cleaner.

4.  Twist  the  hose  from  the  coupling  elbow  on  the  back  of 

cleaner. Check for blockages at cleaner opening and in 

hose. If a blockage is found, clear the blockage.

  The  screw  attaching  the  clear  hose  adapter  can  be 

removed for better access to a blockage.

5.  Screw the hose back onto the back of the cleaner and 

replace the other end of the hose into the hose retainer 

on the hood of vacuum.

Hose

Hose 

Retainer

Содержание 2940 Series

Страница 1: ...suggest you record the model type and serial numbers below They are located on the silver rating plate on your cleaner For prompt and complete service information always refer to these numbers when inquiring about service Model Type___________________________ Serial No ______________________________ It is also important to keep your receipt as proof of date of purchase Part No 74149_Rev2 3 05 2005...

Страница 2: ...ve belt Use extra care when cleaning on stairs Do not use to pick up flammable or combustible liquids such as gasoline or use in areas where they may be present Store your cleaner indoors in a cool dry area Keep your work area well lighted Unplug electrical appliances before vacuuming them SAVETHESE INSTRUCTIONS 2 To reduce the risk of electric shock this appliance has a polarized plug one blade is...

Страница 3: ...nto the holes at back of the unit and tighten with a screwdriver 6 Placethehoseontheback of the vacuum wrapping it up and over the hose hook as shown Firmly push the end of the hose into the hose retainer in the hood of the vacuum 7 7 3 3 Pull the electrical cord up to the cord retainer and firmly push down into retainer This will keep the cord out of the way the next time you vacuum Wind the cord ...

Страница 4: ...ust reach the carpet for effective cleaning For ease in moving the adjustment knob place handle in operating position and tilt cleaner back to remove weight from front wheels Helpful Information Before cleaning under low furniture check area first for objects that might harm the unit or block the vacuum hose WARNING Avoid injury Keep loose clothing hair fingers and all other parts of body away from...

Страница 5: ...ew Eureka Upright uses a cyclone system as a primary filter and a secondary or top mounted filter that has been moved outside of the dirt cup This makes emptying the dirt cup much easier and less messy It is normal for this filter to trap fine particles pet hair and carpet fuzz It should be cleaned periodically depending on vacuuming conditions For optimum performance replace it every 12 months Remove...

Страница 6: ...uum cleaner without the dust bag or filter assembly in place Brush Roll The brush roll turns as it sweeps and combs the carpet nap Remove hair and threads from the brush roll so it continues brushing the carpet To maintain the most efficient cleaning the bristles must touch the carpet To test the bristle length hold a ruler against the underneath side of the cleaner If the bristles no longer touch t...

Страница 7: ...on cleaner Replace and tighten two screws 12 Return vacuum to upright position CAUTION Turn off the switch and unplug the electrical cord before periodic maintenance How to Change Light Bulb 1 Lower handle to floor to change lightbulb 2 Remove bottom filter cover and filter see page 6 3 Remove screw from lens cover 4 Pull old light bulb out of socket 5 Push new lightbulb into socket 6 Replace lens co...

Страница 8: ...ot be cleared continue to step 3 3 Remove the hood from the cleaner and check for a blockage in the brush roll area Make sure the hose inlet is clear If no blockage is found continue to step 4 After the blockage is found and cleared replace the hood on the cleaner 4 Twist the hose from the coupling elbow on the back of cleaner Check for blockages at cleaner opening and in hose If a blockage is fou...

Страница 9: ...9 ...

Страница 10: ...ir please include the model type and serial number from the data plate on the cleaner Further Limitations and Exclusions Any warranty that may be implied in connection with your purchase or use of the cleaner including any warranty of Merchantability or any warranty for Fitness For A Particular Purpose is limited to the duration of this warranty Some states do not allow limitations on how long an ...

Страница 11: ... TAX add state tax local taxes as required by law IMPUESTOS agregue impuesto estatal e impuestos locales según exige la ley POSTAGE HANDLING CHARGE within USA 5 50 GASTOS DE ENVÍO dentro de los EE UU T O T A L E N C L O S E D T O T A L I N C L U I D O MODEL TYPE SERIAL NUMBER NUMBER NÚMERO TIPO NÚMERO MODELO SERIE IMPORTANT Be sure to include your model type and serial numbers These numbers may be...

Страница 12: ...include day and evening phone numbers Par la poste Remplissez simplement ce bon de commande Assurez vous de mentionner vos numéros de téléphone jour et soir ONLINE En Ligne www eureka com 74150A 3 05 2005 Electrolux Home Care Products Ltd Printed in China Imprimé aux Chine Check or money order Do not send currency Payable to Electrolux Home Care Products Canada Chèque ou mandat N envoyez pas d esp...

Отзывы: