background image

Vacuum Cleaner G11 Quick Start Guide


· 01

Xiaomi Vacuum Cleaner G11 Guida rapida


· 08

Xiaomi Vacuum Cleaner G11 Guide de démarrage rapide


Xiaomi Vacuum Cleaner G11 Kurzanleitung


Xiaomi Vacuum Cleaner G11 Manual de inicio rápido


· 29

Xiaomi Vacuum Cleaner G11 Guia de iniciação rápida


· 36

Xiaomi Vacuum Cleaner G11 Руководство по началу работы


Xiaomi Vacuum Cleaner G11 Skrócona instrukcja obsługi


· 50

Xiaomi Vacuum Cleaner G11 Hızlı Başlangıç Kılavuzu

· 57

· 43

· 15

· 22

Содержание G11

Страница 1: ...de de d marrage rapide Xiaomi Vacuum Cleaner G11 Kurzanleitung Xiaomi Vacuum Cleaner G11 Manual de inicio r pido 29 Xiaomi Vacuum Cleaner G11 Guia de inicia o r pida 36 Xiaomi Vacuum Cleaner G11 Xiaom...

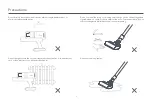
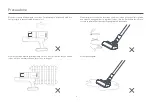
Страница 2: ...ning or smoking substances such as unextinguished cigarette butts or hard or sharp objects like nails To prevent injury do not touch rotating parts while the vacuum cleaner is running Do not vacuum an...

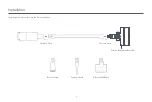
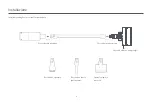
Страница 3: ...2 Installing the Accessories onto the Vacuum Cleaner Installation Click into Place Click into Place Electric Tangle free Brush Bar Brush Nozzle Crevice Nozzle Electric Mite Brush...

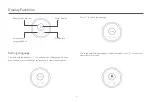
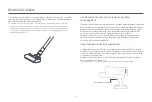
Страница 4: ...e language to select the desired one To use the selected language press and hold the button for 3 seconds or no operation for 5 seconds Press to switch the language Battery Status Indicator Suction Le...

Страница 5: ...press the power button to start the vacuum cleaner Press the power button again to stop it Switching Suction Levels Auto Mode is enabled by default In this mode the vacuum cleaner automatically adjus...

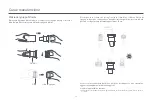
Страница 6: ...n press the dust release button Rotate and remove the dust compartment then clean the sensor area with a soft dry cloth Easy to empty Dust Compartment Cleaning the Dust Sensor Press firmly to close th...

Страница 7: ...ilter and sponge filter under running tap water until clean then set aside all parts to fully dry for at least 24 hours Do not touch the surface of the filter or sponge filter with a brush or sharp ob...

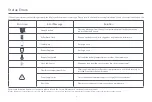
Страница 8: ...ocked Clear any blockages from the dust compartment pre filter filter extension rod brush bar and nozzle Roller Brush Stuck Remove any debris or objects clogged or tangled on the roller brush Low Batt...

Страница 9: ...sostanze che bruciano o fumano ad es mozziconi di sigaretta non spenti n oggetti duri o taglienti ad es chiodi Per evitare lesioni non toccare le parti rotanti quando l aspirapolvere in funzione Non...

Страница 10: ...degli accessori nell aspirapolvere Installazione Far scattare in posizione Far scattare in posizione Spazzola elettrica anti grovigli Bocchetta a spazzola Bocchetta a lancia per fessure Spazzola elet...

Страница 11: ...a desiderata Per usare la lingua selezionata tenere premuto il pulsante per 3 secondi o non eseguire alcuna operazione per 5 secondi Premere per cambiare lingua Indicatore di stato della batteria Puls...

Страница 12: ...accendere l aspirapolvere Per uscire dalla Modalit continua premere il pulsante Abilitare la Modalit continua permette all aspirapolvere di funzionare continuativamente senza dover tenere premuto il p...

Страница 13: ...rimuovere lo scomparto raccogli polvere quindi pulire l area del sensore con un panno morbido e asciutto Scomparto raccogli polvere facile da svuotare Pulizia del sensore di rilevamento delle polveri...

Страница 14: ...spugna sotto acqua corrente fino a quando risultano puliti poi lasciare tutte le parti ad asciugare completamente per almeno 24 ore Non toccare la superficie del filtro o del filtro di spugna con una...

Страница 15: ...mparto polvere dal pre filtro dal filtro dall asta di prolunga dalla barra della spazzola e dalla bocchetta Spazzola a rullo bloccata Rimuovere eventuali residui o oggetti intasati o aggrovigliati sul...

Страница 16: ...mme des m gots de cigarette non teints ni d objets durs et pointus comme des clous Pour viter de vous blesser ne touchez aucune pi ce rotative lorsque l aspirateur est en marche N aspirez pas de liqui...

Страница 17: ...16 Installation des accessoires sur l aspirateur Installation Enclencher Enclencher Barre de brosse motoris e Suceur brosse Suceur fente Brosse anti acarien motoris e...

Страница 18: ...onnez celle d sir e Pour valider la langue s lectionn e maintenez le bouton enfonc Appuyez sur pour changer de langue Voyant d tat de la batterie Bouton du niveau d aspiration de la langue Affichage d...

Страница 19: ...ton pour activer le mode Continu Appuyez ensuite sur le bouton marche arr t pour allumer l appareil Pour quitter le mode Continu appuyez sur le bouton L activation du mode Continu permet l aspirateur...

Страница 20: ...agement Faites pivoter le compartiment poussi re et retirez le puis nettoyez la zone du capteur avec un chiffon doux et sec Compartiment poussi re facile vider Nettoyage du capteur de poussi re Appuye...

Страница 21: ...le filtre ponge l eau claire jusqu ce qu ils soient propres puis mettez les pi ces de c t pour les Ne touchez pas la surface du filtre ou du filtre ponge avec une brosse ou un objet pointu pour viter...

Страница 22: ...se et le suceur ne sont pas obstru s Brosse rotative Retirez tout l ment emm l sur la brosse rotative Batterie faible Rechargez l appareil rapidement Batterie puis e Rechargez l appareil rapidement Ba...

Страница 23: ...n oder rauchenden Gegenst nde wie zum Beispiel gl hende Zigarettenstummel oder harte oder scharfe Gegenst nde wie N gel auf Um Verletzungen zu vermeiden sollten Sie keine rotierenden Teile ber hren w...

Страница 24: ...23 Installation des Zubeh rs am Staubsauger Installation Einrasten lassen Einrasten lassen Verfilzungsfreie elektrische B rstenrolle B rstend se Spaltd se Elektrische Milbenb rste...

Страница 25: ...rn und die gew nschte Sprache auszuw hlen Um die gew hlte Sprache einzustellen die Taste 3 Sekunden lang gedr ckt halten oder 5 Sekunden lang keine Taste bet tigen Dr cken Sie um die Sprache umzuschal...

Страница 26: ...tivieren und dr cken Sie dann die Ein Ausschalttaste um den Staubsauger einzuschalten Um den Dauermodus zu beenden dr cken Sie die Taste Durch die Aktivierung des Dauermodus kann der Staubsauger konti...

Страница 27: ...betaste des Staubbeh lters Drehen und entfernen Sie den Staubbeh lter und reinigen Sie den Sensorbereich mit einem weichen trockenen Tuch Leicht zu entleerender Staubbeh lter Reinigung des Staubsensor...

Страница 28: ...und legen Sie alle Teile mindestens 24 Stunden lang beiseite bis sie vollst ndig getrocknet sind Vermeiden Sie es die Oberfl che des Filters oder des Schwammfilters mit einer B rste oder scharfen Geg...

Страница 29: ...m Verl ngerungsrohr der B rstenrolle und der D se Die B rstenrolle sitzt fest Entfernen Sie alle Verschmutzungen oder Gegenst nde die sich in der B rstenrolle verfangen oder verheddert haben Niedriger...

Страница 30: ...bustibles o humeantes como colillas de cigarrillos encendidas ni objetos duros o afilados como u as Para no sufrir lesiones no toque las piezas giratorias mientras la aspiradora est en funcionamiento...

Страница 31: ...en la aspiradora Instalaci n La boquilla estar conectada al hacer clic La boquilla estar conectada al hacer clic Barra del cepillo el ctrico antienredos Boquilla con cepillo Boquilla para hendiduras C...

Страница 32: ...o Para utilizar el idioma seleccionado mantenga pulsado el bot n durante 3 segundos o no realice ninguna operaci n durante 5 segundos Pulse para cambiar el idioma Indicador del estado de la bater a Bo...

Страница 33: ...lse el bot n de encendido para poner en marcha la aspiradora Para salir del Modo Continuo pulse el bot n Activar el Modo Continuo permite que la aspiradora funcione continuamente sin tener que pulsar...

Страница 34: ...a extraer el polvo Gire y retire el compartimento del polvo y luego limpie la zona del sensor con un pa o suave y seco Compartimento de polvo f cil de vaciar Limpieza del sensor de polvo Presione suav...

Страница 35: ...iltro de esponja con agua del grifo hasta que est n limpios A continuaci n deje que se sequen por completo durante al menos 24 horas No toque la superficie del filtro o de la esponja con un cepillo ni...

Страница 36: ...mpartimento de polvo el prefiltro el filtro la varilla de extensi n la barra del cepillo y la boquilla Cepillo de rodillo atascado Elimine los residuos u objetos obstruidos o enredados en el cepillo d...

Страница 37: ...s ardentes ou que estejam a fumar como beatas de cigarro mal apagadas ou objetos duros e afiados como pregos Para evitar ferimentos n o toque nas pe as rotativas enquanto o aspirador estiver a funcion...

Страница 38: ...37 Instalar os acess rios no aspirador Instala o Clique para encaixar Clique para encaixar Escova el trica antiemaranhamento Bocal com escova Bocal para fissuras Escova el trica de limpeza de caros...

Страница 39: ...rar o idioma pretendido Para utilizar o idioma selecionado mantenha o bot o premido durante 3 segundos ou n o efetue nenhuma opera o durante 5 segundos Prima para alterar o idioma Indicador do estado...

Страница 40: ...e de seguida prima o bot o de alimenta o para ligar o aspirador Prima o bot o para sair do Modo Cont nuo A ativa o do Modo Cont nuo permite que o aspirador funcione continuamente sem ter de manter o...

Страница 41: ...rima o bot o de desbloqueio do p Gire e remova o compartimento do p e de seguida limpe a zona do sensor com um pano suave e seco Compartimento do p de esvaziamento f cil Limpar o sensor do p Prima fir...

Страница 42: ...a corrente at ficarem limpos De seguida coloque todas as pe as de lado para que sequem completamente durante pelo menos 24 horas N o toque na superf cie do filtro ou filtro de esponja com uma escova o...

Страница 43: ...todas as eventuais obstru es no compartimento do p pr filtro filtro cabo de extens o escova e bocal Escova rotativa bloqueada Remova eventuais detritos ou objetos presos ou emaranhados na escova rota...

Страница 44: ...43...

Страница 45: ...44...

Страница 46: ...45 3 5 Auto English English English...

Страница 47: ...46...

Страница 48: ...47...

Страница 49: ...48 24 24h...

Страница 50: ...49...

Страница 51: ...stancji takich jak niegaszone niedopa ki papieros w ani twardych lub ostrych przedmiot w takich jak gwo dzie Aby zapobiec obra eniom nie nale y dotyka obracaj cych si element w podczas pracy odkurzacz...

Страница 52: ...onta akcesori w na odkurzaczu Monta Zatrza ni cie na miejscu Zatrza ni cie na miejscu Szczotka elektryczna zapobiegaj ca pl taniu Dysza ze szczotk Dysza szczelinowa Elektryczna szczotka przeciw roztoc...

Страница 53: ...i j zyk Aby u y wybranego j zyka nale y nacisn i przytrzyma przycisk przez 3 sekundy lub nie wykonywa adnych dzia a przez 5 sekund Nacisn aby zmieni j zyk Wska nik poziomu na adowania akumulatora Przy...

Страница 54: ...w czy odkurzacz Aby wyj z trybu ci g ego nale y nacisn przycisk W czenie trybu ci g ego pozwala na ci g prac odkurzacza bez konieczno ci przytrzymywania przycisku zasilania co zapewnia swobod palc w...

Страница 55: ...pnie nacisn przycisk usuwania kurzu Obr ci i wyj pojemnik na kurz a nast pnie wyczy ci obszar czujnika mi kk such szmatk atwy do opr nienia pojemnik na kurz Czyszczenie czujnika kurzu Nacisn mocno aby...

Страница 56: ...d do czysto ci a nast pnie od o y wszystkie cz ci do ca kowitego wyschni cia na co najmniej 24 godziny Nie dotyka powierzchni filtra ani filtra g bkowego szczotk lub ostrym przedmiotem aby unikn uszko...

Страница 57: ...tra wst pnego filtra przed u enia szczotki i dyszy Wa ek czyszcz cy jest zablokowany Usun wszelkie zanieczyszczenia lub przedmioty zatkane lub zapl tane w wa ek czyszcz cy Niski poziom na adowania Na...

Страница 58: ...ra izmaritleri gibi yanan veya duman t ten maddeleri ya da ivi gibi sert veya keskin nesneleri s p rmeyin Yaralanmalar nlemek i in elektrikli s p rge al rken d nen par alara dokunmay n Herhangi bir s...

Страница 59: ...58 Aksesuarlar Elektrikli S p rgeye Takma Kurulum Yerine Tak n Yerine Tak n Elektrikli Sa Dolanmas n nleyici F r a F r a Ba l Aral k Ba l Elektrikli akar f r as...

Страница 60: ...diller aras nda gezinmek i in d meye bas n Se ili dili kullanmak i in d meyi 3 saniye bas l tutun ya da 5 saniye boyunca i lem yapmay n Dili de i tirmek i in d mesine bas n Pil Durumu G stergesi Emme...

Страница 61: ...apatma d mesine bas n S rekli Moddan kmak i in d meye bas n S rekli Modun etkinle tirilmesi elektrikli s p rgenin a ma kapatma d mesini bas l tutmak zorunda kalmadan s rekli al mas na olanak tan yarak...

Страница 62: ...Ard ndan toz bo altma d mesine bas n Toz haznesini d nd rerek kar n Daha sonra sens r alan n yumu ak kuru bir bezle temizleyin Kolay Bo alt lan Toz Haznesi Toz Sens r n Temizleme Toz haznesini kapatma...

Страница 63: ...emizlenene kadar musluk suyu alt nda durulay n Daha sonra t m par alar en az 24 saat tamamen kurumaya b rak n Zarar g rmemesi i in filtrenin veya s nger filtrenin y zeyine f r a ya da keskin bir cisim...

Страница 64: ...filtre uzatma ubu u f r a ve ba l ktaki t m t kan kl klar temizleyin D ner F r a S k t D ner f r aya tak lan veya dolanan t m birikintileri veya nesneleri kar n Pil Seviyesi D k Bir s re sonra arj edi...

Отзывы: