


2
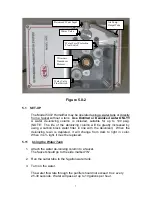
1. Install the ½” NPT x 1” Hose barb on the chamber.
A. Determine the minimum height at which the barb can be installed.
I.
Place the humidifier next to the chamber.
II.
Measure up 6” from the top of the output barb on the
humidifier.
III.
Mark the chamber at that height. That is the minimum height
at which the barb can be installed. Mounting the barb lower
may cause the humidifier to function improperly.
IV.
For a chamber and humidifier placed on the same level
surface, the installation height should be approximately
18”
.
B. Drill a .825” hole at the previously determined location and install the
barb. The threaded portion will go inside the chamber and be held in
place with the ½” NPT nut. The barb will be outside the chamber.
(If the humidifier is being used with an ETS Chamber, the barb is
already installed.)
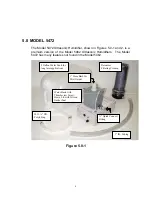
2. Place the humidifier a minimum of 12” away from the chamber.
3. Cut the 1” I.D. tubing to the appropriate length, then slide the tubing over
each 1” barb.
NOTE
Condensation will form inside the transfer tubing when the
humidifier is in use. The condensation must be allowed to drain
back into the humidifier. If there are any slack or dips in the tubing,
water will accumulate and block the airflow.
4. Place the fan inside the chamber.
Direct the airflow toward the humidity sensor. A strong air current will
prevent condensation from forming on the sensor, which will produce false
readings. If there is no AC power in the chamber, it may be necessary to
drill a hole to pass the power cord to the outside (this hole must be sealed
after the cord is installed). The fan can run continuously for all chamber
conditions.


