background image


LS Microscope Startup Manual 2018.7.25 


3.


(

LS620 and LS560 only

).  For almost all fluorescence imaging applications, power from the computer 

via the USB cable to the LS Microscope will be sufficient.  If higher levels of illumination are required, 
e.g., with very dim samples, insert the small round plug of the external power supply/cord into the 
round port labeled 

SUPPLEMENTAL POWER 

on the back of the LS Microscope and the electrical plug 

into an AC outlet.  You should see a moderate increase in the Illumination level.  
   

H.


Phase Contrast 
 

1.


L

S720 only


a.


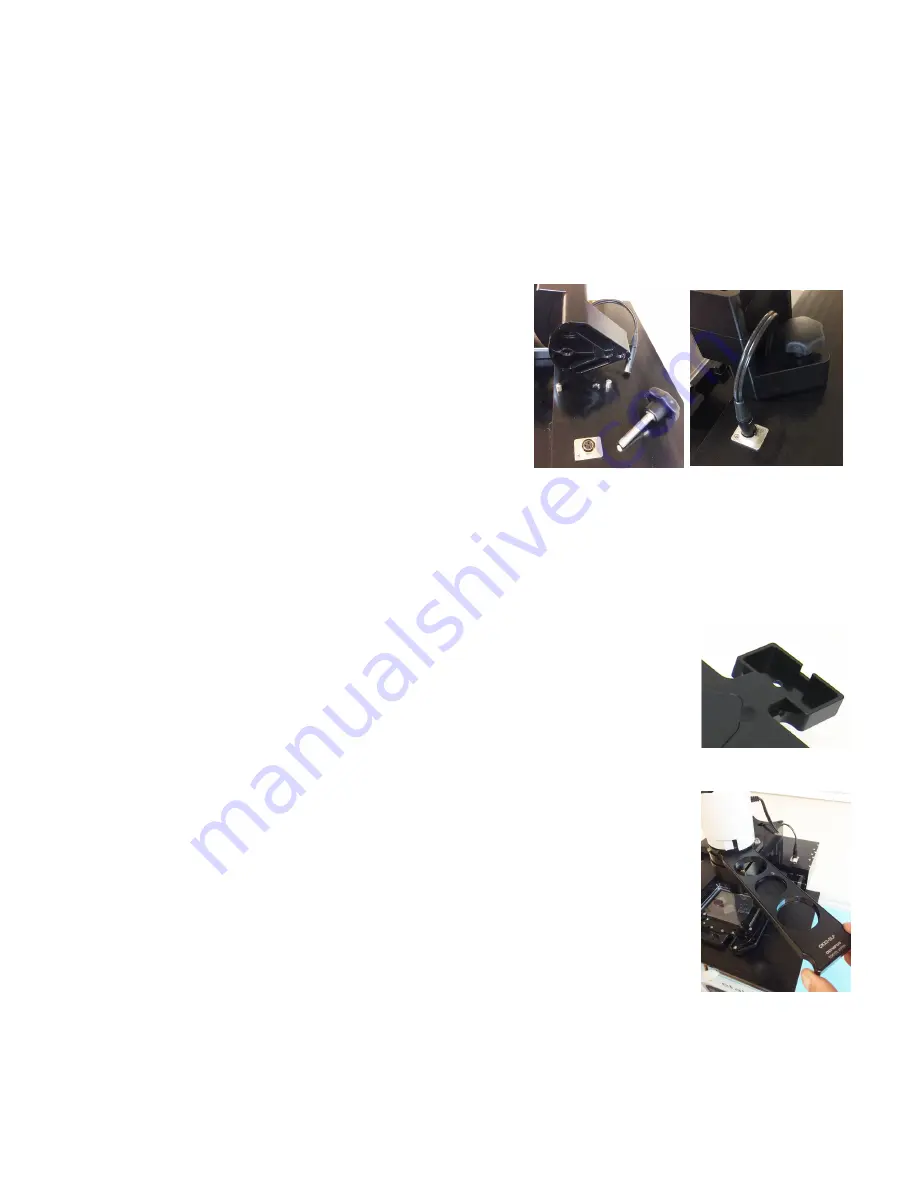
If using the Phase Contrast Accessory LS720 (Phase 
Accessory), remove from its shipping box (save box 
and packing materials).  Attach Phase Accessory by 
placing the holes on the bottom of the Phase 
Accessory arm over the pegs on the upper surface 
(right rear) of the LS720.  Make sure pegs are fully 
seated and arm is totally flush with the LS720 
surface.  Tighten the large thumb screw at the back 
of the Phase Accessory arm.


b.


Connect the free end of the Phase Accessory communication cable to the round port on the LS720 
back panel (left side) labeled External Lamp Power Out.  This allows the Phase Accessory to be 
controlled by Lumaview.  


2.


(

LS620, LS560, LS460 only)


a.


If using the Phase Contrast Accessory LS620/560/460 (Phase Accessory), 
remove from its shipping box (save box and packing materials).  Ensure that 
the Phase Accessory adaptor is attached to the rear tab of the LS 
Microscope Deck.  Attach Phase Accessory by inserting the base of the arm 
into the Phase Accessory adaptor.  Ensure it is fully seated and tighten the 
thumb screw on the bottom of the adaptor. 
 

b.


Connect the free end of the Phase Accessory communication cable to the 
round port on the LS Microscope back panel (left side) labeled External Lamp 
Power Out.  This allows the Phase Accessory to be controlled by Lumaview. 


3.


Insert the phase contrast Slider (pre-centered version included with Phase 
Accessory) into the slot going through the condenser.  Of the 3 positions in the 
Slider, the phase ring is visible and typically present in the middle position.  Any 
open positions can be used for Brightfield. 
 

I.


Brightfield 


1.


For optimal brightfield, use of the Phase Accessory (Section I.H. above) with the included Slider in an 
open position (no phase ring) is recommended.  The Phase Accessory, which provides collimated light, 

Phase Accessory cable 

Phase Accessory arm 
attachment 

Inserting Slider 

Phase Accessory adapter 

Содержание LS460

Страница 1: ...t etaluma com LS620 with Phase Contrast Accessory and Manual XY Stage both optional and ordered separately LS560 LS460 with Phase Contrast Accessory and Manual XY Stage both optional and ordered separately LS720 with Phase Contrast Accessory optional and ordered separately Etaluma Inc www etaluma com Lumaview is the trademark of Etaluma Inc 2009 2018 All rights reserved LS720 LS620 LS600 LS560 LS4...

Страница 2: ...ing Conditions B Launching Lumaview C Initialization and Calibration LS720 only D Instrument Setup E Finding a Live Image With Manual Focus F Focusing Manual on LS720 G Snapping Images H Generating Auto Composite Images I Videos From Time Lapse and Live Video J Setting Up Autofocus LS720 only K Writing and Using Protocols L Creating a Z Map M Editing a Z Map N Tiling Across Locations O Live Video ...

Страница 3: ...communication cable Fluorescence shroud LS560 only External power supply cord with country specific plug LS620 LS560 LS560 only B Optional Accessories purchased separately Phase Contrast Accessory LS720 Olympus Phase Contrast Accessory LS620 LS560 LS460 Olympus Manual XY Stage LS620 LS560 LS460 Labware Holders Holder for 35 mm Petri dishes fits inside Holder for 60 mm Petri dishes Holder for 60 mm...

Страница 4: ... 1 Using the supplied 3 mm hex wrench loosen the 2 set screws on top of the installed shipping lock Loosen the 2 set screws smaller and more internal on bottom of the lock 2 Unscrew completely the 2 larger 1 inch screws on bottom of the shipping lock Slide the shipping lock toward you to remove 3 Keep the 4 set screws screwed into the shipping lock and place in a secure place along with the two 1 ...

Страница 5: ...p Power Out This allows the Phase Accessory to be controlled by Lumaview 2 LS620 LS560 LS460 only a If using the Phase Contrast Accessory LS620 560 460 Phase Accessory remove from its shipping box save box and packing materials Ensure that the Phase Accessory adaptor is attached to the rear tab of the LS Microscope Deck Attach Phase Accessory by inserting the base of the arm into the Phase Accesso...

Страница 6: ...screw in the new objective Do not overtighten Return the removable insert to the deck 3 When installing or changing an objective carry out the insertion quickly to minimize dust falling onto the mirrored dichroic filter A small amount of dust will not affect imaging However if dust is significant and it appears to affect quality of the live image or snapped images contact Etaluma by email support ...

Страница 7: ...n unrecognized App appears click Run anyway You will be asked about the location note that the default is a new Etaluma folder inside the Program Files x86 folder During installation a Device Driver Installation Wizard will open Click to continue twice and finish installing the two drivers Installation of Lumaview will then finish After installation a Lumaview shortcut orange circle icon convenien...

Страница 8: ...ding out the shelf Place the computer to be used on a flat and stable surface near to the incubator and within the 3 M USB cable provided WARNING Do not extend the USB cable or use another USB cable other than that supplied particularly a longer one as communication issues will arise 3 LS620 LS560 and LS460 Place the sample on the microscope adjust focus and close the incubator door Check the focu...

Страница 9: ... AC outlet and fluorescence shroud is available if imaging involves fluorescence B Launching Lumaview 1 Launch the Lumaview software from the desktop icon or other chosen location and allow the LS Microscope to be discovered This may take a minute or so the first time Two windows will open on your monitor a Live Image Window inside the larger Main Window Live Image Window will be in the title bar ...

Страница 10: ...ng if a 4x objective has been installed Click Yes and the communication dialog box will close c The Live Image Window will now show red crosshairs and the microplate carrier will move so well A1 is close to being over the objective d Click the Manual Image icon in the left tool bar top icon to open its dialog box e To use ambient light for calibration recommended see Section I I check Brightfield ...

Страница 11: ... version to make sure it is the most recently posted version on the Etaluma website www etaluma com products downloads Ensure that the LS Microscope being used is checked If it is necessary to change the LS Microscope model number that is checked you will be prompted to restart the program Be sure to restart so that all functions work correctly 3 Click the Objective button to open its dialog box c...

Страница 12: ...Composites folder Check Individual Channel Folders to have images from multiple channels in a Protocol saved in separate folders e g for compiling time lapse videos in single channels 8 Of the next 6 features listed on the left check those desired a Time date label will be displayed in the lower left corner of each image b Hot pixel removal Check if desired and then complete Instrument Setup To st...

Страница 13: ...les in the labware If desired move dialog boxes to the sides of the Live Image Window If closed and then reopened they will open in the same locations prior to closing However when Lumaview is closed the dialog box positions will not be saved 3 LS720 only Select a desired XY location in a sample labware using one of two options in Manual XYZ a Use the X Y Move arrows and Step size arrows if needed...

Страница 14: ...y tone is seen in Live Image Window 6 For phase contrast using the Phase Contrast Accessory use appropriate Slider phase ring for objective Section I H check Brightfield in Manual Image and turn the phase condenser iris on front of condenser to the left to the fully open position Turn Exposure and Gain to very low Increase Illumination until a mid gray tone is seen in the Live Image Window F Manua...

Страница 15: ...p the image If the Zoom function was used to focus the image captured will include the entire field of view FOV observable with the Zoom off If Click sound for manual image snap was checked in Instrument Setup Section II D a shutter like sound occurs when each image is snapped 2 If Manual image autosave was checked in Instrument Setup images will be saved automatically using the time based numberi...

Страница 16: ...s are snapped click the Last File icon in the Left Tool Bar lowest icon The folder containing the individual images plus the Composite image will open I Live Video Manual 1 When a desired field has been illuminated and focused in Live Image Window click the Video Record icon in the Left Tool Bar fifth from the top to open its dialog box Select parameters requested and also those in Instrument Setu...

Страница 17: ...time sec will also be shown 5 If autofocus did not result in a sharp live image make sure the Center position transferred was correct In general if autofocus consistently uses the full Max focus time the range is too great for the time entered or the time is insufficient It may be necessary to decrease the Focus range and or increase the Max focus time 6 Upon successful autofocus move to other loc...

Страница 18: ...ialog box will open asking if you want to save the current Protocol If Yes click OK 4 If not previously saved enter the new desired Protocol name in the Filename field and click OK Or click on an existing File name to overwrite and a File Overwrite Alert will open click Yes You are now ready to create a new Protocol 5 On the Information tab if you enter User Notes they will become part of the new ...

Страница 19: ...ed to individual folders for each location Check Save to folders named for wells If you prefer images to go to one folder uncheck the box In Instrument Setup you may also choose the setting that saves images according to channel Section II D 10 LS720 only Click on the Focus Settings button to open its dialog box There are 4 options to set up focus in a Protocol a Manual Focus Uncheck both Use Auto...

Страница 20: ...brightfield and red channel images select at least the brightfield channel for focus Autofocus will occur in the brightfield channel and then remain at that level to capture the red channel image If you want the red channel to also be focusing select both the brightfield and red channels M Creating a Z Map 1 Load desired labware with samples into labware carrier 2 Find a Live Image in a location a...

Страница 21: ...ts dialog box A representative Location will be shown 2 Select the number of tiles desired using the drop down menu The tile grid will then appear superimposed over the location based on the objective to be used and the location dimensions Select the tiles to be imaged by clicking each individually or Select all The tile number and tiles selected will apply to all locations to be imaged in the Pro...

Страница 22: ...r toward front un l end of travel If carrier overhangs the deck change step size to 0 5 mm and move back un l there is no overhang Repeat for side posi oning by se7ng step size of 10 mm and moving carrier to le8 un l end of travel Change step size to 5 5 mm and press le8 arrow one me to move carrier slightly right 3 Slide shipping lock into posi on at front of deck just le8 of the Deck Knob Fig 1 ...

Страница 23: ... to Control Panel Programs Features right click on the Lumaview file and select Uninstall A8er uninstall is completed verify that the Lumaview folder is now gone from the C Program Files x86 Etaluma folder You are now ready to install the new version of Lumaview ...

Страница 24: ...dium hypochlorite diluted to 10 with water for a broad spectrum of an microbial ac vity Because of its oxidizing power bleach loses potency quickly and should be made fresh and used within the same day Allow to remain in contact for 10 min Bleach is corrosive to stainless steel and must be wiped away using sterile wa ter Exposure to Hydrogen Peroxide Vapor HPV If the incubator to be used has on bo...

Страница 25: ... hidden devices Verify that libusbK Usb Devices is present in the list 3 If libusbK Usb Devices is not present in the list you will need to reinstall the current version of Lumaview From the download loca on on your computer e g in the Downloads folder double click the Lumaview_v file to start the install The Lumaview Setup Wizard dialog box will open select Repair Lumaview720 and click Finish The ...

Страница 26: ...og box that appears select Let me pick from a list of device drivers on my computer as shown in Fig 6 10 The next dialog box that appears will show the choices for the hard ware devices Fig 7 The Show compa ble hardware box should be checked Select 600 Series Lumascope and click Next Windows should now install the LS Microscope driver over the conflic ng driv er 11 When installa on is complete disc...

Страница 27: ...6 Appendix E Lumaview Folder File Organiza on ...

Страница 28: ...k parameters such as format type in Instrument Setup Sec on II D Enter the Full Path informa on and check Add me stamp label if de sired Images captured will be saved to the folder shown this can be changed e g to a new subfolder set up within the Video folder 3 Click OK and image capture will begin To stop image capture click the Record Video icon in the Le8 Tool Bar again 4 To compile the images...

Страница 29: ... se7ng and make sure it is set to disabled Press Apply to save then OK B Connec on SeBngs Network connec on NOT required Disconnect the Ethernet cable if wired connec on is used and turn on Airplane Mode Navigate to Se7ngs Network Internet Airplane Mode le8 side ON Or click on the Wi Fi icon on your Tool bar and click the Airplane Mode bu on Airplane Mode will prevent all wireless communica ons Wi...

Отзывы: