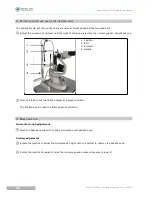
With:
N°
D
ESCRIPTION
1
Work tabletop
2
Joystick: Incline joystick to move the instrument slightly on the horizontal surface and rotate
it to adjust the elevation of the microscope.
3
Brightness control knob: Avoid working continuously at high brightness or the service life of
the bulb will be shortened.
4
Base locking screw: The base will be locked when fastening this screw.
5
Illumination arm locking knob: When locking the screw, the illumination system and checking
system were connected, when loosing it the illumination system can be used separately.
6
The mark line on the ring of the microscope arm.
Together with (7) to indicate the angle between the microscope and illumination unit.
SL300L / SL400L - Slit lamp microscope > V2 - 03-2018
16
U
SER
MANUAL
> III. N
OMENCLATURE
Содержание SL 300
Страница 1: ...www essilor instruments com User manual...
Страница 4: ...I INTRODUCTION...
Страница 8: ...II SAFETY AND PRECAUTIONS...
Страница 13: ...III NOMENCLATURE...
Страница 16: ...IV ASSEMBLY...
Страница 24: ...V OPERATION PROCEDURES...
Страница 30: ...VI CLEANING...
Страница 33: ...VII MAINTENANCE...
Страница 36: ...VIII TROUBLESHOOTING GUIDE...
Страница 38: ...IX APPENDIX...
Страница 39: ...Electrical circle drawing SL300L SL400L Slit lamp microscope V2 03 2018 44 USER MANUAL IX APPENDIX...


