Bedienungsanleitunguser manual Mode d’emploiGebruiksaanwijzing
DigiMicro Mobile
DM mobile4lg.indd 1
26.02.2013 10:04:03
Страница 1: ...Bedienungsanleitung user manual Mode d emploi Gebruiksaanwijzing DigiMicro Mobile DM mobile4lg indd 1 26 02 2013 10 04 03...
Страница 2: ...mit Computer verbinden 19 Software 19 Zusatzhinweise 23 Hinweis zu der Vergr erungsangaben 24 Standfu montieren 25 Technische Daten 26 CE Erkl rung 25 Umweltgerechte Entsorgung 25 Serviceinformation 2...
Страница 3: ...ationen harten St en lassen Sie es nicht fallen und sch tteln Sie es nicht Setzen Sie das Ger t keinen hohen Temperaturen ber 60 C und starken Temperatur schwankungen aus Sch tzen Sie es vor direkter...
Страница 4: ...ergleichbarer AMD Prozessor 100 MB freier Festplattenspeicher min 32MB RAM empfohlen sind 512 MB RAM 24 Bit Farb Videokarte freie USB 2 0 Schnittstelle CD ROM Laufwerk Lieferumfang DigiMicro Mobile St...
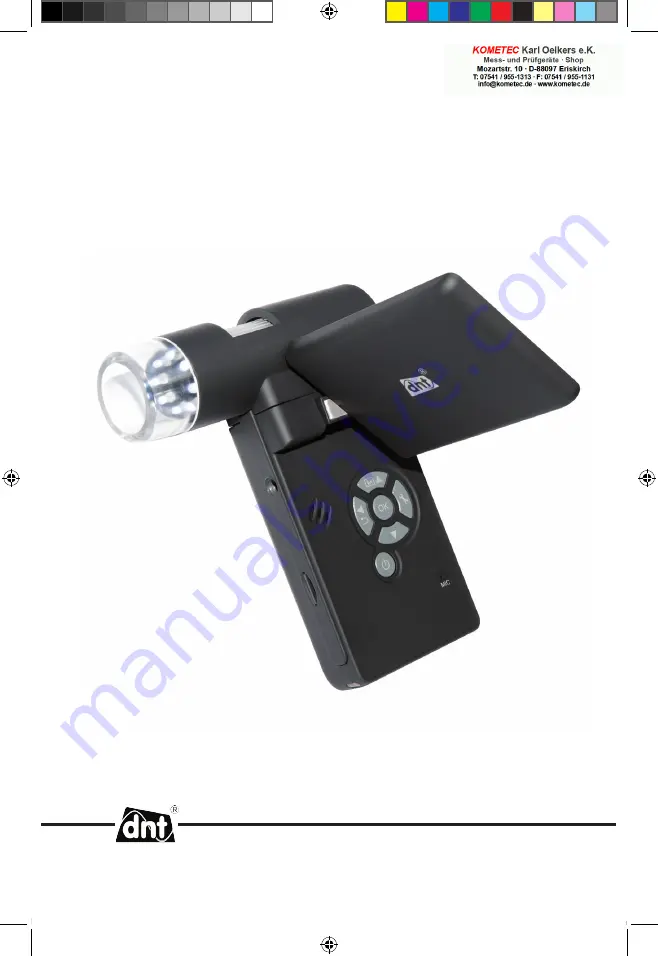
Страница 5: ...ckseite Ger teansicht LEDs Objektiv Gewinde f r Standfu microSD Karten Slot Ladeanzeige Batteriefach LED Helligkeitseinsteller R ndelrad Aufnahmetaste digitaler Zoom Monitor aufgeklappt Tastatur Mikr...
Страница 6: ...ht Unten Ger teansicht AV Ausgang Ladebuchse USB Anschluss Tastatur und Navigation Farbdarstellung aufw rts Wiedergabe links zur ck abw rts Ein Aus Men Punkt ffnen Men Einstellungen DM mobile4lg indd...
Страница 7: ...nden Sie zur Sicherheit im Batteriefach aufgedruckt Batterie laden Verbinden Sie das Ger t mit dem Ladeger t Eine volle Ladung reicht f r ca 4 Stunden Betrieb Die Ladezeit der Batterie betr gt ca 3 St...
Страница 8: ...htung und damit die Bildqualit t Einsetzen der microSD Karte und SD Kartenstatusanzeige SchaltenSiedasDigitalmikroskopaus DermicroSD KartenslotbesitzteinenFedermechanismus Beim Reindr cken rastet die...
Страница 9: ...en Zum Auschalten klappen Sie das Display zu oder dr cken die Ein Aus Taste Die Symbole k nnen ausgeblendet werden Dr cken Sie dazu kurz den Zoom Schalter Einschalten Zum Einschalten klappen Sie das D...
Страница 10: ...das Ger t auf das Zielobjekt aus Stellen Sie eine geeignete LED Helligkeit ein Stellen Sie die gew nschte Vergr erung ein berpr fen Sie nochmals den Fokus Markierung zum Ablesen der Ver gr erung Fokus...
Страница 11: ...e rung EinVideo aufnehmen Um in den Video Modus umzuschalten dr cken Sie wiederholt auf die Taste bis das Videosymbol oben links erscheint Um die Aufname zu starten dr cken Sie den Aufnahmeknopf Zum...
Страница 12: ...uschalten bitte die OK Taste bet tigen hatten Sie zuletzt den schnellen R cklauf gew hlt erfolgt die Wiedergabe weiterhin in normaler Geschwindigkeit r ckw rts Um auf Wiedergabe vorw rts zu wechseln b...
Страница 13: ...chalten zwischen Farbe und Graustufen dr cken Sie die Taste Die Umschal tung erfolgt in folgender Reihenfolge Farbe Graustufen in Positivdarstellung und Graustufen Invers bzw Negativdarstellung Zoom A...
Страница 14: ...in Intervallen gemacht werden Die nachfolgenden Informationen gelten sowohl f r Frames als auch f r Intervall Verlassen Sie das Men mit der Taste durch bet tigen der Aufnahmetaste werden die zuvor ei...
Страница 15: ...nden ein Bild aufgenommen Um Verwacklungen beim Ausl sen einer einzelnen Aufnahme zu verhindern stel len Sie das Intervall auf 0 0 0 und dr cken anschlie end die Aufnahmetaste Dann wird mit einer Zeit...
Страница 16: ...t zur ck Taste Men verlassen Taste Auswahl best tigen Aktion durchf hren Sprache Stellen Sie die gew nschte Men sprache ein Auto Aus Wenn der Energiesparmodus Auto Aus eingeschal tet ist schaltet sich...
Страница 17: ...AV Kabels startet der Monitor wieder Datum und Uhrzeit einstellen W hlen Sie den Men punkt um Datum und Uhrzeit einzustellen Zuerst stellen Sie das Datumsformat ein F r Deutschland ist das Format DD M...
Страница 18: ...evor Sie das Ger t an den USB Port anschlies sen Legen Sie die mitgelieferte CD ins Laufwerk ein W hlen Sie Install PortableCapture um die Software auf dem Computer zu installieren Die Installation l...
Страница 19: ...die Bilder und Videos von der SD Karte in die Datenbank bzw das Foto und Video Verzeichnis der PortableCapture Software zu importieren Der Computer ben tigt einen Augenblick bis er das Ger t eingerich...
Страница 20: ...fnahme mit Erfassen Video gestartet wird Die Aufnahme wird gestoppt sobald das Symbol nochmals angeklickt wird Videos werden in den Ordner Video gespeichert Hauptmen leiste Datei File Photos Directory...
Страница 21: ...pe directly to your USB Port Wenn Ihr Computer nicht ber eine USB 2 0 Schnittstelle verf gt verringert sich die Bildaufl sung Bildbearbeitung Gleichzeitig mit dem Hauptprogramm wird auch eine Software...
Страница 22: ...inienst rke Legen Sie die Linienst rke fest Linienfarbe Zeichensatz f r die Bema ung Letzte Bearbeitung r ckg ngig machen Freihand zeichnen Linie zeichnen ohne Bema ung Rechteck zeichnen Texteingabemo...
Страница 23: ...entsprechend zu drehen In der N he des rechten Anschlags erhalten Sie so die niedrige Vergr erung in der N he des linken Anschlags erhalten Sie hohe Vergr erung Drehen Sie die R ndelschraube auf Rech...
Страница 24: ...ch des linken Anschlags von hinten gesehen der R ndelschraube erzielt werden kann Bei direktem Kontakt der beleuchteten Spitze des Mikroskops ergeben sich in der Praxis hierbei Vergr erungen von ca 29...
Страница 25: ...Seite fest Drehen Sie danach den Standfu gerade in das Gewinde auf der Vorderseite des Ger tes Wenden Sie dabei keine Gewalt an Bringen Sie anschlie end den Standfu in die richtige Position wobei Sie...
Страница 26: ...ws 7 MAC OS 10 5 oder h her Spannungsversorgung Li Ionen Batterie 3 7V 800mA 5 V USB Port Ladeger t Abm Geh use 105 x 130 x 28 mm Technische Informationen Umweltgerechte Entsorgung Dieses Ger t ist en...
Страница 27: ...is Donnerstag von 8 00 17 00 Uhr Freitag von 8 00 16 00 Uhr Hotline Service 06074 3714 31 E Mail support dnt de Bitte senden Sie Ihr Ger t nicht ohne Aufforderung durch unser Service Team an unsere An...
Страница 28: ...on 44 Picture editing 47 Additional information 49 Magnification 49 Mounting the stand 50 Service informationen 50 Specifications 51 Declaration of conformity 51 Disposal of electronic equipment 51 Wa...
Страница 29: ...oms with high humidity e g bathrooms Don t use the unit at dusty places Technical problems In case any foreign material or liquid gets into the product please immediately remove the power cord Before...
Страница 30: ...ium 1800 or compatible AMD processor 100 MB free hard disk space min 32MB RAM 512 MB RAM recommended 24 Bit colour Video adaptor free USB 2 0 port CD ROM drive Delivery content DigiMicro Mobile stand...
Страница 31: ...de rear side View of the device LEDs lens mounting hold microSD card slot charging indicator battery compartment LED brightness control Focus wheel capture button digital zoom monitor open keypad micr...
Страница 32: ...ted Install the battery View of the device bottom View of the device AV output charging socket USB port Keypad and navigation colour mode up playback left back down On Off Menu setup DM mobile4lg indd...
Страница 33: ...standard AC outlet The battery indicator LED at the end corner of the unit will be in red to show that the battery is charging When the battery is finished charging the battery indicator LED will be i...
Страница 34: ...card to record and store your pictures and videos Turn the device off Insert the MicroSD card into the MicroSD card slot gently press in until card is latched The display shows a SD card icon Please...
Страница 35: ...and then the microscope will turn off automatically Press ON OFF button By Power Save The icon displays can be switched on off by pressing Zoom Wheel downward vertically Turn on Unfold the display pa...
Страница 36: ...body by right hand put the viewing end closely to target object Adjust the LED brightness dial to get a proper brightness for the LEDs at the viewing end Adjust focus wheel to get clear image by left...
Страница 37: ...button to enter video mode as follows There is video icon on the left corner Press Capture button to start recording video Press again to stop video mode VGA redording time resolution SD card inserted...
Страница 38: ...s OK button again For fast forward and rewind press the buttons To switch back to normal playback press the OK button If the last choice was rewind it plays in a normal speed but backward To switch to...
Страница 39: ...hoto mode At preview status press button to switch among Colour Positive and Negativ Zoom The zoom wheel is located on the rear The zoom range is 1 0 to 4 0 times The zoom factor is shown in the displ...
Страница 40: ...Select a menu item button In menu item back button Exit the menu button Confirm the selection Resolution The available resolution is VGA 1 3 3 0 5 0 9 0 and 12 megapixel Timer From the main menu choos...
Страница 41: ...means 32 frames Intervall Input the interval time between frame capture by buttons Quality The three selections will result in different image compress ratio Sharpness Choose Sharpness and then select...
Страница 42: ...c settings buttons Select a menu item button In menu item back button Exit the menu button Confirm the selection Language Choose Language Power save Choose Power Save and then select among the fol low...
Страница 43: ...en select between NTSC and PAL the correct mode compatible with your TV Date time Choose Date Time to setup date and time Setup date and time by buttons Setup date mode among YY MM DD DD MM YY and MM...
Страница 44: ...fore the microscope is connected to the USB port Insert the driver CD into CD ROM Drive and this will automatically display the following inter face Click Install ProtableCapture software and then reb...
Страница 45: ...longer valid but most of functions are available by PortableCapture software Preview on Computer Connect the microscope to computer by USB cable Choose PC Camera mode Start PortableCapture software Wh...
Страница 46: ...videos are stored in the Videos Directory Main menu File Photos Directory Directory to store the photos Videos Directory Directory to store the videos Import Import the pictures from the microscope t...
Страница 47: ...s you to perform measurements in the picture To start the software double click on the image in the picture gallery on the right side At the bottom of the window you see some icons which you remember...
Страница 48: ...line width Line Color Character set for the dimension Cancel last edition Freehand drawing Draw a line with no dimension Draw a Rectangle Text entry mode Distance measured with an indication of the d...
Страница 49: ...full screen This is the low magnification It has a diameter of 6mm Now if you continue turning the thumb wheel to the left you see the inner circle full screen This is the high magnification It has a...
Страница 50: ...end into the hole forcing may damage the microscope Adjust the height of the stand at a proper position Service information In case of complaints your device shows a defect please consult your dealer...
Страница 51: ...from valuable materials that can be recycled Recycling reduces the amount of waste and helps to protect the environment Dispose of the packaging at a recycling point which sorts materials by type Mak...
Страница 52: ...ciel 70 Traitement d images 71 Avis concernant les indications de grossissement 73 Montage du pied de support 75 Caract ristiques techniques 76 D claration de conformit CE 76 limination cologique 76 S...
Страница 53: ...ques trop fortes Prot gez le des vibrations et des chocs durs ne le faites pas tomber et ne le secouez pas N exposez pas l appareil des temp ratures lev es plus de 60 C et de fortes variations de temp...
Страница 54: ...ent au minimum 100 MB de m moire libre sur le disque dur 32MB RAM au minimum 512 MB RAM sont recommand s Carte vid o en couleur 24 bits Port USB 2 0 libre Lecteur CD ROM tendue de la livraison DigiMic...
Страница 55: ...e l appareil DEL Objectif Filetage pour pied de support Slot de carte Micro SD T moin de charge Compartiment piles R gulateur de lumi nosit DEL Molette de r glage Touche d enregistrement Zoom num riqu...
Страница 56: ...appareil Sortie V Prise de chargement Port USB Clavier et navigation Repr sentation des couleurs vers le haut Lecture vers la gauche marche arri re Vers le bas Marche arr t Ouvrir un point de menu R g...
Страница 57: ...est en plus imprim e dans le compartiment piles Chargement de la batterie Branchez l appareil au chargeur Une charge enti re conf re une autonomie de service d environ 4 heures Le temps de charge est...
Страница 58: ...minuent Insertion de la carte micro SD et affichage de l tat de la carte SD teignez le microscope num rique Le slot de carte micro SD dispose d un m canisme ressorts La carte s enclenche en l ins rant...
Страница 59: ...r t Fermez l cran ou appuyez sur la touche Marche Arr t pour teindre le microscope Les symboles peuvent tre masqu s en appuyant bri vement sur le r gulateur de zoom Mise en marche D pliez l cran pour...
Страница 60: ...ppareil sur l objet cibl S lectionnez un clairage DEL appropri Param trez le grossissement souhait V rifiez encore une fois le foyer Marquage pour lire le grossissement R glez le foyer et relevez le g...
Страница 61: ...er une vid o Pour commuter au mode vid o appuyez plusieurs reprises sur la touche jusqu ce que le symbole vid o s affiche en haut gauche Appuyez sur le bouton d enregistrement pour d marrer l enregist...
Страница 62: ...uyez sur la touche OK Si vous venez de s lectionner la marche arri re rapide la lecture se fera une vitesse nor male en arri re Pour revenir au mode de lecture normale en marche avant appuyez une fois...
Страница 63: ...sur la touche pour changer entre les couleurs et les niveaux de gris Le change ment s effectue dans l ordre suivant couleur niveaux de gris en positif et niveaux de gris en inversant l chelle en n ga...
Страница 64: ...enregistrements des intervalles d finis Les indications suivantes s appliquent aussi bien qu la fr quence des images qu l intervalle Quittez le menu avec la touche En appuyant sur le bouton d enregis...
Страница 65: ...ur viter des flous de boug lors du d clenchement d un enregistre ment individuel r glez l intervalle sur 0 0 0 et appuyez ensuite sur la touche d enregistrement La prise de vue sera ensuite effectu e...
Страница 66: ...de menu en arri re Touche Quitter le menu Touche Confirmer la s lection effectuer l action Langue S lectionnez la langue d sir e Arr t Auto Lorsque le mode d conomie d nergie Arr t Auto est activ l ap...
Страница 67: ...quement apr s avoir s par le c ble AV Date Heure R glage de l heure et de la date S lectionnez ce point de menu pour r gler l heure et la date R glez d abord le format de la date Le format DD MM YY co...
Страница 68: ...au port USB installez d abord le pilote Ins rez le CD fourni au lecteur CD ROM S lectionnez Install PortableCapture pour installer le logiciel sur l ordinateur L installation se d roule de mani re co...
Страница 69: ...e masse pour importer les images et les vid os de la carte SD dans la base de donn es et ou le r pertoire photo et vid o du logiciel PortableCapture L ordinateur met un peu de temps avant d avoir inst...
Страница 70: ...rrant l enregistrement avec Capturer Vid o L enregistrement est arr t en cliquant une nouvelle fois sur ce symbole Les vid os sont enregistr es dans le dossier Vid os Barre du menu principal Fichier R...
Страница 71: ...diminue Traitement de l image Un logiciel permettant de proc der des mesures dans l image est install en m me temps que le programme principal Pour d marrer ce logiciel double cliquez sur une image da...
Страница 72: ...de ligne Jeu de caract res pour la cotation Annuler effacer le dernier traitement Dessiner main lev e Tracer des lignes sans cotation Dessiner un rectangle Mode saisie de texte Mesurer la distance en...
Страница 73: ...au point fixes en tournant la vis molet e A proximit de la but e droite vous obtenez le grossissement le plus faible proximit de la but e gauche vous obtenez le grossissement le plus lev Tournez la v...
Страница 74: ...urnant la vis molet e vers la but e de droite En cas de contact direct de la pointe clair e du microscope il en r sulte des gros sissements d environ 290 300x lorsque l on observe l image en mode plei...
Страница 75: ...e du pied de support Vissez le pied de support troitement dans le filetage situ sur la face avant de l appareil Ne forcez pas Positionnez ensuite correctement le pied de support DM mobile4lg indd 75 2...
Страница 76: ...s XP SP2 Vista Windows 7 Windows 8 MAC OS 10 5 ou sup rieur Alimentation lectrique Batterie Li Ion 3 7V 800mA 5 V port USB chargeur Dim bo tier 05 x 130 x 28 mm Informations techniques Elimination col...
Страница 77: ...di de 8h00 16h00 Assistance t l phonique Service 06074 37 14 31 Courriel support dnt de Nous vous prions de ne pas envoyer votre appareil notre adresse sans y avoir t invit au pr alable par notre quip...
Страница 78: ...Apparaat met computer verbinden 95 Software 96 Extra aanwijzingen 99 Standvoet monteren 100 Technische gegevens 101 CE verklaring 101 Milieuvriendelijke afvoer 101 Garantievoorwaarden 27 Firma die het...
Страница 79: ...tel Bescherm het tegen vibraties en harde schokken Laat het niet vallen en schud het niet Stel het toestel niet bloot aan hoge temperaturen meer dan 60 C en sterke temperatuur schommelingen Bescherm h...
Страница 80: ...um 1800 of vergelijkbare AMD processor 100 MB vrij schijfgeheugen Min 32 MB RAM aanbevolen zijn 512 MB RAM 24 bit kleur videokaart Vrije USB 2 0 interface CD ROM loopwerk DigiMicro Mobile Standvoet La...
Страница 81: ...ijde Apparaataanzicht LED s Objectief Schroefdraad voor standvoet Micro SD kaartgleuf Laaddisplay Batterijvak LED LED helder heidsregelaar Kartelwiel Opnametoets Digitale zoom Beeldscherm opengeklapt...
Страница 82: ...cht Beneden Apparaataanzicht AV uitgang Laadbus USB aansluiting Toetsenbord en navigatie Kleurweergave opwaarts Weergave links terug Neerwaarts Aan uit Menupunt openen Menu instellingen DM mobile4lg i...
Страница 83: ...ariteit op het batterijvak gedrukt Batterij laden Verbind het apparaat met de acculaadinrichting Een volle lading is voldoende voor een bediening van ca 4 uren De laadtijd van de batterij bedraagt ca...
Страница 84: ...en daardoor ook de beeldkwaliteit Aanbrengen van de microSD kaart en SD kaartstatusdisplay Schakel de digitale microscoop uit De microSC kaartgleuf bezit een veermechanisme Bij het indrukken klikt de...
Страница 85: ...uit te schakelen moet u het display dichtklappen of op de aan uit toets drukken U kunt de symbolen laten verdwijnen Druk daarvoor kort op de zoom schakelaar Inschakelen Klap het display open om in te...
Страница 86: ...en Richt het apparaat op het doelobject Stel een geschikte LED helderheid in Stel de gewenste vergroting in Controleer nogmaals de focus Markering voor het aflezen van de vergroting De focus instellen...
Страница 87: ...n Om over te gaan naar de videomodus moet u herhaaldelijk op de Ttoets drukken tot het videosymbool links bovenaan verschijnt Druk op de opnameknop om de opname te starten Druk opnieuw op de opnamekno...
Страница 88: ...en Had u het laatst het snelle terugspoelen gekozen gebeurt de weergave verder met normale snelheid achteruit Om over te gaan naar de weergave voorwaarts moet u 1 keer op de toets voor vooruitspoelen...
Страница 89: ...schakelen van kleur naar grijstinten De omschakeling gebe urt in de volgende volgorde kleur grijstinten als positieve weergave en grijstinten als omge keerde resp negatieve weergave Zoom Op de achterz...
Страница 90: ...ntervallen worden gemaakt De volgende informatie geldt zowel voor frames als voor interval verlaat het menu met de toets Door op de opna metoets te drukken worden de voorheen ingestelde timeropnames u...
Страница 91: ...d opgenomen Um Verwacklungen beim Ausl sen einer einzelnen Aufnahme zu verhindern stel len Sie das Intervall auf 0 0 0 und dr cken anschlie end die Aufnahmetaste Dann wird mit einer Zeitverz gerung vo...
Страница 92: ...een menupunt terug toets menu verlaten toets keuze bevestigen actie doorvoeren Taal Stel de gewenste menutaal in Auto uit Als de energiespaarmodus auto uit is ingeschakeld wordt het apparaat na de in...
Страница 93: ...loskoppelen van de AV kabel start het beeldscherm opnieuw Datum en tijd instellen Kies het menupunt voor het instellen van de datum en de tijd Stel eerst het datumformaat in Voor Duitsland is het for...
Страница 94: ...erst de driver voordat u het apparaat op de USB poort aansluit Leg de meegeleverde CD in het loopwerk Kies Install PortableCapture om de software op de computer te installeren De installatie verloopt...
Страница 95: ...m de beelden en video s van de SD kaart in de databank resp het foto en videoregister van de PortableCapture software te importeren De computer heeft een ogenblik nodig tot hij het apparaat heeft inge...
Страница 96: ...o wordt gestart De opname wordt gestopt zodra nogmaals op het symbool wordt geklikt Video s worden in de ordner video opgeslagen Hoofdmenulijst Bestand Fotoregister Register waarin de foto s worden op...
Страница 97: ...uw computer niet over een USB 2 0 interface beschikt vermindert de beeldre solutie Beeldbewerking Samen met het hoofdprogramma wordt ook een software ge nstalleerd waarmee u metingen in het beeld kunt...
Страница 98: ...dikte Leg de lijndikte vast Lijnkleur Tekenset voor de dimensionering De laatste bewerking annuleren Uit de vrije hand tekenen Een lijn tekenen zonder dimensionering Een rechthoek tekenen Tekstinvoerm...
Страница 99: ...de buitenste cirkel die het beeldscherm vult Dit is de lage vergroting Hij heeft een diameter van 6 mm Als u nu de kartelschroef verder naar links draait ziet u de binnenste cirkel die het beeldscherm...
Страница 100: ...jn als men het complete beeld 100 op een 17 43 18 cm beeldscherm bekijkt Om een beeldweergave van 100 1 1 op het beeldscherm te verwezenlijken bestaan er free ware programma s zoals bijv XnView xnView...
Страница 101: ...isvuil en moeten worden afgegeven op de daarvoor voorziene inzamelpunten Conformiteitsverklaring Hiermee verklaart dnt GmbH dat het apparaat DigiMicro Mobile in overeenstemming is met de fundamentele...
Страница 102: ...uur s vrijdags van 8 00 16 00 uur Hotline service 06074 3714 31 E Mail support dnt de Stuur uw toestel a u b niet naar ons adres als ons serviceteam u niet daarom verzoekt De kosten en het gevaar van...
Страница 103: ...emise de l appareil En cas d application de la garantie nous demandons que soit restitu l appareil accompagn de son justificatif d achat ticket de caisse facture ou autres la carte de l appareil d men...
Страница 104: ...74 3714 0 Fax 49 0 6074 3714 37 Service Hotline 49 0 6074 3714 31 Internet http www dnt de Email dnt dnt de Serien Nr Serial no N de s rie Seienr Kaufdatum Date of purchase Date d achat Koopdatum Stem...