background image

User Manual

 12

WATER SUPPLY AND DRAIN CONNECTION CONTINUED

Important!

 New waste traps typically have the dishwasher spigot sealed off with plastic and requires the plumber or 

licensed installer to drill out the center of the spigot to allow water to flow. It’s important to ensure this spigot is drilled 

out before calling our Service team to respond to a dishwasher failure, as there will be a fee payable should we attend 

and find this non-warranty installation fault.  

If you do not have a waste trap with the dishwasher spigot, you can also insert the drain hose directly into a drain pipe, 

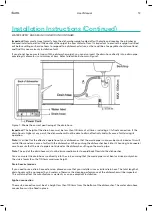
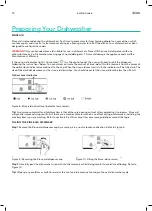
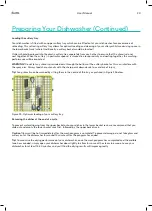
providing it’s diameter is a minimum of 4cm. Refer to location B shown in Figure 7. 

Figure 7- Shows the correct positioning of the drain hose. 

Important!

 The height of the drain hose must be less than 1000mm at all times, including at its final connection. If the 

drain hose is higher at any point, the dishwasher will not be able to drain effectively and will cause a fault during its 

operation.

Note.

 It’s critical for the effective operation of your dishwasher, that the waste pipe is not over-bent or kinked as this will 

restrict flow and can cause a fault with the dishwasher. When pushing the dishwasher back into it’s housing, take special 

care to ensure that the waste pipe is not kinked or the dishwasher sitting on the waste pipe.

Note.

 The end of the drain hose must not be immersed in water to avoid back flow into the dishwasher.

You can also let the drain hose run directly into the sink, ensuring that the waste pipe is not bent or kinked, only when 

the sink is lower than the 1000mm maximum height.

Drain hose extensions

If you need to use a drain hose extension, please ensure that your installer uses a similar drain hose. The total length of 

drain hose must be no longer than 4 meters, otherwise the cleaning performance of the dishwasher will be impacted. 

This will also effect the manufacturer’s warranty as a non-compliant installation.

Syphon connection

The waste connection must be at a height less than 1000mm from the bottom of the dishwasher. The water drain hose 

connection must be fixed in place.

Installation Instructions (Continued)

Содержание EDW7CS

Страница 1: ...UserManual Exactly what you need Model Code s EDW7CS Online esatto house Product 60cm Freestanding Dishwasher Version V2 0521...

Страница 2: ...Appliances Exactly what you need...

Страница 3: ...ctions 07 Your Dishwasher 08 Control Panel 09 Technical Information 10 Installation Instructions 13 Preparing Your Dishwasher 21 Operating Your Dishwasher 24 Maintenance and Cleaning 29 Troubleshootin...

Страница 4: ...165 Barkly Avenue Burnley Victoria Australia 3121 Online residentia group Telephone 1300 ESATTO 1300 372 886 Email support residentia group New Zealand Applico Online http applico co nz Telephone 0800...

Страница 5: ...onments It is not intended for use in Commercial environments Children shall not play with the appliance Cleaning and user maintenance shall not be done by children without supervision Packaging mater...

Страница 6: ...local council for recycling check http epsa org au for details of your local EPS recycler Caution During unpacking the packaging materials polythene bags polystyrene pieces etc should be kept out of...

Страница 7: ...esatto house 07 Your Dishwasher THE MAIN COMPONENTS Note The images may differ slightly to your model and are for general reference only Figure 1 Front view Figure 2 Back view...

Страница 8: ...to the selected wash program 10 Child lock indicator LED indicates whether the child lock function is activated or not 11 Extra Drying indicator LED indicates whether the Extra Drying function is act...

Страница 9: ...rmation Height 845mm Width 598mm Depth 600mm with door closed 1175mm with door open Water Pressure 0 04 1 0MPa 0 4 10 bar Power Supply AC 220 240V 50Hz Power Consumption 1760 2100W Capacity 14 Place S...

Страница 10: ...ance must be connected is not appropriate for the plug have a licenced electrician replace the socket do not use a power adapter as this can lead to overheating POSITIONING THE DISHWASHER Important En...

Страница 11: ...aution is required to avoid the risk of the water inlet becoming blocked or dirty water damaging your new dishwasher Figure 5 Connecting the supply hose to a inch tap Note If your dishwasher is not go...

Страница 12: ...its operation Note It s critical for the effective operation of your dishwasher that the waste pipe is not over bent or kinked as this will restrict flow and can cause a fault with the dishwasher When...

Страница 13: ...cator will be fully dark The size of the dark dot decreases as the rinse aid diminishes You should never let the rinse aid level be less than 1 4 full Optical Level Indicator Figure 8 Rinse aid optica...

Страница 14: ...e rinse aid Adjustment dial Figure 12 Rinse aid dispenser dial DISHWASHER DETERGENT The chemical ingredients that compose the dishwasher detergent are necessary to remove break down and dispense all d...

Страница 15: ...the main wash cycle For more heavily soiled wash loads you can also add some detergent into the smaller cavity labelled B in figure 14 below which is used for the pre wash cycle Figure 14 The open di...

Страница 16: ...to dishwasher model EDW7CS is fitted with quick adjust handles on either side of the upper basket To adjust the height of the upper basket follow these steps Step 1 Slide out the upper basket to the e...

Страница 17: ...allowing you to lean the tall glasses against it i e holding wine glass stems You can also remove it when it is not required for use Figure 19 Adjusting the upper basket glass racks FOLDING BACK THE...

Страница 18: ...and cutlery basket may vary slightly by model For optimal performance of the dishwasher follow these loading guidelines Items such as cups glasses pots pans etc are faced downwards so as not to colle...

Страница 19: ...er basket rack is designed to hold the larger items and those most difficult to clean Items such as pots pans lids serving dishes dinner plates bowls etc as shown in figure 22 below It is preferable t...

Страница 20: ...sharp point downwards to avoid risk of injury Tip Long utensils can be washed by sitting them in the centre of the tray as pictured in Figure 23 below Figure 23 Optimum loading of your cutlery tray Re...

Страница 21: ...ogram selected Step 5 optional Add any additional options to the wash program including Half Load or Extra Drying To activate the Half Load function press the Half Load button To activate the Extra Dr...

Страница 22: ...nt program for energy and water consumption for a normal load Prewash Wash 45 Rinse 50 Drying 5g 27 5g or all in 1 tablet 175 0 78 12 3 Yes Glass Ideal for lightly soiled crockery and glassware Prewas...

Страница 23: ...e detergent dispenser has been released Step 1 Press the Start Pause button to put the dishwasher into standby mode Step 2 Open the door a little allowing for the spray arms to stop spinning before op...

Страница 24: ...ressure cleaner of any kind Never use abrasive cleaners or scouring pads on the outer surfaces as these may scratch the finish INTERNAL CARE Base of the dishwasher Residual food can build up at the ba...

Страница 25: ...use a soft cleaning brush i e a soft bristtled toothbrush Figure 26 Rinsing and scrubbing any residual food particles or foreign objects from the filter components Step 4 Before re fitting the filter...

Страница 26: ...re to follow the regularly maintenance steps outlined may lead to voiding your Manufacturer s warranty Cleaning the spray arms It is necessary to clean the spray arms regularly as hard water chemicals...

Страница 27: ...e hottest program for your dishwasher and the acids within the vinegar will help to break down any deposits on the interior of your dishwasher Step 4 Remove the bowl from the dishwasher once your cycl...

Страница 28: ...hwasher cleaner available from your local supermarket When your dishwasher will not be used from sometime It is recommended that you run a wash cycle with the dishwasher empty and then remove the plug...

Страница 29: ...kitchen sink that is not draining you may need a plumber rather than a serviceman for dishwashers Suds are remaining within the dish washer base Wrong detergent Spilled rinse aid Use only the special...

Страница 30: ...e and to get them clean Black or grey marks on dishes Aluminium utensils have rubbed against dishes Use a mild abrasive cleaner to eliminate those marks Detergent left in dispenser Dishes block deterg...

Страница 31: ...ersists please contact our Customer Care team E4 will be displayed on the LED display and the buzzer will sound Overflow The onboard computer has detected a leak correctly or incorrectly Check that yo...

Страница 32: ...Appliance not having purchased the Appliance for re sale and your has a corresponding meaning 2 This warranty only applies to Appliances purchased and used in Australia and is in addition to and does...

Страница 33: ...umer Law You are entitled to a replacement or refund for a major failure and for compensation for any other reasonably foreseeable loss or damage You are also entitled to have the Appliance repaired o...

Страница 34: ...alteration misuse or incorrect installations f a product dismantled repaired or serviced by any serviceman other than an authorised service agent g a product not in possession of the original purchase...

Страница 35: ...esatto house 35 This page is intentionally left blank...

Страница 36: ...Appliances Exactly what you need A RESIDENTIA GROUP INITIATIVE...

Отзывы: