


34
4.4 tIg WelDIng setup
When the PROCESS switch is placed in the TIG position, the
Multimaster 300/300X turns “ON” the weld contactor so that
power is immediately available to the output connection. The
Touch TIG starting system is then enabled.
Step 1. Determine the weld parameters based on the metal
thickness in Table 4 or use the
ESAB TIG Welding
Handbook
(optional) for suggested welding param-
eters.
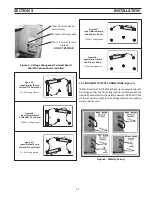
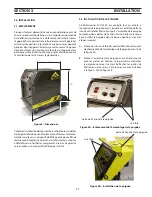
Step 2. Be sure to set the polarity to DCEN (Electrode Nega-
tive) by placing the Heliarc Torch in the Negative
connection terminal on the front of the power source
as shown in Figure 20.
Step 3. Place the WELD PROCESS 1 switch in the TIG (left)
position.
figure 20 - tIg polarity connection
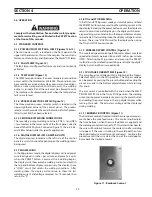
figure 21- tIg front control panel
table 4 - tIg paraMeters chart
When the WelD process switch is moved to the tIg or
stIcK position, electrode becomes electrically “hot”. Do
not allow the electrode to contact ground potential until
you are ready to make a weld.
Step 4. While holding the PRESET 2 button, turn the VOLT-
AGE/CURRENT knob to the desired weld current on
the top digital display window.
Step 5. Set the shielding gas flow rate to 20 cfh by opening
the manual gas valve on the Heliarc torch and adjust-
ing the control knob on the R-33-FM-580 flowmeter.
Step 6. Touch the tungsten electrode to the workpiece
momentarily to establish the welding arc. Trim the
current as desired by turning the VOLTAGE/CURRENT
4 knob.
NOTE: The Wire Feed Speed knob 3 has no effect in the TIG
mode.
1
4
2
3
sectIon 4
operatIon
Содержание Multimaster 300
Страница 1: ...Multimaster300 300X MIG TIG STICK WELDING PACKAGE 0558007770 06 2010 Instruction Manual...
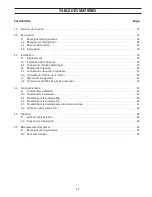
Страница 4: ...4 table of contents...
Страница 40: ...40 TABLE DES MATI RES...
Страница 66: ...66 section 6 replacement parts...
Страница 67: ...67 section 6 replacement parts 26...
Страница 68: ...68 section 6 replacement parts...
Страница 69: ...69 section 6 replacement parts...
Страница 70: ...70 section 6 replacement parts...
Страница 71: ...71 section 6 replacement parts...
Страница 72: ...72 section 6 replacement parts...
Страница 73: ...73 section 6 replacement parts...
Страница 74: ...74 section 6 replacement parts...
Страница 75: ...75 section 6 replacement parts...
Страница 76: ...76 section 6 replacement parts Mulitmaster 300 Mulitmaster 300X...
Страница 77: ...77 section 6 replacement parts Mulitmaster 300 Mulitmaster 300X...
Страница 78: ...78 section 6 replacement parts Mulitmaster 300 Mulitmaster 300X...
Страница 79: ...79 section 6 replacement parts Mulitmaster 300 Mulitmaster 300X...
Страница 80: ...80 section 6 replacement parts Mulitmaster 300 Mulitmaster 300X...
Страница 81: ...81 section 6 replacement parts Mulitmaster 300 Mulitmaster 300X...
Страница 84: ...section 6 replacement parts...


