background image

29

4.0  operatIon

comply with all ventilation, fire and other safety require-

ments for arc welding as established in the safetY section 

at the front of this manual.

4.1  stanDarD controls
4.1.1 poWer on/off sWItch & laMp


(figures 12 &13)

The main power switch is located on the front panel in the 

upper left-hand corner.  This switch energizes the main trans-

former, control circuitry and illuminates the Power “ON” lamp. 

4.1.2   fault laMp (figure 12)

The fault lamp is configured for future use and is not currently 

activated.

4.1.3   teMp laMp (figure 12)

The TEMP lamp illuminates if an over temperature condition 

occurs within the Multimaster 300/300X. This condition may 

be caused by excessive duty cycle or over-current conditions. 

When an over temperature condition occurs, the welding 

output is turned off and the unit must be allowed to cool. 

The machine will automatically reset when the temperature 

falls to a safe level.  

4.1.4  process selector sWItch (figure 12)

The three position process selector switch is located in the 

upper righthand corner of the control panel.  The process 

selector switch provides the visual indication of which process 

(Mig, Tig or Stick) has been selected.

4.1.5 seconDarY WelDIng connectIons

The secondary output welding terminals, POS (+) and NEG 

(-) are located in the lower right of the front panel, directly 

beneath the NAS Mig Gun Connector (Figure 13). See  4.4, 4.5, 

and 4.6 for Setup Guides for specific application.

4.1.6  DIgItal DIsplaYs (Wfs, aMps & Volts)

The digital displays located on the left side of the control 

panel are multi-functional depending on the welding process 

being used. 

4.1.7 MIg WelDIng

In the Mig process mode, the digital displays will read preset 

wire feed speed in inches per minute and preset arc volts 

when the PRESET button is pressed. Once welding begins, 

the displays will show average welding current and volts in 

the top and bottom display, respectively. The displays have 

a “HOLD” circuit that retains the welding conditions.  After 

welding  stops,  the  display  will  continue  to  show  the  last 

welding current and voltage sampled  for 10 seconds, then 

returns to “0”.

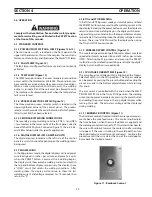
figure 11 - Burnback control

4.1.8 tIg and stIcK WelDIng

In the TIG and STICK process mode, you must depress and hold 

the PRESET button while presetting the welding current in the 

top display. Releasing the preset button causes the display to 

return to zero.  Once welding begins, the display will show av-

erage welding current and volts in the top and bottom display, 

respectively. After welding stops, the display will again return 

to zero.  There is no “HOLD” circuit for the display when using 

the TIG and STICK process modes. 

4.1.9  WIre feeD speeD control (figure 12)

The wire feed speed control potentiometer allows wire feed 

speed adjustments between 65 and 675 inches per minute 

(IPM).  Selecting the Mig process and pressing the PRESET 

switch allows the wire feed speed to be preset in the top digital 

display by turning the wire speed knob.

4.1.10 Voltage/current trIM (figure 12)

The arc voltage is controlled with this knob when the Process 

Selector Switch is in the MIG position.  The Mig arc voltage 

can be preset by pressing the preset button and reading the 

preset arc volts in the bottom digital display while turning 

this knob.  


The arc current is controlled with this knob when the WELD 

PROCESS SWITCH is in the TIG or STICK position.  The welding 

current can be preset in amperes by pressing the preset button 

and reading the preset amps in the top digital display while 

turning this knob.  The actual arc voltage will be displayed 

during welding.  

4.1.11 BurnBacK control (figure 11)

The burnback control is located inside the wire spool compart-

ment above the wire feed motor.  The control knob adjusts 

the time between when the wire feed brake is applied and 

the welding contactor is turned “off”.  This determines how far 

the wire will burnback towards the contact tip after welding 

is stopped.  If the wire is sticking in the weld pool then turn 

the knob clockwise a small amount and retest.  Continue this 

procedure until the wire clears the top of the weld pool or 

burns back the desired amount.  

sectIon 4 

operatIon

Содержание Multimaster 300

Страница 1: ...Multimaster300 300X MIG TIG STICK WELDING PACKAGE 0558007770 06 2010 Instruction Manual...

Страница 2: ...from improper use faulty maintenance damage improper repair or alteration by anyone other than the manufacturer or a ser vice facility designated by the manufacturer Be sure this information reaches t...

Страница 3: ...nections 24 3 4 Voltage Changeover 24 3 5 Secondary Output Connections 25 3 6 NAS Torch Connections 26 3 7 Wire Feeder Mechanism 26 3 8 Connection of Shielding Gas Supply 27 4 0 Operation 29 4 1 Stand...

Страница 4: ...4 table of contents...

Страница 5: ...5 Protect other personnel from arc rays and hot sparks with a suitable non flammable partition or curtains 6 Usegogglesoversafetyglasseswhenchippingslag orgrinding Chippedslagmaybehotandcanflyfar Bys...

Страница 6: ...2 ExposuretoEMFmayhaveotherhealtheffectswhich are unknown 3 Welders should use the following procedures to minimize exposure to EMF A Route the electrode and work cables together Secure them with tap...

Страница 7: ...available from Compressed Gas Association 1235 Jefferson Davis Highway Arlington VA 22202 EQUIPMENT MAINTENANCE Faulty or improperly maintained equipment can cause injury or death Therefore 1 Alwaysha...

Страница 8: ...Safe Practices for Welding and Cutting of Containers That Have Held Hazardous Substances Meaning of symbols As used throughout this manual Means Atten tion Be Alert Your safety is involved Meansimmed...

Страница 9: ...s del arco y chis pascalientesconunacortina adecuadano flamable como divisi n 6 Usecaretaprotectoraadem sdesusgafasdesegu ridad cuando est removiendo escoria o puliendo La escoria puede estar caliente...

Страница 10: ...2 Exponerseacamposelectromagn ticos EMF puede causar otros efectos de salud a n desconocidos 3 Los soldadores deber n usar los siguientes proced imientos para minimizar exponerse al EMF A Mantenga el...

Страница 11: ...IENTO DEL EQUIPO Equipo defectuoso o mal mantenido puede causar da o o muerte Por lo tanto 1 Siempre tenga personal cualificado para efec tuar l a instalaci n diagn stico y mantenimiento del equipo No...

Страница 12: ...n Est Alerta Se trata de su seguridad Significa riesgo inmediato que de no ser evadido puede resultar inmediatamente en serio da o personal o la muerte Significa el riesgo de un peligro potencial que...

Страница 13: ...tection Ils r capitulent les informations de pr caution provenant des r f rences dans la section des Informations de s curit suppl mentaires Avant de proc der l installation ou d utiliser l unit assur...

Страница 14: ...aise persiste 4 Consultez ANSI ASC Standard Z49 1 la page suivante pour des recommandations sp cifiques concernant la ventilation 1 Assurez vous que le ch ssis de la source d alimentation est branch a...

Страница 15: ...z contenant des chimiques consid res par l tat de la Californie comme tant une cause des malformations cong nitales et dans certains cas du cancer California Health Safety Code 25249 5 et seq MANIPULA...

Страница 16: ...Soyez vigilant Votre s curit est en jeu Signifie un danger imm diat La situation peut entra ner des blessures graves ou mortelles Signifieundangerpotentielquipeutentra nerdes blessures graves ou mort...

Страница 17: ...12FT CO2 Packages with 12ft GM 250 Torch MT 250SG 0558101418 MM 300 230V NAS 12FT MT250 SG 0558101428 MM 300 575V NAS 12FT MT250 SG Packages with 12ft GM 250 Torch ST 23A 0558101420 MM 300 230V NAS 1...

Страница 18: ...vac 1 phase 50 50 Hz 0558007778 230 575 vac 1 phase 50 60 Hz 0558007779 If TIG Set with Thumb Control Remote is desired for the above add one of the TIG Stick sets listed on the next page If you wish...

Страница 19: ...15 ft Electrode Holder 12 5 ft or 25 ft HW 17V 2TL Torch Torch Accessory Kit Remote Control Module TC 2B Thumb Control and TIG Handbook TIG Stick Set 12 5 ft 0558004449 TIG Stick Set 25 ft 0558004450...

Страница 20: ...uilt into the power source cabinet housed separately from the welding machine electri cal components Cooling air is not drawn through the wire feedercompartmentorelectroniccontrolsreducingexposure to...

Страница 21: ...r 400 Mig Gun 15 Work Cable and Clamp Simple To Use Weld Controls Figure 1A Components Large Easy To Read Digital Displays for Wire Speed Amps and Volts Simple and quick polarity change over section 2...

Страница 22: ...th Small Parts Tray Primary Input Voltage Reconnect Panel under this cover 4 Roll Drive Stand Adaptable Spindle Assembly Inductance Burnback Preflow postflow Spot Options Figure 1B Components section...

Страница 23: ...bar To install the handle in its proper position do the following A Removethetwosheetmetalscrewsfromthebracketson each side of the front handle assembly See Figure 3A B Removefronthandleassemblyandrev...

Страница 24: ...ct or breaker can be wired to a single phase system or two conductors of a three phase system A third conductor for grounding must be connected between the disconnect and the receptacle Thetermi nalla...

Страница 25: ...nput Terminal Board 230 460 575 Vac Model 575 Vac Configuration Figure 4D Input Terminal Board 208 230 Vac Model 208 Vac Configuration Figure 4E Input Terminal Board 208 230 Vac Model 230 Vac Configur...

Страница 26: ...iameter wire the large groove feeds 052 in wire for the MultiMaster 300X the small groove feeds 035 in diameter wire the large groove feeds 045 in wire The groove nearest the gear motor feeds the wire...

Страница 27: ...se drag or counterclock wise to decrease it Drag should be just enough to limit wire overrun 3 8 CONNECTION OF SHIELDING GAS SUPPLY 3 8 1 R 33 FM 320 Flowmeter Regulator The R 33 FM 320 Flowmeter Regu...

Страница 28: ...icalcomponents in the regulator When the gauge needle stops moving then open the cylinder valve fully I Using a leak test solution such as P N 998771 8 oz ctr or soapy water test for leakage around th...

Страница 29: ...retains the welding conditions After welding stops the display will continue to show the last welding current and voltage sampled for 10 seconds then returns to 0 Figure 11 Burnback Control 4 1 8 TIG...

Страница 30: ...age Set MIG Current Set STICK TIG Wire Feed Speed Trim IPM Figure 12 Control Panel Main Power Switch Spool Gun Control Module Option Remote Control Module Option Mig Gun NAS Connection Positive Output...

Страница 31: ...adjust this control as desired to optimize personal preferences of weld ing characteristics OPTIONAL PN 0558002889 Figure 15 This optional control is mounted in place of the standard burnback control...

Страница 32: ...Step 2 Place theWELD PROCESS 1 switch in the MIG cen ter position then press the PRESET button Step 3 Turn the Wire Feed Speed Knob 3 to the desired speed in the top digital display window Step 4 Turn...

Страница 33: ...052 1 4mm Argon 25 CO2 or 100 CO2 as recommended in product data sheet Polarity DCEP Electrode Positive Polarity DCEP Electrode Positive Polarity DCEP Electrode Positive Polarity DCEN Electrode Negati...

Страница 34: ...n Figure 20 TIG Polarity Connection Figure 21 TIG Front Control Panel Table 4 TIG PARAMETERS CHART When the WELD PROCESS switch is moved to the TIG or STICK position electrode becomes electrically HOT...

Страница 35: ...Connection NOTE Due to built in Arc Force control the Actual current while weld ingmaydifferfromthe Pre set value Iftheweldingvoltagefalls below 23 volts the actual welding current will be greater tha...

Страница 36: ...the end of the electrode touches the plate The arc will then strike Once the electrode scratches the plate retract the torch approximately 1 8 This will establish the arc The arc can be struck on the...

Страница 37: ...Multimaster300 300X POSTE DE SOUDAGE MIG TIG OU LECTRODE ENROB E 0558007770 06 2010 Manuel d instructions FR CAN...

Страница 38: ...fication par une personne autre que le fabricant ou un centre de service d sign par le fabricant ASSUREZ VOUS QUE CETTE INFORMATION EST DISTRIBU E L OP RATEUR VOUS POUVEZ OBTENIR DES COPIES SUPPL MENT...

Страница 39: ...ctions de sortie secondaires 51 3 6 Connecteurs torches pour NAS 52 3 7 M canisme de d vidoir 52 3 8 Connexions du d bit de gaz de protection 53 4 0 Fonctionnement 55 4 1 Commandes standards 55 4 2 Co...

Страница 40: ...40 TABLE DES MATI RES...

Страница 41: ...orc 3 Le lieu de travail doit tre am nag convenablement pour acqu rir le mat riel en toute s curit libre de courants d air 4 quipement de s curit personnelle Vous devez toujours utiliser un quipement...

Страница 42: ...es projections peuvent causer un incendie Assurez vous qu il n y a pas de mat riel inflammable proximit de l appareil BRUIT un bruit excessif peut endommager la capacit auditive Prot gez vos oreilles...

Страница 43: ...12FT CO2 Packages with 12ft GM 250 Torch MT 250SG 0558101418 MM 300 230V NAS 12FT MT250 SG 0558101428 MM 300 575V NAS 12FT MT250 SG Packages with 12ft GM 250 Torch ST 23A 0558101420 MM 300 230V NAS 1...

Страница 44: ...400 NAS torch 208 230 vac 1 phase 50 50 Hz 0558007778 230 575 vac 1 phase 50 60 Hz 0558007779 If TIG Set with Thumb Control Remote is desired for the above add one of the TIG Stick sets listed on the...

Страница 45: ...ee connector 1 male 2 female 13792804 Tig Stick Sets Includes 15 ft Electrode Holder 12 5 ft or 25 ft HW 17V 2TL Torch Torch Accessory Kit Remote Control Module TC 2B Thumb Control and TIG Handbook TI...

Страница 46: ...atre galets d entra nement est int gr dans l armoire de la g n ratrice et est situ dans un compartiments par desautrescomposants lectriques L air de refroidissement ne circule pas travers le compartim...

Страница 47: ...travail de 15 avec pince Commandes de soudage faciles utiliser Figure 1A Composants Affichage num rique large pour la vitesse du c ble l amp rem tre et le voltm tre facile lire Changement de polarit...

Страница 48: ...Panneau de raccordement de la tension d entr e principale sous ce couvercle Support pour 4 galets d entra nement Ensemble de l axe adaptable pr d bit postd bit soudage par points anticollage en optio...

Страница 49: ...nue Pour installer la poign e dans la bonne position suivez les tapes suivantes A Enlevezlesdeuxvis t ledespattesdefixationsetrouvant de chaque c t de l assemblage de la poign e avant Voir la figure 3...

Страница 50: ...joncteur peut tre branch soit un syst me monophas soit deux conducteurs triphas s Un troisi meconducteurassurantlamise terredoit trebranch entre le sectionneur et la prise La borne tiquet e GRD est br...

Страница 51: ...d le 208 230 vca Configuration 575 vca Figure 4D borne d entr e mod le 208 230 vca Configuration 208 vca Figure 4E borne d entr e mod le 230 460 575 vca configuration 230 vca 3 5 CONNEXIONS DE SORTIE...

Страница 52: ...d un diam tre de 0 045 po tandis que la plus large entra ne le fil d un diam tre de 0 052 po 300 la petite gorge est destin e au fil d un diam tre de 0 035 po tandis que la plus large entra ne le fil...

Страница 53: ...e tra nage devrait tre suffisamment bas pour emp cher au fil de trop se d vider 3 8 CONNEXION DU D BIT DE GAZ DE PROTECTION 3 8 1 D bitm tre r gulateur R 33 FM 320 Le d bitm tre r gulateur R 33 FM 320...

Страница 54: ...r Lorsque l aiguille de l indicateur ne bouge plus ouvrez le robinet de la bouteille fond I Enutilisantunesolutionpouressaid tanch it telleque lapartienum ro998771 8ozrce oudel eausavonneuse v rifiezq...

Страница 55: ...de la tension et su soudage resteront affich es pour une dur e de 10 secondes avant de se remettre 0 Figure 11 Commande d anticollage 4 1 8 SOUDAGE TIG ET LECTRODE ENROB E En fonctionTIG et LECTRODE...

Страница 56: ...la tension MIG R glage du courant lectrode enrob e mig Fonction de vitesse du d vidoir PPM Figure 12 Panneau de commande interrupteur d alimentation principal module de commande pour pistolet d vidoir...

Страница 57: ...rateurpeutr glercettecommandeselonses sp cifications d applications de soudage personnelles 4 2 2 PR D BIT POSTD BIT SOUDAGE PAR POINTS ANTICOLLAGE A Pr d bit postd bit La commande de PR D BIT sert r...

Страница 58: ...SET tape 3 R glez le s lecteur de r glage de vitesse d entra nement du fil WIRE FEED SPEED 3 la vitesse d sir e la vitesse est indiqu e sur l cran d affichage num rique sup rieur tape 4 R glez le s le...

Страница 59: ...mm 052 1 4mm 052 1 4mm Argon 25 CO2 or 100 CO2 as recommended in product data sheet Polarity DCEP Electrode Positive Polarity DCEP Electrode Positive Polarity DCEP Electrode Positive Polarity DCEN Ele...

Страница 60: ...GE TIG Lorsque le s lecteur de proc d est la position TIG ou LECTRODE ENROB E l lectrode est charg e L lec trode ne doit pas venir au contact du potentiel de terre avant que vous soyez pr t e commence...

Страница 61: ...tr elpeutnepascorrespondreaucourantpr r gl Si la tension de soudage devient inf rieure 23 V le courant de soudage r el sera sup rieur au courant pr r gl Figure 23 Panneau de commande avant pour le sou...

Страница 62: ...on ce que l extr mit de l lec trodetouchelaplaquette L amor agedel arcseproduira D s que l amor age d arc a eu lieu retirez l lectrode de fa on ce qu elle soit environ 1 8 Cela permettra d tablir l a...

Страница 63: ...ve insulation and other electrical hazards IF UNINSULATED CABLE AND PARTS ARE NOT RE PLACED AN ARC CAUSED BY A BARE CABLE OR PART TOUCHING A GROUNDED SURFACE MAY DAMAGE UNPROTECTEDEYESORSTARTAFIRE BOD...

Страница 64: ...contactor These thermal switches will reset auto maticallyaftertheheatsinkortransformerwindingshave cooled to a safe level While de energized the contactor can not be oper ated But if the gun trigger...

Страница 65: ...rts Refer to the Communications Guide located on the back page of this manual for a list of customer service phone numbers 6 2 Ordering 6 0 Replacement Parts Items listed in the following Bill of Mate...

Страница 66: ...66 section 6 replacement parts...

Страница 67: ...67 section 6 replacement parts 26...

Страница 68: ...68 section 6 replacement parts...

Страница 69: ...69 section 6 replacement parts...

Страница 70: ...70 section 6 replacement parts...

Страница 71: ...71 section 6 replacement parts...

Страница 72: ...72 section 6 replacement parts...

Страница 73: ...73 section 6 replacement parts...

Страница 74: ...74 section 6 replacement parts...

Страница 75: ...75 section 6 replacement parts...

Страница 76: ...76 section 6 replacement parts Mulitmaster 300 Mulitmaster 300X...

Страница 77: ...77 section 6 replacement parts Mulitmaster 300 Mulitmaster 300X...

Страница 78: ...78 section 6 replacement parts Mulitmaster 300 Mulitmaster 300X...

Страница 79: ...79 section 6 replacement parts Mulitmaster 300 Mulitmaster 300X...

Страница 80: ...80 section 6 replacement parts Mulitmaster 300 Mulitmaster 300X...

Страница 81: ...81 section 6 replacement parts Mulitmaster 300 Mulitmaster 300X...

Страница 82: ...Axle Pressure Roll Locating Pin Nut Pressure Roll Axle Circlip Retaining Screw Pressure Arm Spring Bogie Auto Lift Spring to Pressure Arm Auto Lift Spacer Tube Small Spacer Tube Big DESCRIPTION Space...

Страница 83: ...in 0 8 mm 035 in 0 9 mm 045 in 1 2 mm 030 in 0 8 mm 035 in 0 9 mm 040 in 1 0 mm 045 in 1 2 mm 052 in 1 4 mm 1 16 in 1 6 mm 5 64 in 2 0 mm 0558001499 0558001499 0558001498 0558001498 030 in 0 8 mm 035...

Страница 84: ...section 6 replacement parts...

Страница 85: ...revision history 1 Original release April 2008 2 revision June 2009 updated replacement parts per ECN 093115 3 revision June 2010 changed name to 300 300X updated BOM s...

Страница 86: ...x 843 664 5557 Hours 7 30 AM to 3 30 PM EST Repair Estimates Repair Status F WELDING EQUIPMENT TRAINING Telephone 843 664 4428 Fax 843 679 5864 Hours 7 30 AM to 4 00 PM EST Training School Information...

Отзывы: