26
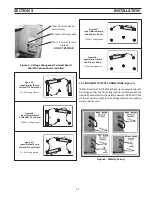
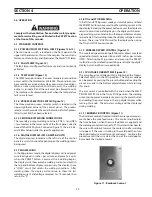
3.6 “nas” torch connectIons (figure 6)
To install a Gun Master Mig Gun 400, remove the locking
knob on the side of the NAS connector and insert the male
power pin of the gun. Be sure the o-rings are securely seated
by pushing inward on the power pin while tightening the
locking knob.
Install a spool of welding wire on the spindle as follows:
A. Remove the locking pin from the spindle (
figure 8
).
B. Place wire spool on the spindle to rotate clockwise as
wire is unwound; spindle brake pin must engage hole in
spool.
C. Replace the locking pin into the spindle hole closest to
the spool.
3.7.3 threaDIng WelDIng WIre
A. Turn off power switch.
B. Release pressure drive roll assembly. Check that proper
wire diameter grooves are in the inner position.
3.7 WIre feeDer MechanIsM
3.7.1 DrIVe rolls (figure 7 and 9)
The drive roll has two grooves:
for the MultiMaster 300
- the small groove feeds .045 in.
diameter wire, the large groove feeds .052 in. wire.
for the MultiMaster 300X
- the small groove feeds .035 in.
diameter wire, the large groove feeds .045 in. wire.
The groove nearest the gear motor feeds the wire. If the
required groove is not correctly positioned, perform the fol-
lowing:
A. Release the pressure drive roll lever.
B. Remove the two (2) screws holding the drive rolls to the
gears.
C. Reverse the drive roll on the drive roll shaft.
D. Replace the screws and tighten.
E. Secure the pressure drive roll assembly.
figure 6 - nas gun connector
Locking Knob
Feed Roll Release Screws
figure 7 - Wire feeder Mechanism
3.7.2 WelDIng WIre spool InstallatIon
as with any work area, make sure safety glasses with side
shields are worn when handling or changing wire or clip-
ping wire off at the spool or at the end of the torch. hold
onto the wire coming off the spool with one hand before
clipping. serious eye injury can result due to the resilience
of the wire which can quickly unravel, or a cut wire end
which may shoot across the room.
figure 8 - spindle assembly
Locking Pin
Spool Spindle
sectIon 3
InstallatIon
Содержание Multimaster 300
Страница 1: ...Multimaster300 300X MIG TIG STICK WELDING PACKAGE 0558007770 06 2010 Instruction Manual...
Страница 4: ...4 table of contents...
Страница 40: ...40 TABLE DES MATI RES...
Страница 66: ...66 section 6 replacement parts...
Страница 67: ...67 section 6 replacement parts 26...
Страница 68: ...68 section 6 replacement parts...
Страница 69: ...69 section 6 replacement parts...
Страница 70: ...70 section 6 replacement parts...
Страница 71: ...71 section 6 replacement parts...
Страница 72: ...72 section 6 replacement parts...
Страница 73: ...73 section 6 replacement parts...
Страница 74: ...74 section 6 replacement parts...
Страница 75: ...75 section 6 replacement parts...
Страница 76: ...76 section 6 replacement parts Mulitmaster 300 Mulitmaster 300X...
Страница 77: ...77 section 6 replacement parts Mulitmaster 300 Mulitmaster 300X...
Страница 78: ...78 section 6 replacement parts Mulitmaster 300 Mulitmaster 300X...
Страница 79: ...79 section 6 replacement parts Mulitmaster 300 Mulitmaster 300X...
Страница 80: ...80 section 6 replacement parts Mulitmaster 300 Mulitmaster 300X...
Страница 81: ...81 section 6 replacement parts Mulitmaster 300 Mulitmaster 300X...
Страница 84: ...section 6 replacement parts...


