background image


# VSH400PLC090909 


- 22 - 


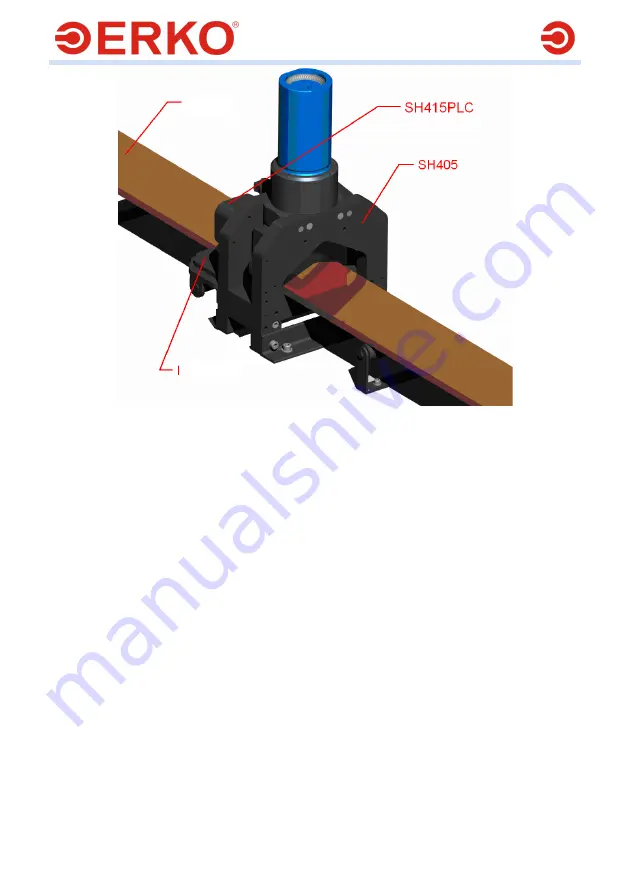
Fig. 26. 

 
8.5   WORKING WITH AN EXTERNAL HEAD 


Prepare the station as described in 6.1 


Equip the pressure conduit with an external head and enter the settings as 
described in item 6.7 


Equip the head and follow the procedure described in the head technical 
documentation. 


Press the pedal Q3 to start the head. 


Release the pedal to stop the process – the working element of the head will 
return to its starting position. 

NOTES: 
Do not disconnect the head during its operation. 
Disconnect the head and the conduit after the head working element has returned 
to its starting position. 


After the head and the conduit have been disconnected, put screens on the quick 
couplers. 


busbar 

slide 

Содержание SH400PLC

Страница 1: ...ółka jawna Bracia Pętlak ul Ks Jana Hanowskiego 7 11 042 JONKOWO k OLSZTYNA tel fax 48 089 5129273 NIP 739 020 46 93 e mail sprzedaz erko pl export erko pl serwis informacyjny www erko pl OPERATION MANUAL BUSBAR PROCESSING SITE SH400PLC TYPE SWW 0792 VSH400PLC090909 PKWiU 29 56 25 90 00 ...

Страница 2: ...909 1 Thank you for buying our product Before using this equipment please carefully read the user and the maintenance manuals ERKO has the right to introduce construction modifications due to equipment modernization ...

Страница 3: ...3 ACCESSORIES 4 4 MACHINE INSTALLATION 5 5 CONTROL PANEL 5 6 SOFTWARE 6 7 ZERO ADJUTING OF THE MEASUREMENT SYSTEM 11 8 TECHNOLOGY 17 9 MAINTENANCE AND OPERATION RECOMMENDATIONS 23 10 HYDRAULIC GENERATOR 24 11 WORK SEFETY AND HYGIENE MANUAL 27 12 SERVICING 27 13 DISPOSAL 27 ...

Страница 4: ...sensor of the bending angle accuracy 0 1 Built in measurement bar for positioning within an accuracy of 0 1 mm Precise regulation of the height of the hole cutting head accuracy 0 1 mm Making round and oval holes without burrs Rail cutting without distortion or burr Pedal control Built in reliable hydraulic drive 2 TECHNICAL DATA Station weight 782 64lb Max dimensions L x W x H 1400 x 850 x 1420 m...

Страница 5: ...uge SH 415PLC o o Rail offsetting insert SH 406PLC o Additional side tabletop SH 408PLC o o Extended length measurement range from 0 to 1020 SH 418PLC o o Round hole cutter dimensions as per the catalogue SH 403 o o o Oval hole blanking die dimensions as per the catalogue SH 404 o o o Rectangular hole blanking die dimensions chosen by the customer SH 409 o o o Insert for forcing in nuts SH 407 o o...

Страница 6: ...f a defect or destruction of the station Block the brakes of the station wheels Connect the equipment to the electrical power supply In order to work properly station type SH400PLC requires five line electrical network L1 L2 L3 N PE in any sequence of phases For four line network it is necessary to bridge PE and N lines in the supply socket 5 CONTROL PANEL The control panel consists of the followi...

Страница 7: ...tation switch on the main switch Q1 to position I Then a screen Fig 2 will appear on the panel screen where you will be asked to choose the user interface language by clicking the appropriate flag After the appropriate language has been selected the message Communication OK on CAN Fig 3 will appear followed by the screen from which you will select the type of operation Fig 4 Fig 2 Fig 3 Fig 4 It i...

Страница 8: ...e angle measurement insert level the insert must be connected with the assembly socket As a result the red area should disappear After all these actions have been performed the station is ready to work If only the HEAD GŁOWICA or CUTTING CIĘCIE menu is used looking for reference points is not necessary 6 2 DIE BLANKING Die blanking is the default option when you go to the BODY KORPUS menu is there...

Страница 9: ...n area L Fig 7 Fig 7 6 3 BENDING In order to start the bending operation go the BODY menu and equip the body with a punch and the measuring insert SH 401PLC E After a mandrel is installed a window will appear where you will have to define the reference points of the measurement bars Fig 8 Fig 8 Fig 9 Fig 10 Fig 11 ...

Страница 10: ... and Fig 12 showing whether the body should be lifted or lowered will help When the value has been achieved the OK message will appear in area H Fig 13 To adjust the distance between the hole centre and the rail edge Move and block the stop slide S2 to the desired distance The value of offsetting is displayed in area L Fig 13 6 4 OVERBENDING In order to start the bending operation go the BODY KORP...

Страница 11: ...d on the button 0 Fig 14 The numerical keyboard will be displayed with which you will enter the width of the rail being bent Confirm the value by pressing RET Fig 15 To adjust the body height in relation to the rail Turn the knob S1 so that the centre of the rail width coincide with the centre of the bending insert The arrow in area H in Fig 16 showing whether the body should be lifted or lowered ...

Страница 12: ... zero and gives the negative offset equal to the cutter thickness Fig 19 Fig 20 Fig 20 Fig 21 In order to adjust the length of the rail element which is being cut move it under the cutter for the desired length The value is displayed in area G Fig 21 After the desired length has been cut off the counter sets to zero and gives the offset equal to the thickness of the cutter NOTE Electronic measurem...

Страница 13: ...y time of the station operation but it is only active when the extended measurement bar is in its basic position To fold the tabletop fold up the extended measurement bar to its basic position if any press the button TABLETOP FOLDING on the control panel the button releases for 5 seconds the blockade of the tabletop blocking bolts release the bolts and lower the tabletop to the resting position bo...

Страница 14: ... 1 Switch on the power supply of the stand Fig 23 2 After selecting the language version on the control panel Fig 24 select the option KORPUS body Fig 25 Fig 24 Fig 25 3 Put the locating insert SH410PLC 2 and the offset insert 3 Fig 4 into the body 1 the screen will display a message about the instrumentation error Fig 27 Fig 26 Fig 27 3 2 1 4 5 ...

Страница 15: ...the measurement roll 1 pushing it up to the knife 2 The bus should have the length of 1 m marked counting from the side of the knife 2 Fig 29 Fig 29 8 Release the pedal and wait till the knife withdraws completely to its top position 9 Slowly but firmly shift the bus by 1 m the marked value on the bus should match the left edge of the cutting die 10 Hold the bus so as to not allow it to be moved a...

Страница 16: ...body of the measurement insert 4 Holding the immobilized levers 1 Fig 31 on the panel Fig 32 press the pushbutton A 0 at the height of the counter A 5 Return to the basic screen of the panel by taking out the locating insert 2 or the offset insert 3 Fig 26 6 Check the correctness of bending 7 If necessary scale the system of the counter A again Zero adjusting of the length measurement system count...

Страница 17: ...cond measurement range 3 Put the standard section of 1 m length 3 Fig 33a between the basing insert 2 and the measurement lever 1 4 Holding the immobilized lever on the panel press the pushbutton L2 0 at the height of the counter L 5 Return to the basic screen of the panel by taking out the locating insert 2 or the offset insert 3 Fig 26 6 Check whether the hole is correctly made with the proper d...

Страница 18: ... Return to the basic screen of the panel by taking out the locating insert 2 or the offset insert 3 Fig 26 6 Check whether the hole is correctly made with the proper distance from the edge of the bus 7 If necessary scale the system of the counter H again 8 TECHNOLOGY 8 1 DIE BLANKING NOTES When punching holes in aluminium rails lubricate the punch with oil or kerosene each time Recommended agent H...

Страница 19: ... to the bumper S2 Press the pedal Q3 to start the die blanking procedure after the operation is complete the piston rod will return to its starting position To repeat the operation release the pedal and press it again Accessories as per order Punches type SH403 hole for M6 M20 screws a set of punch and blanking die Standard dimensions Designation Hole diameter mm For a screw M SH403 6 6 ν 6 6 6 SH...

Страница 20: ...ical properties of rails made of copper or aluminum may vary different cross sections have different moment of inertia this may result in different bending angles The property is particularly linked to the moment of inertia of a cross section In order to perform precise bending bend a rail by an angle which is smaller by 5 10 from the target value and measure the angl e with a measuring insert Cal...

Страница 21: ...ail into the bending space and move the rail to the bumper S2 Set the offsetting value with a knob Fig 25 Press the pedal Q3 to start the offsetting procedure after the operation is complete the piston rod will return to its starting position To repeat the operation release the pedal and press it again Note Offestting process should be run only within the cylindrical elements of the insertion Do n...

Страница 22: ...in 6 6 Move the rail into the space between the cutters set the appropriate distance from the rail edge centre and block the rail with the guide Press the pedal Q3 to start the cutting process To repeat the operation release the pedal Q3 move the rail be the desired length and press the pedal Q3 again knop crank ...

Страница 23: ...ibed in the head technical documentation Press the pedal Q3 to start the head Release the pedal to stop the process the working element of the head will return to its starting position NOTES Do not disconnect the head during its operation Disconnect the head and the conduit after the head working element has returned to its starting position After the head and the conduit have been disconnected pu...

Страница 24: ... 46 Fix the shield Install the crank S1 Defects Problem Cause Solution 1 The power supply control lamp is not lit after the machine is switched on a No power supply b Absence of 1 phase c Voltage drop to 175 V phase Check the source of power 2 The machine switches off during operation a Phase decay on the engine b The engine fuse action c Power decay Check the source of power and engine fuse 3 Lou...

Страница 25: ... generator 10 2 TECHNICAL DATA Supply voltage 3x230 400 V 50 Hz power 1 1 kW Work type S340 maximal pressure 630 bar Design rating 0 33 gal min Control 24 V DC Working medium L HM 22 Tank volume ca 5 dm 3 10 3 Construction of the power unit Fig 26 A compact pump supply consists of an oil tank with built in elements which comprise the hydraulic system elektrovalve 3 oil level gauge elektrovalve 2 e...

Страница 26: ...e equipment Switch off the electrical power supply when carrying out any maintenance work the hydraulic system should be unloaded The supply generates high pressures Any pressure leak may result in unexpected consequences Take special precautions when operating the equipment Upon releasing the seals the operator loses the guarantee for the entire hydraulic system The maximum working pressure was s...

Страница 27: ...d the pump is working evenly and quietly In the case of a power unit loud and uneven work and no power the air removal operation should be repeated Skipping this procedure will prevent obtaining proper working pressure level and in extreme situations will result in pump seizure When operating the station check the system tightness every day and regularly remove any leaks of oil and check its level...

Страница 28: ...irs in order to prevent accidental machine starting 6 Personnel should wear adequate protective gear while operating the equipment 7 The SH400 PLC station should only be used for its intended use 8 Prevent debris collection around the machining station In case of high dust concentration cover the equipment 9 Starting the equipment while performing any maintenance assembly disassembly positioning t...

Отзывы: