166
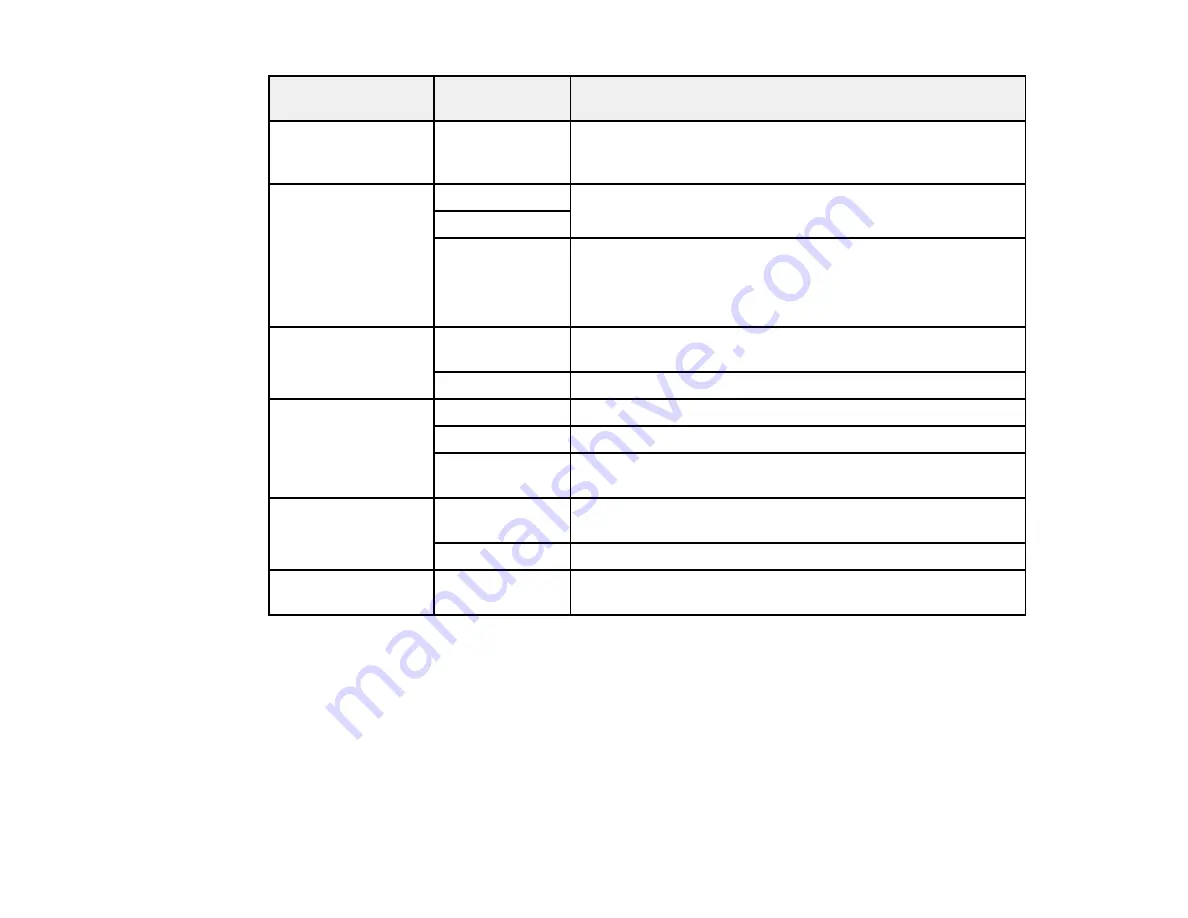
Print settings
Available
options
Description
Paper Type
Various paper
types
Indicates the type of paper you have loaded; see the list of
paper types for copying (available options depend on the
selected
Paper Size
setting)
Paper Cassettes
Cassette 1
Displays the paper settings for the cassettes
Cassette 2
Cassette 1 > 2
Prints onto paper loaded in Cassette 1 and then onto paper
loaded in Cassette 2 when the first cassette is empty (load
the same size and type of paper in both cassettes when
selecting this option)
Border
Borderless
Expands the image to the edge of the paper (slight cropping
may occur)
With Border
Leaves a small margin around the image
Expansion
Standard
Expands images correctly for most borderless prints
Medium
Expands images slightly less for borderless prints
Minimum
Expands images the least amount for borderless prints (you
may see some white border)
Fit Frame
On
Automatically crops the photo to fit into the selected photo
layout
Off
Turns off automatic cropping
Date
Various date
formats
Prints the date the photo was taken on the photo in the
format you select
Содержание XP-6000
Страница 1: ...XP 6000 User s Guide ...
Страница 2: ......
Страница 13: ...13 XP 6000 User s Guide Welcome to the XP 6000 User s Guide For a printable PDF copy of this guide click here ...
Страница 24: ...24 Product Parts Inside 1 Document cover 2 Scanner glass 3 Memory card slot ...
Страница 57: ...57 1 Slide in the output tray 2 Open the front cover until it clicks ...
Страница 58: ...58 3 Pull on the front cover to slide out the lower paper cassette 4 Slide the edge guides outward ...
Страница 131: ...131 You see an Epson Scan 2 window like this ...
Страница 133: ...133 You see an Epson Scan 2 window like this ...
Страница 135: ...135 You see this window ...
Страница 178: ...178 2 Select Settings and press the OK button 3 Select Camera Print Settings and press the OK button ...
Страница 183: ...183 1 Open the front cover 2 Raise the control panel ...
Страница 264: ...264 Caution Do not touch the flat white cable or the metal bar inside your product 3 Close the scanner unit ...


