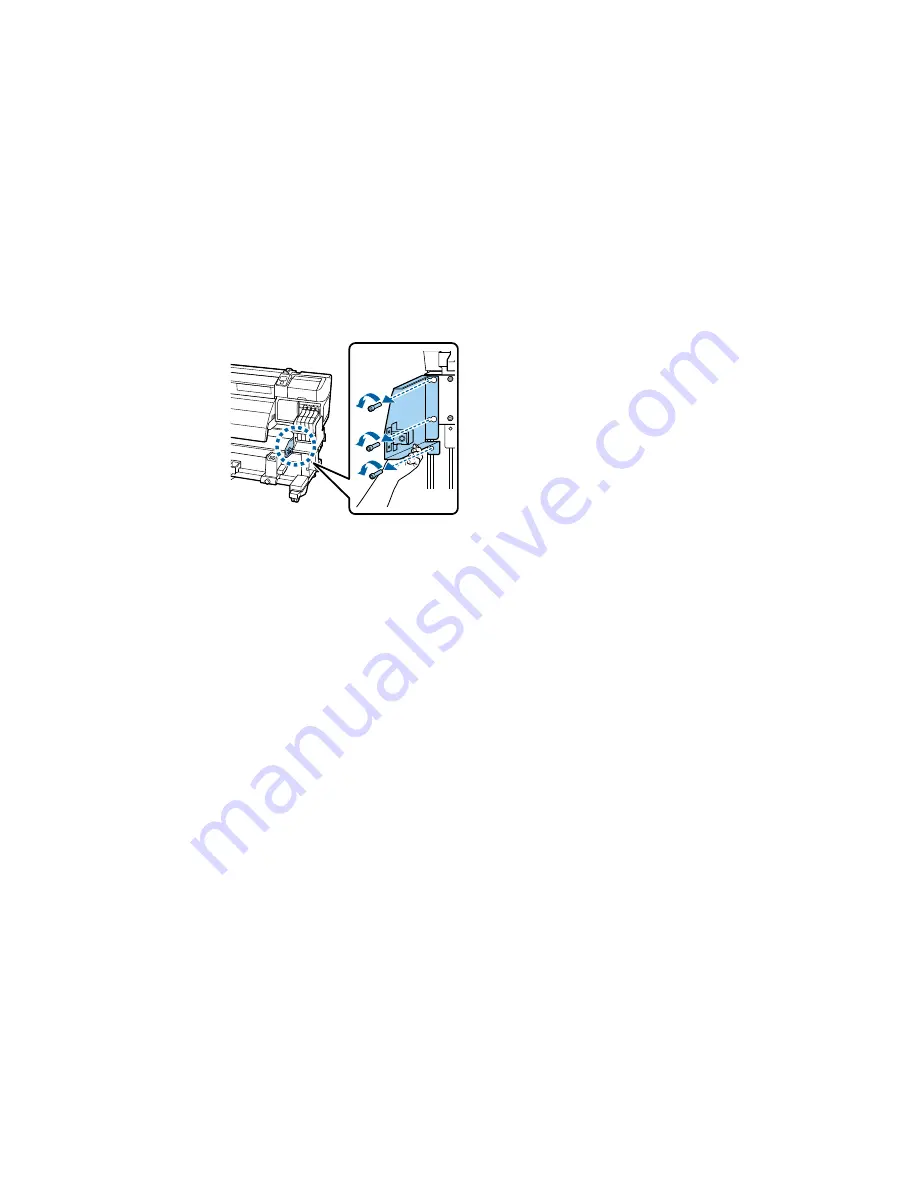
7.
While supporting the tank cover holding plate, use the large hexagon wrench to remove the three
screws securing the plate. Then remove the plate.
Parent topic:
Moving or Transporting the Product
Related tasks
Attaching the Media Guide Bar
Setting Up the Product After Moving
Follow these steps to set up the product after moving it.
1.
Verify that the location is suitable for installation.
2.
Reattach the media guide bar, if you removed it.
3.
Perform parallel adjustment for the media feeding unit and auto take-up reel as necessary.
4.
Install the waste ink bottle.
5.
Connect the power cable to an electrical outlet and turn on the printer.
6.
Load media in the product.
7.
Perform a nozzle check and confirm that there are no clogged nozzles.
8.
Align the print head and check the print quality.
Parent topic:
Moving or Transporting the Product
Related tasks
Replacing the Waste Ink Bottle
138
Содержание SureColor F7200
Страница 1: ...Epson SureColor F7200 User s Guide ...
Страница 2: ......
Страница 7: ...Epson SureColor F7200 User s Guide Welcome to the Epson SureColor F7200 User s Guide 7 ...
Страница 11: ...Slider Chip Holder Parts 1 Slider 2 Ink inlet cover 3 Chip unit LAN Port Parts 11 ...
Страница 34: ...21 Open the front cover 22 Lower the media loading lever to hold the media in place 34 ...
Страница 50: ...1 Move the Auto switch to the off position 50 ...
Страница 65: ...1 Move the Auto switch to the off position 2 Cut the media and roll the cut end onto the auto take up reel 65 ...
Страница 68: ...7 Lower the media roll onto the roll support Parent topic Using the Auto Take up Reel 68 ...
Страница 86: ...2 Grasp the loop at the top of the ink inlet cap and slowly remove the ink inlet cap 86 ...
Страница 97: ...Rest the stirring stick on the tab at the edge of the tank as shown 97 ...
Страница 98: ...10 Cut or tear off the ink pack spout seal 98 ...
Страница 110: ...4 Clean the front and back of the wiper Caution If the wiper has split or broken as shown here replace the wiper 110 ...
Страница 111: ...5 Clean the bottom of the wiper as shown here 6 Inside the product clean the wiper attachment points as shown here 111 ...
Страница 123: ...3 Grasp the wiper cleaner and lift it out of your product as shown 123 ...
Страница 124: ...4 Place the new wiper cleaner on the attachment point shown here and press it down until it clicks into place 124 ...
Страница 125: ...5 Hold the wiper by the attachment point tilt it to the left as shown and lift it out of the product 125 ...
Страница 128: ...4 Remove the left media holding plate as shown here then remove the right media holding plate in the same manner 128 ...
Страница 129: ...5 Align the white line on a new media holding plate with the edge of the platen 129 ...
Страница 141: ...6 Using the large hexagon wrench tighten the two screws securing the left bracket as shown 141 ...
Страница 159: ...6 Place the tabs over the screws at the front of the product and attach them as shown 159 ...
Страница 180: ...19 Use the small hexagon wrench to loosen the two screws 180 ...
Страница 182: ...21 Use the small hexagon wrench to tighten the two screws 22 At the back of the product remove the counterweight 182 ...


