background image

Correcting Distortion in the Projected Image

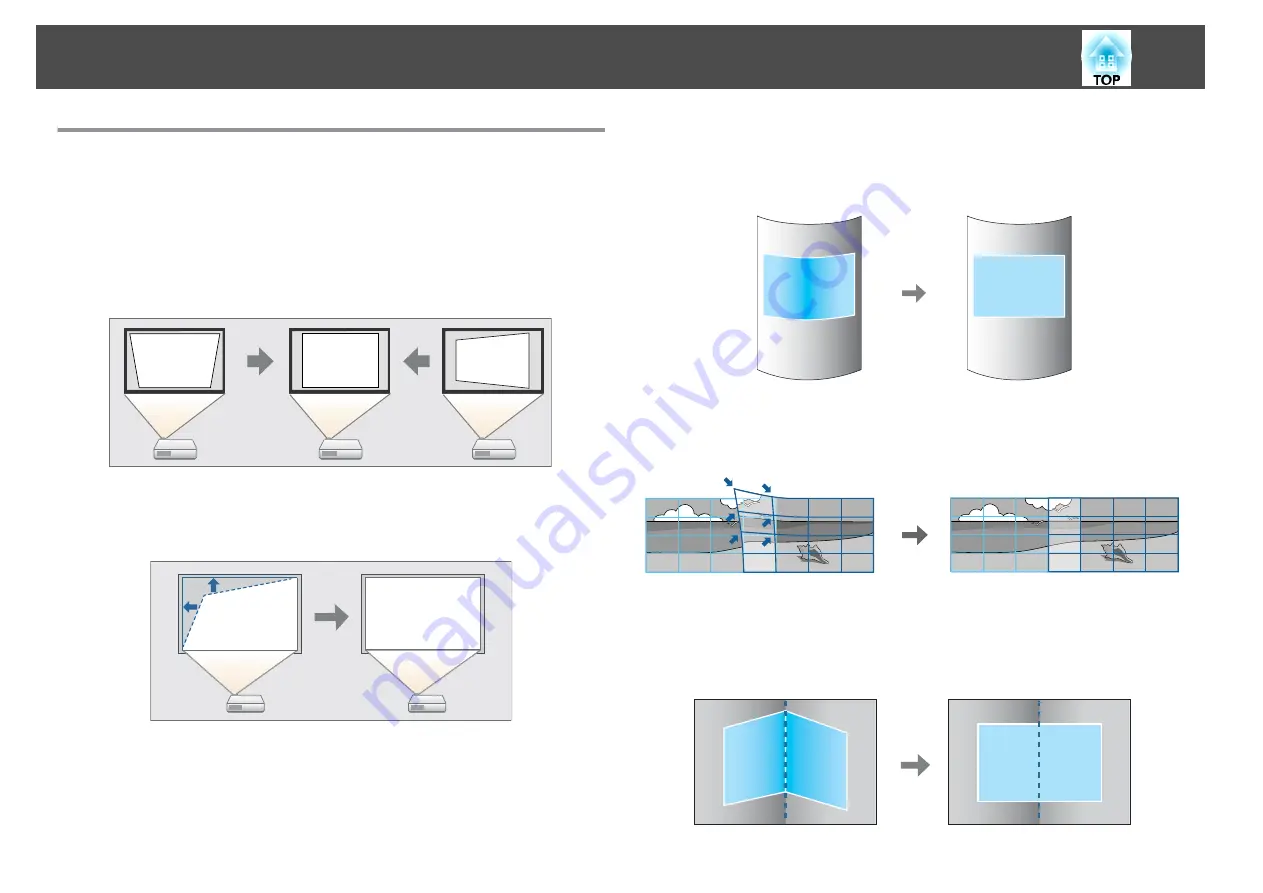
You  can  correct  keystone  distortion  in  projected  images  using  one  of  the
following  methods.

H/V-Keystone
Manually  correct  keystone  distortion  in  the  horizontal  and  vertical
directions  independently.

s

 "H/V-Keystone"  

p.61

Quick  Corner
Manually  correct  the  four  corners  independently.

s

 "Quick  Corner"  

p.62

Curved  Surface
Manually  correct  distortion  that  occurs  when  projecting  on  a  curved
surface,  and  adjust  the  amount  of  expansion  and  contraction.

s

 "Curved  Surface"  

p.63

Point  Correction
Corrects  slight  distortion  which  occurs  partially,  or  adjusts  the  image
position  in  an  overlapping  area  when  projecting  from  multiple  projectors.

s

 "Point  Correction"  

p.65

Corner  Wall
Manually  correct  distortion  that  occurs  when  projecting  on  a  surface  with
right  angles,  such  as  a  square  pillar  or  the  corner  of  a  room,  and  adjust
the  amount  of  expansion  and  contraction.

s

 "Corner  Wall"  

p.67

Adjusting Projected Images

60

Содержание EB-Z10000U

Страница 1: ...User s Guide ...

Страница 2: ...e to incorrect handling General information indications Attention Indicates contents that could cause damage or malfunction to the projector a Indicates additional information and points which may be useful to know regarding a topic s Indicates a page where detailed information regarding a topic can be found g Indicates that an explanation of the underlined word or words in front of this symbol ap...

Страница 3: ...vent it from falling such as passing a wire through the handles If you use adhesives on the ceiling mount fixing points to prevent the screws from loosening or if you use things such as lubricants or oils on the projector the projector case may crack causing it to fall from its ceiling mount This could cause an accident or injury to anyone under the ceiling mount When installing or adjusting the c...

Страница 4: ...ector on an unstable surface such as on an unstable table or tilted surface When projecting vertically install the projector appropriately to prevent the projector from falling Otherwise it may cause an injury Attention Do not install the projector in a location that is subject to vibration or shock Do not install the projector near a high voltage line or object that generates magnetism Otherwise ...

Страница 5: ...s operating life may be reduced significantly s Setting the direction p 30 Using the projector at an improper angle or setting the Configuration menu incorrectly causes malfunctions and shortens the operating life of optical parts Attention Make sure there is a gap at least as wide as shown in the following illustration between the wall and the air exhaust vent and the air intake vent Air exhaust ...

Страница 6: ... adjust by moving the image from the bottom to the top If it is adjusted from the top to the bottom the image position may move down slightly after adjusting Notes on portrait projection An optional frame is required for portrait projection s Optional Accessories p 198 Attention When performing portrait projection attach lamp units for portrait use on both Lamp 1 and Lamp 2 If dedicated lamps are ...

Страница 7: ...urn off the power and immediately back on Turning the power on and off frequently may shorten the lamp s operating life Only remove the lens unit when necessary If dust or dirt enters the projector projection quality deteriorates or it could cause a malfunction Try not to touch the lens section with your hand or fingers If fingerprints or oils are left on the surface of the lens projection quality...

Страница 8: ...hen Moving Nearby prepare the following and then pack up the projector Retract the feet for storing Remove the lens unit if an optional lens other than the standard zoom lens is attached Attach the standard zoom lens if the projector has a built in lens If the projector does not have a lens attach the cover that was on the lens mount when you purchased the projector The vertical and horizontal len...

Страница 9: ... ID Settings 39 Setting the projector ID 39 Checking the projector ID 39 Setting the remote control ID 40 Connecting Equipment 41 Connecting a Computer 41 Connecting Image Sources 42 Connecting to an External Monitor 44 Connecting a LAN Cable 45 Connecting an HDBaseT Transmitter 46 Installing the Wireless LAN Unit ELPAP07 47 Using the Quick Wireless Connection USB Key 48 Batch Setup 49 Setup Using...

Страница 10: ...ng a User s Logo 96 Memory Function 98 Saving Loading Erasing the Memory 98 Scheduling Function 100 Setting the Time 100 Saving a Schedule 101 Setting a schedule 101 Lamp Relay Mode 102 Checking a schedule 104 Editing a schedule 105 Security Functions 107 Managing Users Password Protection 107 Kinds of Password Protection 107 Setting Password Protection 108 Entering the Password 109 Restricting Op...

Страница 11: ...ant to change the language for messages and menus 168 Email is not received even if a problem occurs in the projector 168 The battery that saves your clock settings is running low is displayed 169 Cannot change settings using a Web browser 169 Event ID 170 Maintenance Cleaning 172 Cleaning the Projector s Surface 172 Cleaning the Lens 172 Cleaning the Air Filter 172 Replacing Consumables 175 Repla...

Страница 12: ...7 207 Projection Distances for EB Z11005 EB Z11000 EB Z9870 208 Standard zoom lens ELPLS04 209 Short throw zoom lens ELPLU02 210 Rear projection wide lens ELPLR04 211 Wide zoom lens ELPLW04 212 Middle throw zoom lens ELPLM06 213 Middle throw zoom lens ELPLM07 214 Long throw zoom lens ELPLL07 216 Supported Monitor Displays 218 Supported Resolutions 218 Computer signals analog RGB 218 Component vide...

Страница 13: ...Introduction This chapter explains the names for each part ...

Страница 14: ...etract to adjust the horizontal tilt The front feet can be removed when the projector is installed on a ceiling s Adjusting the tilt of the projected image for normal installment p 36 E Remote receiver Receives signals from the remote control s Remote control operating range p 24 F Interface cover Remove this cover to connect cables to the ports inside when connecting the projector to video equipm...

Страница 15: ...ract to adjust the horizontal tilt The front feet can be removed when the projector is installed on a ceiling s Adjusting the tilt of the projected image for normal installment p 36 C Lamp cover open lever Use this lever to open the lamp cover s Replacing the Lamp p 175 D Remote receiver Receives signals from the remote control s Remote control operating range p 24 E Status indicators The color of...

Страница 16: ...following ports by removing the interface cover For information on how to remove the interface cover and connect video equipment see the following s Attaching and Removing the Interface Cover p 28 s Connecting Equipment p 41 Name Function A SDI input port For EB Z10005U EB Z10000U EB Z9875U EB Z9870U only Inputs SDI signals from video equipment B BNC input port For analog RGB signals from a comput...

Страница 17: ...by maintenance personnel to control the projector This is used for batch settings s Batch Setup p 49 Name Function K Wireless LAN unit port Connects the optional wireless LAN unit s Installing the Wireless LAN Unit ELPAP07 p 47 Connects the optional Quick Wireless Connection USB Key s Using the Quick Wireless Connection USB Key p 48 This is used for batch settings s Batch Setup p 49 L Monitor out ...

Страница 18: ...ss to turn on the projector B t button Press to turn off the projector C Change input buttons Press to change to signals from each input port s Switching to the Target Image p 59 The SDI button is only available for EB Z10005U EB Z10000U EB Z9875U EB Z9870U D Auto button If pressed while projecting analog RGB signals from the Computer input port or the BNC input port you can automatically optimize...

Страница 19: ... Image Lens shift p 35 s Adjusting the Zoom p 37 s Adjusting the Focus p 37 If pressed when the Configuration menu or the Help screen is displayed menu items and setting values are selected s Using the Configuration Menu p 114 L Esc button Press to stop the current function If pressed when the Configuration menu is displayed it returns to the previous menu level s Using the Configuration Menu p 11...

Страница 20: ...og RGB signals from the Computer input port or the BNC input port you can automatically optimize Tracking Sync and Position F Freeze button Press to pause or unpause the images s Freezing the Image Freeze p 95 G Test Pattern button Displays a test pattern s Displaying a Test Pattern p 34 H Lens Shift button Press to adjust the lens shift s Adjusting the Position of the Projected Image Lens shift p...

Страница 21: ...utton User 3 button Select any frequently used item from the nine available Configuration menu items and assign it to one of these buttons s Settings Menu p 121 Name Function P Numeric buttons Enter the password s Setting Password Protection p 108 Use thisbutton toenternumbersin Network settings in the Configuration menu Q ID button Hold down this button and press the numeric buttons to select the...

Страница 22: ...ply pressing one of the buttons on the remote control Operation Set Selecting the password security settings s Managing Users Password Protection p 107 Hold down the Freeze button for more thanfive seconds The PasswordProtection screen is displayed and you can select various settings Locking or unlocking some of the operation of the buttons on the remote control s Restricting Operation p 110 Hold ...

Страница 23: ...tion Make sure you read the following manual before handling the batteries s Safety Instructions a Remove the battery cover Release the battery compartment cover catch and then lift up the cover b Replace the old batteries with new batteries Caution Check the positions of the and marks inside the battery holder to ensure the batteries are inserted the correct way If the batteries are not used corr...

Страница 24: ...Remote control operating range Part Names and Functions 24 ...

Страница 25: ...Preparing the Projector This chapter explains how to install the projector and connect projection sources ...

Страница 26: ...lity deteriorates a To make sure that keystone correction is performed correctly set the Lens Type in the Configuration menu according to the lens you are using s Extended Operation Advanced Lens Type p 122 a Remove the lens replacement cover Lightly press the lens replacement cover When the rear part rises remove the lens replacement cover b Turn the lock lever counterclockwise c Insert the lens ...

Страница 27: ...n When replacing the lens unit turn off the power first If lens shift has been performed set the lens shift to the center before replacing the lens unit s Adjusting the Position of the Projected Image Lens shift p 35 a Remove the lens replacement cover Lightly press the lens replacement cover When the rear part rises remove the lens replacement cover Installing the Projector 27 ...

Страница 28: ...t out as it is released Attaching and Removing the Interface Cover Remove the interface cover before installing the projector so that it is easier to connect the cable after installation Removing While pushing up the switch press the button on the side and pull the interface cover straight out Installing the Projector 28 ...

Страница 29: ...p cover when passing the connected cables from the top Remove the bottom cover when passing the connected cables from the bottom b Press the interface cover along the guide until it clicks into place Installing the Projector 29 ...

Страница 30: ...ection you do not need to set the Direction a Press the button to turn on the projector If the images are out of focus press the Focus button to adjust s Adjusting the Focus p 37 b Press the Menu button c Select Direction from Extended d Press the buttons to select the installation angle based on the direction of the projector and then press the button 1 2 3 4 5 A Pointing Up B Angled Up C Normal ...

Страница 31: ...dition a Press the Menu button while projecting b Select Lamp Select from Extended c Select the lamp to be turned on and then press the button The lamp turns on according to the selection Dual default Both Lamp 1 and Lamp 2 turn on When one of the lamps dies the other lamp remains on Single When the projector is turned on the lamp with less total operation time turns on When one of the lamps dies ...

Страница 32: ...s of the lamps is reduced due to Temp Interlock you cannot set Lamp Select s Settings Power Consumption p 121 Screen Settings Set the Screen Type according to the aspect ratio of the screen being used The area where the image is displayed matches the shape of the screen a The settings for the Screen Type at the time of purchase are as follows WUXGA WXGA projector 16 10 XGA projector 4 3 a Press th...

Страница 33: ...The Screen Position cannot be adjusted in the following situations If you are using a WUXGA WXGA projector and the Screen Type is set to 16 10 If you are using an XGA projector and the Screen Type is set to 4 3 Example If you are using a WUXGA WXGA projector and the Screen Type is set to 4 3 You can move the image to the left and right a Press the Menu button while projecting s Using the Configura...

Страница 34: ...te control Using the control panel The following image adjustments can be made while the test pattern is being displayed Top Menu Name Sub Menu Items Image Color Mode s p 70 Color Temp Advanced Gamma 1 s p 76 RGB RGBCMY s p 76 Reset Signal Auto Setup Settings Geometric Correction s p 60 Extended Multi Projection 2 s p 80 1 Except for Customized 2 Except for Black Level a To set menu items that can...

Страница 35: ... is set in the center C Maximum motion range V 56 When using a short throw zoom lens ELPLU02 if you move it more than 50 part of the screen cannot be displayed correctly D When the horizontal direction is at the maximum value V 32 a When adjusting the vertical lens shift adjust by moving the image from the bottom to the top If it is adjusted from the top to the bottom the image position may move d...

Страница 36: ...Adjusting the tilt of the projected image for normal installment Extend and retract the front feet and rear feet to adjust the projector s horizontal and vertical tilt You can adjust within a range of 3 5 A Extend the front feet and rear feet B Retract the front feet and rear feet Attention The front feet and rear feet can be attached and removed Note that the feet will detach if they are extended...

Страница 37: ...emote control Using the control panel c Press the Esc button to finish the adjustment Adjusting the Focus a Press the Focus button Using the remote control Using the control panel b Press the buttons to adjust Using the remote control Using the control panel c Press the Esc button to finish the adjustment Installing the Projector 37 ...

Страница 38: ...go any further b Focus the image around the center of the lens s Adjusting the Focus p 37 Example When the lens shift is turned all the way down c Correct screen distortion using the distortion ring When correcting distortion the area around the edges of the image is also focused d Focus the entire screen If the area around the lens axis is out of focus fine tune by turning the distortion ring Ins...

Страница 39: ...ot set the remote control ID s Extended Menu p 122 IDs are ignored when the projector ID is set to Off or the remote control ID is set to 0 Setting the projector ID a Press the Menu button while projecting b Select Multi Projection from Extended c Select Projector ID and then press the button d Select the ID you want to set and then press the button e Press the Menu button to close the Configurati...

Страница 40: ...p 39 Remote control Once this setting has been made the projector that can be operated by the remote control is limited a The remote control ID setting is saved in the remote control Even if the remote control batteries are removed to replace them and so on the stored ID setting is retained However if the batteries are left out for a long time it is reset to the default value ID0 Installing the Pr...

Страница 41: ...mputer s display output port to the projector s Computer input port B When using a commercially available 5BNC cable Connect the computer s display output port to the projector s BNC input port C When using a commercially available HDMI cable Connect the HDMI port on the computer to the projector s HDMI input port D When using a commercially available DVI D cable Connect the DVI D port on the comp...

Страница 42: ...he projector s S Video input port D When using an optional component video cable D sub component converter s Optional Accessories p 198 Connect the component output port on the image source to the projector s Computer input port E When using a commercially available component video cable RCA and BNC RCA adapters Connect the component output port on the video equipment to the projector s BNC input ...

Страница 43: ...t it to the projector when the input source is on it could cause a malfunction If the orientation or shape of the plug differs do not try to force it in The device could be damaged or could malfunction Connecting Equipment 43 ...

Страница 44: ...ied with the external monitor a Make the following settings to output image even when the projector is in standby mode Set Standby Mode to Communication On s Extended Standby Mode p 122 Set A V Output to Always On s Extended A V Settings A V Output p 122 Only analog RGB signals from the Computer input port or BNC input port can be output to an external monitor You can set which signals to output i...

Страница 45: ...tor s LAN port with a commercially available 100BASE TX or 10BASE T LAN cable By connecting a computer to the projector over a network you can project images and check the status of the projector a To prevent malfunctions use a category 5 or higher shielded LAN cable Connecting Equipment 45 ...

Страница 46: ...the HDBaseT transmitter When performing Ethernet communication or serial communication or when using the wired remote control via HDBaseT port set Control Communications to On in the Configuration menu s Extended HDBaseT Control Communications p 122 Note that when Control Communications is set to On the projector s LAN port RS 232C port and Remote port are disabled When using the Extron XTP transm...

Страница 47: ...nterface Cover p 28 b Install the wireless LAN unit a When connecting a projector to which the wireless LAN unit is attached to a computer using a wireless LAN set the Wireless LAN Power setting in the wireless LAN menu to On The default setting is On s Wireless LAN Menu p 130 Connecting Equipment 47 ...

Страница 48: ...yed b Check that the SSID and IP address information are displayed and then remove the wireless LAN unit s Installing the Wireless LAN Unit ELPAP07 p 47 c Insert the Quick Wireless Connection USB Key in the wireless LAN unit installation section d When the message Network information update complete Remove the Quick Wireless Connection USB Key Adapter is displayed remove the Quick Wireless Connect...

Страница 49: ...djusting the projected image the adjustments you made may change By using the batch setup function the registered User s Logo is set for the other projectors Do not register confidential information and so on as the User s Logo Caution Performing batch setup is the customers responsibility If batch setup fails due to a power failure communication error and so on the customer is responsible for any...

Страница 50: ...the file name in any other way the projector may not be able to recognize the file correctly You can only use single byte characters for the file name c While holding down the Esc button on the remote control or the control panel connect the power cord to the projector When the projector s indicators turn on as follows release the Esc button Power Status Lamp1 Temp Blue On Blue On Orange On Orange...

Страница 51: ...reless LAN unit port a When the USB flash drive contains 1 to 3 types of batch setup files the file is reflected to the projector with the same model number If there are multiple files for a projector with the same model number the settings may not be reflected correctly When there are four or more types of batch setup files on the USB flash drive the settings may not be reflected correctly Do not...

Страница 52: ... the settings are being written Caution Do not disconnect the power cord from the projector while the settings are being written If the power cord is disconnected the projector may not start correctly Do not disconnect the USB flash drive from the projector while the settings are being written If the USB flash drive is disconnected the projector may not start correctly d When writing completes nor...

Страница 53: ...k that all of the projector s indicators have turned off b Connect the computer s USB port to the projector s Service port with a USB cable c While holding down the Esc button on the remote control or the control panel connect the power cord to the projector When all of the projector s indicators turn on release the Esc button Power Status Lamp1 Temp Blue On Blue On Orange On Orange On The project...

Страница 54: ...B device on your computer and then disconnect the USB cable a When using OS X perform Remove EPSON_PJ The projector enters standby status Reflecting saved settings to other projectors a Disconnect the power cord from the projector and check that all of the projector s indicators have turned off b Connect the computer s USB port to the projector s Service port with a USB cable c While holding down ...

Страница 55: ...ot copy any files or folders other than the batch setup file to the removable disk e Perform Remove USB device on your computer and then disconnect the USB cable a When using OS X perform Remove EPSON_PJ When all of the indicators start flashing the settings are being written Caution Do not disconnect the power cord from the projector while the settings are being written If the power cord is disco...

Страница 56: ...ash drive or the USB cable unplug and then plug in the projector s power cord and then try again Power Blue flashing fast Status Blue flashing fast Lamp1 Orange flashing fast Temp Orange flashing fast Writing the settings may have failed and an error may have occurred in the projector s firmware Stop using the projector remove the power cord from the electrical outlet and contact your local dealer...

Страница 57: ...Basic Usage This chapter explains how to project and adjust images ...

Страница 58: ...ces are connected press the Search button on the remote control until the target image is projected When video equipment is connected make sure that the equipment is ready to play and then start this operation a You can make settings so that images are projected from the same input port the next time the projector is turned on s Extended Operation Startup Source Search p 122 The following screen i...

Страница 59: ...ntrol or by pressing the following buttons on the control panel The following shows the input ports for each button Remote control Control panel Input ports E Changes to images from a computer connected over the network H For EB Z10005U EB Z10000U EB Z9875U EB Z9870U only Projecting Images 59 ...

Страница 60: ...orrect distortion that occurs when projecting on a curved surface and adjust the amount of expansion and contraction s Curved Surface p 63 Point Correction Corrects slight distortion which occurs partially or adjusts the image position in an overlapping area when projecting from multiple projectors s Point Correction p 65 Corner Wall Manually correct distortion that occurs when projecting on a sur...

Страница 61: ...he angle of vertical and horizontal tilt for the projector can be corrected up to 30 degrees against the screen The specifications are when a standard zoom lens ELPLS04 is attached a Press the Menu button while projecting b Select Geometric Correction from Settings c Select H V Keystone and then press the button When the message If this setting is changed the image may be distorted is displayed pr...

Страница 62: ... Esc button is pressed for approximately two seconds the confirm default reset screen is displayed Select Yes to reset the result of Quick Corner corrections e Press the buttons to correct the position of the corner When you press the button the screen shown in step 4 that allows you to select the area to be corrected is displayed If the message Cannot adjust any further is displayed while adjusti...

Страница 63: ...ion method a Press the Menu button while projecting b Select Geometric Correction from Settings c Select Curved Surface and then press the button When the message If this setting is changed the image may be distorted is displayed press the button d Select Correct Shape and then press the button e Press the buttons to select the area you want to adjust and then press the button When selecting a cor...

Страница 64: ... the linearity i Press the Esc button to return to the screen in step 4 Select Horizontal Linearity or Vertical Linearity and then press the button Select Horizontal Linearity to adjust the horizontal expansion or contraction and select Vertical Linearity to adjust the vertical expansion or contraction j Select the standard line for the adjustments and then press the button Press the buttons when ...

Страница 65: ... of 48 pixels in vertical and horizontal directions EB Z11000W EB Z9900W EB Z9800W EB Z11005 EB Z11000 EB Z9870 Maximum of 32 pixels in vertical and horizontal directions When fine tuning the result of corrections you made in Curved Surface and Corner Wall you can adjust in a maximum range of 10 pixels in vertical and horizontal directions a Press the Menu button while projecting b Select Geometri...

Страница 66: ...lt values e Select the point number 3x3 5x5 or 9x9 and then press the button f Press the buttons to move to the point you want to correct and then press the button g Press the buttons to correct distortion To continue to correct another point press the Esc button to return to the previous screen then repeat the step 6 and 7 a Each time you press the button you can show or hide the image and the gr...

Страница 67: ...e with a right angle If a large amount of adjustment is performed the focus may not be uniform even after making adjustments You may not be able to adjust Corner Wall correctly when using the short throw zoom lens ELPLU02 Correction method a Press the Menu button while projecting b Select Geometric Correction from Settings c Select Corner Wall and then press the button When the message If this set...

Страница 68: ...ained using Horizontal Corner as an example f Press the Esc button to display the screen from step 4 Select Correct Shape and then press the button g Adjust the position of the projector and the lens shift so that the line in the center of the screen matches the corner the point where the two surfaces meet s Adjusting the Position of the Projected Image Lens shift p 35 a Each time you press the bu...

Страница 69: ...If the Esc button is pressed for approximately two seconds the confirm default reset screen is displayed Select Yes to reset the result of Corner Wall i Press the buttons to adjust the shape If the message Cannot adjust any further is displayed while adjusting you cannot adjust the shape any further in the direction indicated by the gray triangle j Repeat steps 8 and 9 as needed to adjust any rema...

Страница 70: ...on Dynamic Ideal for use in a bright room This is the brightest mode Presentation Ideal for making presentations using color materials in a bright room Theatre Ideal for watching films in a dark room Gives images a natural tone Photo 1 Ideal for projecting still pictures such as photos in a bright room The images are vivid and brought into contrast Sports 2 Ideal for watching TV programs in a brig...

Страница 71: ...age it lets you enjoy deep and rich images a If you keep projecting extremely dark images Auto Iris may stop for approximately ten minutes When you are using multiple projectors black levels may differ depending on the projected images Auto Iris can only be set when the Color Mode is set to Dynamic 3D Dynamic or Theatre 3D Theatre When Edge Blending is set to On Auto Iris is disabled a Press the M...

Страница 72: ...ry depending on the Screen Type currently set a Set the Screen Type before changing the aspect ratio s Screen Settings p 32 Changing methods Each time you press the Aspect button on the remote control the aspect mode name is displayed on the screen and the aspect ratio changes Remote control Aspect Mode Explanation Auto Projects in an appropriate aspect ratio based on information from the signal b...

Страница 73: ...n setting to Wide or Normal in the Configuration menu according to the resolution of the computer s Signal Resolution p 119 The aspect mode changes as shown in the tables below The following colors in screen images in the tables indicate areas that are not displayed The area where the image is not displayed depending on the screen type setting The area where the image is not displayed depending on...

Страница 74: ... type setting 4 3 Aspect Ratio of Input Signal 16 10 16 9 4 3 Auto or Normal 4 3 16 9 Native Only computer images and images from the HDMI input port HDBaseT port The image may differ depending on the resolution of the input signal EB Z11005 EB Z11000 EB Z9870 Screen type setting 4 3 Aspect Ratio of Input Signal 16 10 16 9 4 3 Auto or Normal 4 3 Adjusting Projected Images 74 ...

Страница 75: ...put signal Screen type setting 16 9 Aspect Ratio of Input Signal 16 10 16 9 4 3 Auto or Normal Full Zoom Native The image may differ depending on the resolution of the input signal Screen type setting 16 10 Aspect Ratio of Input Signal 16 10 16 9 4 3 Auto or Normal 16 9 Full Zoom Native The image may differ depending on the resolution of the input signal Adjusting Projected Images 75 ...

Страница 76: ...ion menu s Image Advanced Gamma p 117 Select and adjust the correction value s Image Advanced Gamma p 117 When a larger value is selected the dark areas of images become brighter but the color saturation for lighter areas may become weaker When a smaller value is selected you can reduce the overall brightness of the image to make the image sharper If you select DICOM SIM from Color Mode on the Ima...

Страница 77: ...e projected image to the part where you want to change the brightness and then press the button Press the buttons to adjust the value Adjust using the gamma adjustment graph s Image Advanced Gamma Customized Adjust it from the graph p 117 Adjust while looking at the gamma adjustment graph Adjusting Projected Images 77 ...

Страница 78: ...otes in the user s guides supplied with the optional items Polarizer ELPPL01 This is only available for standard zoom lens ELPLS04 middle throw zoom lens ELPLM06 and long throw zoom lens ELPLL07 Passive 3D Glasses ELPGS02A ELPGS02B Frame ELPMB44 s Optional Accessories p 198 When projecting 3D images set 3D Images to On in the Configuration menu s Signal 3D Setup 3D Images p 119 The following color...

Страница 79: ...Useful Functions This section describes the Multi Projection Split Screen Memory Schedule and Security functions ...

Страница 80: ...ecommend setting the focus zoom and lens shift at least 20 minutes after you start the projection because images are not stable right after turning on the projector Set Lamp Select to Dual s Extended Lamp Select p 122 If the values for Geometric Correction are large the image position adjustment for overlapping images becomes difficult The Test Pattern can be displayed to adjust the projection sta...

Страница 81: ...on Color Mode p 122 When projecting 3D images set it to 3D Multi Projection d Adjusts the color tone for the whole screen as necessary s Color Uniformity p 183 Edge Blending Follow the steps below to adjust the overlapping areas of the images 1 Fine tune the overlapping areas to make seamless screen s Adjust the overlapping area of the images Edge Blending p 81 2 Adjust the brightness difference f...

Страница 82: ...a guide on the Edge Blending setting range Pattern Guide SettoOntodisplayaguidetomatchthepositionof the Edge Blending setting range Guide Colors Select a combinationof guide colorsfromthe three provided d Turn on Edge Blending 1 Select Edge Blending and then press the button 2 Select On and then press the button 3 Press the Esc button e Set Guide Display to On 1 Select Guide Display and then press...

Страница 83: ...pears on the same position as the overlapping area you can set the blend range with the selected value 6 Press the Esc button h After the settings are complete set Guide Display and Pattern Guide to Off to finish Correcting the brightness Adjust the Brightness Level so that the lamp brightness is the same for each projector Adjust so that all projectors are the same brightness as the darkest lamp ...

Страница 84: ...on and then press the button b Select 1 to 5 as the brightness a You can switch the projected image between the input image and the white image using the buttons c Press the Esc button to return to the previous screen Multi Projection Function 84 ...

Страница 85: ... area is displayed in black so that it is easy to check the edge of the image Adjustment Level There are six levels from white through gray and up to black You can adjust each level individually Red Green Blue Adjusts the tone for each color Brightness Adjusts the image brightness a Whenever the button is pressed the screen changes between the projected image and the adjustment screen b Select Adj...

Страница 86: ...es do not overlap with areas where the images overlap to make the difference less noticeable a Black Level can only be adjusted correctly in images where two images overlap You cannot adjust the black level when a test pattern is displayed If the Geometric Correction value is large you may not be able to adjust correctly The brightness and tone may differ in areas where the images overlap as well ...

Страница 87: ...en press the button c Adjust the black tone and brightness for the areas that do not overlap to match the areas that overlap After this if the tone for some areas do not match adjust them by Area Correction d Press the Esc button to return to the screen displayed in step 2 Multi Projection Function 87 ...

Страница 88: ...hen Left Edge is On and Point Correction 5x5 is selected f Press the buttons to select the point you want to move and then press the button The selected point is displayed in orange g Press the buttons to move the point To continue to move another point press the Esc button to return to step 6 and then repeat steps 6 and 7 a To return Black Level to its default value press the Esc button to return...

Страница 89: ...ale and then press the button d Set Scale to On 1 Select Scale and then press the button 2 Select On and then press the button 3 Press the Esc button to return to the previous screen e Set Scale Mode 1 Select Scale Mode and then press the button 2 Select Zoom Display or Full Display and then press the button Zoom Display Adjusts according to the image currently displayed 2 Full Display Adjusts acc...

Страница 90: ...ally Enlarges or reduces an image vertically Scale Horizontally Enlarges or reduces an image horizontally g Adjust the Image Display Range 1 Select Image Display Range and then press the button 2 Press the buttons to scroll the image Adjust the coordinates and size of each image while viewing the screen 3 Press the Menu button to finish making settings Multi Projection Function 90 ...

Страница 91: ... You cannot project the same input source on both sides left and right of the screen Operating procedures Projecting on a split screen a Press the Split button on the remote control while projecting The currently selected input source is projected on the left of the screen Remote control a You can also perform the same operations in the Configuration menu s Settings Split Screen p 121 b Press the ...

Страница 92: ...e from step 2 Switching the left and right screens Use the following procedure to switch the projected images displayed on the left and right screens a Press the Menu button during split screen projection b Select Swap Screens and then press the button The projected images on the left and right are swapped Switching the left and right image sizes a Press the Menu button during split screen project...

Страница 93: ...jection Operating restrictions The following operations cannot be performed during split screen projection Setting the Configuration menu E Zoom Changing the aspect mode Using the User1 User2 or User3 button on the remote control Help can be displayed only when image signals are not being input or when an error or warning notification is displayed The user s logo is not displayed Restrictions rela...

Страница 94: ...indicators flash while the shutter function is activated When an event that is set in the schedule function is executed the shutter function is released When Shutter Release is set to Shutter in the Extended menu the following operations can be performed while the shutter function is still being activated Change the source with the change input buttons on the remote control Control the projector f...

Страница 95: ...n or off Remote control a When projecting moving images the images continue to be played back while the screen is frozen It is not possible to resume projection from the point where the screen was frozen If the Freeze button is pressed while the Configuration menu or the Help screen is displayed the menu or the Help screen that is displayed is closed Freeze still works while E Zoom is being used E...

Страница 96: ...efault a Project the image you want to save as the User s Logo and then press the Menu button s Using the Configuration Menu p 114 b Select User s Logo from Extended a When User s Logo Protection from Password Protection is set to On a message is displayed and the User s Logo cannot be changed You can make changes after setting User s Logo Protection to Off s Managing Users Password Protection p 1...

Страница 97: ...ize e When you press the button and the message Select this image is displayed select Yes f Select the zoom factor from the zoom setting screen g When the message Save this image as the User s Logo is displayed select Yes The image is saved After the image has been saved the message Completed is displayed a When a User s Logo is saved the previous User s Logo is erased Projection Functions 97 ...

Страница 98: ...Frame Interpolation Noise Reduction Mosquito NR Video Range Scale Overscan Image Processing 3D Images Super resolution Settings Power Consumption Extended Multi Projection Brightness Level Edge Blending Color Matching Black Level Saving Loading Erasing the Memory a Press the Menu button while an image is being displayed s Using the Configuration Menu p 114 b Select Memory from Settings and then pr...

Страница 99: ...erasetheselectedmemory Youcan erase all memories from Reset Memory s Reset Reset Memory p 138 Function Explanation Rename Memory Changes the memory name Select the memory name you want to change and then press the button Enter the memory name using the soft keyboard s Soft keyboard operations p 128 When you have finished move the cursor over Finish and then press the button When a memory has alrea...

Страница 100: ...age Do you want to set the time is displayed When you select Yes the screen from step 4 is displayed When Time Schedule Protection is set to On in Password Protection settings related to the date and time cannot be changed You can make changes after setting Time Schedule Protection to Off s Managing Users Password Protection p 107 a Press the Menu button while projecting s Using the Configuration ...

Страница 101: ... the daylight saving time Set Applies the Daylight Saving Time settings Internet Time Internet Time Set to On to update the time automatically through an Internet time server Internet Time Server Enter the IP address for an Internet time server Set Applies the Internet Time settings When setting it for the last Sunday of the month set the Week to 5 a When changing settings make sure you select Set...

Страница 102: ...ate and time s Soft keyboard operations p 128 e Select Save and then press the button To register additional events repeat steps 3 to 5 f Select Setup complete and then select Yes to finish saving Lamp Relay Mode Specify the date and time to automatically switch to the lamp you want to turn on By switching the lamps you can reduce the the load on the lamps and prevent deterioration Lamp Relay Mode...

Страница 103: ...New from Schedule s Setting a schedule p 101 b Select Lamp Relay Mode and then press the button c Select On and then press the button d Select the period for Lamp Relay Mode from Type Day of the Week Lamp Relay Mode is executed at the specified time on the same day of the week Daily Lamp Relay Mode is executed at the specified time every day e Set the Day of the Week and Time based on the Type set...

Страница 104: ... a schedule a Press the Menu button while projecting b Select Schedule Settings from Extended The indicator appears at the time when an event is saved Aqua Single event Orange Regular event Green Communication monitoring On Off Gray Disabled event Scheduling Function 104 ...

Страница 105: ... date are displayed Blue Enabled event Gray Disabled event Regular event Editing a schedule a Press the Menu button while projecting s Using the Configuration Menu p 114 b Select Schedule Settings from Extended c Press the buttons to highlight the date containing the event you want to edit Scheduling Function 105 ...

Страница 106: ...ge the event details or date and time Select Save and then press the button to complete the editing Clear Deletes the selected event Register Saves a new event Select Save and then press the button to complete the registration f Select Setup complete and then select Yes to finish editing a To delete all registered schedules select Schedule Reset and then select Yes Select Setup complete and then s...

Страница 107: ...e of purchase Password Protection is not activated Kinds of Password Protection The following three kinds of Password Protection settings can be made according to how the projector is being used 1 Power On Protection When Power On Protection is On you need to enter a preset password after the projector is plugged in and turned on this also applies to Direct Power On If the correct password is not ...

Страница 108: ...he screen in step 2 d Set the password 1 Select Password and then press the button 2 When the message Change the password is displayed select Yes and then press the button The default password is set to 0000 Change this to your own desired password If you select No the screen displayed in step 2 is displayed again 3 While holding down the Num button enter a four digit number using the numeric butt...

Страница 109: ...ug from the electrical outlet and then reinsert it and turn the projector s power back on The projector displays the password entry screen again so that you can enter the correct password If you have forgotten the password make a note of the Request Code xxxxx number that appears on the screen and contact the nearest address provided in the Epson Projector Contact List s Epson Projector Contact Li...

Страница 110: ...al Full Lock All of the buttons on the control panel are locked You cannot perform any operations from the control panel including turning the power on or off Control Panel Lock All of the buttons on the control panel except for the t button are locked a Press the button on the control panel during projection to display the Control Panel Lock screen a You can also make settings in Control Panel Lo...

Страница 111: ...et the Lens Operation Lock to On in the Configuration menu s Settings Lens Operation Lock p 121 Remote Control Button Lock This function locks the following buttons on the remote control Each time the Help button is pressed for at least 5 seconds the remote control button lock turns on or off Security Functions 111 ...

Страница 112: ...security slot is compatible with the Microsaver Security System manufactured by Kensington See the following for more details on the Microsaver Security System s http www kensington com Handles A commercially available theft prevention wire lock can be passed through the handle to secure the projector to a desk or pillar Installing the wire lock Pass an anti theft wire lock through the handle See ...

Страница 113: ...Configuration Menu This chapter explains how to use the Configuration menu and its functions ...

Страница 114: ... menu for the available buttons and their operations a Display the Configuration menu screen b Select a top menu item c Select a submenu item d Change settings a When Default Reset is displayed on the guide and you press the Default button on the remote control the settings being adjusted are returned to their default values e Press the Menu button to finish making settings Using the Configuration...

Страница 115: ...Noise Reduction Off NR1 NR2 Mosquito NR On Off Top Menu Name Submenu Name Items or Setting Values Video Range Auto Normal Expanded Input Signal Auto RGB Component Video Signal Auto NTSC NTSC4 43 PAL M PAL N PAL PAL60 SECAM Aspect Auto Normal 4 3 16 9 Full Zoom Native Scale Overscan Auto Off 4 8 Image Processing Fine Fast Settings menu s p 121 Geometric Correction Off H V Keystone Quick Corner Curv...

Страница 116: ...l Refresh Rate Sync Info Status Serial Number Event ID HDBaseT Signal Quality Lamp Info Lamp Hours Lamp Status Version Main Video Status Monitor Reset Menu s p 138 Reset All Reset Memory Network Menu Top Menu Name Submenu Name Items or Setting Values Basic menu s p 129 Projector Name PJLink Password Web Control Password Projector Keyword On Off Wireless LAN menu s p 130 Wireless LAN Power On Off C...

Страница 117: ...Setting details are saved for each image signal s Automatically Detect Input Signals and Change the Projected Image Search p 58 Submenu Function Color Mode Select the quality of the image to suit your surroundings s Selecting the Projection Quality Selecting Color Mode p 70 Brightness Adjusts the image brightness Contrast Adjusts the difference between light and shade in the images Color Saturatio...

Страница 118: ...ge When the Color ModeissettosRGBorDICOMSIM adjustto11stepsin3200K 5000K to 10000K When the Color Mode is set to other settings you can adjust it in a range of 3 to 6 The image is tinted blue when a high value is selected and tinted red when a low value is selected Advanced You can make adjustments by choosing the following items Gamma You can adjust the coloring by selecting one of the gammacorre...

Страница 119: ...d computer Manual allows you to specify the resolution This is ideal when the connected computer is always the same Tracking Only available when an analog RGB computer signal is being input You can adjust computer images when vertical stripes appear in the images Sync Only available when an analog RGB computer signal is being input You can adjust computer images when flickering fuzziness or interf...

Страница 120: ...ectly when set to Auto select the appropriate signal according to the connected equipment Video Signal You can select an input signal from the Video input port or S Video input port If set to Auto video signals are recognized automatically If interference appears in the image or a problem occurs such as no image is being projected when set to Auto select the appropriate signal according to the con...

Страница 121: ...e and up and down Corner Wall Corrects distortion that occurs when projecting on a surface with right angles Split Screen You can split the screen into two screens s Projecting Two Images Simultaneously Split Screen p 91 Control Panel Lock You can restrict operation of the projector s control panel s Control Panel Lock p 110 Lens Operation Lock You can restrict the lens operation of the remote con...

Страница 122: ... Consumption Info Progressive Geometric Correction Multi Projection Resolution Memory Image Processing or On Screen Display Test Pattern You can display a test pattern to adjust the projection without connecting other equipment when you set up the projector s Displaying a Test Pattern p 34 Memory Perform operations and make settings for the memory function s Memory Function p 98 Reset You can rese...

Страница 123: ...ou can turn off the power simply by pressing the t button once Air Filter Notice Set whether or not to enable the Air Filter Notice function When this is set to On and a clog in the air filter is detected the message is displayed on the screen Screen This item cannot be set when projecting images from a computer over a network Set the aspect ratio and position of the projected screen according to ...

Страница 124: ...mination such as for switchers is necessary Remote Control Type You can select Normal or Simple depending on the type of remote control Set this item to Normal to use the remote control provided with this projector When Simple is selected you can use the remote control provided with other Epson projectors to operate this projector This is useful if you want to use a remote control that you are alr...

Страница 125: ...by Mode This item cannot be set when Extron XTP is set to On If you set Communication On you can perform the following operations even if the projector is in standby mode Monitor and control the projector over a network Output audio and images to an external device Only when A V Output is set to Always On Use the status monitor Only when A V Output is set to Always On Communication from the HDBase...

Страница 126: ...Magenta and Y Yellow color components s Adjusting RGBCMY p 86 Black Level Adjusts the differences in brightness and tone for areas where images overlap and areas where the images do not overlap s Black Level p 86 Reset You can reset all adjustment values for the Multi Projection menu to their default settings Submenu Function Lamp Select Select the lamps to be turned on s Selecting the lamp p 31 S...

Страница 127: ...ay Address MAC Address Network Config uration The following menus are available for setting network items Basic Wireless LAN Security Wired LAN Mail Others Reset Complete Displays available region information for the wireless LAN unit being used For more details contact your local dealer or the nearest address provided in the Epson Projector Contact List s Epson Projector Contact List a By using a...

Страница 128: ...re keyboard is displayed Press the buttons on the remote control or control panel to move the cursor to the desired key and then press the button to enter the selected character Enter figures by holding down the Num button on the remote control and pressing the numeric buttons After entering press Finish on the keyboard to confirm your entry Press Cancel on the keyboard to cancel your entry Each t...

Страница 129: ...cters symbols cannot be used Submenu Function Web Control Password Set a password to use when making settings and controlling the projector using Web Control You can enter up to eight single byte alphanumeric characters cannot be used The default password is admin WebControlisacomputerfunction thatallowsyoutosetupand control the projector by using the Web browser on a computer connected on a Netwo...

Страница 130: ...ing the projector over the network set Advanced See the following manual for details on connection mode s EasyMP Network Projection Operation Guide s EasyMP Multi PC Projection Operation Guide Channel This can only be set if Connection Mode is set to Quick Select the frequency band used by the wireless LAN from 1ch 6ch or 11ch This is set to 11ch by default SSID Auto Set ting This can only be set ...

Страница 131: ... masks cannot be used 0 0 0 0 255 255 255 255 GatewayAddress YoucanentertheIPaddressforthegatewayg for the projector You can enter a number from 0 to 255 in each field of the address However the following gateway addresses cannot be used 0 0 0 0 127 x x x 224 0 0 0 to 255 255 255 255 where x is a number from 0 to 255 SSID Display Toprevent theSSIDgfrombeingdisplayedontheLANStandby screen set this ...

Страница 132: ...ing more than 32 characters use your Web browser to enter the text s Changing Settings Using a Web Browser Web Control p 186 When ConnectionMode is set to Quick the initial passphrase is set Type of security When the optional wireless LAN unit is attached and being used in Advanced connection mode it is strongly recommended that you set security WPA is an encryption standard that improves the secu...

Страница 133: ...mber from 0 to 255 SubnetMask YoucanentertheSubnetMaskgfortheprojector Youcanenteranumberfrom0to255ineachfieldoftheaddress However the following subnet masks cannot be used 0 0 0 0 255 255 255 255 GatewayAddress YoucanentertheIPaddressforthegatewayg for the projector You can enter a number from 0 to 255 in each field of the address However the following gateway addresses cannot be used 0 0 0 0 127...

Страница 134: ...r for the SMTP server The default value is 25 You can enter numbers between 0 to 65535 Submenu Function Address 1 Set ting Address 2 Setting Address 3 Setting You can enter the email address of the destination to which you want to send the notification email You can register up to three destinations You can enter up to 32 single byte alphanumeric charactersfortheemailaddress Thefollowingcharacters...

Страница 135: ...is covery When the projector is connected to a network set to On to allow the projector to be detected by AMX Device Discoveryg Set to Off if you are not connected to an environment controlled by a controller from AMX or AMX Device Discovery Submenu Function Crestron Room View Set this to On only when monitoring or controlling the projector over the network using Crestron RoomView Otherwise set th...

Страница 136: ...ed vary depending on the source currently being projected Submenu Function Projector Info Source You can display the source name for the connected equipment currently being projected Input Signal You can display the content of the Input Signal set in the Signal menu according to the source Resolution You can display the resolution Video Signal You can display the settings for Video Signal in the S...

Страница 137: ...using an Event ID See the following page for information on interpreting the Event ID s Event ID p 170 HDBaseT Sig nal Quality You can display the image signal information from the HDBaseT port Lamp Info Lamp Hours You can display the cumulative lamp operating time When the lamp replacement time is reached the characters are displayed in yellow Lamp Status The following icons show the status of th...

Страница 138: ...ngs for the Input Signal Memory Panel Alignment ColorUniformity Date Time ColorMatching LampSelect Language Lamp Hours all items for the Network menu and password are not returned to their default values Reset Memory Resets the names and settings stored in Save Memory s Memory Function p 98 List of Functions 138 ...

Страница 139: ...Troubleshooting This chapter explains how to identify problems and what to do if a problem is found ...

Страница 140: ... the Help button The Help screen is displayed Remote control b Select a menu item Remote control c Confirm the selection Remote control Questions and solutions are displayed as shown on the screen below Press the Help button to exit the Help a See the following if the Help function does not provide a solution to the problem s Problem Solving p 160 Using the Help 140 ...

Страница 141: ...Indicates the projector s status C Lamp1 Lamp2 indicators Indicates the projection lamps status D Temp indicator Indicates the internal temperature status This is normally turned off E Filter indicator Indicates the air filter status This is normally turned off F Wireless LAN indicator Indicates the operating status of wireless LAN when the optional wireless LAN unit is connected Reading the Indic...

Страница 142: ... this status the power indicator flashes blue Blue On Blue Flashing Status varies Off Off Warm up status This is the status immediately after turning on the projector Warm up takes approximately 30 seconds after the lamp turns on The t button is disabled during warm up Blue On Blue On Status varies Off Off Projecting The projector is projecting Blue On Blue Flashing Off Off Off Cool down status Th...

Страница 143: ... Off Blue Flashing Off Orange On Off High Temp Error Overheating The lamp turns off automatically and projection stops Wait for about five minutes After about five minutes the projector switches to standby mode so check the following two points Checkthattheairfilterandairexhaustventsareclear andthattheprojectoris not positioned against a wall If the air filter are clogged remove the power cord fro...

Страница 144: ...not cracked Attach the lamps again and turn on the power If the error continues Replace the lamps with new ones and then turn on the power If the error continues Stop using the projector remove the power cord from the electrical outlet and contact your local dealer or the nearest address provided in the Epson Projector Contact List s Epson Projector Contact List If the lamp is cracked Contact your...

Страница 145: ...tter Error Stop using the projector remove the power cord from the electrical outlet and contact your local dealer or the nearest address provided in the Epson Projector Contact List s Epson Projector Contact List CinemaFilterErr Auto Iris Error Shutter Error Off Blue Flashing Orange On Orange On Off Power Err Bal last Stop using the projector remove the power cord from the electrical outlet and c...

Страница 146: ...us varies Orange Flashing Status varies Status varies Mismatching of lamp types warn ing The message Lamp 1 and Lamp 2 do not match Turn off the projector and install two standard lamps or two portrait mode lamps depending on the orientation of the projector is displayed The lamp unit for portrait use is attached to either Lamp 1 or Lamp 2 Turn off the power remove the power cord from the electric...

Страница 147: ...ith new ones and then turn on the power If the error continues Stop using the projector remove the power cord from the electrical outlet and contact your local dealer or the nearest address provided in the Epson Projector Contact List s Epson Projector Contact List If the lamp is cracked Contact your local dealer or the addresses on the Epson Projector Contact List for further advice If one of the...

Страница 148: ...ntact List s Epson Projector Contact List Low Air Flow This is not an error However projection stops automatically if the airflow falls any further Themessage Theairfilterisclogged Cleanorreplacetheairfilter isdisplayed on the projected screen Check the following points Check that the air filter and air exhaust vents are clear and that the projector is not positioned against a wall If the air filt...

Страница 149: ...cators or messages regarding air filter notice are displayed only when Air Filter Notice is set to On in the Configuration menu s Extended Display Air Filter Notice p 122 Cleaning Filter a See the following if the projector is not operating properly even though the indicators are all showing normal s Problem Solving p 160 If the indicators are in a state not shown in this table stop using the proj...

Страница 150: ...the button on the control panel There are eight display categories for the status monitor and each time you press the buttons the category switches in the following order You can check the items and information of each category by using the buttons a The status monitor turns on in the following situations When one button is pressed on the control panel When an error or a warning occurs When adjust...

Страница 151: ...ctor and lamps Version Projector s firmware version A Displays the item name s Explanations of the Display Content p 153 B Information about the items Display when error or warning occurs When a problem has occurred in the projector the following is displayed When an error occurs When a warning occurs Temp Warning If the problem is cleared or one of the buttons is pressed the display returns to no...

Страница 152: ...ting b Press the button to display the following screen c Press the buttons to adjust the contrast d Press the button to display the following screen e Press the buttons to set the lighting time for the back light The default is set to 30sec 30 seconds You can set from Off light is off 10 60sec and 30min 30 minutes Reading Status Monitor 152 ...

Страница 153: ...has occurred Sensor Error A sensor error has occurred Lamp1 Error S A lamp error has occurred S Standard lamps P Portrait mode lamps Lamp1 Error P Lamp2 Error S Lamp2 Error P Lamp1 Failure S A lamp failure has occurred S Standard lamps P Portrait mode lamps Lamp1 Failure P Lamp2 Failure S Lamp2 Failure P Power1 Error A power error Ballast has occurred Power2 Error Internal Error An internal error ...

Страница 154: ...utter Warning A shutter warning has occurred Perform the same remedies as when the shutter error has occurred DirectionWarning The usage angle is out of range Check the lamp type and set it at the correct angle Lamp Mismatch A lamp types mismatch has occurred Clean Filter An air filter notice has occurred Source Computer Displays the source name for the connected equipment currently being projecte...

Страница 155: ...us On Displays the operating status of Lamp 1 Off Lamp2 Status On Displays the operating status of Lamp 2 Off Lamp Select Dual Displays the settings for Lamp Select s Selecting the lamp p 31 Single Lamp1 Lamp2 Source Source Computer Displays the source name for the connected equipment currently being projected BNC Video S Video HDMI DVI D SDI LAN HDBaseT Resolution Displays the resolution of the c...

Страница 156: ...larity H Posi V Posi Displays the Sync polarity H Posi V Nega H Nega V Posi H Nega V Nega Sync Mode Composite Sync Displays the sync type Separate Sync Sync On Green Detected Mode Displays the discriminant resolution of the current input signal Video Level Auto Normal Displays the video level of the projector Auto Expanded Normal Expanded a Items displayed for source vary depending on the model be...

Страница 157: ...t source is determined HDCP Status Non HDCP Displays the HDCP status Passed Failed HDCP Ri Displays each HDCP information HDCP AKSV HDCP An AVI Info VIC Displays the VIC information AVI of the current input signal AVI InfoChecksum OK Displays the checksum result for AVI NG Signal Mode HDMI Displays the signal mode DVI Pixel Encoding RGB Displays the color space information AVI of the current input...

Страница 158: ...e Displays the projector name used to identify the projector when connected to a network Connection Mode Quick Displays the connection mode to use when connecting the projector and a computer over a wireless LAN Advanced SSID Display On Displays the SSID display settings Off IP Display On Displays the IP address display settings Off SSID Displays the SSID IP Address Displays the IP address DHCP On...

Страница 159: ...Time Lamp1 Op Time PR Displays the total operation time of the portrait mode lamps Lamp2 Pp Time PR Version Serial No Displays the projector s serial number Main Displays the projector s firmware version information Video Status Monitor Setting CONTRAST LEVEL Set the contrast for the LCD Lighting Time Off Set the lighting time for the back light 10 60 sec Approx 30 min Reading Status Monitor 159 ...

Страница 160: ... computer images Some input images such as screen savers may be completely black Is the image signal format setting correct Only when projecting images from a video source Change the setting according to the signal for the connected equipment s Signal Video Signal p 119 Moving images are not displayed Check Remedy Is the computer s image signal being output to the LCD and the monitor Only when pro...

Страница 161: ...and that there are no poor contacts in the cables Is the correct port selected Change the image by pressing the Search button on the remote control s Automatically Detect Input Signals and Change the Projected Image Search p 58 Is the power for the computer or video source turned on Turn the power on for the equipment Are the image signals being output to the projector Only when projecting images ...

Страница 162: ...e optional short throw zoom lens ELPLU02 Set the Lens Type to ELPLU02 in the Extended menu s Extended Operation Advanced Lens Type p 122 See the following for more information on focus correction methods s When using a short throw zoom lens ELPLU02 p 38 Interference or distortion appear in images Check Remedy Is the image signal format setting correct Only when projecting images from a video sourc...

Страница 163: ...ll the aspect is not suitable or the image has been reversed Check Remedy Is the Screen setting correct Make the appropriate Screen setting for the screen being used s Screen Settings p 32 Is the aspect adjusted correctly Press the Aspect button on the remote control to select an aspect suitable for the input source s Changing the Aspect Ratio of the Projected Image p 72 Is the image still being e...

Страница 164: ...connected to the Video input port or the S Video input port s Signal Video Signal p 119 Is the image brightness adjusted correctly Adjust the Brightness setting in the Image menu s Image Brightness p 117 Are the cables connected correctly Check that all the cables required for projection are securely connected Check that no cables are disconnected and that there are no poor contacts in the cables ...

Страница 165: ...e Contrast setting in the Image menu s Image Contrast p 117 Is it time to replace the lamp When the lamp is nearly ready for replacement the images become darker and the color quality declines When this happens replace the lamp with a new lamp s Replacing the Lamp p 175 Is only one projector being used Check if the following items are set to dark s Extended Multi Projection Brightness Level p 122 ...

Страница 166: ...ng to Off s Control Panel Lock p 110 Is the correct setting for the remote receiver selected Check the remote receiver in the Configuration menu s Settings Remote Receiver p 121 Was the power cord plugged back in or was the breaker turned on immediately after direct power off WhenoneoftheoperationstotheleftisperformedwhenDirectPowerOnisset toOn the powermaynotturnbackon Press the button on the rem...

Страница 167: ...l ID and the projector ID match MakesuretheIDfortheprojectoryouwanttooperateandtheIDfortheremotecontrolmatch Tooperateallprojectors by remote control regardless of the ID setting set the ID switch on the remote control to Off s ID Settings p 39 Does the Remote Control Type match the remote control that you are using Check the Remote Control Type on the Configuration menu s Extended Operation Advan...

Страница 168: ... the language setting Select the Language in the Extended menu s Extended Language p 122 Email is not received even if a problem occurs in the projector Check Remedy Is Standby Mode set to Communication On To use the mail notification function when the projector is in standby set Communication On in Standby Mode in the Configuration menu s Extended Standby Mode p 122 Did a fatal error occur and th...

Страница 169: ...ess provided in the Epson Projector Contact List s Epson Projector Contact List Cannot change settings using a Web browser Check Remedy Are the user ID and password correct Enter EPSONWEB as the user ID This cannot be changed Enter the user ID even if the password setting is disabled Enter the characters set for the Web Control Password as the password The default password is admin Problem Solving...

Страница 170: ...4FF A system error occurred in the projector Restart the projector 0891 Cannot find an access point with the same SSID Set the computer the access point and the projector to the same SSID 0892 The WPA WPA2 authentication type does not match Check that the wireless LAN security settings are correct s Network Security p 132 0893 The TKIP AES encryption types do not match 0894 Communication was disco...

Страница 171: ...Maintenance This chapter provides information on maintenance procedures to ensure the best level of performance from the projector for a long time to come ...

Страница 172: ...ector may catch fire due to the high internal temperature of the lamp Attention Do not rub the lens with harsh materials or subject the lens to shocks as it can easily become damaged Cleaning the Air Filter Clean the air filter and the air intake vent when the following message is displayed or the Filter indicator is flashing green s Reading the Indicators p 141 Time to clean the air filter Clean ...

Страница 173: ... set to On in the Configuration menu s Extended Display Air Filter Notice p 122 a After you turn off the projector s power and the confirmation buzzer beeps twice disconnect the power cord b Remove the air filter cover Grip the air filter cover tab between your fingers and pull up and remove the cover while pressing the tab c Remove the air filter d With the front the side with tabs of the air fil...

Страница 174: ...emove any dust remaining on the air filter by using a vacuum cleaner from the front f Attach the air filter g Attach the air filter cover Press the air filter cover until it clicks into place Cleaning 174 ...

Страница 175: ...jection Also only use the portrait mode lamps for portrait projection Make sure you attach lamps on both Lamp 1 and Lamp 2 Attach the same type of lamps on both Lamp 1 and Lamp 2 The lamp replacement message is set to appear after the following time periods to maintain the initial brightness and quality of the projected images EB Z10005U EB Z10000U EB Z11000W EB Z11005 EB Z11000 Standard Lamps Whe...

Страница 176: ...mp Select settings when you replace the lamp s Selecting the lamp p 31 How to replace the lamp The lamp can be replaced even when the projector is suspended from a ceiling Warning When replacing the lamp because it has stopped illuminating there is a possibility that the lamp may be broken If replacing the lamp of a projector which has been installed on the ceiling you should always assume that th...

Страница 177: ... lamp cover on the back of the projector Push the lamp cover lever to the left and then slide the lamp cover to the left Open the lamp cover c Pull up the lock lever for the lamp you want to replace and pull the lamp straight out A Lamp 1 B Lamp 2 Replacing Consumables 177 ...

Страница 178: ...it to the right until it clicks Attention Make sure you attach the lamp securely If the lamp cover is opened the power turns off automatically as a safety precaution If the lamp or the lamp cover is not attached correctly the power does not turn on This product includes a lamp component that contains mercury Hg Please consult your local regulations regarding disposal or recycling Follow the dispos...

Страница 179: ... IfyouselectYesandreset theLamp Hours the count for Lamp 1 is set to 0H Replacing the Air Filter Air filter replacement period If the message is displayed frequently even though the air filter has been cleaned replace the air filter How to replace the air filter The air filter can be replaced even when the projector is suspended from a ceiling a After you turn off the projector s power and the con...

Страница 180: ...he air filter cover Press the air filter cover until it clicks into place a Dispose of used air filters properly in accordance with your local regulations Material of the frame part Polypropylene Material of the filter part Polypropylene Replacing Consumables 180 ...

Страница 181: ... a Press the Menu button while projecting b Select Display from Extended c Select Panel Alignment and then press the button d Enable Panel Alignment 1 Select Panel Alignment and then press the button 2 Select On and then press the button 3 Press the Esc button to return to the previous screen e Select the color you want to adjust 1 Select Select Color and then press the button 2 Select R red or B ...

Страница 182: ... and blue The actual color of the grid is cyan 3 Press the Esc button to return to the previous screen g Select Start Adjustments and then press the button When a message is displayed press the button again Adjustment starts All four corners are adjusted in order starting at the top left a The image may become distorted while adjusting The image is restored once adjustments are complete h Press th...

Страница 183: ...ss the Esc button to return to the previous screen a The image may become distorted while adjusting Color Uniformity The image is restored once adjustments are complete e Select Adjustment Level and then press the button f Press the buttons to set the adjustment level g Press the Esc button to return to the previous screen h Select Start Adjustments and then press the button i Press the buttons to...

Страница 184: ...he buttons to adjust Press the button to weaken the color tone Press the button to strengthen the color tone a The adjustment screen changes each time you press k Return to step 5 and adjust each level l To complete the adjustment press the Menu button Image Maintenance 184 ...

Страница 185: ...Appendix ...

Страница 186: ...tion allows you to perform setup and control operations remotely In addition since you can use the computer s keyboard entering characters required for the setup is easier Use Internet Explorer 8 0 or later as the Web browser Use Safari for OS X a If you set Standby Mode to Communication On you can use the Web browser to make settings and perform control even if the projector is in standby mode wh...

Страница 187: ...enu the password entry screen is displayed c The user ID and password entry screen is displayed Enter EPSONWEB as the user ID The default password is admin a Enter the user ID even if the password setting is disabled You cannot change the user ID You can change the password in the Network menu in the Configuration menu s Network Basic Web Control Password p 129 Using the Using Mail Notification to...

Страница 188: ...ror Fan related error Sensor error Lamp timer failure Lamp Warning 1 Lamp Warning 2 Lamp out Lamp type mismatch Incorrect projection mode Internal temperature error High speed cooling in progress Lamp replacement notification 1 Lamp replacement notification 2 Low Air Flow Low Air Flow Error Peltier Device error Pump Error Shutter Warning Shutter Error Cinema Filter Warning Cinema Filter Error No s...

Страница 189: ...is familiar with the network To use the SNMP function to monitor the projector you need to install the SNMP manager program on your computer The SNMP Agent for this projector complies with version 1 SNMPv1 The managing function using SNMP cannot be used over wireless LAN in Quick connection mode Up to two destination IP addresses can be saved Displaying the Web Remote Screen The Web Remote functio...

Страница 190: ...earch button s Automatically Detect Input Signals and Change the Projected Image Search p 58 G t button Turns the projector off Operating the lens You can operate the lens from a Web browser using Lens Control on the Web Control screen You can adjust the Focus Zoom and Lens Shift Item Function Repeat Shifts the lens to the maximum or minimum motion range Stops the shift Step Shifts the lens for th...

Страница 191: ...Item Command Power ON OFF On PWR ON Off PWR OFF Signal selection Computer Auto SOURCE 1F RGB SOURCE 11 Component SOURCE 14 BNC Auto SOURCE BF RGB SOURCE B1 Component SOURCE B4 DVI D SOURCE A0 HDMI SOURCE 30 Video SOURCE 41 S Video SOURCE 42 LAN SOURCE 53 Item Command SDI For EB Z10005U EB Z10000U EB Z9875U EB Z9870U only SOURCE 60 HDBaseT SOURCE 80 Shutter function On Off On MUTE ON Off MUTE OFF A...

Страница 192: ...or control protocols The projector complies with the PJLink Class1 standard established by the JBMIA You need to make network settings before you can use PJLink See the following for more information on network settings s Network Menu p 127 It complies with all commands except for the following commands defined by PJLink Class1 and agreement was confirmed by the PJLink standard adaptability verifi...

Страница 193: ...ore be used in a system built with Crestron RoomView Visit the Crestron Web site for details on Crestron RoomView Only English language displays are supported http www crestron com The following provides an overview of Crestron RoomView Remote operation using a Web browser You can operate a projector from your computer just like using a remote control Monitoring and control with application softwa...

Страница 194: ...ew to On in the Network menu s Network Others Crestron RoomView p 134 a Start the Web browser on the computer b Enter the IP address of the projector in the address input box of the Web browser and press the Enter key on the computer s keyboard The operation window is displayed Using the operation window A You can perform the following operations when you click the buttons Button Function Power Tu...

Страница 195: ...following operations when you click the other buttons Button Function OK Performs the same operation as the button on the remote control s Remote Control p 20 Menu Press to display and close the Configuration menu Auto If clicked while projecting analog RGB signals from the Computer input port you can automatically optimize Tracking Sync and Position Search Press to change to the next input source...

Страница 196: ...ector The name can contain up to 32 single byte alphanumeric characters and symbols DHCP Select Enabled to use DHCP You cannot enter an IP address if DHCP is enabled IP Address EntertheIPaddresstoassigntothecurrentlyconnected projector Subnet Mask Enter a subnet mask for the currently connected projector Default Gateway Enter the gateway address for the currently connected projector Send Click thi...

Страница 197: ... Enterthe newpasswordwhen changing thepasswordto open the operation window The name can contain up to 26 single byte alphanumeric characters Confirm Enter the same password as you entered in New Password If the passwords are not the same an error is displayed Send Click this button to confirm the changes made to the User Password Monitoring and Controlling 197 ...

Страница 198: ...mote control cable set ELPKC28 10 m 2 piece set Use this to guarantee operation from the remote control from a distance Wireless mouse receiver ELPST16 Use this to use the projector s remote control to control the mouse pointer on the computer or to page up and down HDBaseT Transmitter ELPHD01 This transmitter performs long distance transmissions for HDMI signals and control signals for 1 LAN cabl...

Страница 199: ...est address provided in the Epson Projector Contact List s Epson Projector Contact List Consumables Lamp unit one pack ELPLP81 Lamp unit two packs ELPLP82 Use as a replacement for used lamps Lamp unit for portrait use one pack ELPLP83 Lamp unit for portrait use two packs ELPLP84 Use for portrait projection Air Filter ELPAF46 Use as a replacement for used air filter Optional Accessories and Consuma...

Страница 200: ...de to Maximum Tele Vertical Lens Shift Top to Bottom 60 130x81 199 326 8 89 70 151x94 233 382 9 104 80 172x108 268 438 11 119 90 194x121 302 493 12 133 100 215x135 337 549 14 148 120 258x162 406 661 16 178 150 323x202 509 828 20 222 200 431x269 682 1106 27 296 250 538x337 855 1385 34 370 300 646x404 1027 1663 41 444 350 754x471 1200 1942 47 519 400 862x538 1372 2220 54 593 450 969x606 1545 2499 61...

Страница 201: ...90 183x137 343 560 14 151 100 203x152 383 623 15 168 120 244x183 461 749 18 201 4 3 Screen Size A B Minimum Wide to Maximum Tele Vertical Lens Shift Top to Bottom 150 305x229 578 938 23 252 200 406x305 773 1253 31 335 250 508x381 969 1569 38 419 300 610x457 1164 1884 46 503 350 711x533 1359 2199 54 587 400 813x610 1555 2515 61 671 441 896x672 1715 2773 68 740 Short throw zoom lens ELPLU02 Unit cm ...

Страница 202: ...9 400 886x498 578 697 83 581 450 996x560 651 784 94 654 486 1076x605 704 848 101 706 Unit cm 4 3 Screen Size A B Minimum Wide to Maximum Tele Vertical Lens Shift Top to Bottom 53 108x81 80 97 8 89 60 122x91 91 110 9 101 70 142x107 107 130 11 117 80 163x122 123 149 12 134 90 183x137 139 168 14 151 100 203x152 155 188 15 168 120 244x183 187 226 18 201 150 305x229 236 284 23 252 200 406x305 316 381 3...

Страница 203: ...664x374 473 187 350 775x436 553 218 400 886x498 633 249 450 996x560 713 280 16 9 Screen Size A B 486 1076x605 770 303 Unit cm 4 3 Screen Size A B 53 108x81 87 40 60 122x91 99 46 70 142x107 117 53 80 163x122 134 61 90 183x137 152 69 100 203x152 169 76 120 244x183 205 91 150 305x229 257 114 200 406x305 345 152 250 508x381 433 191 300 610x457 521 229 350 711x533 610 267 400 813x610 698 305 441 896x67...

Страница 204: ... 266x149 315 431 25 174 150 332x187 395 540 31 218 200 443x249 530 723 42 291 16 9 Screen Size A B Minimum Wide to Maximum Tele Vertical Lens Shift Top to Bottom 250 553x311 664 905 52 363 300 664x374 798 1088 63 436 350 775x436 933 1270 73 509 400 886x498 1067 1453 83 581 450 996x560 1201 1635 94 654 486 1076x605 1298 1767 101 706 Unit cm 4 3 Screen Size A B Minimum Wide to Maximum Tele Vertical ...

Страница 205: ...x75 315 486 13 87 70 155x87 370 570 15 102 80 177x100 425 653 17 116 16 9 Screen Size A B Minimum Wide to Maximum Tele Vertical Lens Shift Top to Bottom 90 199x112 479 736 19 131 100 221x125 534 819 21 145 120 266x149 644 986 25 174 150 332x187 808 1236 31 218 200 443x249 1082 1652 42 291 250 553x311 1355 2068 52 363 300 664x374 1629 2484 63 436 350 775x436 1903 2900 73 509 400 886x498 2176 3317 8...

Страница 206: ...9 4117 47 519 400 862x538 3100 4709 54 593 450 969x606 3490 5300 61 667 500 1077x673 3881 5892 68 741 Unit cm 16 9 Screen Size A B Minimum Wide to Maximum Tele Vertical Lens Shift Top to Bottom 59 131x73 450 694 12 86 60 133x75 458 706 13 87 70 155x87 538 828 15 102 80 177x100 618 949 17 116 90 199x112 698 1071 19 131 100 221x125 779 1192 21 145 120 266x149 939 1436 25 174 150 332x187 1180 1800 31...

Страница 207: ...202 1708 2399 20 222 200 431x269 2287 3209 27 296 250 538x337 2867 4020 34 370 16 10 Screen Size A B Minimum Wide to Maximum Tele Vertical Lens Shift Top to Bottom 300 646x404 3447 4830 41 444 350 754x471 4026 5640 47 519 400 862x538 4606 6451 54 593 450 969x606 5186 7261 61 667 500 1077x673 5765 8071 68 741 Unit cm 16 9 Screen Size A B Minimum Wide to Maximum Tele Vertical Lens Shift Top to Botto...

Страница 208: ...170 18 201 150 305x229 1937 2720 23 252 200 406x305 2594 3637 31 335 250 508x381 3250 4555 38 419 300 610x457 3906 5472 46 503 350 711x533 4562 6389 54 587 400 813x610 5219 7307 61 671 441 896x672 5757 8059 68 740 Projection Distances for EB Z11005 EB Z11000 EB Z9870 A Projection distance B Distance from the center of the lens to the base of the image This varies depending on the setting for verti...

Страница 209: ...Tele Vertical Lens Shift Top to Bottom 56 124x70 197 324 17 87 60 133x75 212 348 18 93 16 9 Screen Size A B Minimum Wide to Maximum Tele Vertical Lens Shift Top to Bottom 70 155x87 249 407 21 108 80 177x100 285 467 24 124 90 199x112 322 526 27 139 100 221x125 359 586 30 155 120 266x149 432 704 36 185 150 332x187 542 882 45 232 200 443x249 726 1179 60 309 250 553x311 909 1476 75 386 300 664x374 109...

Страница 210: ... 245 0 229 200 406x305 271 328 0 305 250 508x381 340 412 0 381 300 610x457 410 495 0 457 350 711x533 479 578 0 533 4 3 Screen Size A B Minimum Wide to Maximum Tele Vertical Lens Shift Top to Bottom 400 813x610 548 662 0 610 450 914x686 617 745 0 686 500 1016x762 686 828 0 762 Unit cm 16 9 Screen Size A B Minimum Wide to Maximum Tele Vertical Lens Shift Top to Bottom 56 124x70 79 96 12 81 60 133x75...

Страница 211: ...r projection wide lens ELPLR04 Lens shift is not supported Unit cm 4 3 Screen Size A B 60 122x91 84 46 70 142x107 100 53 80 163x122 115 61 4 3 Screen Size A B 90 183x137 130 69 100 203x152 145 76 120 244x183 176 91 150 305x229 221 114 200 406x305 297 152 250 508x381 373 191 300 610x457 449 229 350 711x533 525 267 400 813x610 601 305 450 914x686 677 343 500 1016x762 753 381 Unit cm 16 9 Screen Size...

Страница 212: ...A B Minimum Wide to Maximum Tele Vertical Lens Shift Top to Bottom 70 142x107 171 236 6 113 80 163x122 197 270 7 129 90 183x137 222 305 8 145 100 203x152 248 340 8 161 120 244x183 299 409 10 193 150 305x229 376 513 13 241 200 406x305 504 686 17 322 250 508x381 632 860 21 402 300 610x457 759 1033 25 483 350 711x533 887 1207 30 563 400 813x610 1015 1380 34 643 450 914x686 1143 1553 38 724 500 1016x7...

Страница 213: ...269 534 728 45 314 250 538x337 670 912 56 393 300 646x404 805 1096 67 471 350 754x471 941 1279 79 550 16 10 Screen Size A B Minimum Wide to Maximum Tele Vertical Lens Shift Top to Bottom 400 862x538 1076 1463 90 628 450 969x606 1212 1647 101 707 471 1014x634 1269 1724 106 740 Middle throw zoom lens ELPLM06 Unit cm 4 3 Screen Size A B Minimum Wide to Maximum Tele Vertical Lens Shift Top to Bottom 6...

Страница 214: ...317 491 13 94 70 151x94 372 575 16 110 80 172x108 428 659 18 126 16 10 Screen Size A B Minimum Wide to Maximum Tele Vertical Lens Shift Top to Bottom 90 194x121 483 743 20 141 100 215x135 538 826 22 157 120 258x162 648 994 27 188 150 323x202 813 1246 34 236 200 431x269 1089 1666 45 314 250 538x337 1365 2086 56 393 300 646x404 1640 2506 67 471 350 754x471 1916 2926 79 550 400 862x538 2191 3346 90 6...

Страница 215: ...1 2051 3126 75 386 300 664x374 2465 3755 90 464 350 775x436 2880 4385 105 541 400 886x498 3295 5015 120 618 450 996x560 3710 5645 135 695 16 9 Screen Size A B Minimum Wide to Maximum Tele Vertical Lens Shift Top to Bottom 458 1014x570 3777 5746 137 708 Unit cm 16 10 Screen Size A B Minimum Wide to Maximum Tele Vertical Lens Shift Top to Bottom 57 123x77 436 675 13 90 60 130x81 460 712 13 94 70 151...

Страница 216: ...3 18 93 70 155x87 831 1176 21 108 80 177x100 955 1348 24 124 16 9 Screen Size A B Minimum Wide to Maximum Tele Vertical Lens Shift Top to Bottom 90 199x112 1078 1521 27 139 100 221x125 1201 1693 30 155 120 266x149 1448 2038 36 185 150 332x187 1818 2556 45 232 200 443x249 2435 3418 60 309 250 553x311 3052 4281 75 386 300 664x374 3669 5144 90 464 350 775x436 4286 6006 105 541 400 886x498 4902 6869 1...

Страница 217: ... Vertical Lens Shift Top to Bottom 250 538x337 2968 4164 56 393 300 646x404 3569 5004 67 471 350 754x471 4169 5843 79 550 400 862x538 4769 6682 90 628 450 969x606 5369 7521 101 707 471 1014x634 5621 7874 106 740 Screen Size and Projection Distance 217 ...

Страница 218: ...870 1 Only compatible when Wide is selected as the Resolution in the Configuration menu This is not available for EB Z11005 EB Z11000 EB Z9870 2 EB Z10005U EB Z10000U EB Z9875U EB Z9870U EB Z9750U only Only compatible when VESA CVTRB Reduced Blanking signals are being input Even when signals other than those mentioned above are input it is likely that the image can be projected However not all fun...

Страница 219: ...0i 50 60 1920x1080 HDTV 1080p 24 30 50 60 1920x1080 1 When an HDMI connection is made using the optional HDBaseT Transmitter 2 This is not available for EB Z11005 EB Z11000 EB Z9870 3 Only compatible when VESA CVT RB Reduced Blanking signals are being input Input Signals from SDI Input Port For EB Z10005U EB Z10000U EB Z9875U EB Z9870U only Signal Refresh Rate Hz Resolution Dots Mode Color Space N...

Страница 220: ... 1 Automatic 1 1 61 Lens shift 2 Automatic Maximum vertical direction of approx 60 Maximum horizontal direction of approx 18 Automatic Maximum vertical direction of approx 56 3 Maximum horizontal direction of approx 19 Lamp Normal UHE lamp 380W Model No ELPLP81 one pack ELPLP82 two packs For por trait use UHE lamp 304W Model No ELPLP83 one pack ELPLP84 two packs Power 100 240 V AC 10 50 60 Hz 11 2...

Страница 221: ... On 2 9 W Standby power consumption Communica tion Off 0 37 W Operating 1060 W Standby power consumption Communica tion On 2 9 W Standby power consumption Communica tion Off 0 37 W Operating 948 W Standby power consumption Communica tion On 2 9 W Standby power consumption Communica tion Off 0 37 W Operating 809 W Standby power consumption Communica tion On 2 9 W Standby power consumption Communica...

Страница 222: ...t 1 Mini D Sub15 pin female black DVI D input port 1 DVI D 24pin Single link HDCP compatible HDBaseT port 1 RJ 45 LAN port 1 RJ 45 SDI input port 1 1BNC female Service port 1 USB connector Type B RS 232C port 1 Mini D Sub 9 pin male Remote port 1 Stereo mini jack 3 5Ф USB port Only for wireless LAN unit 1 USB connector Type A USB 2 0 is supported However USB ports are not guaranteed to operate all...

Страница 223: ... reasonable protection against harmful interference in a residential installation This equipment generates uses and can radiate radio frequency energy and if not installed and used in accordance with the instructions may cause harmful interference to radio communications However there is no guarantee that interference will not occur in a particular installation If this equipment does cause interfe...

Страница 224: ...Part 15 of the FCC Rules Operation is subject to the following two conditions 1 this device may not cause harmful interference and 2 this device must accept any interference received including interference that may cause undesired operation Specifications 224 ...

Страница 225: ...A Center of lens B Distance from center of lens to suspension bracket fixing point Units mm Appearance 225 ...

Страница 226: ...aticallyassignsan IP addressgto equipmentconnected to a network DICOM An acronym for Digital Imaging and Communications in Medicine An international standard that defines image standards and a communications protocol for medical images Gateway Address This is a server router for communicating across a network subnet divided according to subnet maskg HDBaseT The connection standard for consumer ele...

Страница 227: ...ted so that colors that are reproduced by video equipment can be handled easily by computeroperatingsystems OS andtheInternet IftheconnectedsourcehasansRGBmode setboththeprojectorandtheconnectedsignalsource to sRGB SSID SSID is identification data for connecting to another device on a wireless LAN Wireless communication is possible between devices with the same SSID Subnet Mask This is a numerical...

Страница 228: ...ual projector may differ Restriction of Use When this product is used for applications requiring high reliability safety such as transportation devices related to aviation rail marine automotive etc disaster prevention devices various safety devices etc or functional precision devices etc you should use this product only after giving consideration to including fail safes and redundancies into your...

Страница 229: ...Microsoft Corporation in the United States and or other countries WPA and WPA2 are registered trademarks of Wi Fi Alliance HDMI and High Definition Multimedia Interface are the trademarks or registered trademarks of HDMI Licensing LLC PJLink is a trademark or registered trademark in Japan the United States and or other countries and areas HDBaseT and the HDBaseT Alliance logo are trademarks of the...

Страница 230: ... 118 Color Uniformity 123 126 183 Computer Input Port 17 Configuration Menu 114 Connection Mode 130 Consumables 199 Contrast 117 Control Panel 15 18 Control Panel Lock 110 121 Corner Wall 67 121 Crestron RoomView 193 Curved Surface 63 121 D Date Time 100 125 DICOM SIM 70 Direct Power On 124 Direction 30 123 Display 123 Display Background 123 Distance 200 Document Camera 198 DVI D Port 17 Dynamic 7...

Страница 231: ...plays 218 Monitor Out Port 17 Mosquito NR 120 Multi Projection 70 126 Multi Projection function 80 N Network Configuration 127 Network Information 127 Network Menu 127 Noise Reduction 120 O Operating Temperature 221 Operation 124 125 Optional Accessories 198 Overheating 143 Overscan 120 P Panel Alignment 123 181 Part Names and Functions 14 Passphrase 132 Password Protection 107 Photo 70 PJLink 192...

Страница 232: ...SMTP Server 134 SNMP 189 Soft Keyboard 128 Source 91 136 Specifications 220 Split Screen 91 121 Split Screen Setup 91 Sports 70 sRGB 70 SSID 130 SSID Auto Setting 130 SSID Display 131 Standby Confirmation 123 Standby Mode 125 Startup Screen 123 Startup Source Search 124 Status 137 Status Indicator 141 Status Indicators 15 Status Monitor 19 150 Storage Temperature 221 Subnet Mask 131 133 Super reso...

Страница 233: ...Z Zoom 19 37 Index 233 ...

Отзывы: