background image

Setting Up Monitoring Using SNMP

75

Network administrators can install SNMP (Simple Network Management

Protocol) software on network computers so they can monitor projectors. If

your network uses this software, you can set up the projector for SNMP

monitoring.

a

Press the

button on the remote control, select the Network menu,

and press [Enter].

b

Select Network Configuration and press [Enter].

c

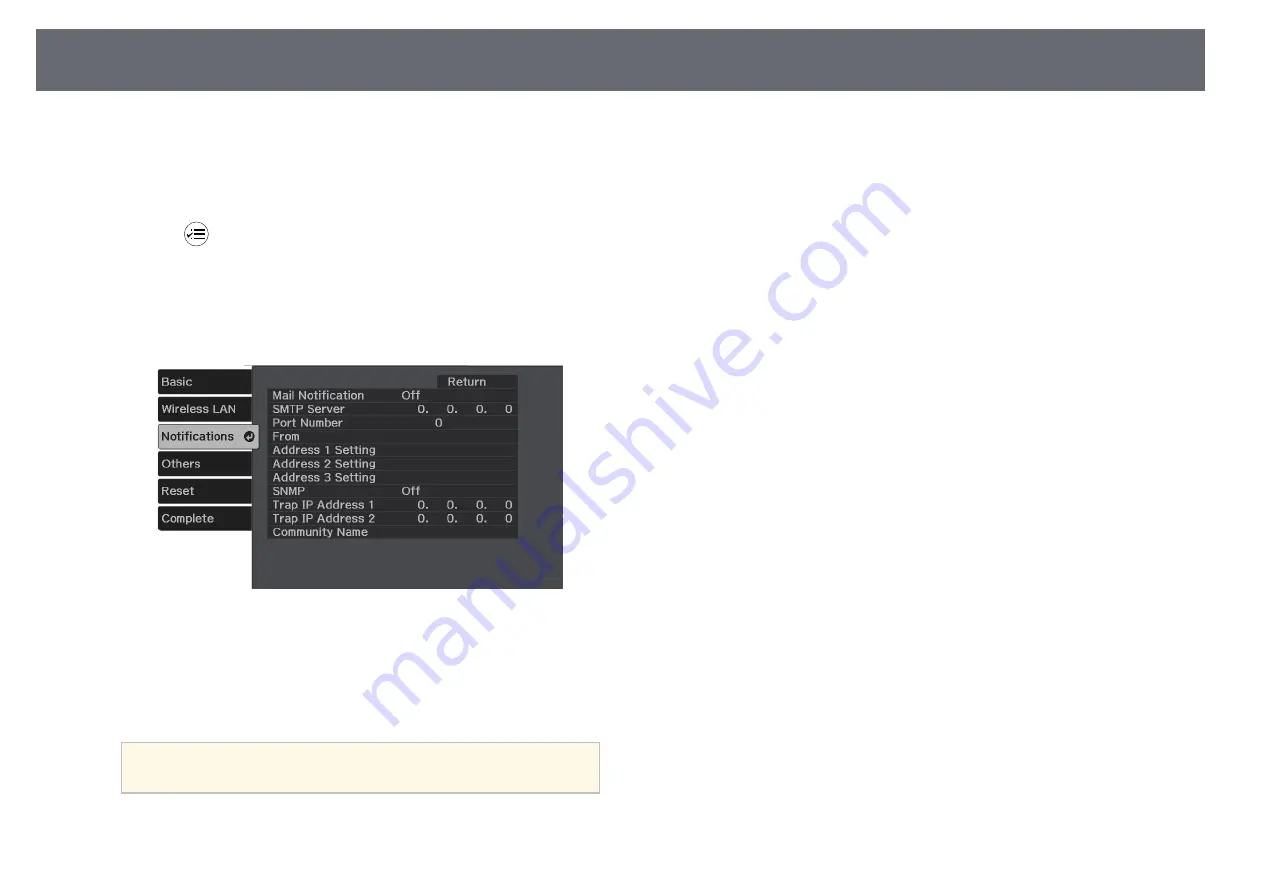
Select the Notifications menu and press [Enter].

d

Set the SNMP setting to On.

e

Enter up to two IP addresses to receive SNMP notifications as the Trap

IP Address 1 and Trap IP Address 2 settings, using 0 to 255 for each

address field.

a

Do not use these addresses: 224.0.0.0 through 255.255.255.255.

This projector supports SNMP agent version 1 (SNMPv1).

f

Enter the SNMP Community Name up to 32 alphanumeric characters

long.

g

When you finish selecting settings, select Complete and follow the on-

screen instructions to save your settings and exit the menus.

Содержание CO-FD01

Страница 1: ...User s Guide ...

Страница 2: ... a Computer for USB Video and Audio 23 Connecting to an iPad iPhone 24 Connecting to External USB Devices 24 USB Device Projection 24 Connecting to a USB Device 24 Disconnecting a USB Device 25 Connecting to a Document Camera 25 Using Basic Projector Features 26 Turning On the Projector 27 Home Screen 28 Turning Off the Projector 30 Selecting the Language for the Projector Menus 31 Projection Mode...

Страница 3: ...ing a Password 65 Selecting Password Security Types 66 Entering a Password to Use the Projector 67 Installing a Security Cable 67 Monitoring and Controlling the Projector 68 Epson Projector Management 69 Controlling a Networked Projector Using a Web Browser 70 Web Control Options 71 Setting Up Projector Network E Mail Alerts 74 Network Projector E mail Alert Messages 74 Setting Up Monitoring Using...

Страница 4: ...ting an Upside down Image 110 Solving USB Display Problems 111 Solving Sound Problems 112 Solving Remote Control Operation Problems 113 Solving Password Problems 114 Solving HDMI Link Problems 115 When the Message It is time to replace the projector is Displayed 116 Appendix 117 Optional Accessories and Replacement Parts 118 Mounts 118 For Wireless Connection 118 External Devices 118 Screen Size a...

Страница 5: ...Contents 5 Copyright Attribution 133 ...

Страница 6: ...bly result in personal injury or physical damage due to incorrect handling General Information Notations Attention This label indicates procedures that may result in damage or injury if sufficient care is not taken This label indicates additional information that may be useful to know button Indicates the buttons on the remote control or the control panel Example button Menu Setting name Indicates...

Страница 7: ... window and then click Search Hits are displayed as a list Click one of the displayed hits to jump to that page Jumping Directly from Bookmarks Click a title to jump to that page Click or to view the lower level titles in that section To return to the previous page perform the following operation on your keyboard Windows Hold down Alt and then press Mac OS Hold down the command key and then press ...

Страница 8: ...Getting the Latest Version of the Documents 8 You can get the latest version of the manuals and specifications on the Epson Web site Visit epson sn and enter your model name ...

Страница 9: ...Introduction to Your Projector Refer to these sections to learn more about your projector s features and part names g g Related Links Projector Parts and Functions p 10 ...

Страница 10: ...t Takes in air to cool the projector internally Name Function G HDMI port Inputs video signals from HDMI compatible video equipment and computers This port is compatible with HDCP 2 3 H USB B port Connects a USB cable to the computer to project computer images I port Connects a USB memory device or a digital camera and projects movies or images using PC Free Connects the optional document camera C...

Страница 11: ...ok into the vents If the lamp explodes gases may escape and small fragments of glass may be scattered which could cause an injury Contact a doctor if any fragments of broken glass are inhaled or get into the eyes or mouth Name Function Caution While projecting do not put your face or hands near the air exhaust vent and do not place objects that may become warped or damaged by heat near the vent Ho...

Страница 12: ...y available wire lock through here and lock it in place You can also attach the optional safety wire here to prevent the projector from falling from the ceiling or wall C Air intake vent Takes in air to cool the projector internally D Front adjustable foot When the projector is set up on a surface such as a desk extend the foot to adjust the position of the image g g Related Links Adjusting the Im...

Страница 13: ... s menu When the or icons are displayed on the menu screen use these buttons to select the menu items E Enter button Enters the current selection and moves to the next level while displaying the projector s menu F Home button Displays and closes the Home screen G Esc button Stops the current function Moves back to the previous menu level while displaying the projector s menu H E Zoom buttons Zooms...

Страница 14: ...st the settings that control how your projector works N Brightness button Adjusts the brightness of the projected image O Source button Switches to the next input source P Remote control light emitting area Outputs remote control signals g g Related Links Zooming Images E Zoom p 61 Adjusting Image Quality Color Mode p 46 Home Screen p 28 Correcting the Image Shape with the Keystone Button p 37 Sel...

Страница 15: ...ctor Follow the instructions in these sections to set up your projector g g Related Links Projector Placement p 16 Installing the Safety Wire p 19 Installing Batteries in the Remote Control p 20 Projector Connections p 22 ...

Страница 16: ...se may crack causing it to fall from its ceiling mount This could cause serious injury to anyone under the ceiling mount and could damage the projector Failure to install the ceiling mount and projector may cause the projector to fall After installing the specific Epson mount that supports your projector make sure you secure the mount to all of the projector s ceiling mount fixing points Also secu...

Страница 17: ... also cause the projector to malfunction When using the projector outdoors at night be careful not to trip over any extension power cords you are using Otherwise the projector could fall or topple causing an accident and injury Attention Do not operate the projector on its side This may cause the projector to malfunction If you are using the projector at altitudes above 1 500 m set the High Altitu...

Страница 18: ...stance at which you place the projector from the screen determines the approximate size of the image The image size increases the farther the projector is from the screen but can vary depending on the zoom factor aspect ratio and other settings See the Appendix for details about how far to place the projector from the screen based on the size of the projected image a When correcting keystone disto...

Страница 19: ...he safety wire provided with the Epson ceiling mount The safety wire is available as an optional Safety Wire Set ELPWR01 a Pass the safety wire through the security cable attachment point on the projector b Attach the other end of the safety wire to a structure that is strong enough to bear the projector s weight such as a commercially available mounting hardware If the wire is too long loop the w...

Страница 20: ...ulations c Insert the batteries with the and ends facing as shown Warning Check the positions of the and marks inside the battery holder to ensure the batteries are inserted the correct way If the batteries are not used correctly they could explode or leak causing a fire injury or damage to the product d Replace the battery cover and press it down until it clicks into place g g Related Links Remot...

Страница 21: ...e projector s receivers within the distance and angles listed here a Avoid using the remote control in conditions with bright fluorescent lights or in direct sunlight or the projector may not respond to commands If you are not going to use the remote control for a long time remove the batteries ...

Страница 22: ...evice or an optional cable to connect to the projector The cable differs depending on the output signal from the connected video devices Some video devices are capable of outputting different types of signals See your video device manual to confirm what type of signals can be output g g Related Links Connecting to an HDMI Video Source p 22 Connecting to an HDMI Video Source If your video source ha...

Страница 23: ...our projector s USB B port b Connect the other end to any available USB port on your computer c Turn on the projector and your computer d Do one of the following to install the Epson USB Display software a You only need to install this software the first time you connect the projector to the computer Windows Select Run EMP_UDSE EXE in the dialog box that is displayed to install the Epson USB Displ...

Страница 24: ...Device Projection p 24 Connecting to a USB Device p 24 Disconnecting a USB Device p 25 USB Device Projection You can project images and other content without using a computer or video device by connecting any of these devices to your projector USB flash drive Digital camera or smartphone USB hard drive a Digital cameras or smartphones must be USB mounted devices not TWAIN compliant devices and mus...

Страница 25: ...sconnecting a USB Device When you have finished projecting with a connected USB device disconnect the device from the projector a Turn off and unplug the device if necessary b Disconnect the USB device from the projector Connecting to a Document Camera You can connect a document camera to your projector to project images viewed by the camera The connection method varies depending on your Epson doc...

Страница 26: ...jector Menus p 31 Projection Modes p 32 Setting the Screen Type p 33 Displaying a Test Pattern p 35 Adjusting the Image Height p 36 Image Shape p 37 Focusing the Image Using the Focus Lever p 40 Resizing the Image with Zoom p 41 Adjusting the Image Position Using Image Shift p 42 Selecting an Image Source p 43 Image Aspect Ratio p 44 Adjusting Image Quality Color Mode p 46 Controlling the Volume w...

Страница 27: ...status indicator flashes blue as the projector warms up Once the projector is warmed up the status indicator stops flashing and turns blue d Turn on the connected device e Try the following if you do not see a projected image Turn on the connected computer or video device Change the screen output from the computer when using a laptop computer Insert a DVD or other video media and press play if nec...

Страница 28: ...njury Be very careful not to allow such pieces of glass to enter your eyes or mouth If the lamp breaks ventilate the area immediately and contact a doctor if any fragments of broken glass are inhaled or get into the eyes or mouth Do not turn the projector back on immediately after turning off the projector Turning the projector on off too frequently can shorten the lamp life a When the Direct Powe...

Страница 29: ... uneven rectangle a After 10 minutes of inactivity the Home screen disappears and you are returned to the screen that you were on before the current input source screen or no signal message g g Related Links Image Shape p 37 Projector Information Display Info Menu p 91 Using the Projector s Menus p 77 Using the Projector Help Displays p 106 ...

Страница 30: ...ed off directly using the breaker a Press the power button on the projector or remote control The projector displays a shutdown confirmation screen b Press the power button again To leave it on press any other button The projected image disappears and the status indicator turns off a With Epson s Instant Off technology there is no cool down period so you can pack up the projector for transport rig...

Страница 31: ...ssages in another language you can change the Language setting a Turn on the projector b Press the button on the remote control c Select the Settings menu and press Enter d Select the Language setting and press Enter e Select the language you want to use and press Enter f Press or to exit the menus ...

Страница 32: ...32 Projector Setup and Installation Options p 17 Changing the Projection Mode Using the Remote Control You can change the projection mode to flip the image over top to bottom a Turn on the projector and display an image b Hold down the button on the remote control for five seconds The image disappears briefly and reappears flipped top to bottom c To change projection back to the original mode hold...

Страница 33: ...stallation Screen Screen Type You see this screen e Select your screen s aspect ratio and press Enter f Press to exit the menus g Adjust the aspect ratio for the projected image if necessary g g Related Links Adjusting the Image Position Using Screen Position p 33 Adjusting the Image Position Using Screen Position You can adjust the image position if there are margins between the edge of the image...

Страница 34: ...Screen Type 34 c Select the Settings menu and press Enter d Select Installation Screen Screen Position e Use the arrow buttons on the remote control to adjust the position of the image f When you are finished press ...

Страница 35: ...tion Screen Screen Type To set menu items that cannot be set while the test pattern is being displayed or to fine tune the projected image project an image from the connected device a Turn on the projector b Press the button on the remote control c Select the Settings menu and press Enter d Select Installation Pattern Test Pattern and press Enter The test pattern is displayed e Adjust the image as...

Страница 36: ... to focus Locate the projector so that it only needs to be tilted at a small angle a Turn on the projector and display an image b Press the foot release lever to extend and retract the front adjustable foot The foot extends from the projector You can adjust the position up to 12 degrees c Release the lever to lock the foot If the projected image is unevenly rectangular you need to adjust the image...

Страница 37: ...ng the Image Shape with the Keystone Button You can correct the shape of an image that is unevenly rectangular To correct the distortion in the horizontal and vertical directions independently use the button on the remote control a You cannot combine H V Keystone correction with other image shape correction methods You can correct keystone distortion by up to 30º right left up or down a Turn on th...

Страница 38: ...ct the Settings menu and press Enter d Select Installation Keystone and press Enter e Select Quick Corner and press Enter Then press Enter again if necessary You see the area selection screen f Use the arrow buttons to select the corner of the image you want to adjust Then press Enter a To reset the Quick Corner corrections hold down for about two seconds while the area selection screen is display...

Страница 39: ...u cannot adjust the shape any further in the direction indicated by the gray triangle h Repeat steps 6 and 7 as needed to adjust any remaining corners i When you are finished press g g Related Links Projector Feature Settings Settings Menu p 81 ...

Страница 40: ...Focusing the Image Using the Focus Lever 40 You can correct the focus using the focus lever ...

Страница 41: ...nu a Turn on the projector and display an image b Press the button on the remote control c Select the Settings menu and press Enter d Select Installation Zoom and press Enter e Press the left or right arrow button to adjust the zoom setting and press Enter f Press to exit the menus ...

Страница 42: ...tton on the remote control c Select the Settings menu and press Enter d Select Installation Image Shift and press Enter e Use the arrow buttons to adjust the image position a You can shift the image diagonally by pressing any pair of adjacent arrow buttons on the remote control f Press the button to close the adjustment screen a The Image Shift setting is retained even if the projector is turned o...

Страница 43: ... and press play c Do one of the following Press the button on the remote control until you see the image from the source you want a This screen is displayed when no image signal is detected Check the cable connections between the projector and image source Press the button on the remote control Then select the source you want to use from the screen displayed a When no image signal is detected chec...

Страница 44: ...mage Aspect Ratios p 44 Image Quality Settings Image Menu p 79 Changing the Image Aspect Ratio You can change the aspect ratio of the displayed image a Turn on the projector and display an image b Press the button on the remote control c Select the Image menu and press Enter d Select Aspect and press Enter e Select one of the available aspect ratios for your input signal and press Enter f Press to...

Страница 45: ...older of that image based on copyright law Aspect mode Description Auto Automatically sets the aspect ratio according to the input signal 16 9 Converts the aspect ratio of the image to 16 9 CO W01 CO WX01 CO WX02 Full Displays images using the full size of the projection area but does not maintain the aspect ratio Zoom Displays images using the full width of the projection area and maintains the a...

Страница 46: ...ge the Color Mode The name of the Color Mode appears briefly on the screen and then image appearance changes c To cycle through all of the available color modes for your input signal press the button repeatedly a You can also set the Color Mode setting in the projector s Image menu g g Related Links Image Quality Settings Image Menu p 79 Available Color Modes You can set the projector to use these...

Страница 47: ...ink s Settings Operation HDMI Link Audio Out Device a Turn on the projector and start a presentation b To lower or raise the volume press the or buttons on the remote control A volume gauge appears on the screen c To set the volume to a specific level for an input source select Volume in the projector s Settings menu Caution Do not start a presentation at a high volume setting Sudden loud noises m...

Страница 48: ... Wireless Network Connection p 49 Projecting a PC Free Presentation p 54 Shutting Off the Image and Sound Temporarily A V Mute p 58 Turning Off the Sound Temporarily Mute p 59 Stopping Video Action Temporarily p 60 Zooming Images E Zoom p 61 Saving a User s Logo Image p 62 Saving a User Pattern p 64 Projector Security Features p 65 ...

Страница 49: ...e the responsibility of the customer g g Related Links Installing the Wireless LAN Module p 49 Selecting Wireless Network Settings Manually p 49 Selecting Wireless Network Settings in Windows p 51 Selecting Wireless Network Settings in Mac p 51 Setting Up Wireless Network Security p 52 Using a QR Code to Connect a Mobile Device p 52 Installing the Wireless LAN Module To use the projector over a wi...

Страница 50: ...ty password to prevent access to the projector by anyone not in the room with it You must enter a displayed randomized keyword from a computer using Epson iProjection to access the projector and share the current screen Display Keyword lets you select whether to display a projector keyword on the projected image when accessing the projector using Epson iProjection Display LAN Info lets you set the...

Страница 51: ...s to save your settings and exit the menus The wireless network settings are complete when you see the correct IP address on the LAN standby screen When you have finished making wireless settings for your projector you need to select the wireless network on your computer Then start the network software to send images to your projector through a wireless network g g Related Links Network Menu Wirel...

Страница 52: ...d press Enter b Select Network Configuration and press Enter c Select the Wireless LAN menu and press Enter d Select the Security setting and press Enter e Select the security settings to match your network settings WPA2 PSK WPA3 PSK WPA2 WPA3 PSK f Select Passphrase press Enter and enter a passphrase from 8 to 63 characters long To enter more than 32 characters use your Web browser g Select Compl...

Страница 53: ... screen The QR code is displayed on the projected surface a If you do not see the QR code set the Display LAN Info setting to Text QR Code in the projector s Network menu s Network Network Configuration Basic Display LAN Info To hide the QR code press c Start Epson iProjection on your mobile device d Read the projected QR code using Epson iProjection to connect it to the projector a To correctly r...

Страница 54: ...tead Projection is not guaranteed for all file types in the following table File contents File type extension Details Image jpg Make sure the file is not CMYK format JPEG 2000 Above 8192 8192 resolution bmp Make sure the file is not Above 1280 800 resolution gif Make sure the file is not Above 1280 800 resolution Animated Interlaced png Make sure the file is not Above 1280 800 resolution Interlace...

Страница 55: ... the projector you can switch to the USB input source and start your slide show a You can change the PC Free operation options or add special effects by highlighting Option at the bottom of the screen and pressing Enter a Press the button on the remote control to switch to the USB source The PC Free file list screen is displayed a If the Select Drive screen is displayed press the arrow buttons to ...

Страница 56: ...can change the PC Free operation options by highlighting Option at the bottom of the screen and pressing Enter a Press the button on the remote control to switch to the USB source The PC Free file list screen is displayed a If the Select Drive screen is displayed press the arrow buttons to select the drive and press Enter To display movie files on the other USB drive highlight Select Drive at the ...

Страница 57: ...ter Setting Options Description Display Order Name Order Displays files in name order Date Order Displays files in date order Sort Order In Ascending Sorts files in first to last order In Descending Sorts files in last to first order Continuous Play On Displays a slide show continuously Off Displays a slide show once Screen Switching Time No Does not display the next file automatically 1 Second to...

Страница 58: ... the screen displayed in the A V Mute setting in the projector s Settings menu s Settings Display A V Mute a Press the button on the remote control The projected image and sound are interrupted b To turn the image and sound back on press again a The projector s power automatically turns off 30 minutes after A V Mute is enabled You can disable this feature s Settings Operation A V Mute Timer The la...

Страница 59: ...Turning Off the Sound Temporarily Mute 59 You can temporarily turn off the sound a Press the button on the remote control b To turn the sound back on press again ...

Страница 60: ...ter presentation and keep the current image on the screen Any sound or video action continues to run however so you cannot resume projection at the point that you stopped it a Press the button on the remote control to stop the video action b To restart the video action in progress press again ...

Страница 61: ... of adjacent arrow buttons at the same time Press the button repeatedly to zoom into the image area Press and hold the button to zoom in more quickly To pan around the zoomed image area use the arrow buttons To zoom out of the image press the button To return to the original image size press The enlarged image is projected and the enlargement ratio is displayed on the screen You can enlarge the se...

Страница 62: ...ot want to share between multiple projectors as a user s logo You cannot save content that is protected by HDCP a Display the image you want to project as the user s logo b Press the button on the remote control c Select the Settings menu and press Enter d Select Display User s Logo Start Setting and press Enter You see a prompt asking if you want to use the displayed image as a user s logo a Adju...

Страница 63: ...A V Mute and set it to Logo a To prevent anyone from changing the User s Logo settings without first entering a password set the User s Logo Protection setting to On in the Password Protection setting menu and set the password g g Related Links Selecting Password Security Types p 66 ...

Страница 64: ...lect the Settings menu and press Enter d Select Installation Pattern User Pattern and press Enter You see a prompt asking if you want to use the displayed image as a User Pattern a Adjustments such as Keystone Zoom or Aspect are temporarily cancelled when you select User Pattern You cannot save digital images protected by HDCP technology as a User Pattern e Select Yes and press Enter f Press Enter...

Страница 65: ...ector at first time you must enter the correct password This also applies to Direct Power On and Auto Power On User s Logo Protection prevents anyone from changing the custom screen displayed when the projector turns on when no signal is being input or when you use the A V Mute feature The custom screen discourages theft by identifying the projector s owner Network Protection prevents anyone from ...

Страница 66: ... Password Security Types After setting a password you see this menu allowing you to select the password security types you want to use If you do not see this menu hold down the button on the remote control for five seconds until the menu appears To prevent unauthorized use of the projector select On as the Power On Protection setting To prevent changes to the User s Logo screen or related display ...

Страница 67: ...u have forgotten the password make a note of the Request Code xxxxx number that appears on the screen and contact Epson for help If you continue to repeat the above operation and input the wrong password 30 times in succession the message The projector s operation will be locked Contact Epson as described in your documentation is displayed and the projector does not accept any more password entrie...

Страница 68: ...sections to monitor and control the projector over a network g g Related Links Epson Projector Management p 69 Controlling a Networked Projector Using a Web Browser p 70 Setting Up Projector Network E Mail Alerts p 74 Setting Up Monitoring Using SNMP p 75 ...

Страница 69: ...ement Operation Guide for instructions You can download Epson Projector Management from the following Web site epson sn a The authentication method when registering projectors varies depending on the version of the Epson Projector Management software you are using For the best results we recommend that you use the latest version of the Epson Projector Management software ...

Страница 70: ...n if the projector is in standby mode when the power is off s ECO Standby Mode a Make sure the projector is turned on b Make sure your computer or device is connected to the same network as the projector c Start your Web browser on the computer or device d Go to the Epson Web Control screen by entering the projector s IP address into the browser s address box When entering an IPv6 address wrap the...

Страница 71: ...ssword g g Related Links Web Control Options p 71 Projector Feature Settings Settings Menu p 81 Network Menu Basic Menu p 85 Projector Setup Settings ECO Menu p 90 Web Control Options Basic Control Options on the Basic Control screen allow you to select the input source and control the projector a If you see a log in window enter your user name and password The user name is EPSONREMOTE and the def...

Страница 72: ...lays the projector s setting menus C Use your finger or mouse to navigate the menus D Returns to the previous menu E Displays help topics Test Pattern The Test Pattern screen displays the available test patterns and allow you to select to project it A Returns to the Epson Web Control screen B Displays available test patterns select to project a test pattern C Turns off test pattern display Advance...

Страница 73: ...u name you selected C Specifies the projector settings The available settings vary depending on your projector model D Locks unlocks the projector settings E Updates the projector settings a You cannot change the following settings using Epson Web Control HDMI Link Image Shift User s Logo HDMI EQ Setting Language Search Access Point a You can select the following settings only with Epson Web Contr...

Страница 74: ... as the sender in From h Choose an address field enter the e mail address and select the alerts you want to receive Repeat for up to three addresses a Your e mail address can be up to 64 alphanumeric characters long To enter more than 32 characters use your Web browser i When you finish selecting settings select Complete and follow the on screen instructions to save your settings and exit the menu...

Страница 75: ...on and press Enter c Select the Notifications menu and press Enter d Set the SNMP setting to On e Enter up to two IP addresses to receive SNMP notifications as the Trap IP Address 1 and Trap IP Address 2 settings using 0 to 255 for each address field a Do not use these addresses 224 0 0 0 through 255 255 255 255 This projector supports SNMP agent version 1 SNMPv1 f Enter the SNMP Community Name up...

Страница 76: ...rojector s Menus p 77 Using the Displayed Keyboard p 78 Image Quality Settings Image Menu p 79 Projector Feature Settings Settings Menu p 81 Projector Network Settings Network Menu p 84 Projector Setup Settings ECO Menu p 90 Projector Information Display Info Menu p 91 Projector Reset Options Reset Menu p 93 Copying Menu Settings Between Projectors Batch Setup p 94 ...

Страница 77: ...s the up or down arrow button to move through the menus listed on the left The settings for each menu are displayed on the right c To change settings in the displayed menu press Enter d Press the up or down arrow button to move through the settings e Change the settings using the buttons listed on the bottom of the menu screens f To return all the menu settings to their default values select Reset...

Страница 78: ... the SYM1 2 key the symbols enclosed by the frame change b After entering the text select Finish on the keyboard to confirm your entries Select Cancel to cancel entering text g g Related Links Available Text Using the Displayed Keyboard p 78 Controlling a Networked Projector Using a Web Browser p 70 Available Text Using the Displayed Keyboard You can enter the following text when using the display...

Страница 79: ...n to magenta tones in the image White Balance Color Temp sets the color temperature according to the color mode you selected Higher values tint the image blue and lower values tint the image red Customized adjusts the individual R red G green and B blue components of the offset and gain Sharpness Adjusts the sharpness or softness of image details Aspect See the list of available aspect ratios Sets...

Страница 80: ...Image Quality Settings Image Menu 80 g g Related Links Available Color Modes p 46 Available Image Aspect Ratios p 44 ...

Страница 81: ... be visible in projected images Pattern Display lets you display the selected pattern type on the screen to aid in presentation Pattern Type select from Patterns 1 to 4 or User Pattern Patterns 1 to 4 display patterns pre registered in the projector such as ruled lines or grid patterns User Pattern captures a projected screen and saves it as a pattern for display Test Pattern displays a test patte...

Страница 82: ...d device PJ Device automatically turns on the connected device when you turn on the projector Power Off Link controls whether connected devices are turned off when you turn off the projector Setting Options Description Sleep Mode Automatically turns off the projector after an interval of inactivity when On Sleep Mode Timer Sets the interval for Sleep Mode A V Mute Timer Automatically turns off the...

Страница 83: ...uage Various languages available Select the language for projector menu and message displays Reset Settings Resets all adjustment values on the Settings menu to their default settings except for the following Zoom Image Shift Projection Screen Audio Out Device Power On Link Power Off Link Standby Mode High Altitude Mode Auto Source Search Language a When you set User s Logo Protection to On in the...

Страница 84: ... Level Projector Name SSID DHCP IP Address Subnet Mask Gateway Address MAC Address Region Code IPv6 Displays wireless network status and details Available when you have set Wireless LAN Power to On Display the QR Code Displays a QR code for connecting with iOS or Android devices using the Epson iProjection app Network Configuration To additional network menus Configures your network settings a Onc...

Страница 85: ...Password Four digit number Enter a password for accessing the projector as a moderator using Epson iProjection No password is set by default Projector Keyword On Off Set to On to enable a security password to prevent access to the projector by anyone not in the same room as the projector You must enter a displayed randomized keyword from a computer using Epson iProjection to access the projector a...

Страница 86: ...nistrator of the network system you want to connect to Open Security is not set WPA2 PSK Communication is performed using WPA2 security Uses AES method for encryption When establishing a connection from a computer to the projector enter the value set in the passphrase WPA3 PSK Communication is performed using WPA3 security Uses AES method for encryption When establishing a connection from a comput...

Страница 87: ...lect the IPv6 settings if you want to connect the projector to the network using IPv6 IPv6 IPv6 set to On if you want to connect the projector to the network using IPv6 IPv6 is supported to monitor and control the projector over a network using Epson Web Control Auto Configuration Auto Configuration set to On to assign addresses automatically according to the Router Advertisement Use Temporary Add...

Страница 88: ... number from 0 to 255 Community Name Up to 32 alphanumeric characters do not use spaces and any symbols other than Set the SNMP community name Network Menu Others Menu Settings on the Others menu let you select other network settings s Network Network Configuration Others Setting Options Description Command Communication Protected Compatible Selects the authentication method for command communicat...

Страница 89: ...tting Options Description Reset network settings Resets all network settings Network Menu Complete Menu When you finish making network settings select Complete and follow the on screen instructions to save your settings s Network Network Configuration Complete Setting Options Description Save network settings Saves the network settings Press Enter to save the network settings ...

Страница 90: ...d lamp life Sleep Mode On Off Automatically turns off the projector after an interval of inactivity when On Sleep Mode Timer 1 to 30 minutes Sets the interval for Sleep Mode A V Mute Timer On Off Automatically turns off the projector after 30 minutes if A V Mute is enabled when On Setting Options Description Standby Mode Communication On Communication Off Communication On indicates that the projec...

Страница 91: ...ormation item Description Lamp Hours Displays the number of hours H the lamp has been used in High and Low Eco Source Displays the name of the port to which the current input source is connected Input Signal Displays the input signal setting of the current input source Resolution Displays the resolution of the current input source Refresh Rate Displays the refresh rate of the current input source ...

Страница 92: ...er was disconnected Restart the network software 0479 04FF A projector system error has occurred Turn the projector off and then on again 0891 Cannot find an access point with the same SSID Set your computer access point and projector to the same SSID 0892 The WPA WPA2 WPA3 authentication type does not match Make sure the wireless network security settings are correct 0893 The TKIP AES encryption ...

Страница 93: ... default values using the Reset All Config option on the Reset menu Setting Options Description Reset All Config Resets most of the projector settings to their default values You cannot reset the following settings using the Reset All Config option Zoom Image Shift Language Network menu items ...

Страница 94: ...ation errors or other problems that may cause such failures g g Related Links Transferring Settings From a USB Flash Drive p 94 Transferring Settings From a Computer p 95 Transferring Settings From a USB Flash Drive You can copy menu settings from one projector to another of the same model using a USB flash drive a The USB flash drive must use a FAT format and not incorporate any security function...

Страница 95: ...SB port and to the projector s Service USB Mini B port c Hold down the button on the remote control and connect the power cord to the projector d When all of the projector s indicators turn on release the button The computer recognizes the projector as a removable disk e Open the removable disk icon or folder and save the batch setup file to the computer a The file name for the batch setup file is...

Страница 96: ...ord is disconnected the projector may not start correctly g g Related Links Batch Setup Error Notification p 96 Batch Setup Error Notification The projector s indicators notify you if an error occurs during a batch setup operation Check the status of the projector s indicators and follow the instructions described in the table here Indicator status Problem and solutions Flashing orange The batch s...

Страница 97: ...the Projector Follow the instructions in these sections to maintain your projector g g Related Links Projector Maintenance p 98 Cleaning the Lens p 99 Cleaning the Projector Case p 100 Cleaning the Air Vents p 101 ...

Страница 98: ...y part you should replace is the remote control batteries If any other part needs replacing contact Epson or an authorized Epson servicer Warning Before cleaning any part of the projector turn it off and unplug the power cord Never open any cover on the projector except as specifically explained in this manual Dangerous electrical voltages in the projector can injure you severely ...

Страница 99: ... then wipe the lens Warning Before cleaning the lens turn off the projector and unplug the power cord Do not use any flammable gas sprays such as air dusters to blow off dust The high heat generated by the projector may cause a fire Attention Do not wipe the lens right after you turn off the projector Doing so could damage the lens Do not use any harsh materials to clean the lens and do not subjec...

Страница 100: ...e a soft dry lint free cloth To remove stubborn dirt use a soft cloth moistened with water and mild soap Do not spray liquid directly on the projector Attention Do not use wax alcohol benzene paint thinner or other chemicals to clean the projector case These can damage the case Do not use canned air or the gases may leave a flammable residue ...

Страница 101: ...xhaust vents periodically or whenever you notice dust on the surface of the vents to prevent the projector from overheating due to blocked ventilation a Turn off the projector and unplug the power cord b Carefully remove the dust using a vacuum cleaner or a brush ...

Страница 102: ...dicator Status p 104 Using the Projector Help Displays p 106 Solving Projector Power On or Power Off Problems p 107 Solving Image Problems p 108 Solving Sound Problems p 112 Solving Remote Control Operation Problems p 113 Solving Password Problems p 114 Solving HDMI Link Problems p 115 When the Message It is time to replace the projector is Displayed p 116 ...

Страница 103: ... it on If this does not solve the problem check the following The indicators on the projector may indicate the problem The projector s Help system can display information about common problems The solutions in this manual can help you solve many problems If none of these solutions help contact Epson for technical support ...

Страница 104: ...e it turned off to cool down for 5 minutes Make sure that the air vents are not clogged with dust or obstructed by nearby objects Make sure the environmental temperature is not too hot If the problem persists unplug the projector and contact Epson for help Low air flow through the air filter Make sure that the air vents are not clogged with dust or obstructed by nearby objects Make sure the enviro...

Страница 105: ...Projector Indicator Status 105 Indicator status Problem and solutions Power error Ballast Turn the projector off unplug it and contact Epson for help ...

Страница 106: ...ector b Press the button on the remote control c Select Help on the Home screen The Help menu is displayed d Use the up and down arrow buttons to highlight the problem you want to solve e Press Enter to view the solutions f Perform one of the following actions when you are finished To select another problem to solve press To exit the help system press ...

Страница 107: ...e broken Warning Do not swing or tilt the projector Shards of glass may fall out and could cause an injury If any shards of glass get into your eyes or mouth contact a doctor immediately Solving Projector Shutdown Problems If the projector turns off unexpectedly try the following steps until the problem is solved a Projectors may have entered sleep mode after a period of inactivity Perform any ope...

Страница 108: ...or Connect the video source directly to the projector Replace the HDMI cable with the shorter one c Check the status of your video source Turn on the connected video source and press the play button to start a video if necessary Make sure the connected device meets the HDMI CEC standard See the documentation supplied with the device for more information If you are projecting from a laptop computer...

Страница 109: ...r resolution or select a resolution that matches the projector s native resolution g g Related Links Image Quality Settings Image Menu p 79 Focusing the Image Using the Focus Lever p 40 Cleaning the Lens p 99 Fixing Partial Image Problems If only a partial computer image is displayed try the following steps until the problem is solved a If you zoomed into or out of the image using the Zoom setting...

Страница 110: ...sconnect all the cables connecting the projector and video devices confirm no signal is being input and then rest all the projector settings by performing Reset All Config in the projector s Reset menu g g Related Links Projector Setup Settings ECO Menu p 90 Projector Reset Options Reset Menu p 93 Adjusting an Image with Incorrect Brightness or Colors If the projected image is too dark or bright o...

Страница 111: ...con in the Dock folder If the icon does not appear on the Dock double click USB Display in the Applications folder If you select Exit from the USB Display icon menu on the Dock USB Display does not start automatically when you connect the USB cable d If the mouse cursor flickers select Make the movement of the mouse pointer smooth in the Epson USB Display Settings program on your computer e Turn o...

Страница 112: ...n on the remote control to resume video and audio if they were temporarily stopped Press the button on the remote control to unmute audio if it was muted d Check the following settings on your video equipment Check your video source to make sure the volume is turned up and the audio output is set for the correct source Set the connected device to PCM output When you are connecting the projector to...

Страница 113: ...o see if a button on the remote control is stuck down causing it to enter sleep mode Release the button to wake the remote control up c Make sure you are operating the remote control within the reception angle and range of the projector d Make sure the projector is not warming up or shutting down e Strong fluorescent lighting direct sunlight or infrared device signals may be interfering with the p...

Страница 114: ...r b If you set a Remote password in Epson Web Control and forgot the user ID or password try entering the following User ID EPSONREMOTE Default password Projector s serial number a If you have entered an incorrect password too many times and see a message displaying a request code write down the code and contact Epson for help Provide the request code and proof of ownership for assistance in unloc...

Страница 115: ...ctions list If the device does not appear in the Device Connections list it does not meet the HDMI CEC standards Connect a different device s Settings Operation HDMI Link Device Connections d Check that all cables required for HDMI Link are securely connected e Make sure the connected devices are turned on and in standby status See the documentation supplied with the device for more information f ...

Страница 116: ...d consider replacing the projector even if the lamp continues to work Warning If you continue to use the projector after the lamp s life expires the possibility that the lamp may explode increases If the lamp breaks note the following points Ventilate the area immediately Do not swing or tilt the projector Shards of glass may fall out and could cause an injury If any shards of glass get into your ...

Страница 117: ...ptional Accessories and Replacement Parts p 118 Screen Size and Projection Distance p 119 Supported Monitor Display Resolutions p 121 Projector Specifications p 122 External Dimensions p 124 USB Display System Requirements p 125 List of Safety Symbols and Instructions p 126 Warning Labels p 128 Glossary p 129 Notices p 131 ...

Страница 118: ... ceiling Safety Wire Set ELPWR01 Use when connecting the projector to the installation mount to prevent the projector from falling down Ceiling pipe 450 mm ELPFP13 Ceiling pipe 700 mm ELPFP14 Use when installing the projector on a high ceiling a Special expertise is required to suspend the projector from a ceiling Contact Epson for help For Wireless Connection Wireless LAN module ELPAP11 Use this ...

Страница 119: ...26 58 32 67 91 4 0 34 75 42 89 120 5 1 40 89 50 105 142 6 1 16 9 screen size A B Minimum Wide to Maximum Tele 60 133 75 158 214 9 1 80 177 100 211 286 12 1 100 221 125 264 358 15 2 200 443 249 531 717 30 4 290 642 361 771 1041 43 5 300 664 374 797 1077 44 6 391 866 487 1040 1404 58 7 16 10 screen size A B Minimum Wide to Maximum Tele 24 52 32 67 91 4 0 32 69 43 90 122 5 1 40 86 54 113 154 6 1 60 1...

Страница 120: ...5 274 371 16 2 200 431 269 550 744 32 3 280 603 377 771 1042 45 5 300 646 404 826 1116 48 5 378 814 509 1042 1407 61 7 4 3 screen size A B Minimum Wide to Maximum Tele 22 45 34 67 91 4 0 29 59 44 89 120 5 1 40 81 61 123 167 7 1 60 122 91 186 251 11 1 80 163 122 248 336 15 2 100 203 152 311 420 18 2 150 305 229 467 631 27 3 200 406 305 623 842 37 4 247 502 376 770 1040 45 5 300 610 457 936 1264 55 ...

Страница 121: ...ution dots VGA 60 640 480 SVGA 60 800 600 XGA 60 1024 768 WXGA 60 1280 800 60 1366 768 WXGA 60 1440 900 WXGA 60 1600 900 SXGA 60 1280 960 60 1280 1024 SXGA 60 1400 1050 WSXGA 60 1680 1050 UXGA 60 1600 1200 1920 1080 50 60 1920 1080 SDTV 480i 480p 59 94 720 480 SDTV 576i 576p 50 720 576 HDTV 720p 50 59 94 60 1280 720 HDTV 1080i 50 59 94 60 1920 1080 HDTV 1080p 23 98 24 29 97 30 50 59 94 60 1920 108...

Страница 122: ... W Standby power consumption 0 5 W Operating altitude Altitude 0 to 3 048 m Operating temperature Altitude of 0 to 2 286 m 5 to 40 C No condensation Altitude of 2 287 to 3 048 m 5 to 35 C Humidity of 20 to 80 No condensation Storage temperature 10 to 60 C Humidity of 10 to 90 No condensation Mass Approx 2 4 kg Lamp brightness automatically dims if the surrounding temperature gets too high Approxim...

Страница 123: ...Projector Specifications 123 a USB A and USB B port supports USB 2 0 However USB ports are not guaranteed to operate all devices that support USB USB B port does not support USB 1 1 ...

Страница 124: ...External Dimensions 124 A Center of lens B Distance from center of lens to suspension bracket fixing point The unit in these illustrations is mm ...

Страница 125: ...se 32 and 64 bit macOS 10 13 x 64 bit 10 14 x 64 bit 10 15 x 64 bit 11 0 x 64 bit 12 0 x 64 bit Windows 10 Windows 10 Home 32 and 64 bit Windows 10 Pro 32 and 64 bit Windows 10 Enterprise 32 and 64 bit CPU Intel Core2Duo or faster Intel Core i3 or faster recommended Intel Core2Duo or faster Intel Core i5 or faster recommended Memory 2 GB or more 4 GB or more recommended Hard disk space 20 MB or mo...

Страница 126: ...ntify the positive and negative connections the polarity on a piece of equipment to which a d c power supply may be connected No Symbol mark Approved standards Description I The same as No 8 J IEC60417 No 5001B Battery general On battery powered equipment To identify a device for instance a cover for the battery compartment or the connector terminals K IEC60417 No 5002 Positioning of cell To ident...

Страница 127: ...njury such as electric shock if the equipment is disassembled X IEC60417 No 5266 Standby partial standby To indicate that part of the equipment is in the ready status Y ISO3864 IEC60417 No 5057 Caution movable parts To indicate that you must keep away from movable parts according to protection standards Z IEC60417 No 6056 Caution Moving Fan Blades As a safety precaution stay away from the moving f...

Страница 128: ...Warning Labels 128 This product comes with warning labels As with any bright source do not stare into the beam RG2 IEC EN 62471 5 2015 ...

Страница 129: ...ignal the image can be transferred at the highest quality possible It also provides an encryption function for the digital signal HDTV An abbreviation for High Definition Television that refers to high definition systems which satisfy the following conditions Vertical resolution of 720p or 1080i or greater p Progressive I Interlace Screen aspect ratio of 16 9 Interlace Transmits information needed...

Страница 130: ...s the relative position of the crests and the troughs in the signal is called Synchronization If the signals are not synchronized flickering blurriness and horizontal interference occur VGA A screen size standard with a resolution of 640 horizontal 480 vertical dots XGA A screen size standard with a resolution of 1 024 horizontal 768 vertical dots WXGA A screen size standard with a resolution of 1...

Страница 131: ...ination model HA84B HA85B HA86B FCC Compliance Statement For United States Users This device complies with part 15 of the FCC Rules Operation is subject to the following two conditions 1 This device may not cause harmful interference and 2 this device must accept any interference received including interference that may cause undesired operation This equipment has been tested and found to comply w...

Страница 132: ... epson co uk Restriction of Use When this product is used for applications requiring high reliability safety such as transportation devices related to aviation rail marine automotive etc disaster prevention devices various safety devices etc or functional precision devices etc you should use this product only after giving consideration to including fail safes and redundancies into your design to m...

Страница 133: ... for identification purposes only and may be trademarks of their respective owners Epson disclaims any and all rights in those marks Copyright Notice All rights reserved No part of this publication may be reproduced stored in a retrieval system or transmitted in any form or by any means electronic mechanical photocopying recording or otherwise without the prior written permission of Seiko Epson Co...

Отзывы: