background image

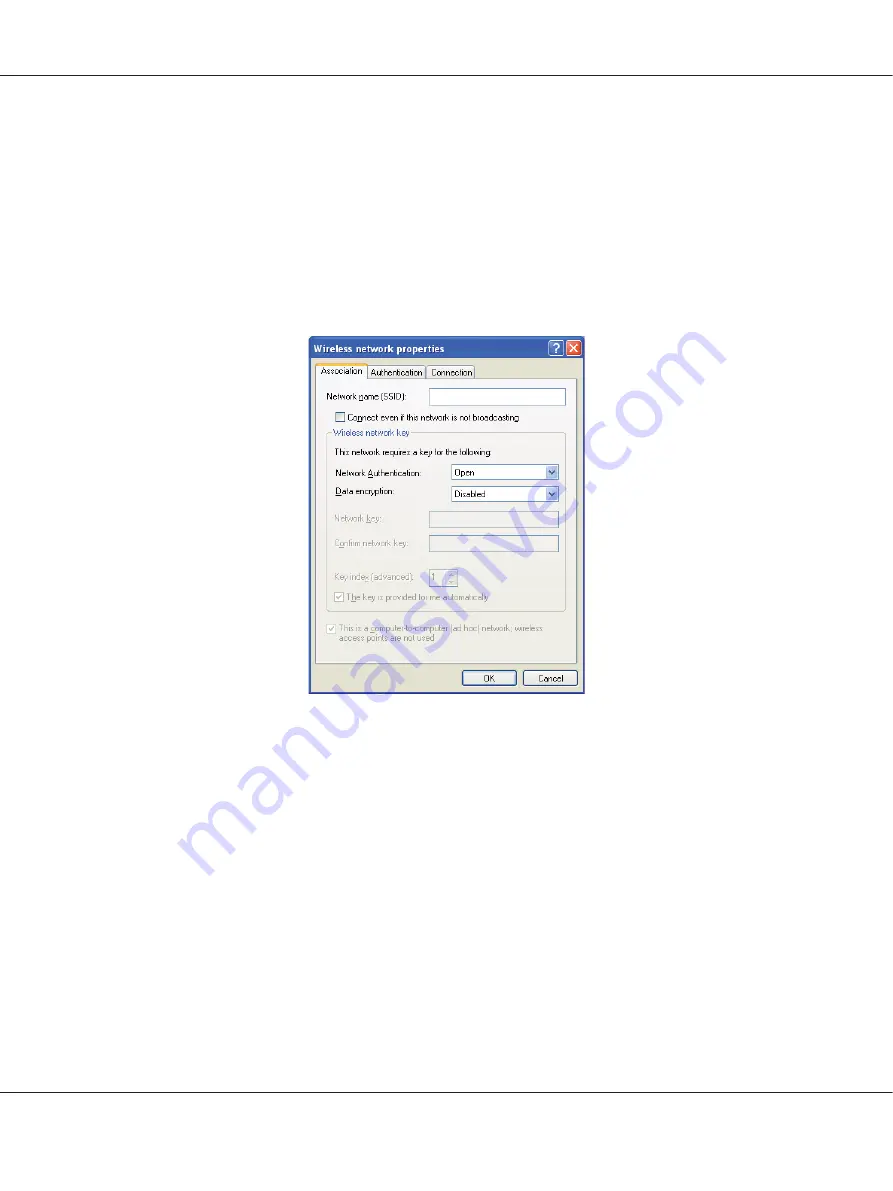
h On the 

Association

 tab, enter the following information and click 

OK

.

Network name (SSID): xxxxxxxx

 (xxxxxxxx indicates a wireless device’s SSID which you

use)

Network Authentication: Open

Data encryption: Disabled

i Click the 

Move up

 button to move the newly added SSID to the top of the list.

j Click 

OK

 to close the 

Wireless Network Connection Properties

 dialog box.

For Windows Vista:

a Display 

Control Panel

.

b Select 

Network and Internet

.

c Select 

Network and Sharing Center

.

d Select 

Connect to a network

.

Epson AcuLaser C1750 Series     User’s Guide

Network Basics     

63

Содержание AcuLaser C1750 Series

Страница 1: ...User s Guide NPD4429 00 EN ...

Страница 2: ...nt View 15 Rear View 16 Operator Panel 16 Printing a Panel Settings Page 18 The Operator Panel 18 The Printer Setting Utility 18 Power Saver Mode 19 Exiting the Power Saver Mode 19 Chapter 3 Printer Management Software Print Driver 20 EpsonNet Config 20 Creating an Administrative Password 20 Printer Setting Utility Windows Only 21 Status Monitor Windows Only 22 Launcher Windows Only 23 Epson AcuLa...

Страница 3: ...36 Network Connection Setup 38 Configuring Wireless Settings Epson AcuLaser C1750W Only 39 Setting Up for Shared Printing 74 Installing Print Driver on Computers Running Mac OS X 83 Installing the Driver 83 Adding a Printer 84 Chapter 5 Printing Basics About Print Media 91 Print Media Usage Guidelines 91 Print Media That Can Damage Your Printer 92 Supported Print Media 92 Usable Print Media 93 Loa...

Страница 4: ...Disabling the Panel Lock 150 Setting the PowerSaver Time Option 151 Resetting to Factory Defaults 151 Chapter 7 Troubleshooting Clearing Jams 152 Avoiding Jams 152 Identifying the Location of Paper Jams 153 Clearing Paper Jams From the Front of the Printer 154 Clearing Paper Jams From the Back of the Printer 155 Clearing Paper Jams From the Center Output Tray 157 Jam Problems 160 Basic Printer Pro...

Страница 5: ... Chart 176 Determining Values 177 Entering Values 178 Noise 180 Other Problems 182 Understanding Printer Messages 182 Contacting Service 193 Getting Help 193 LCD Panel Messages 193 Status Monitor Alerts 193 Non Genuine Toner Mode 194 The Operator Panel 194 The Printer Setting Utility 194 Chapter 8 Maintenance Cleaning the Printer 196 Cleaning Inside the Printer 196 Cleaning the Color Toner Density...

Страница 6: ... Page Counts 211 Moving the Printer 212 Appendix A Where To Get Help Contacting Epson Support 216 Before Contacting Epson 216 Help for Users in Europe 216 Help for Users in Taiwan 216 Help for Users in Singapore 218 Help for Users in Thailand 218 Help for Users in Vietnam 219 Help for Users in Indonesia 219 Help for Users in Hong Kong 221 Help for Users in Malaysia 221 Help for Users in India 222 ...

Страница 7: ...o strictly comply with Seiko Epson Corporation s operating and maintenance instructions Seiko Epson Corporation and its affiliates shall not be liable against any damages or problems arising from the use of any options or any consumable products other than those designated as Original Epson Products or Epson Approved Products by Seiko Epson Corporation Apple Bonjour ColorSync Macintosh and Mac OS ...

Страница 8: ... followed Note Additional information that merits emphasis See Also References within this guide 3 Orientation of documents or paper is described in this guide as follows Long Edge Feed LEF Loading the document or paper in portrait orientation Short Edge Feed SEF Loading the document or paper in landscape orientation LEF Orientation SEF Orientation Paper feed direction Epson AcuLaser C1750 Series ...

Страница 9: ...inks 2 Sided Print Manual 2SidedPrintistoprinttwoormorepagesonthe front and back sides of a single sheet of paper manually This feature allows you to reduce the paper consumption For more information see Manual Duplex Printing Windows PrintDriver Only onpage 111 Multiple Up Print Multiple Upenablesyoutoprintmultiplepages on a single sheet of paper This feature allows you to reduce the paper consum...

Страница 10: ... purchased For more information see Configuring Wireless Settings Epson AcuLaser C1750W Only on page 39 Priority Sheet Inserter PSI Print media loaded on the PSI is given precedence over those loaded on the multipurpose feeder MPF Using the PSI allows you to use other types or sizes of print media preferentially over the regular print media loaded on the MPF For more information see Loading Print ...

Страница 11: ...y Important LED LED electrophotographic system Fusing system Thermal fusing system using a belt Continuous print speed 1 A4 When plain paper fed is from the multipurpose feeder Color 1 Sided 2 12 sheets min Monochrome 1 Sided 15 sheets min Important 1 Print speed may decrease due to factors such as paper type paper size and printing conditions 2 When continuously printing a single document of A4 R...

Страница 12: ...er related printing problems can occur when using the printer in an environment that is dry cold or very humid Printing over the printed side or on the reverse side of paper that already has been printed on can result in poor print quality When printing on envelopes use envelopes that do not have adhesive applied The type of paper being used and environmental conditions can affect printingquality ...

Страница 13: ...d Ethernet 10Base T 100Base TX IEEE802 11b g n Supported protocol TCP IP LPR Port9100 WSD HTTP SMTP RARP AutoIP SNMP DHCP BOOTP Bonjour mDNS Power AC 110 127 V 10 7 A both 50 60 Hz 3 Hz AC 220 240 V 10 5 A both 50 60 Hz 3 Hz Power consumption Maximum 340 W During Mode 2 of Power Saver Mode 7 W or less Average During standby 69 W During continuous color printing 340 W During continuous monochrome p...

Страница 14: ...on Non Use Temperature 20 40 C Humidity 5 85 exceptmalfunctionsdue to dew condensation Important Until the conditions temperature and humidity inside the printer become acclimated to the installation environment certain qualities of the paper can cause poor printing Epson AcuLaser C1750 Series User s Guide Specifications 14 ...

Страница 15: ...1 10 9 8 7 6 5 1 2 3 4 7 1 Operator Panel 2 Center Output Tray 3 Output Tray Extension 4 Print Head Cleaning Rod 5 Toner Access Cover 6 Power Switch 7 Paper Width Guides 8 Multipurpose feeder MPF 9 Front Cover 10 Slide Bar 11 Length Guide 12 Priority Sheet Inserter PSI Epson AcuLaser C1750 Series User s Guide Basic Operation 15 ...

Страница 16: ...rt 5 Rear Door 6 Transfer Roller 7 Paper Chute 8 Paper Feed Roller 9 Transfer Belt 10 Levers Operator Panel The operator panel has a liquid crystal display LCD buttons and indicators 1 10 6 5 4 3 2 7 8 9 1 Energy Saver Button Indicator Epson AcuLaser C1750 Series User s Guide Basic Operation 16 ...

Страница 17: ...recoverable error occurs 6 Ready Indicator Lights up when the printer is ready or the printer is in the Mode 1 for the Power Saver Mode and blinks when data is being received 7 Back Button Switches to the print mode from the top menu of the Menu mode Returns to the upper hierarchy of the menu from the submenu of the Menu mode 8 Button Displays the selected menu or item and determines the selected ...

Страница 18: ...l Programs EPSON EPSON Printer Software EPSON AL C1750N EPSON AL C1750W Printer Setting Utility Note The Select Printer window appears in this step when multiple print drivers are installed on your computer In this case click the name of the desired printer listed in Printer Name The Printer Setting Utility appears 2 Click the Printer Settings Report tab 3 Select Information Pages from the list at...

Страница 19: ...ode 1 and six minutes Mode 2 are changeable within the range of 5 to 30 minutes Mode 1 and 1 to 6 minutes Mode 2 The printer returns to the ready to print state in about 25 seconds when re activated See Also Setting the PowerSaver Time Option on page 151 Exiting the Power Saver Mode TheprinterautomaticallyexitsthePowerSaverModewhenitreceivesaprintjobfromacomputer To manually exit the Mode 1 press ...

Страница 20: ... instant access to printer status and printer configuration options Anyone on yournetworkcanaccesstheprinterusingtheirwebbrowsersoftware Inadministrativemodeyoucan change the configuration of the printer and manage your printer settings without leaving your computer Note Users who are not given passwords by the administrator can still view the configuration settings and options in user mode They w...

Страница 21: ...trator name and password can log in and change the printer configuration and settings Printer Setting Utility Windows Only The Printer Setting Utility allows you to view or specify the system settings You can also diagnose the system settings by using the Printer Setting Utility The Printer Setting Utility consists of the Printer Settings Report Printer Maintenance and Diagnosis tabs The Printer S...

Страница 22: ...when a paper jam occurs or toner is running low By default the StatusMonitor window launchesautomatically when printing starts You can specify the conditions for starting the Status Monitor window in Auto start setup To change the pop up settings for the Status Monitor window The following procedure uses Microsoft Windows XP as an example 1 Click start All Programs EPSON Status Monitor Activate St...

Страница 23: ... Launcher The Launcher window appears 2 The Launcher window provides two buttons Status Window and Printer Setting Utility To exit click the X button at the top right of the window For details click the Help button icon of each application Status Window Click to open the Status Monitor window See also Status Monitor Windows Only on page 22 Printer Setting Utility Click to open the Printer Setting ...

Страница 24: ...ter on the network Microsoft Windows operating systems Run the Installer on the Software Disc to automatically set the printer s Internet Protocol IP address if you connect the printer to an established TCP IP network You can also manually set the printer s IP address on the operator panel Mac OS X systems Manually set the printer s TCP IP address on the operator panel 6 Print a Printer Settings p...

Страница 25: ... generally not included with your printer and must be purchased separately The available feature for each connection type is shown in the following table Connection Type Available Feature USB When connected via USB you can instruct print jobs from a computer Ethernet When connected via Ethernet you can instruct print jobs from a computer on the network USB Connection A local printer is a printer w...

Страница 26: ...a 64 bit Edition Windows 7 Windows 7 64 bit Edition Mac OS X 10 3 9 10 4 11 10 5 8 10 6 To attach the printer to a computer 1 Ensure that the printer computer and any other attached devices are turned off and unplugged from the power source outlet 2 Connect the smaller USB connector into the USB port at the back of the printer and the other end of the cable into a USB port of the computer Epson Ac...

Страница 27: ...ected devices have been turned off and all cables have been disconnected 2 ConnectoneendofanEthernetcableintotheEthernetportattherearoftheprinter andtheother end to a LAN drop or hub Ethernet port Note Connect the Ethernet cable only if you need to setup a wired connection See Also Configuring Wireless Settings Epson AcuLaser C1750W Only on page 39 Epson AcuLaser C1750 Series User s Guide Network ...

Страница 28: ... a Dynamic Host Configuration Protocol DHCP server A DHCP server automatically programs an IP address into every computer and printer on the network that is configured to use DHCP A DHCP server is built into most cable and Digital Subscriber Line DSL routers If you use a cable or DSL router see your router s documentation for information on IP addressing Automatically Setting the Printer s IP Addr...

Страница 29: ...Select Admin Menu and then press the button 3 Select Network Setup and then press the button 4 Select TCP IP and then press the button 5 Select IPv4 and then press the button 6 Select Get IP Address and then press the button 7 Select DHCP AutoIP and then press the button Using EpsonNet Config To turn on off the DHCP protocol 1 Launch your web browser 2 Enter the IP address of the printer in the ad...

Страница 30: ...istrator You can assign the IP address by using the operator panel or using the Printer Setting Utility The Operator Panel 1 Turn on the printer Ensure that Ready message appears on the LCD panel 2 On the operator panel press the Menu button 3 Select Admin Menu and then press the button 4 Select Network Setup and then press the button 5 Select TCP IP and then press the button 6 Select IPv4 and the...

Страница 31: ...teps 16 to 17 to set network mask and then press the button 19 Press the Back button and then ensure that Network Mask is selected 20 Select Gateway Address and then press the button The cursor is located at the first digit of the gateway address 21 Enter the value of the gateway address using the or button 22 Press the button The next digit is selected 23 Repeat steps 21 to 22 to set gateway addr...

Страница 32: ...art printer to apply new settings button to take effect The IP address is assigned to your printer To verify the setting display the web browser on any computerconnectedtothenetworkandentertheIPaddressintotheaddressbaronthebrowser Ifthe IP address is set up correctly the EpsonNet Config displays in your browser You can also assign the IP address to the printer when installing the print drivers wit...

Страница 33: ...page and check your printer s IP address The Operator Panel 1 Press the Menu button 2 Select Information Pgs and then press the button 3 Select Printer Settings and then press the button The Printer Settings page is printed 4 Confirm the IP address next to IPAddress under NetworkSetup on the Printer Settings page If the IP address is 0 0 0 0 wait for a few minutes to resolve the IP address automat...

Страница 34: ...Click the Printer Settings button The Printer Settings page is printed If the IP address is 0 0 0 0 the factory default or 169 254 xx xx an IP address has not been assigned See Also Assigning an IP Address for IPv4 Mode on page 30 Installing Print Driver on Computers Running Windows Identifying Print Driver Pre install Status for Network Connection Setup Before installing the print driver on your ...

Страница 35: ...ep when multiple print drivers are installed on your computer In this case click the name of the desired printer listed in Printer Name The Printer Setting Utility appears 2 Select TCP IP Settings from the list on the left side of the page The TCP IP Settings page appears If the IP address shows 0 0 0 0 the factory default or 169 254 xx xx an IP address has not been assigned To assign one for your...

Страница 36: ...llation of the Epson printer software is complete USB Connection Setup The following procedure uses Windows XP as an example When the Printer is Connected to Computer With a USB Cable 1 Insert the Software Disc into your computer s CD DVD drive Note If the Software Disc does not automatically launch click Start start for Windows XP All Programs for Windows Vista and Windows 7 Accessories for Windo...

Страница 37: ...f the printer 2 Insert the Software Disc into your computer s CD DVD drive Note If the Software Disc does not automatically launch click Start start for Windows XP All Programs for Windows Vista and Windows 7 Accessories for Windows Vista and Windows 7 Run andthenenterD setup exe whereDisthedriveletterofyourcomputer andthenclick OK 3 Click Easy Install The SOFTWARE LICENSE AGREEMENT appears 4 If y...

Страница 38: ...for Windows Vista and Windows 7 Accessories for Windows Vista and Windows 7 Run andthenenterD setup exe whereDisthedriveletterofyourcomputer andthenclick OK 2 Click Easy Install The SOFTWARE LICENSE AGREEMENT appears 3 If you agree to the terms of the SOFTWARE LICENSE AGREEMENT select Agree and then click Next The Easy Install Navi launches 4 Click Installing Drivers and Software 5 Select Network ...

Страница 39: ...all You can specify folders in which to install the software and documentation To change the folders click Browse 9 Click Finish to exit the wizard when the Congratulations screen appears If necessary click Print Test Page to print a test page Configuring Wireless Settings Epson AcuLaser C1750W Only This section describes how to configure wireless settings through Easy Install Navi Important The W...

Страница 40: ...ng PIN assignments in the printer and computer This setting performed through access point is available only when the access points of your wireless router supports WPS 2 WPS PBC Wi FiProtectedSetup PushButtonConfiguration isamethodtoauthenticateandregisterdevicesrequiredfor wireless configuration by pressing the button provided on the access point via wireless routers and then performing WPS PBC ...

Страница 41: ...lick Next The Easy Install Navi launches 4 Click Start Setup 5 Click Connect Your Printer Select your type of connection screen appears 6 Select Wireless Connection and then click Next The setting method selection window appears Epson AcuLaser C1750 Series User s Guide Network Basics 41 ...

Страница 42: ...7 Ensure that Wizard is selected and then click Next Epson AcuLaser C1750 Series User s Guide Network Basics 42 ...

Страница 43: ...nfigure the security setting and then click Next The IP Address Settings screen appears 11 Select IP Mode depending on your network scheme When IPv4 is selected Configure the following a Select Type Epson AcuLaser C1750 Series User s Guide Network Basics 43 ...

Страница 44: ...When IPv6 is selected Configure the following a Select Use Manual Address b Enter IP address of your printer c Enter the gateway address of your network When Dual Stack is selected Configure the IPv4 Settings and IPv6 Settings Epson AcuLaser C1750 Series User s Guide Network Basics 44 ...

Страница 45: ...12 Click Next 13 Ensure that the wireless settings are displayed and then click Apply Epson AcuLaser C1750 Series User s Guide Network Basics 45 ...

Страница 46: ...rrectly configured To reconfigure the wireless settings click Next on the Complete configuration screen and then click Return 17 Follow the instructions until the Check Setup screen appears 18 Confirm there are no errors displayed on the LCD panel and then click Start Installation If you see any errors click Trouble Shooting Guide and follow the instruction 19 Check if the printer to be installed ...

Страница 47: ...s screen appears 22 Click Finish to exit this tool The wireless configuration is complete Using Advanced Setup to Configure Wireless Settings To use the Advanced setup display the Configure Wireless Settings screen The following procedure uses Windows XP as an example Displaying Configure Wireless Settings Screen 1 Insert the Software Disc provided with the printer in your computer 2 Click Easy In...

Страница 48: ...l Navi launches 4 Click Start Setup 5 Click Connect Your Printer 6 Select Wireless Connection and then click Next The setting method selection window appears Epson AcuLaser C1750 Series User s Guide Network Basics 48 ...

Страница 49: ...t Cable on page 49 WPS PIN on page 56 WPS PBC on page 57 Operator Panel on page 59 EpsonNet Config on page 60 Ethernet Cable 1 Select Ethernet Cable and then click Next 2 Follow the instructions and then click Next Epson AcuLaser C1750 Series User s Guide Network Basics 49 ...

Страница 50: ...inter screen try the following steps Click Refresh to update the information Click Enter IP Address and then enter the IP address of your printer 4 Enter the SSID 5 Select Type of wireless network 6 Configure the security setting and then click Next The IP Address Settings screen appears 7 Select IP Mode depending on your network scheme Epson AcuLaser C1750 Series User s Guide Network Basics 50 ...

Страница 51: ...Address of your printer Network Mask Gateway Address When IPv6 is selected Configure the following a Select Use Manual Address b Enter IP address of your printer c Enter the gateway address of your network When Dual Stack is selected Epson AcuLaser C1750 Series User s Guide Network Basics 51 ...

Страница 52: ...Configure the IPv4 Settings and IPv6 Settings 8 Click Next Epson AcuLaser C1750 Series User s Guide Network Basics 52 ...

Страница 53: ...9 Ensure that the wireless settings are displayed and then click Apply Epson AcuLaser C1750 Series User s Guide Network Basics 53 ...

Страница 54: ...as Good Acceptable or Low on the report Note When Wireless Status is No Reception check if the wireless settings are correctly configured To reconfigure the wireless settings click Next on the Complete configuration screen and then click Return 13 Click Next 14 Follow the instructions until the Check Setup screen appears 15 Confirm there are no errors displayed on the LCD panel and then click Star...

Страница 55: ...rinter screen try the following steps Click Refresh to update the information Click Manually add using IP address and then enter the details of the printer manually 17 Configure the required items on the Enter Printer Settings screen and then click Next 18 Select the software to be installed and then click Install The Congratulations screen appears 19 Click Finish to exit this tool Epson AcuLaser ...

Страница 56: ...r This setting performed through access point is available only when the access points of your wireless router supports WPS 1 Select WPS PIN and then click Next 2 Follow the instructions until the Check Setup screen appears 3 Confirm there are no errors displayed on the LCD panel and then click Start Installation If you see any errors click Trouble Shooting Guide and follow the instruction Epson A...

Страница 57: ... The wireless configuration is complete When the WPS PIN operation is successful and the printer is rebooted wireless LAN connection is completed WPS PBC Note WPS PBC Wi Fi Protected Setup PushButton Configuration is a method to authenticate and register devices required for wireless configuration by pressing the button provided on the access point via wireless routers and then performing WPS PBC ...

Страница 58: ...Printer screen try the following steps Click Refresh to update the information Click Manually add using IP address and then enter the details of the printer manually 5 Configure the required items on the Enter Printer Settings screen and then click Next 6 Select the software to be installed and then click Install The Congratulations screen appears 7 Click Finish to exit this tool Epson AcuLaser C1...

Страница 59: ...the printer is rebooted wireless LAN connection is completed Operator Panel 1 Select Operator Panel and then click Next 2 Follow the instructions until the Check Setup screen appears 3 Confirm there are no errors displayed on the LCD panel and then click Start Installation If you see any errors click Trouble Shooting Guide and follow the instruction Epson AcuLaser C1750 Series User s Guide Network...

Страница 60: ...5 Configure the required items on the Enter Printer Settings screen and then click Next 6 Select the software to be installed and then click Install The Congratulations screen appears 7 Click Finish to exit this tool The wireless configuration is complete EpsonNet Config 1 Select EpsonNet Config and then click Next 2 Follow the instructions until the Check Setup screen appears 3 Confirm there are ...

Страница 61: ...Printer screen try the following steps Click Refresh to update the information Click Manually add using IP address and then enter the details of the printer manually 5 Configure the required items on the Enter Printer Settings screen and then click Next 6 Select the software to be installed and then click Install The Congratulations screen appears 7 Click Finish to exit this tool Epson AcuLaser C1...

Страница 62: ...ter For Windows XP and Windows Server 2003 a Select Network Connections from Control Panel b Right click Wireless Network Connection and select Properties c Select the Wireless Networks tab d Ensure that the check box for UseWindowstoconfiguremywirelessnetworksettings is selected Note Make note of the wireless settings on the Advanced window step f and the Wireless network properties window step h...

Страница 63: ...Open Data encryption Disabled i Click the Move up button to move the newly added SSID to the top of the list j Click OK to close the Wireless Network Connection Properties dialog box For Windows Vista a Display Control Panel b Select Network and Internet c Select Network and Sharing Center d Select Connect to a network Epson AcuLaser C1750 Series User s Guide Network Basics 63 ...

Страница 64: ...available network list and click Connect f Click Close in the dialog box after confirming the connection is a success For Windows Server 2008 R2 and Windows 7 a Display Control Panel b Select Network and Internet c Select Network and Sharing Center d Select Connect to a network e Select xxxxxxxx xxxxxxxx indicates a wireless device s SSID which you use from the network items listed in the availabl...

Страница 65: ...s the button Default IP address range 169 254 xxx yyy IP Address 169 254 000 041 3 Ensure that the IP Address on your computer is assigned by DHCP 4 Launch your web browser 5 Enter the IP address of the printer in the address bar and then press the Enter key Epson AcuLaser C1750 Series User s Guide Network Basics 65 ...

Страница 66: ...ess configuration software use itto change the wireless settings See the instructions below For Windows XP and Windows Server 2003 a Select Network Connections from Control Panel b Right click Wireless Network Connection and select Properties c Select Wireless Networks tab d Ensure that the check box for UseWindowstoconfiguremywirelessnetworksettings is selected Epson AcuLaser C1750 Series User s ...

Страница 67: ...k OK i Click Move up to move the setting to the top of the list j Click OK to close the Wireless Network Connection Properties dialog box For Windows Vista a Display Control Panel b Select Network and Internet c Select Network and Sharing Center d Select Connect to a network e Select the network and then click Connect f Click Close in the dialog box after confirming the connection is a success For...

Страница 68: ...e operating system on your computer provides a wireless configuration software use itto change the wireless settings See the instructions below For Windows XP and Windows Server 2003 a Select Network Connections from Control Panel b Right click Wireless Network Connection and select Properties c Select the Wireless Networks tab d Ensure that the check box for UseWindowstoconfiguremywirelessnetwork...

Страница 69: ... and click OK Network name SSID xxxxxxxx xxxxxxxx indicates a wireless device s SSID which you use Network Authentication Open Data encryption Disabled i Click the Move up button to move the newly added SSID to the top of the list j Click OK to close the Wireless Network Connection Properties dialog box For Windows Vista a Display Control Panel Epson AcuLaser C1750 Series User s Guide Network Basi...

Страница 70: ...ter d Select Connect to a network e Select xxxxxxxx xxxxxxxx indicates a wireless device s SSID which you use from the network items listed in the available network list and click Connect f Click Close in the dialog box after confirming the connection is a success For Windows Server 2008 R2 and Windows 7 a Display Control Panel b Select Network and Internet c Select Network and Sharing Center d Se...

Страница 71: ... IP address on the printer See Assigning an IP Address for IPv4 Mode on page 30 4 Launch your web browser 5 Enter the IP address of the printer in the address bar and then press the Enter key Epson AcuLaser C1750 Series User s Guide Network Basics 71 ...

Страница 72: ...eless configuration software use itto change the wireless settings Or you can change the wireless settings using the tool provided with the operating system See the instructions below For Windows XP and Windows Server 2003 a Select Network Connections from Control Panel b Right click Wireless Network Connection and select Properties c Select Wireless Networks tab Epson AcuLaser C1750 Series User s...

Страница 73: ...Enter the setting that you will send to the printer and click OK i Click Move up to move the setting to the top of the list j Click OK to close the Wireless Network Connection Properties dialog box For Windows Vista a Display Control Panel b Select Network and Internet c Select Network and Sharing Center d Select Connect to a network e Select the network and then click Connect f Click Close in the...

Страница 74: ...hod However ifyouuseeitheroftheMicrosoft methods you will not get features such as the Status Monitor and other printer utilities which will get installed with the Software Disc Ifyouwanttousetheprinteronanetwork sharetheprinterandinstallitsdriversonallthecomputers on the network Note You need to purchase a Ethernet cable separately for shared printing For Windows XP Windows XP 64 bit Edition Wind...

Страница 75: ...continue appears 5 Click Continue button 6 Select the Share this printer check box and then enter a name in the Share name text box 7 Select Additional Drivers and select the operating systems of all network clients using this printer 8 Click OK 9 Click Apply and then click OK For Windows Server 2008 and Windows Server 2008 64 bit Edition 1 Click Start Control Panel Hardware and Sound Printers 2 R...

Страница 76: ...hared The share icon is shown under the printer icon BrowseNetworkorMyNetworkPlaces Findthehostnameoftheserverandlookfortheshared name you assigned to the printer Now that the printer is shared you can install the printer on network clients using the Point and Print method or the peer to peer method Point and Print Point and Print is a Microsoft Windows technology that allows you to connect to a r...

Страница 77: ...ork traffic Close My Network Places 4 Print a test page to verify installation a Click start Startfor WindowsServer 2003 Windows Server 2003 x64 Edition Printers and Faxes b Select the printer you have installed c Click File Properties d On the General tab click Print Test Page When a test page is printed successfully installation is complete For Windows Vista and Windows Vista 64 bit Edition 1 Cl...

Страница 78: ... select Properties d On the General tab click Print Test Page When a test page is printed successfully installation is complete For Windows Server 2008 and Windows Server 2008 64 bit Edition 1 Click Start Network 2 Locate the host name of the server computer and then double click the host name 3 Right click the shared printer name and then click Connect 4 Click Install driver 5 Wait until the driv...

Страница 79: ... copied from the server to the client computer A new printer object will be added to the Devices and Printers folder The time taken for these activities varies based on network traffic 6 Print a test page to verify installation a Click Start Devices and Printers b Right click the printer you just created and select Printer properties c On the General tab click Print Test Page When a test page is p...

Страница 80: ... click Next 6 Selecttheprinter andthenclickNext Iftheprinterisnotlisted clickBackandenterinthepathof the printer in the text box For example server host name shared printer name The server host name is the name of the server computer that identifies it to the network The shared printer name is the name assigned during the server installation process If this is a new printer you may be prompted to ...

Страница 81: ...r example server host name shared printer name The server host name is the name of the server computer that identifies it on the network The shared printer name is the name assigned during the server installation process 4 If this is a new printer you may be prompted to install a print driver If no system driver is available specify the location where the driver is available 5 Confirm the printer ...

Страница 82: ...mpted to install a print driver If no system driver is available specify the location where the driver is available 5 Confirm the printer name and then select whether to use this printer as the default printer and click Next 6 Select whether to share this printer or not 7 If you want to verify installation click Print a test page 8 Click Finish When a test page is printed successfully installation...

Страница 83: ...Click Finish When a test page is printed successfully installation is complete Installing Print Driver on Computers Running Mac OS X Installing the Driver The following procedure uses Mac OS X 10 6 as an example 1 Run the Software Disc on the Mac OS X 2 Double click the AL C1750 C1700 Installer icon 3 Click Continue on the displayed screen 4 Click Continue on the Introduction screen 5 Select a lan...

Страница 84: ...to Print Fax If your USB printer is not displayed execute the following procedures 6 Click the plus sign and then click Default 7 Select the printer connected via USB from the Printer Name list Name Location and Print Using are automatically entered 8 Click Add When Using Bonjour 1 Turn on the printer 2 Ensure that your computer is connected to the network If you use wired connection ensure that t...

Страница 85: ...he network If you use wireless connection ensure that wireless connection is configured properly on your computer and printer 3 Display System Preferences and then click Print Fax 4 Click the plus sign and then click IP 5 Select Line Printer Daemon LPD for Protocol 6 Enter the IP address of the printer in the Address area 7 Select the model of your printer for Print Using Note When the printing is...

Страница 86: ...dialog box 8 Select the printer connected via USB from the Printer Name list Name Location and Print Using are automatically entered 9 Click Add When Using Bonjour 1 Turn on the printer 2 Ensure that your computer is connected to the network If you use wired connection ensure that the Ethernet cable is connected between the printer and the network If you use wireless connection ensure that wireles...

Страница 87: ...nection ensure that wireless connection is configured properly on your computer and printer 3 Start Printer Setup Utility Note You can find Printer Setup Utility in the Utilities folder in Applications 4 Click Add 5 Click IP Printer in the Printer Browser dialog box 6 Select Line Printer Daemon LPD for Protocol 7 Enter the IP address of the printer in the Address area 8 Select EPSON for Print Usin...

Страница 88: ...isplayed execute the following procedures 6 Click Add 7 Select USB from the menu 8 Select the printer from the Product list Printer Model is automatically selected 9 Click Add When Using Rendezvous Bonjour 1 Turn on the printer 2 Ensure that your computer is connected to the network If you use wired connection ensure that the Ethernet cable is connected between the printer and the network If you u...

Страница 89: ... wired connection ensure that the Ethernet cable is connected between the printer and the network If you use wireless connection ensure that wireless connection is configured properly on your computer and printer 3 Start Printer Setup Utility Note You can find Printer Setup Utility in the Utilities folder in Applications 4 Click Add 5 Click IP Printing from the menu 6 Select LPD LPR for Printer Ty...

Страница 90: ...Note When the printing is set up using IP printing the queue name is displayed as blank You do not need to specify it 9 Click Add Epson AcuLaser C1750 Series User s Guide Network Basics 90 ...

Страница 91: ...eet inserter PSI Fan paper or other specialty media before loading in the paper tray Do not print on label stock once a label has been removed from a sheet Use only paper envelopes Do not use envelopes with windows metal clasps or adhesives with release strips Print all envelopes single sided only Some wrinkling and embossing may occur when printing envelopes Donotoverloadthepapertray Donotloadpri...

Страница 92: ...nter Unacceptable media includes Rough or porous media Plastic media Paper that has been folded or wrinkled Paper with staples Envelopes with windows or metal clasps Padded envelopes Non laser glossy or coated paper Perforated media w Warning Do not use conductive paper such as origami paper carbonic paper or conductively coated paper When paper jam occurs it may cause short circuit and eventually...

Страница 93: ...rintmediathatdiffersfromthepapersizeorpapertype selectedontheprintdrivermay lead to paper jams To ensure that printing is correctly done select the correct paper size and paper type Multipurpose Feeder MPF Paper Size A4 SEF 210 297 mm B5 SEF 182 257 mm A5 SEF 148 210 mm Letter SEF 8 5 11 inches Legal SEF 8 5 14 inches Folio SEF 8 5 13 inches Executive SEF 7 25 10 5 inches C5 SEF 162 229 mm Monarch...

Страница 94: ... for DL LEF 3 The minimum length is 3 875 inches for Monarch LEF and 110 mm for DL LEF Priority Sheet Inserter PSI Paper Size A4 SEF 210 297 mm B5 SEF 182 257 mm A5 SEF 148 210 mm Letter SEF 8 5 11 inches Legal SEF 8 5 14 inches Folio SEF 8 5 13 inches Executive SEF 7 25 10 5 inches C5 SEF 162 229 mm Monarch SEF 3 875 7 5 inches 10 Env SEF 4 125 9 5 inches DL SEF 110 220 mm Custom Size Width 76 2 ...

Страница 95: ...ps prevent jams and ensures trouble free printing Beforeloadingprintmedia identifytherecommendedprintsideoftheprintmedia Thisinformation is usually on the print media package Note After loading paper in the feeder specify the same paper type on the print driver Capacity Multipurpose feeder MPF can hold 150 sheets of standard paper 16 2 mm 0 64 inches of thick paper One sheet of coated paper Five e...

Страница 96: ... 220 mm for DL LEF The minimum length is 3 875 inches for Monarch LEF and 110 mm for DL LEF The PSI accepts print media within the following dimensions Width 76 2 215 9 mm 3 00 8 50 inches Length 190 5 355 6 mm 7 50 14 00 inches Loading Print Media in the Multipurpose Feeder MPF Note To avoid paper jams do not remove the priority sheet inserter PSI while printing is in progress Use only laser prin...

Страница 97: ... Open the front cover Note When you use the MPF for the first time open the front cover by pulling out the instruction sheet 2 Pull the PSI out Epson AcuLaser C1750 Series User s Guide Printing Basics 97 ...

Страница 98: ...instruction sheet attached to the PSI with adhesive tape Read the instruction sheet before you use the PSI 3 Pull the slide bar forward until it stops 4 Pull the length guide forward until it stops Epson AcuLaser C1750 Series User s Guide Printing Basics 98 ...

Страница 99: ...e print media flex the sheets back and forth and then fan them Straighten the edges of the stack on a level surface 7 Load print media on the MPF with the top edge first and with the recommended print side facing up Epson AcuLaser C1750 Series User s Guide Printing Basics 99 ...

Страница 100: ...de the length guide towards the printer until it touches the print media Note Depending on the size of print media first slide the slide bar backward until it stops and then pinch the length guide and slide it backward until it touches print media Epson AcuLaser C1750 Series User s Guide Printing Basics 100 ...

Страница 101: ...en the output tray extension 12 Selectthepapertypefromtheprintdriveriftheloadedprintmediaisnotstandardplainpaper Ifa user specified print media is loaded in the MPF you must specify the paper size setting by using the print driver Epson AcuLaser C1750 Series User s Guide Printing Basics 101 ...

Страница 102: ...t on envelopes be sure to specify the envelope setting on the print driver If not specified the print image will be rotated 180 degrees When Loading 10 DL or Monarch Load envelopes with the side to be printed on facing up the flap side facing down and the flap turned to the right To prevent DL and Monarch from being wrinkled they are recommended to be loaded with the print side facing up flap open...

Страница 103: ...cing up flap opened and facing you Important Never use envelopes with windows or coated linings These lead to paper jams and can cause damage to the printer Note If you do not load envelopes in the MPF right after they have been removed from the packaging they may bulge To avoid jams flatten them as shown below when loading them in the MPF Epson AcuLaser C1750 Series User s Guide Printing Basics 1...

Страница 104: ...n the following illustration The amount of the bending shall be 5 mm 0 20 inches or less To confirm the correct orientation of each print media such as envelopes see the instruction on the Envelope Paper Setup Navigator on the print driver Epson AcuLaser C1750 Series User s Guide Printing Basics 104 ...

Страница 105: ...title on the letterhead enters the printer first Loading Print Media in the Priority Sheet Inserter PSI Note To avoid paper jams do not remove the PSI while printing is in progress Use only laser print media Do not use ink jet paper in this printer 1 Open the front cover Epson AcuLaser C1750 Series User s Guide Printing Basics 105 ...

Страница 106: ... on the MPF 3 Adjust the paper width guides to their maximum width 4 Before loading the print media flex the sheets back and forth and then fan them Straighten the edges of the stack on a level surface Epson AcuLaser C1750 Series User s Guide Printing Basics 106 ...

Страница 107: ... first and with the recommended print side facing up 6 Adjust the paper width guides until they rest lightly against the edges of the stack of print media 7 Open the output tray extension Epson AcuLaser C1750 Series User s Guide Printing Basics 107 ...

Страница 108: ... driver Loading Envelope in the Priority Sheet Inserter PSI Note Be sure to fully insert the envelope until it stops Otherwise print media that is loaded on the MPF will be fed When you print on envelopes be sure to specify the envelope setting on the print driver If not specified the print image will be rotated 180 degrees When Loading 10 DL or Monarch Load the envelope with the side to be printe...

Страница 109: ...th windows or coated linings These lead to paper jams and can cause damage to the printer Note If you do not load envelopes in the PSI right after they have been removed from the packaging they may bulge To avoid jams flatten them as shown below when loading them in the PSI Epson AcuLaser C1750 Series User s Guide Printing Basics 109 ...

Страница 110: ...n the following illustration The amount of the bending shall be 5 mm 0 20 inches or less To confirm the correct orientation of each print media such as envelopes see the instruction on the Envelope Paper Setup Navigator on the print driver Epson AcuLaser C1750 Series User s Guide Printing Basics 110 ...

Страница 111: ...Do not close the window until duplex printing is complete Manual duplex printing can be done using the multipurpose feeder MPF or the priority sheet inserter PSI Operations on Your Computer The following procedure uses Microsoft Windows XP WordPad as an example Note The way to display the printer Properties Printing Preferences dialog box differs according to the application software Refer to the ...

Страница 112: ... 7 Click Print in the Print dialog box to start printing Important When you start manual duplex printing the instruction window appears Note that the window cannot be reopened once it is closed Do not close the window until duplex printing is complete Loading Print Media in the Multipurpose Feeder MPF 1 First print the even pages rear sides For a six page document rear sides are printed in the ord...

Страница 113: ...tting them 3 Stack the prints and set them as they are with the blank side facing up into the MPF and then press the button Pages are printed in the order of page 1 rear of page 2 page 3 rear of page 4 and then page 5 rear of page 6 Note Printing on both sides of the paper is not possible if the document consists of various sizes of paper Loading Print Media in the Priority Sheet Inserter PSI 1 Fi...

Страница 114: ...from the center output tray Note Warped or curled prints can cause paper jams Straighten them before setting them 3 Stack the prints and set them as they are with the blank side face up into the PSI and then press the button Pagesareprintedinorderofpage1 rearofpage2 page3 rearofpage4 andthenpage5 rearof page 6 Note Printing on both sides of the paper is not possible if the document consists of var...

Страница 115: ... window representing the print driver opens Selectthe appropriate settings for the specific job you are sending to print Print settings selected from the driver have precedence over the default menu settings selected from the operator panel or Printer Setting Utility You may need to click Preferences from the initial Print dialog box to see all the available system settings you can change If you a...

Страница 116: ...to the selected printer Canceling a Print Job There are several methods for canceling a print job Canceling From the Operator Panel To cancel a job after it has started printing 1 Press the Cancel Job button Note Printing is canceled only for the current job All the following jobs will continue to print Canceling a Job From the Computer Running Windows Canceling a Job From the Taskbar When you sen...

Страница 117: ...nt jobs appears in the printer window 3 Select the job you want to cancel 4 Press the Delete key Selecting Printing Options Selecting Printing Preferences Windows Printer preferences control all of your print jobs unless you override them specifically for a job For example if you want to use duplex printing for most jobs set this option in printer settings To select printer preferences 1 Click sta...

Страница 118: ...se Photo print quality mode for a particular graphic select this setting in the driver before printing that job 1 With the desired document or graphic open in your application access the Print dialog box 2 Select the Epson AcuLaser C1750 series and click Preferences to open the print driver 3 Make selections on the driver tabs See the following table for specific printing options Note In Windows y...

Страница 119: ...velope Paper Setup Navigator Printer Status Defaults Image Options tab Output Color Output Recognition Image Adjustment Mode Image Types Image Auto Correction Image Settings Color Balance Profile Settings Defaults Layout tab Image Orientation Multiple Up Booklet Poster Mixed Document Rotation Fit to New Paper Size Specify Zoom Image Shift Print Position Defaults Windows XP Windows Server 2003 Wind...

Страница 120: ... open in your application click File and then click Print 2 Select the Epson AcuLaser C1750 series from Printer 3 Select the desired printing options from the menus and drop down lists that are displayed Note InMacOS X clickSaveAsonthePresetsmenuscreentosavethecurrentprintersettings Youcan createmultiplepresetsandsaveeachwithitsowndistinctivenameandprintersettings Toprintjobs using specific printe...

Страница 121: ...Cover Page Cover Page Type Billing Info Scheduler Print Document Priority Job Control Account Mode Image Settings Brightness Contrast Chroma Printer Features Basic Output Color Paper Type Detailed Settings Image Type Image Rotation 180deg Skip Blank Pages Draft Mode Trapping Image Enhancement Sharpness Adjustment Screen Color Balance C M Y K Low Density Medium Density High Density Epson AcuLaser C...

Страница 122: ...iver Note When setting the paper size on the print driver be sure to specify the same size as the actual print media used Settingthewrongsizeforprintingcancauseprinterfailure Thisisespeciallytrueifyouconfigurea bigger size when using a narrow width paper Using the Windows Print Driver On the Windows print driver set the custom size in the Custom Paper Size dialog box This section explains the proc...

Страница 123: ...aper Use the following procedures to print using either the Windows or Mac OS X print drivers Using the Windows Print Driver This section explains the procedure using Windows XP WordPad as an example Note The way to display the printer Properties Printing Preferences dialog box differs according to the application software Refer to the manual of your respective application software 1 From the File...

Страница 124: ...ize 7 Specify Non Printable Area if necessary 8 Click OK 9 Make sure that the newly created paper size is chosen in Paper Size and then click OK 10 From the File menu select Print 11 Click Print to start printing Checking Status of Print Data Checking Status Windows Only YoucanchecktheprinterstatuswithStatusMonitor Double clicktheStatusMonitorprintericonon the taskbar at the bottom right of the sc...

Страница 125: ...ig Windows Mac OS X You can check the status of the print job sent to the printer at the Jobs tab of EpsonNet Config See Also Printer Management Software on page 20 Printing a Report Page You can print a variety of settings for your printer including Printer Settings Panel Settings Job History Report and Error History Report This section describes two methods of printing a report page Printing a P...

Страница 126: ...The Printer Setting Utility appears 2 Click the Printer Settings Report tab 3 Select Information Pages from the list at the left side of the page The Information Pages page is displayed 4 Click Printer Settings The Printer Settings page is printed Printer Settings Using the Operator Panel to Change the Printer Settings You can select menu items and corresponding values from the operator panel When...

Страница 127: ...etting for the menu item appears Each menu item has a list of values for the menu item A value can be A phrase or word to describe a setting A numerical value that can be changed An On or Off setting Note Press the and button at the same time This will display the factory default menu settings 5 Select the desired value 6 Press the button This enables the setting value which is indicated by an ast...

Страница 128: ...n multiple print drivers are installed on your computer In this case click the name of the desired printer listed in Printer Name The Printer Setting Utility appears 2 Click the Printer Maintenance tab 3 Select the desired menu item Each menu item has a list of values for the menu item A value can be A phrase or word to describe a setting A numerical value that can be changed An On or Off setting ...

Страница 129: ...e Printer Setting Utility appears 2 Click the Printer Maintenance tab 3 Select System Settings from the list at the left side of the page The System Settings page is displayed 4 Select the desired language from Panel Language and then click the Apply New Settings button Printing with Web Services on Devices WSD This section provides information for network printing with WSD the new Windows Vista W...

Страница 130: ...he Print and Document Services check box on the Server Roles window in the Add Roles Wizard and then click Next 4 Click Next 5 Select the Print Server check box and then click Next 6 Click Install Printer Setup You can install your new printer on the network using the Software Disc that shipped with your printer or using Add Printer Wizard Installing a Print Driver Using the Add Printer Wizard 1 C...

Страница 131: ...ore installing the driver using the Add Printer wizard on Windows Server 2008 R2 or Windows 7 perform one of the followings Establish the Internet connection so that Windows Update can scan your computer Add the print driver to your computer in advance 5 If prompted install the print driver on your computer If you are prompted for an administrator password or confirmation type the password or prov...

Страница 132: ...gs Use the Information Pgs menu to print the settings and history information of your printer Note A password is required to enter the operator panel menus when Panel Lock Set is set to Enable In this case enter the password you specified and press the button Printer Settings Purpose To print a list of the information such as the printer name the status of the printer and the network settings Pane...

Страница 133: ...nu to configure a variety of printer features Note A password is required to enter the operator panel menus when Panel Lock Set is set to Enable In this case enter the password you specified and press the button Network Setup UsetheNetwork Setupmenutochangetheprintersettingsaffectingjobssenttotheprinterthrough the wired or wireless network Note Values marked by an asterisk are the factory default ...

Страница 134: ...l strength No changes can be made on the operator panel to improve the status of the wireless connection Values Good Indicates good signal strength Acceptable Indicates marginal signal strength Low Indicates insufficient signal strength No Reception Indicates that no signal is received Note This item is displayed only when the printer is connected with a wireless network Wireless Setup Epson AcuLa...

Страница 135: ...y 2 WEP Key 3 and WEP Key 4 WEP 128Bit Specify the WEP 128bit Key to use through the wireless network Enter 26 hexadecimal characters Transmit Key Specify the transmit key from WEP Key 1 WEP Key 2 WEP Key 3 and WEP Key 4 WPA PSK TKIP Select to configure the wireless setting with the security method of WPA PSK TKIP PassPhraseEnt ry Specify the pass phrase of alphanumericcharactersfrom8to63 only whe...

Страница 136: ...less setting with the security method of WPS PBC PIN Code Start Config Configures the wireless setting using the PIN code as signed automatically by the printer Print PIN Code Prints the PIN code Confirm it when you enter the PIN code to your computer Note This item is displayed only when the printer is connected with a wireless network Init Wireless Epson AcuLaser C1750W Only Purpose To initializ...

Страница 137: ...d to the printer Network Mask Manually sets the subnet mask Gateway Address Manually sets the gateway address Protocol Purpose To enable or disable each protocol The change becomes effective after the printer is turned off and then on Values LPR Disable Disables the Line Printer Daemon LPR port Enable Enables the LPR port Port 9100 Disable Disables the Port9100 port Enable Enables the Port9100 por...

Страница 138: ...fies the IP address which you want to control the access to your printer No 1 5 Mask Sets the subnet mask for the specified IP address No 1 5 Mode Off Selects whether to accept or reject the access from the specified IP address Accept Reject Reset Defaults Purpose To initialize wired network data stored in Non Volatile Memory NVM After executing this function and rebooting the printer all wired ne...

Страница 139: ...etup menu to configure the power saving mode time out time job log auto print mm inch setting default paper size setting and low toner alert setting Note Values marked by an asterisk are the factory default menu settings PowerSaver Time Purpose To specify the time for transition to Power Saver Mode Values Mode1 5min Specifies the time taken by the printer before it enters Mode1 after it finishes a...

Страница 140: ...lso return the printer to the standby mode by pressing any button on the operator panel In Mode 2 you can return the printer to the standby mode by pressing the Energy Saver button Fault Time Out Purpose To specify the time taken by the printer before it cancels jobs that stop abnormally The print job is cancelled if it times out Values Off Disables the fault time out On 60sec Specifies the time t...

Страница 141: ... the Information Pgs menu mm inch Purpose To specify the measurement unit displayed after the numeric value on the operator panel Values millimeter mm Specifies the default measurement unit inch Def Paper Size Purpose To specify the default paper size Values A4 210x297 Letter 8 5x11 Low Toner Msg Purpose To specify whether to show the alert message when the toner is low Epson AcuLaser C1750 Series...

Страница 142: ...e To display the version of the controller Adjust PaperType Purpose To adjust the paper type Values Plain Light Normal Labels Light Normal Adjust BTR Purpose Tospecifytheoptimumvoltagesettingsforprintingforthetransferroller BTR Tolowerthevoltage set negative values To increase set positive values The default settings may not give the best output on all paper types If you see mottles on the print o...

Страница 143: ...ng for the fusing unit To lower the temperature set negative values To increase set positive values The default settings may not give the best output on all paper types When the printed paper has curled try to lower the temperature When the toner does not fuse on the paper properly try to increase the temperature Note The print quality changes depending on the values you select for this item Epson...

Страница 144: ...ues Off Does not automatically adjust color registration On Automatically adjusts color registration Adjust ColorRegi Purpose To specify whether to manually adjust color registration Color registration adjustments need to be made during the initial setup of the printer or when the printer is moved to a different location Epson AcuLaser C1750 Series User s Guide Using the Operator Panel Menus 144 ...

Страница 145: ...ion color adjustment values individuallyforLY LeftYellow LM LeftMagenta andLC LeftCyan 5 5 Enter RY RM RC 0 0 0 Specifies process paper feed direction color adjustment values individually for RY Right Yellow RM Right Magenta and RC Right Cyan 5 5 Clear Developer Purpose To rotate the developer motor and stir the toner in the toner cartridge Toner Refresh Purpose To use up a toner cartridge when yo...

Страница 146: ...e NVM for system parameters After executing this function and rebooting the printer all the menu parameters except the parameters for the network are reset to their factory default values See Also Resetting to Factory Defaults on page 151 Non GenuineToner Purpose To use toner cartridge of another manufacturer Note Using non genuine toner cartridges may make some printer features unusable reduce pr...

Страница 147: ... being used Note Anincorrectaltitudeadjustmentsettingleadstopoorprintingquality incorrectindicationofremaining toner Values 0m Specifies the altitude of the location where the printer is installed 1000m 2000m 3000m Secure Settings Use the Secure Settings menu to set a password to limit access to the menus This prevents items from being changed accidentally Note Values marked by an asterisk are the...

Страница 148: ... menus Values Current Password Enter the current password to change the password New Password Enter the new password Re enter Enter the new password again to confirm Note This item is displayed only when Panel Lock Set is set to Enable Login Error Purpose To set the maximum number of failed login attempts before an administrator is denied access to the operator panel menus Values Off Does not set ...

Страница 149: ...ais Italiano Deutsch Español Nederlands Português Türkçe Panel Lock Function This feature prevents unauthorized users from changing settings made by the administrator However you can select settings for individual print jobs using the print driver Enabling the Panel Lock 1 Press the Menu button 2 Select Admin Menu and then press the button Epson AcuLaser C1750 Series User s Guide Using the Operato...

Страница 150: ...confirm and then press the button The display will briefly indicate the password has been changed If you change the password perform steps 1 Enter the current password and then press the button Perform steps 2 to 4 Select Change Password and then press the button Enter the current password and then press the button Perform steps 7 and 8 This will change the password Disabling the Panel Lock 1 Pres...

Страница 151: ... 7 To return to the previous screen press the Back button Resetting to Factory Defaults After executing Initialize NVM and rebooting the printer all the menu parameters or data except the parameters for the network are reset to their factory default values 1 Press the Menu button 2 Select Admin Menu and then press the button 3 Select Maintenance Mode and then press the button 4 Select Initialize N...

Страница 152: ...rces Ensure that the stacked print media does not exceed the maximum height indicated on the paper width guides Do not load wrinkled creased damp or curled print media Flex fan and straighten print media before you load it If a jam occurs with print media try feeding one sheet at a time through the MPF or the PSI Do not use print media that you have cut or trimmed Do not mix print media sizes weig...

Страница 153: ...rwrapped around a Fusing Unit or a heat roller Otherwise it may cause injuries or burns Switch off the product promptly and contact your local Epson representative Important Do not attempt to clear any jams using tools or instruments This may permanently damage the printer The following illustration shows where paper jams may occur along the print media path 1 2 3 4 5 6 7 Epson AcuLaser C1750 Seri...

Страница 154: ...ose feeder MPF 7 Priority Sheet Inserter PSI Clearing Paper Jams From the Front of the Printer Note To resolve the error displayed on the LCD panel you must clear all print media from the print media path 1 Pull the PSI out Epson AcuLaser C1750 Series User s Guide Troubleshooting 154 ...

Страница 155: ...ter Important To prevent electric shock always turn off the printer and disconnect the power cord from the grounded outlet before performing maintenance To avoid burns do not clear paper jams immediately after printing The fusing unit becomes extremely hot during use Note To resolve the error displayed on the LCD panel you must clear all print media from the print media path Epson AcuLaser C1750 S...

Страница 156: ...1 Push the rear cover handle and open the rear door 2 Lift up the levers 3 Remove any paper jammed from the back of the printer Epson AcuLaser C1750 Series User s Guide Troubleshooting 156 ...

Страница 157: ...inter and disconnect the power cord from the grounded outlet before performing maintenance To avoid burns do not clear paper jams immediately after printing The fusing unit becomes extremely hot during use Note To resolve the error displayed on the LCD panel you must clear all print media from the print media path Epson AcuLaser C1750 Series User s Guide Troubleshooting 157 ...

Страница 158: ...rear door 2 Lift up the levers 3 Remove any paper jammed from the back of the printer If no paper is found in the paper path then remove any paper jammed out of the center output tray Epson AcuLaser C1750 Series User s Guide Troubleshooting 158 ...

Страница 159: ...4 Lower the levers to their original position 5 Close the rear door Epson AcuLaser C1750 Series User s Guide Troubleshooting 159 ...

Страница 160: ...orming manual duplex printing ensure that the print media is not curled Fan the print media If the print media is damp turn over the print media If the problem continues use print media that is not damp Note If the problem continues even though you have taken suggested actions described above contact the Epson local representative office or an authorised dealer Multi feed jam Problem Action Print ...

Страница 161: ...roblem turn off the printer wait for 10 seconds and then turn on the printer This often fixes the problem Display Problems Problem Action After the printer is turned on the displayontheLCDpanelisblank keeps showing Please wait or the back light is not lit Turn off the printer wait for 10 seconds and turn on the printer Self Test Message appears on the LCD panel When the test is completed Ready is ...

Страница 162: ... the correct Ethernet or USB cable and that it is securely connected to the printer Verify that the correct print media size is selected If you are using a print spooler verify that the spooler has not stalled Check the interface of your printer from Admin Menu Determine the host interface you are using Print a Printer Settings page to verify that the current interface settings are correct Refer t...

Страница 163: ...nting again to see if feeding improves Do not mix print media types Do not mix reams of print media Removethetopandbottomcurledsheetsofareambeforeloadingtheprintmedia Load a print media source only when it is empty The envelope is creased after printing Ensure that the envelope is loaded as instructed in Loading Envelope in the MultipurposeFeeder MPF onpage102or LoadingEnvelopeinthePrioritySheet I...

Страница 164: ...oner in each toner cartridge 1 Check the toner level in the Status tab in the Status Monitor window 2 Replace the toner cartridges as necessary Verify that the print media is dry and the correct print media is used If not use the print media recommended for the printer See also Usable Print Media on page 93 Try changing the Paper Type setting in the print driver 1 On the Paper Output tab in Printi...

Страница 165: ...ces of the print driver change the Paper Type setting Verify that the correct print media is being used If not use the print media recommended for the printer See also Usable Print Media on page 93 Adjust the temperature of the fusing unit 1 Launch the Printer Setting Utility and click Adjust Fusing Unit on the Printer Maintenance tab 2 Adjust the fixing temperature by turning up the value for you...

Страница 166: ...Load one sheet of paper on the MPF and then print a solid image all over paper 2 Loadtheprintedsheetwiththesidetobeprintedonfacingdown andthenprint a blank sheet of paper Note If the problem continues even though you have taken suggested actions described above contact the Epson local representative office or an authorised dealer The Entire Output Is Blank If this trouble happens contact the Epson...

Страница 167: ...ntact the Epson local representative office or an authorised dealer Pitched Color Dots If this trouble happens contact the Epson local representative office or an authorised dealer Vertical Blanks Epson AcuLaser C1750 Series User s Guide Troubleshooting 167 ...

Страница 168: ...fice or an authorised dealer Mottle Problem Action The printed result has mottled appearance Adjust the transfer bias 1 Launch the Printer Setting Utility click Adjust BTR on the Printer Maintenance tab 2 Adjust the setting for the type of print media being used 3 Click the Apply New Settings button If you use non recommended print media use the print media recommended for the printer Note If the ...

Страница 169: ...erTypesettinginthe print driver For example change Plain to Lightweight Cardstock 1 On the Paper Output tab in Printing Preferences of the print driver change the Paper Type setting Adjust the temperature of the fusing unit 1 Launch the Printer Setting Utility and click Adjust Fusing Unit on the Printer Maintenance tab 2 Adjust the fixing temperature by turning up the value for your printing media...

Страница 170: ... representative office or an authorised dealer Bead Carry Out BCO Problem Action Bead Carry Out BCO is happening If the printer is installed in a high altitude location set the altitude of the location 1 Launch the Printer Setting Utility and click Adjust Altitude on the Printer Maintenance tab 2 Selectthevalueclosetothealtitudeofthelocationwherethe printerisinstalled 3 Click the Apply New Setting...

Страница 171: ...indow 2 Replace the toner cartridges as necessary Start Developer Stir Mode 1 Launch the Printer Setting Utility and click Developer Stir Mode on the Diagnosis tab 2 Click the Start button Note If the problem continues even though you have taken suggested actions described above contact the Epson local representative office or an authorised dealer Wrinkled Stained Paper Epson AcuLaser C1750 Series...

Страница 172: ...elope whichis220mmorlongerandhasaflaponthe long edge use a different size envelope If the envelope is C5 which is 220 mm or longer and has a flap on the short edge load it in the MPF with the flap open and facing up If the envelope is Monarch or DL which is shorter than 220 mm load it long edge feed in the MPF with the flap open and facing up If the problem continues use a different size envelope ...

Страница 173: ... even though you have taken suggested actions described above contact the Epson local representative office or an authorised dealer Color Registration Is out of Alignment Epson AcuLaser C1750 Series User s Guide Troubleshooting 173 ...

Страница 174: ...1 Launch the Printer Setting Utility and click Color Registration Adjustment on the Printer Maintenance tab 2 Deselect the check box next to On 3 Click the Start button next to Print Color Regi Chart 4 Select the paper size and then click OK The color registration chart is printed 5 Check the values with the straight lines on the chart 6 Select the value for each color on the Printer Setting Utili...

Страница 175: ...he Epson local representative office or an authorised dealer Adjusting Color Registration This section describes how to adjust the color registration when you first install the printer or after moving it to a new location Performing Auto Correct Auto Correct allows you to correct the color registration automatically The Operator Panel 1 Press the Menu button 2 Select Admin Menu and then press the ...

Страница 176: ...s case click the name of the desired printer listed in Printer Name The Printer Setting Utility opens 2 Click the Printer Maintenance tab 3 Select Color Registration Adjustment from the list at the left side of the page The Color Registration Adjustment page is displayed 4 Deselect the check box next to On 5 Click the Start button next to Auto Correct The color registration is corrected automatica...

Страница 177: ...Printer Setting Utility opens 2 Click the Printer Maintenance tab 3 Select Color Registration Adjustment from the list at the left side of the page The Color Registration Adjustment page is displayed 4 Deselect the check box next to On 5 Click the Start button next to Print Color Regi Chart 6 Select the paper size and then click OK The color registration chart is printed Determining Values On the ...

Страница 178: ...78 Entering Values The Operator Panel Using the operator panel enter the values that you found in the color registration chart to make adjustments 1 Press the Menu button 2 Select Admin Menu and then press the button 3 Select Maintenance Mode and then press the button 4 Select Adjust ColorRegi and then press the button Epson AcuLaser C1750 Series User s Guide Troubleshooting 178 ...

Страница 179: ... Enter RY RM RC appears 14 Press the or button until you reach the value for example 3 displayed on the chart 15 Press the button once and move the cursor to the next color 16 Repeat steps 14 and 15 to enter all of the digits and then press the button The top screen appears 17 Perform steps 1 to 4 to enter the Adjust ColorRegi menu 18 Select Color Regi Chart and then press the button The color reg...

Страница 180: ...to On 5 Select the value you checked in the color registration chart and then click the Apply New Settings button 6 Click the Start button next to Print Color Regi Chart 7 Select the paper size and then click OK The color registration chart is printed with the new values 8 Adjust until all straight lines are at the value of 0 Show image of before and after adjustment will help Important After prin...

Страница 181: ...and click Machine Check on the Diagnosis tab 3 Select Dispense Motor Check Yellow Dispense Motor Check Magenta Dispense Motor Check Cyan or Dispense Motor Check Black from the drop down list box and click the Start button 4 Click the Play of Sound button to check the motor sound 5 Repeat steps 3 and 4 to perform Dispense Motor Check for the rest of the toner cartridges Note You can perform Dispens...

Страница 182: ... the printer and indicates possibleprinterproblemsyoumustresolve Thissectiondescribesmessages theirmeanings andhow to clear the messages Important When an error message is displayed the print data remaining on the printer and the information accumulated in the memory of the printer are not secured Message What You Can Do FusingUnit Error Restart Printer Error 010 397 Restart Printer Turn off the p...

Страница 183: ...tart Printer Error 016 610 Restart Printer Turn off the printer and then on If this does not solve the problem contact the Epson local representative office or an authorised dealer See also Contacting Epson Support on page 216 Error 016 612 Restart Printer Out of Memory Press OK Button Error 016 718 Press OK Button Press the button to cancel the current print job See also Canceling a Print Job on ...

Страница 184: ...6 742 Press OK Button Range Chk Error Press OK Button Error 016 743 Press OK Button Check Sum Error Press OK Button Error 016 744 Press OK Button Header Error Press OK Button Error 016 745 Press OK Button Invalid Job Press OK Button Error 016 799 Press OK Button Press the button to cancel the current print job See also Canceling a Print Job on page 116 Epson AcuLaser C1750 Series User s Guide Trou...

Страница 185: ...16 MCU Firmware Err Restart Printer Error 024 340 Restart Printer Turn off the printer and then on If this does not solve the problem contact the Epson local representative office or an authorised dealer See also Contacting Epson Support on page 216 Download Mode Send FW Data Error 024 360 Send FW Data Turn off the printer and then on If this does not solve the problem contact the Epson local repr...

Страница 186: ...ffice or an authorised dealer See also Contacting Epson Support on page 216 Motor Error Restart Printer Error 042 325 Restart Printer Turn off the printer and then on If this does not solve the problem contact the Epson local representative office or an authorised dealer See also Contacting Epson Support on page 216 Fan Motor Error Restart Printer Error 042 358 Restart Printer Deve Mode Error Rest...

Страница 187: ...rom the Back of the Printer on page 155 Jam at Exit Open Rear Door and Remove Paper Check and clear the paper path See also Clearing Paper Jams From the Center Output Tray on page 157 Rear Door Open Close Rear Door Close the rear door Jam at Exit Open Rear Door Check and clear the paper path See also Clearing Paper Jams From the Center Output Tray on page 157 Jam at Reg Roll Open Rear Door Check a...

Страница 188: ...r Restart Printer Error 092 661 Restart Printer Check Unit CTD Sensor Clean the CTD sensor See also Cleaning the Color Toner Density CTD Sensor on page 199 Printer Status CTD Sensor Printer Status Yellow Low Replace Soon Replace the specified toner cartridge soon See also Replacing Toner Cartridges on page 201 Printer Status Magenta Low Replace Soon Printer Status Cyan Low Replace Soon Printer Sta...

Страница 189: ... Yellow Cartridge Remove the specified toner cartridge and install a new one If you do not replace the toner cartridge print quality problems may occur See also Replacing Toner Cartridges on page 201 Printer Status Replace Yellow Cartridge Empty Yellow Cartridge Replace MagentaCartridge Printer Status Replace MagentaCartridge Empty MagentaCartridge Replace Cyan Cartridge Printer Status Replace Cya...

Страница 190: ... Cartridge Error Yellow Cartridge Check the specified toner cartridge if there is any malfunction Re install the specified toner cartridge See also Replacing Toner Cartridges on page 201 Cartridge Error MagentaCartridge Cartridge Error Cyan Cartridge Cartridge Error Black Cartridge Invalid Yellow Re install the specified toner cartridge with the supported one See also Replacing Toner Cartridges on...

Страница 191: ...f the printer and then on If this does not solve the problem contact the Epson local representative office or an authorised dealer See also Contacting Epson Support on page 216 RAM Error Restart Printer Error 116 315 Restart Printer Controller Error Restart Printer Error 116 317 Restart Printer Controller Error Restart Printer Error 116 324 Restart Printer NV RAM Error Restart Printer Error 116 32...

Страница 192: ...Error Restart Printer Error 116 351 Restart Printer Network Error Restart Printer Error 116 352 Restart Printer Network Error Restart Printer Error 116 355 Restart Printer ASIC Error Restart Printer Error 124 333 Restart Printer Turn off the printer and then on If this does not solve the problem contact the Epson local representative office or an authorised dealer See also Contacting Epson Support...

Страница 193: ...eral automatic diagnostic tools to help you produce and maintain print quality LCD Panel Messages The LCD panel provides you with information and troubleshooting help When an error or warning condition occurs the LCD panel displays a message informing you of the problem See also Understanding Printer Messages on page 182 Status Monitor Alerts The Status Monitor is a tool that is included on the So...

Страница 194: ...ir charges for such break down will be incurred by users Note To disable the Non Genuine Toner mode select Off for Non GenuineToner on the operator panel or deselect the check box next to On on the Non Genuine Toner page on the Printer Setting Utility The Operator Panel Note Before starting the operation described below confirm that Ready is displayed on the LCD panel 1 Press the Menu button 2 Sel...

Страница 195: ...n your computer In this case click the name of the desired printer listed in Printer Name The Printer Setting Utility opens 2 Click the Printer Maintenance tab 3 Select Non Genuine Toner from the list at the left side of the page The Non Genuine Toner page is displayed 4 Select the check box next to On and then click the Apply New Settings button Epson AcuLaser C1750 Series User s Guide Troublesho...

Страница 196: ...d cleaning materials exclusive to it Other cleaning materials may result in poor performance of the product Never use aerosol cleaners or it may catch fire and cause explosion c Caution Whencleaningthisproduct alwaysswitchoffandunplugit Accesstoalivemachineinteriormay cause electric shock Cleaning Inside the Printer 1 Turn off the printer 2 Open the toner access cover Epson AcuLaser C1750 Series U...

Страница 197: ...n in the illustration 4 Pull the toner cartridge out Important Always pull the toner cartridge out slowly so you do not spill any toner 5 Pull the other three toner cartridges out as well Epson AcuLaser C1750 Series User s Guide Maintenance 197 ...

Страница 198: ... beside the arrow on the printer until its tip reaches the interior of the printer as illustrated below and then pull it out 8 Repeat the same procedure for the other three holes 9 Return the print head cleaning rod to its original location Epson AcuLaser C1750 Series User s Guide Maintenance 198 ...

Страница 199: ...e toner cartridge clicks 11 Replace the other three toner cartridges as well 12 Close the toner access cover Cleaning the Color Toner Density CTD Sensor Clean the CTD sensor only when an alert for the CTD sensor is shown on the Status Monitor window or operator panel 1 Ensure that the printer is turned off Epson AcuLaser C1750 Series User s Guide Maintenance 199 ...

Страница 200: ...2 Push the rear cover handle and open the rear door 3 Clean the CTD sensor inside the printer with a clean dry cotton swab 4 Close the rear door Epson AcuLaser C1750 Series User s Guide Maintenance 200 ...

Страница 201: ...allows toner spit it out rinse mouth with water drink water and consult a physician immediately When replacing toner cartridges be careful not to spill the toner In case of any toner spills avoid contact with clothes skin eyes and mouth as well as inhalation If toner spills onto your skin or clothing wash it off with soap and water If you get toner particles in your eyes wash it out with plenty of...

Страница 202: ...When placing a used toner cartridge on the floor or on a table place a few sheets of paper under the toner cartridge to catch any toner that may spill Do not reuse old toner cartridges once you remove them from the printer Doing so can impair print quality Do not shake or pound the used toner cartridges The remaining toner may spill We recommend you to use up the toner cartridges within one year a...

Страница 203: ...ustration 5 Pull the toner cartridge out Important Always pull the toner cartridge out slowly so you do not spill any toner 6 Place the toner cartridge slowly on the sheets of paper spread in step 3 Epson AcuLaser C1750 Series User s Guide Maintenance 203 ...

Страница 204: ... times to distribute the toner evenly Note Ensure that the color of the new toner cartridge matches that on the handle before replacing it Handle the toner cartridge carefully to avoid spilling of the toner 2 Remove the tape from the toner cartridge Epson AcuLaser C1750 Series User s Guide Maintenance 204 ...

Страница 205: ...e removed toner cartridge in the box in which the installed toner cartridge was packed up 6 Take care not to contact with the spilled toner and remove the sheets of paper spread under the removed toner cartridge Ordering Supplies The toner cartridges need to be ordered occasionally Each toner cartridge includes installation instructions on the box Epson AcuLaser C1750 Series User s Guide Maintenan...

Страница 206: ...message when the toner cartridge must be replaced Important This printer is designed to provide the most stable performance and print quality when used with the recommended toner cartridges Not using toner cartridges recommended for this machine degrades the performance and printing quality of the printer You could also incur charges if the machine breaks down To receive customer support and achie...

Страница 207: ...tus of a local printer refer to Checking Printer Status with Status Monitor Windows Only on page 207 Starting EpsonNet Config Use the following procedure to start EpsonNet Config 1 Launch your web browser 2 Enter the IP address of the printer in the address bar The EpsonNet Config page appears Checking Printer Status with Status Monitor Windows Only Status Monitor is a tool that is installed with ...

Страница 208: ... containing the following information The network settings and the printer status The error status which has occurred on the printer Setting the E mail Environment Activate EpsonNet Config On the Properties tab configure the following settings according to your e mail environment After configuring the settings on each screen always click Apply and then turn off on the printer to reboot For details...

Страница 209: ...l Permitted E mail Address When setting the permission for checking information and changing the settings for an e mail address input the e mailaddressthatis permittedtoreceivethee mail Ifno address is input here the printer receives e mails from all users StatusMessenger Password Set the password for access to the printer Checking the Printer Status with E mail This section describes cautions whe...

Страница 210: ...ommands are ignored Command Parameter Description Password Password Use this command at the top of the e mail when a password is set You can omit this command when the password is not set NetworkInfo Set this when you want to check information on the network settings list Status Set this when you want to check the printer status Example of Commands When the read only password is ronly and to check...

Страница 211: ...counted as one job and 2 sided print including Multiple Up is counted as two During 2 sided printing if an error occurs after one side is printed properly it is counted as one When printing color data which has been converted by using ICC profile on an application with the Color setting the data is printed by color even if it seems to be black and white data on the monitor In that case Color Impre...

Страница 212: ...de of this printer is heavier than the rear Take note of this difference in weight when moving the printer 1 Turn off the printer 2 Disconnect the power cord and the interface cable Epson AcuLaser C1750 Series User s Guide Maintenance 212 ...

Страница 213: ...Close the output tray extension if it is opened 4 Remove any paper in the priority sheet inserter PSI or multipurpose feeder MPF Keep the paper wrapped and away from humidity and dirt 5 Push the PSI in Epson AcuLaser C1750 Series User s Guide Maintenance 213 ...

Страница 214: ...6 Slide the slide bar backward until it stops 7 Close the front cover 8 Lift the printer and move it gently Epson AcuLaser C1750 Series User s Guide Maintenance 214 ...

Страница 215: ...9 Adjust the color registration before using your printer See Also Adjusting Color Registration on page 175 Epson AcuLaser C1750 Series User s Guide Maintenance 215 ...

Страница 216: ... give themthefollowing information Product serial number The serial number label is usually on the back of the product Product model Product software version Click About Version Info or similar button in the product software Brand and model of your computer Your computer operating system name and version Names and versions of the software applications you normally use with your product Help for Us...

Страница 217: ...345299 No 1 Ln 359 Sec 2 Zhongshan Rd Zhonghe City Taipei County 235 Taiwan 039 605007 039 600969 No 342 1 Guangrong Rd Luodong Township Yilan County 265 Taiwan 038 312966 038 312977 No 87 Guolian 2nd Rd Hualien City Hualien County 970 Taiwan 02 82273300 02 82278866 5F 1 No 700 ZhongzhengRd Zhonghe City Taipei County 235 Taiwan 03 2810606 03 2810707 No 413 Huannan Rd Pingzhen City Taoyuan County 3...

Страница 218: ...p www epson com sg Information on product specifications drivers for download Frequently Asked Questions FAQ Sales Enquiries and Technical Support via e mail are available Epson HelpDesk Phone 65 6586 3111 Our HelpDesk team can help you with the following over the phone Sales enquiries and product information Product usage questions or problems Enquiries on repair service and warranty Help for Use...

Страница 219: ...one 84 8 823 9239 Service Center 80 Truong Dinh Street District 1 Hochiminh City Vietnam Help for Users in Indonesia Contacts for information support and services are World Wide Web http www epson co id Information on product specifications drivers for download Frequently Asked Questions FAQ Sales Enquiries questions through e mail Epson Hotline Sales enquiries and product information Technical su...

Страница 220: ...itech Mall lt IIB No 12 Jl Kusuma Bangsa 116 118 Surabaya Phone 62 31 5355035 Fax 62 31 5477837 Yogyakarta Hotel Natour Garuda Jl Malioboro No 60 Yogyakarta Phone 62 274 565478 Medan Wisma HSBC 4th floor Jl Diponegoro No 11 Medan Phone Fax 62 61 4516173 Makassar MTC Karebosi Lt Ill Kav P7 8 JI Ahmad Yani No 49 Makassar Phone 62 411 350147 411 350148 Epson AcuLaser C1750 Series User s Guide Where T...

Страница 221: ... of Epson product drivers Users can access our World Wide Web home page at http www epson com hk Technical Support Hotline You can also contact our technical staff at the following telephone and fax numbers Phone 852 2827 8911 Fax 852 2827 4383 Help for Users in Malaysia Contacts for information support and services are World Wide Web http www epson com my Information on product specifications dri...

Страница 222: ...rld Wide Web http www epson co in Information on product specifications drivers for download and products enquiry are available Epson India Head Office Bangalore Phone 080 30515000 Fax 30515005 Epson India Regional Offices Location Telephone number Fax number Mumbai 022 28261515 16 17 022 28257287 Delhi 011 30615000 011 30615005 Chennai 044 30277500 044 30277575 Kolkata 033 22831589 90 033 2283159...

Страница 223: ...lesservices usersarewelcometocontacttheEpson Philippines Corporation at the telephone and fax numbers and e mail address below Trunk Line 63 2 706 2609 Fax 63 2 706 2665 Helpdesk Direct Line 63 2 706 2625 E mail epchelpdesk epc epson com ph World Wide Web http www epson com ph Information on product specifications drivers for download Frequently Asked Questions FAQ and E mail Enquiries are availab...

Страница 224: ... Enquiries on repair service and warranty Epson AcuLaser C1750 Series User s Guide Where To Get Help 224 ...

Страница 225: ...From back of the printer 155 From center output tray 157 From front of the printer 154 Color Registration Chart 176 Configuring wireless settings 39 Connecting printer 24 Connection specification 24 Connection type 24 Conserving supplies 210 Consumables 206 Contacting Epson 216 Contacting Service 193 CTD Sensor 199 D Determining values 177 Display Problem 161 E E mail Commands for 210 Email Alerts...

Страница 226: ... LPR 137 LW Gloss Card 143 144 M Main components 15 Managing printer 207 Manual Duplex Printing 111 Menu Button 17 Messages Status Monitor 193 Meters Total Page Counts 211 mm inch 141 Mottle 168 Moving Printer 212 Multiple Up 211 Multipurpose feeder MPF 15 154 N Network basics 24 Network connection setup 38 Network Setup 133 Non GenuineToner 146 O OK Button 17 Operator Panel 15 Ordering supplies 2...

Страница 227: ...contacting Epson 216 solving 216 Product Features 9 R Ready Indicator 17 Rear Cover Handle 16 Rear Door 16 154 Recycled 143 144 Removing the toner cartridges 202 Report Page 125 Reset Defaults 138 Resetting to defaults 151 S Secure Settings 147 Sending print job 115 Service 216 Setting 211 Slide Bar 15 SNMP 137 Specification 11 Status Monitor Alerts 193 StatusMessenger Checking printer status 208 ...

Отзывы: