


EPSON Stylus COLOR 900/900N
Chapter 5 Adjustments
121
5.1.1 Special Adjustment Tools
The table below shows the adjustment tools you need for servicing the
EPSON Stylus COLOR 900/900N.
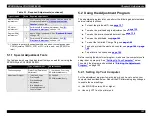
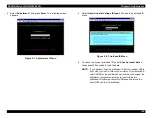
5.2 Using the Adjustment Program
The adjustment program lets you perform the following adjustments and
service-related functions:
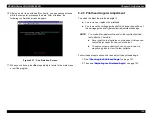
To input the printhead ID, see
.
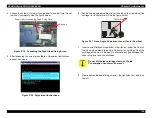
To make the printhead angle adjustment, see
To make the bi-directional adjustment, see
To clean the printhead, see
To reset the Initial Ink Charge Flag, see
To check or clear the waste ink counter, see
To perform a fan check, see
Before running the adjustment program, make sure the computer you’re
using is set up properly. See
below.
Then start the program as described in
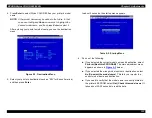
5.2.1 Setting Up Your Computer
For the adjustment program to work properly, you have to set up your
computer as described below. Reboot the PC after making any changes
to enable the new settings.
Use MS-DOS version 6.2 or higher.
Use only LPT1 as the printer port.
Waste Ink Pad
replacement
1
After replacing the waste ink pads, clear the waste ink
counter as explained in
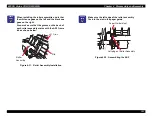
CR motor
replacement
1
Perform the Bi-Directional Adjustment. See
Program ROM
replacement
*1
1
Input a 22-digit printhead ID. See
2
Perform the Bi-Directional Adjustment. See
*1: You have to perform these adjustments only when you replace an older
PROM (version TEE01A, 01B, or 01C) with a new one (TEE01D or
later).
Tool
Type of Adjustment
Specifications
Thickness gauge
Platen Gap (Parallelism)
Adjustment
1.14 mm thick, 5 cm long;
EPSON-available only
Adjustment Program
• Initial Ink Charge
• Printhead ID
• Printhead Angle
Adjustment
• Bi-d Adjustment
• Clearing Waste Ink
Counter Value
SC900.EXE;
EPSON-available only
Table 5-1. Required Adjustments (continued)
Type of repair
Step
Required adjustments
Содержание 900N
Страница 1: ...EPSONStylusCOLOR900 900N Color ink jet printer TM SC900 N 6 59 0 18 ...
Страница 8: ... 37 5 PRODUCTDESCRIPTION ...
Страница 37: ... 37 5 OPERATINGPRINCIPLES ...
Страница 67: ... 37 5 TROUBLESHOOTING ...
Страница 89: ... 37 5 DISASSEMBLYANDASSEMBLY ...
Страница 121: ... 37 5 ADJUSTMENTS ...
Страница 156: ... 37 5 MAINTENANCE ...
Страница 169: ... 37 5 APPENDIX ...
Страница 178: ...EPSON Stylus COLOR 900 900N Chapter 7 Appendix 175 7 3 Component Layout Figure 7 2 C265 Main Board Component side ...
Страница 179: ...EPSON Stylus COLOR 900 900N Chapter 7 Appendix 176 Figure 7 3 C265 Main Board Soldering side ...
Страница 180: ...EPSON Stylus COLOR 900 900N Chapter 7 Appendix 177 Figure 7 4 C265 PSB Board Figure 7 5 C265 PSE Board ...
Страница 181: ...EPSON Stylus COLOR 900 900N Chapter 7 Appendix 178 Figure 7 6 C265 PNL Board ...
Страница 195: ...06 03 01 02 for S E ASIA 03 03 05 03 04 EPSON STYLUS COLOR 900 No 7 10056 Rev 01 ...
Страница 197: ......
Страница 198: ......
Страница 199: ......
Страница 200: ......
Страница 201: ......