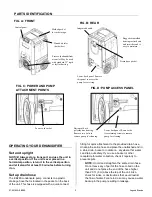
07-02185A EB280
3
Legend Brands
Plug in electrical cord
The EB280 dehumidifier should be plugged into a GFCI-
protected 115 volt outlet rated for at least 15
amps.
Remove the cord from its storage pocket and uncoil it.
Always plug the cord firmly into the unit first, and then
plug the other end into a suitable outlet.
Turn the unit on
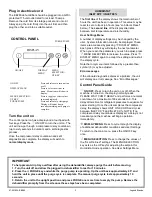
The control panel on has a display and a touchpad with
four keys. Press the
ON/OFF
to turn the unit on. The
unit will now go through a compressor delay countdown
(up to sixty seconds in duration) and a self-diagnostics
process.
Once the compressor delay countdown and self-
diagnostics are complete, the display will switch to
normal display mode
.
HUMIDISTAT
INLET 00°F / INLET 00%
The
first line
of the display shows the total number of
hours the unit has been in operation. This value may be
reset to zero to track job hours (see “Job Hours Reset”
below). The
second line
of the display alternates
between inlet temperature and inlet humidity.
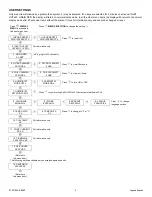
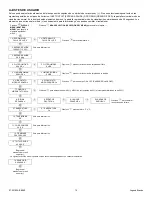
User Settings Menu
A number of display settings may be changed by the
user. System information can also be displayed. These
items are accessed by pressing
DISPLAY MENU.
Each press of the key will display the next parameter.
When you reach the parameter you wish to adjust, press
MENU SELECTION to increase the value. Press
DISPLAY MENU again to accept the setting and re-start
the display cycle.
Note that only menu items followed by a greater-than
symbol (
>
) may be adjusted.
Error messages
If the onboard diagnostics discover a problem, the unit
will display an error message. See “Error Messages.”
Control Panel Guide
ON/OFF
.
Press to turn the unit on or off. When the
machine is turned on, the display normally reads
PLEASE WAIT COMP. DELAY and performs a numeral
countdown for a maximum of 60 seconds to 0. This
delay allows time for refrigerant pressures to equalize for
easier starting. Once the unit completes the compressor
delay, the display shows UNIT ON XX HRS and cycles
between INLET XX°F and INLET XX%. NOTE: If no
compressor delay countdown is displayed, a delay is not
necessary and the machine will begin operation
immediately.
DISPLAY MENU.
Press to cycle through the display
of additional dehumidifier conditions and User Settings.
To return to the main menu, press the ON/OFF key
once.
MENU SELECTION.
Press to change the values of
the "User Defined" settings. The MENU SELECTION
key acts as the UP key for adjusting the setpoint for
Humidistat mode operation. See User Settings Menu.
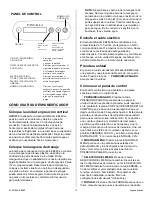
ON/OFF
Press and release to turn unit on
or off.
DISPLAY MENU
Press to select next item in
menu. Menu item will show in
display.
MENU SELECTION /
UP KEY
Press to toggle or select values
in menu displayed.
PURGE PUMP
Press and release to start purge.
Display will count down
seconds remaining until purge is
complete.
IMPORTANT
To help prevent drip tray overflow after using the dehumidifier, always purge the unit before moving.
1. Turn the unit off and allow the plugged in dehumidifier to rest for 10 minutes.
2. Press the PURGE key and while the purge pump is operating, tip the unit back approximately 45° and
hold the unit in place until the purge cycle is complete. The manual purge cycle lasts approximately 10
seconds.
3. Return the unit to the upright position and press PURGE one more time to empty the pump. Remove the
dehumidifier promptly from the site once these steps have been completed.
CONTROL PANEL
ON/OFF
DISPLAY
DISPLAY
MENU
MENU
SELECTION /
UP KEY
PURGE PUMP


