background image


10

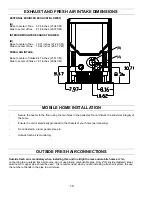
EXHAUST AND FRESH AIR INTAKE DIMENSIONS 


MOBILE HOME INSTALLATION 


Secure the heater to the floor using the two holes in the pedestal. Do not disturb the structural integrity of 
the home. 


Ensure the unit is electrically grounded to the chassis of your home (permanently). 


Do not install in a room people sleep in. 


Outside fresh air is mandatory. 


OUTSIDE FRESH AIR CONNECTIONS 


Outside fresh air is mandatory when installing this unit in airtight homes and mobile homes.

 When 

connecting to an outside fresh air source, do not use plastic, combustible pipe. Only 2” ID (inside diameter) steel, 
aluminum or copper pipe should be used.  It is recommended, when you are installing a fresh air system, to keep 
the number of bends in the pipe to a minimum. 


EXTERNAL MOUNTED EXHAUST BLOWER. 


(A)  

Base to center of flue   8.36 inches (21.34 CM) 
Side to center of flue 

8.16 inches (20.72 CM) 


INTERIOR MOUNTED EXHAUST BLOWER. 
 
(B) 

Base to center of flue  10.71 inches (27.20 CM)
Side to center of flue 

10.62 inches (26.97 CM)


FRESH AIR INTAKE. 
 

Base to center of intake 8.47 inches (21.51 CM) 
Side to center of intake  7.97 inches (20.54 CM) 

(A) 

(B) 

Содержание EF-V EVOLUTION

Страница 1: ...SHERWOOD INDUSTRIES LTD 6782 OLDFIELD RD VICTORIA BRITISH COLUMBIA V8M 2A3 PELLET STOVE EF V EVOLUTION OWNERS TECHNICAL MANUAL...

Страница 2: ...rements 8 Clearances to Combustibles 9 Mobile Home Installation 10 Outside Fresh Air Connections 10 Horizontal Exhaust through the Wall 11 12 Inside Vertical Pipe Installation 13 Hearth Mount Installa...

Страница 3: ...OVE Since Sherwood Industries Ltd has no control over the quality of pellets that you use we assume no liability caused by the quality of wood pellets used P F I PELLET STANDARDS Fines 1 maximum throu...

Страница 4: ...dard 115 volts 60 hertz electrical outlet Be careful that the electrical cord is not trapped under the appliance and that it is clear of any hot surfaces or sharp edges This unit s maximum power requi...

Страница 5: ...l The ashes should be retained in the closed container until all cinders have thoroughly cooled before disposing of them H Make sure the ash pan is closed tightly during the operation of the stove I K...

Страница 6: ...d if the chimney is over 6 in diameter or over 28 sq inches cross sectional area An interior vent can be used with approved pipe passing through the ceiling and roof 5 Locate the stove in a large and...

Страница 7: ...either side of the unit to remove the unit from the pallet HEARTH PAD PEDESTAL INSTALLATION Carefully place the back of the pellet appliance on the pallet and install the hearth pad Align the holes in...

Страница 8: ...upon the plants and nature of grade surface The exhaust gases are hot enough to ignite grass plants and shrubs located in the vicinity of termination The grade surface must not be lawn Distance from...

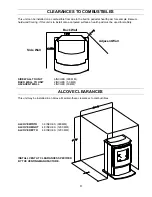
Страница 9: ...onto a carpeted surface a hearth pad must be used for stability SIDE WALL TO UNIT 6 INCHES 900 MM BACK WALL TO UNIT 2 INCHES 50 MM ADJACENT WALL 2 INCHES 50 MM ALCOVE CLEARANCES This unit may be inst...

Страница 10: ...and mobile homes When connecting to an outside fresh air source do not use plastic combustible pipe Only 2 ID inside diameter steel aluminum or copper pipe should be used It is recommended when you a...

Страница 11: ...ature silicone 8 Push the stove straight back leaving a minimum of 2 5 cm clearance from the back of the stove to the wall Seal the vent pipe to the thimble with high temperature silicone 9 The pipe m...

Страница 12: ...ROUGH WALL WITH VERTICAL RISE recommended WALL FRAMING INTERIOR WALL SURFACE TERMINATION CAP WALL THIMBLE VENT PIPE EF V EVOLUTION WALL FRAMING TERMINATION CAP INTERIOR WALL SURFACE VERTICAL SECTION O...

Страница 13: ...ed vertically it will be 3 76 mm away from a combustible wall 3 Locate the center of the fresh air intake pipe on the unit Match that center with the same point on the wall and cut a hole about 2 1 8...

Страница 14: ...exhaust pipe 4 Install flexible stainless steel liner or listed pellet vent to the top of the chimney RAIN CAP SEAL PLATE EXISTING MASONRY FLUE VENT PIPE single wall stainless flex pipe or solid PL ve...

Страница 15: ...moving 1 one screw between the top louvers Loosen the three screws on the back of the cabinet side and remove panel 2 Loosen the four screws that hold the top back grill in place Lift the back grill o...

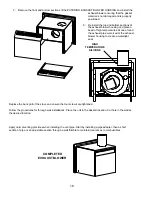
Страница 16: ...exits the exhaust blower housing to create a watertight seal Replace the back grill of the stove and ensure the four screws are tightened Follow the procedures for through wall installations Place the...

Страница 17: ...s must be in accordance to local code requirements EF V EVOLUTION 90 DEGREE ELBOW 45 DEGREE ELBOW WITH RODENT SCREEN OR STAINLESS STEEL TERMINATION HOOD 2 FOOT RISER PIPE ADAPTER EXTERIOR BLOWER AND H...

Страница 18: ...tallations Ensure that vent pipe is properly secured to wall using wall straps Maintain clearances to combustibles on vent pipe as well as unit ROOF SHEATHING RAIN CAP ROOF FLASHING ROOF RAFTERS CEILI...

Страница 19: ...stove it should be placed in the OFF position in order to heat the unit as quickly as possible Once the room has come up to temperature the control may be set to a comfortable level The flashing green...

Страница 20: ...Dial A Fire has been set on the lowest setting the Slider Damper should be pushed in slightly decreasing the air in the firebox If after long periods of burning the fire builds up and over flows the...

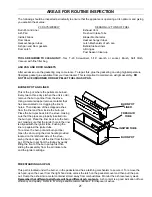
Страница 21: ...pper remove material that has accumulated or is clogging the liner s holes Then dispose of the scrapped ashes from the liner and from inside the burn pot Place the burn pot back into the stove making...

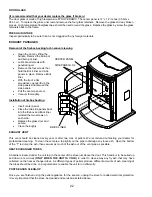
Страница 22: ...ert center panel Place the two side panels back into the firebox and Brick liner reinstall the two screws on each side Replace the glass door and secure Clean thoroughly EXHAUST VENT This vent should...

Страница 23: ...23 ELECTRICAL COMPONENT AND FUNCTIONS Some parts have been removed for clarity 2 1 3 4 5 6 7 8 9 10 11 12 13 14 16 15 17...

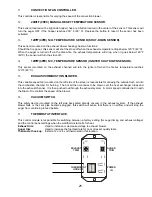
Страница 24: ...The auger motor s control is handled by the timing control module and Dial A Fire 6 COMBUSTION EXHAUST PHASE CONTROLLER Blower speed control module The phase controller supplies an adjustable voltage...

Страница 25: ...COMBUSTION BLOWER This variable speed fan mounted on the left side of the stove is responsible for drawing the outside fresh air into the combustion chamber for burning The hot air then continues to b...

Страница 26: ...eps going out 10 Thermostat interface does not work correctly NOTE All troubleshooting procedures should be carried out by qualified technicians or installers 1 The stove will not start Make sure the...

Страница 27: ...vection blower against the wiring diagram If the convection motor will not run apply 115 V to the motor directly If the motor runs replace the fan controller If the motor does not run the convection b...

Страница 28: ...exhaust vacuum place a magnehelic gauge in the sensor end of the vacuum tube It should read 0 23 wc If the reading is good then replace the vacuum sensor If the auger motor still does not work then at...

Страница 29: ...will require slightly higher settings If the stove goes out and there are partially burned pellets left in the burn pot liner the stove shuts down due to a lack of air exhaust temperature or power fa...

Страница 30: ...30 WIRING DIAGRAM...

Страница 31: ...ICKEL EF5 113 POWER UP TIMER EF5 114 COMBUSTION BLOWER EF5 115 VACUUM SWITCH EF5 116 AUGER MOTOR EF5 118 AUGER EF5 119 CONVECTION BLOWER EF5 120 CONVECTION BLOWER MOUNT EF5 121 CONTROL PANEL DOOR EF5...

Страница 32: ...ON DIAL A FIRE 20 074 EXHAUST TEMP SENSOR 120 F 49 C EF5 109 IGNITER TEMP SENSOR 120 F 49 C EF5 110 THERMOSTAT CONTROLLER 20 026 PHASE CONTROLLER EF5 111 AUGER TIMER CONTROL EF5 112 POWER UP TIMER EF5...

Страница 33: ...OT LINER 20 054 BURN POT EF5 128 GLASS RETAINER SET EF5 133 GLASS 356 X 356MM 20 023 DOOR HANDLE EF5 134 DOOR ASSEMBLY COMPLETE 20 014 DOOR HINGE BRACKET EF5 135 ASH SHELF EF5 132 ASH PAN COVER EF5 13...

Страница 34: ...ODICAL MALFUNCTION ETC The limited warranty covers defects in materials and workmanship as long as the products has been installed according to the manual s instruction If the product is damaged or br...

Отзывы: