background image

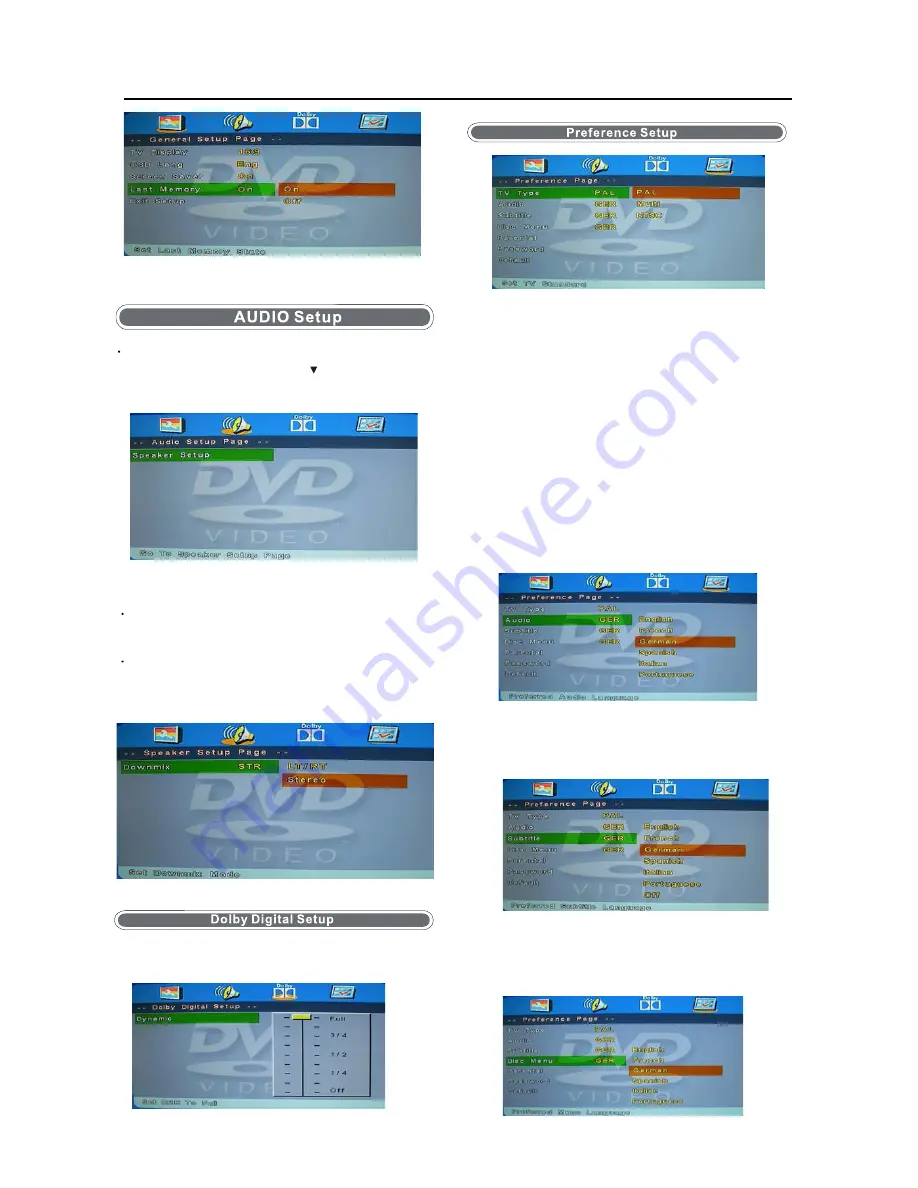
Speaker Setup

Downmix

LT/RT

A disc recorded multi channel soundtrack,the output 
signal will be incorporated to left and right channel.

Stereo

A disc recorded multi channel soundtack,The output
signal will be incorporated to stereo.

Dynamic

This option is used to set the compression ration in 
order to control the sound (Volume) contrast.

32

TV Type

PAL

This is selected when the player is connected to a PAL 
system TV.

MULTI

The player will set the TV system according to the disc 
in the tray.

NTSC

Au

Subtitle

Disc Menu

dio

Choose the language you want to watch your DVD in. Only 
if the language is recorded to the DVD will this option be 
functional.

Enter the Audio setup page using    button, press ok 
see the options.

This menu is only available when in DVD mode and no DVD 
is playing or the DVD has been stopped.

This is selected when the player is connected to a NTSC 
system TV.

Choose the subtitle language you want to watch. Only if subtitles 
have been recorded to the DVD will this option be functional.

Choose the language you want to see the Disc menu in. Only if 
the language is recorded to the DVD will this option be 
functional.

Содержание AIL-2519S2DVD

Страница 1: ......

Страница 2: ...able 9 CONNECTIONS 11 PC connection 11 VGA HDMI PC Connection 11 Satellite connection 11 Connecting an audio system 12 Connecting a DVD player 13 HDMI Connection 13 SCART Connection 13 USB Connection 13 AV Connection 14 YPbPr Connection 14 Common Interface Slot 15 USING YOUR COMMON INTERFACE SLOT 15 Auto installation setup 15 Power On Off the LED TV 15 TV SETTINGS Menu 16 Signal Source 16 Auto Sca...

Страница 3: ...Operation 27 1 Photo 28 2 Music 28 3 Movie 28 4 Text 28 TROUBLE SHOOTING GUIDE 34 TECHNICAL SPECIFICATIONS 34 cations 34 D cations 34 5 3 g n i t n u o M l l a W DVD Operation 31 DVD Operation 31 Recording Operation 29 PVR settings 29 ...

Страница 4: ...intenance instructions in the literature accompanying this unit This symbol indicates that dangerous voltage constituting a risk of electric shock is present within this unit Keep these instructions Do not use this TV near water Clean only with a slightly damp cloth Do not block any ventilation openings Install in accordance with the supplied Quick Start Guide and this User Guide Protect the power...

Страница 5: ...reasons The unit becomes warm when in operation Do not place any covers or blankets on the unit in order to prevent overheating The ventilation holes are not to be blocked Do not set up near radiators Do not place in direct sunshine When placing on a shelf leave 5 cm 2 free space around the whole unit Do not allow water or moisture to enter the TV Do NOT use in wet or moist areas such as Bathrooms...

Страница 6: ...ble TV service DVB C is provided Please ask your dealer if you need further information about the local availability of these services DVB T is the standard for terrestrial digital TV and DVB C designates the digital cable TV service Despite this TV set conforms with all current DVB T und DVB C standards we cannot guarantee compatibility with any future digital terrestrial DVB T and DVB C signals ...

Страница 7: ...respectively red green yellow and blue used in a few sub menus Exit Exit all menus Info info TV modes index in Teletext mode Picture Picture settings Aspect settings available in any mode Sound Sound settings available in all modes to select a different audio channel Guide Show hide the Electronic Program Guide EPG Toggles from time to channel display in EPG Last Channel display In Guide mode Chan...

Страница 8: ...DVBS DVBS2 source Shortcut to DVBC source Timeshift Play or pause Press to enter Timeshift the image paused and it start record from the paused position Stop playing or stop recording Fast reverse and Fast forward Previous next chapter in USB mode or play the Previous next scene of the recorded programs jump by 30 seconds VOL VOL Press to increase decrease the sound level CH CH When watching a cha...

Страница 9: ...Down Select Page in Hold mode Left Right Hold main page and select sub pages using Red Green soft OK Hold page and Expand TOP Bottom Full Use TXT for Update NUMBER BUTTONS Press 0 9 to select a teletext page Press this button to show hidden text e g the solutions for TV quiz shows Press it again to hide the text SUB Subtitle display select button can display Hide a menu TXT Text Mix TV always in U...

Страница 10: ...ce WARNING DO NOT LEAVE BATTERIES IN THE REMOTE CONTROL FOR EXTENDED PERIODS AS THEY CAN LEAK OR CORRODE CAUSING DAMAGE TO THE REMOTE CON TROL CHECK THEM PERIODICALLY AND REPLACE THEM AS REQUIRED WARNING DO NOT MIX BATTERY TYPES WHEN INSERTING BATTERIES REPLACE ALL BATTERIES AT THE SAME TIME DO NOT MIX OLD AND NEW BATTERIES WARNING EXHAUSTED BATTERIES MUST BE TREATED WITH CARE AND DISPOSED OF ACCO...

Страница 11: ......

Страница 12: ...ully and do not bend or break the connector pins When using the VGA cable Switch on the TV Switch on the PC Select PC VGA as input source When using the HDMI cable Select HDMI as input source VGA cable HDMI to DVI cable Audio cable HDMI to HDMI All illustrated cables are not supplied Satellite connection DVB S DVB S2 Signal Connect the DVB S DVB S2 signal to the SATELLITE LNB on the TV SET Select ...

Страница 13: ... Select Scart source You can now see the playback picture from the video recorder Note To connect the video recorder using other cables refer to the video recorder instruction manual Scart cable Video recorder Video camera Mini AV cables are supplied Mini Audio and Video transfer cable A Connecting an audio system You can supply the TV sound to the stereo system A with the Scart socket Use a speci...

Страница 14: ......

Страница 15: ... control and select the AV input source YPbPr Connection Connect the YPbPr output of the DVD or VCR to the YPbPr input on the TV set Connect the Audio output of the DVD or VCR to the Audio input jacks on the TV set using two RCA cables together with the supplied converter cables Match the jacks colors Y is green Pb is blue Pr is red Audio left is white and Audio right is red Press the SOURCE butto...

Страница 16: ...n additional service by pressing the Quick Start button ATV Analogue Television is used for Analogue Cable systems DVB DTT Digital Terrestrial Television DVB T is used if you have an antenna receiving signals from a terrestrial transmitter Cable is used for Digital Cable systems DVBC Satellite is preset for Astra 19 2E Y xed dish with a universal LNB To install any other satellites use the full sa...

Страница 17: ...ode press the Menu button on the remote control to display the TV Settings menu When you are in the correct mode press Menu button on the remote control and enter the TV Settings Menu To select the TV mode directly from the remote control use the 3 mode keys Press MENU button to display the main menu use left right buttons to select EINSTELLUNGEN menu press OK or down button to enter the menu Pres...

Страница 18: ... Symbol ks s using the buttons QAM Type Select the QAM Type using the buttons ATV analogue cable TV Manual Tuning You can manually tune ATV channels in the TV SETTINGS menu Storage to Press the buttons to change the numbered location of the found channel System Select the system using the buttons Current CH Displays the current channel number press the buttons to choose the channel you wish to mod...

Страница 19: ...ng a message will be displayed allowing you to Guide EPG Electronic Program Guide the Electronic Program Guide EPG contains a 7 day programme preview as long as the selected channel supports this function If there is more information about a programme press the and buttons to scroll able number of characters is limited Favourite Lists ton to add it to the list of favourite channels To remove a cha...

Страница 20: ...he advanced Dish set up for multiple satellites using DiSEqC switches and DiSEqC positioner follows This should only be attempted by experience users The Dish set up main menu page displays the main inter face The interface consists of Satellite List Transponder list and Dish LNB parameter list Satellite List The Satellite list displays the satellite names Satellite Edit No The current list number...

Страница 21: ...T o c c A ne s t t te Transponder List st sho r rs or the se ect t te Edit Transponder menu Press GREEN button to enter Tr No s r Nr c ted Frequency Set the do requency Symbol ks s te Polarity t v c Delete Transponder Press the YELLOW button the c r Press OK to de ete Add Transponder Press RED button to ent r No ted Frequency Set the do requency Symbol ks s te Polarity t v c khz ...

Страница 22: ...nstalled 22KHzSatellite signal switch Press to select Auto On Off Auto Automatically issued 22 KHz pulse signal to control switching On Off Manual control switch Tone burst Double Single Switch Require users to install Tone burst switch Press to select Burst A Burst B None Burst A Burst B Manually switch the satellite A B DiSEqC1 0 4 select 1 switch Require the user device support DiSEqC 1 0 proto...

Страница 23: ...sable Limit Abolish the current limit set Move Auto East or west of Automatic Control continued to turn the polar axis to the desired position Move Continue Manual control of the east or the west continued to turn the polar axis to the desired position Move Step Control of the east or wes xed polar axis step rotation Store Position Save the current rotation angle of polar axis Goto Position Contro...

Страница 24: ...the selected LNB Satellite settings at the time of manufac ture This will be the quickest search Channel Type FTA Free to Air or ALL Free to Air and Pay Channels Service Type DTV DVB TV or Radio DVB Radio or both DTV Radio Polarization The LNB polarization H horizontal V ver tical and AUTO depending on the LNB installation Menu Settings Picture menu Picture Mode Choose from Standard Dynamic User a...

Страница 25: ... 120min 180min 240min and off PC Setup PC mode only Press the OK button to enter the submenu to adjust the Horizontal Vertical position or Size and Phase of the picture To select automatic installation use the up down buttons to highlight the option and press OK OPTIONS menu OSD Language Allows you to select the on screen display menu language Audio Language can only be selected in DTV mode Select...

Страница 26: ...word Enter the current password New Password Enter the new password ew Password Enter the new password You can use the Channel Lock to lock selected channels Press the buttons to select the desired channel and then press the GREEN button on the remote control to lock it To unlock a previously locked channel select the channel and press the GREEN button Note In order to view locked channels you hav...

Страница 27: ...Volume option and then press to set the desired volume Then the output volume will never exceed the set maximumvalue Source Lock Press the buttons to select the Source Lock option and then press OK to enable the menu Press the button to toggle between ON and OFF All signal sources labelled ON will not be available any more in the signal source selection menu Clear Lock Press the buttons to select ...

Страница 28: ...MENU PHOTO MUSIC MOVIE TEXT USB device list MAIN MENU PHOTO MUSIC MOVIE TEXT Navigation options Information of the USB device 3 Press button to sel les on the USB device PHOTO MUSIC MOVIE TEXT to view or play Return to main menu Preview File Information Press buttons to select and the OK button to activat le or open folder Press button t les in full screen mode When in full screen mode press the O...

Страница 29: ...h Screen Saver Press the BLUE button to enter the Screen Saver mode press any button to exit 3 Movie Wat Press buttons to select the option on the menu and press OK button to activate Repeat Select the repeat mode from Repeat All Repeat 1 Repeat None Set A B Select and play the preferabl le by setting A and B at the beginning and end Press OK button to cancel Playlist Display the playlist on the s...

Страница 30: ... the recorded list Note Delete any scheduled recordings out of this list with the RED button Schedule List Press the A button on the remote control to display the recorder schedule list Note Delete any scheduled recordings out of this list with the RED button Timer Record When selecting a programme in the EPG for Timer record the Recorder menu will appear Press OK and the Timer will set automatica...

Страница 31: ... and exit the navigation menu by pressing the EXIT button While you are recording you can press the play button and watch what has already been recorded When you press the Pause Play button the picture will be paused and the navigation menu will displayed on screen While you are doing a time shift recording you can press the play button and watch what has already been re corded EPG Recording Displ...

Страница 32: ...here is no disc in the DVD player the screen will show NO DISC Insert Disc according to picture next to disc slot Do not touch the playing surface Hold the disc around the outside with your fingers and place the disc into the slot The player will automatically draw the disc into the player To Eject the disc press the EJECT button on the TV or the button on the remote control Enter the DVD Setup me...

Страница 33: ...ng to the disc in the tray NTSC Au Subtitle Disc Menu dio Choose the language you want to watch your DVD in Only if the language is recorded to the DVD will this option be functional Enter the Audio setup page using button press ok see the options This menu is only available when in DVD mode and no DVD is playing or the DVD has been stopped This is selected when the player is connected to a NTSC s...

Страница 34: ...h densitycompressed data that needs proper handling 1 Hold the disc with fingersby outer edge and or the center spindle hole Do not touch the discs surface 2 Do not bend or press the disc 3 Do not expose the disc to direct sunlight or heating sources Stere discs in cabinet vertically and in dry condition Prevent exposure to Direct sunlight Heat or exhaust from a heating device Extreme humidity Cle...

Страница 35: ......

Страница 36: ...aste If the battery or accumulator contains more than the values of lead Pb mercury Hg and or cadmium Cd in the Bat tery Directive 2006 66 EC then the chemicals Hg Cd Pb symbols for lead Pb mercury Hg and or cadmium Cd will appear below the crossed out wheeled dust bin symbol By participating in separate collection of batteries you will help to assure the proper disposal of products and batteries ...

Отзывы: