


18
Destination 2.3 Insert Installation and Operation Manual
5 Burning Wood Efficiently
5.1 The First Fires
Two things will happen as you burn your first few fires; the paint cures and the internal components
of the insert are conditioned.
As the paint cures, some of the chemicals vaporize. The vapors are not poisonous, but they do smell
bad. Fresh paint fumes can also cause false alarms in smoke detectors. So,
when you first light
your insert, be prepared by opening doors or windows to ventilate the house
. As you burn
hotter and hotter fires, more of the painted surfaces reach the curing temperature of the paint. The
smell of curing paint does not disappear until you have burned one or two very hot fires.
Burn one or two small fires to begin the curing and conditioning process
. Then build bigger
and hotter fires until there is no longer any paint smell from the insert. Once the paint smell
disappears, your insert is ready for serious heating.
5.2 Lighting Fires
Each person who heats with wood develops their own favorite way to light fires. Whatever method
you choose, your goal should be to get a hot fire burning quickly. A fire that starts fast produces less
smoke and deposits less creosote in the chimney. Here are three popular and effective ways to start
wood fires.
Allow the insert to reach operating temperature
(approximately one hour)
before turning on the blower
,
since increased airflow from the blower will remove heat and
affect the start up combustion efficiency.
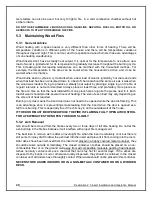
The insert's blower assembly is equipped with a heat
sensor. Therefore, you can leave the switch in the automatic
position (3). The blower will start automatically when the
insert is hot enough and it will stop when the insert has
cooled down. You can also set the switch to the manual
position (1) to operate the blower at any time. Select the
position (2) to manually stop the blower.
Содержание Destination 2.3
Страница 6: ...6 Destination 2 3 Insert Installation and Operation Manual CERTIFICATION PLATE ...
Страница 10: ...10 Destination 2 3 Insert Installation and Operation Manual 2 3 Dimensions ...
Страница 46: ...46 Destination 2 3 Insert Installation and Operation Manual ...
Страница 48: ...48 Destination 2 3 Insert Installation and Operation Manual Appendix 5 Log retainers installation 1 2 3 ...
Страница 52: ...52 Destination 2 3 Insert Installation and Operation Manual Appendix 8 Exploded Diagram and Parts List ...
Страница 55: ...Destination 2 3 Insert Installation and Operation Manual 55 ...
Страница 56: ...56 Destination 2 3 Insert Installation and Operation Manual ...