16
17
Operation
GB
IE
GB
IE
In more detail...
ENB520GRB by Energer
ENB520GRB by Energer
In more detail...
Care and maintenance
General operation
Grinding wheel replacement
General cleaning
1. Clean the product with a dry cloth. Use a brush for areas that are hard to reach.
2. Check for worn or damaged parts. Replace worn parts as necessary or contact
an authorised service centre for repair before using the product again.
The golden rules of care
1. Keep the product clean. Remove debris from it after each use and before storage.
2. Regular and proper cleaning will help ensure safe use and prolong the life of the
product.
3. Inspect the product before each use for worn and damaged parts. Do not operate
it if you find broken and worn parts.
NOTE: Do not use chemical, alkaline, abrasive or other
aggressive detergents or disinfectants to clean this
product as they might be harmful to its surfaces.
WARNING! Always switch the product off, disconnect it
from power supply and let the product cool down before
performing inspection, maintenance and cleaning work!
WARNING! Only perform repairs and maintenance
work according to these instructions! All further works
must be performed by a qualified specialist!
1. After switching the grinder on, allow it to reach full speed before performing
grinding operation.
2. The eye shields are able to be adjusted and should be positioned to allow the
operator a clear view of the work through the shields.
3. The appropriate adjustments of the tools rests will provide the correct working
angle for efficient grinding. As the diameter of the grinding wheel is subject to
wear. It will be necessary to re-adjust the edge of the grinding wheel.
Fix the grinder to horizontal, stable surface before using. Positing the grinder towards
the front edge of the bench will facilitate the handing of long tools. If possible, leave
space to the left hand side of the machine for easy access to the wet wheel. An
alternative method is to secure the grinder to a sheet of plywood which can then be
clammed to a bench or table to present the grinder in the most convenient position.
Before using the dry wheel ensures that the spark guard (behind the eye shield) is
positioned as close to the surface of the wheel as possible and that the eye shield is
in a position to prevent sparks flying up. It is a sensible precaution to wear safety
spectacles as well when operating a grinding machine.
The dry wheel can be used for grinding profiles or virtually any cutting tool; plane
irons, chisel, gouges, turning tools, drill bits, etc. The aluminum oxide will cut cleanly
and without undue heating of the tip of the tool. However care should be taken not to
grind a tool too hard or for too long in case over-heating occurs.
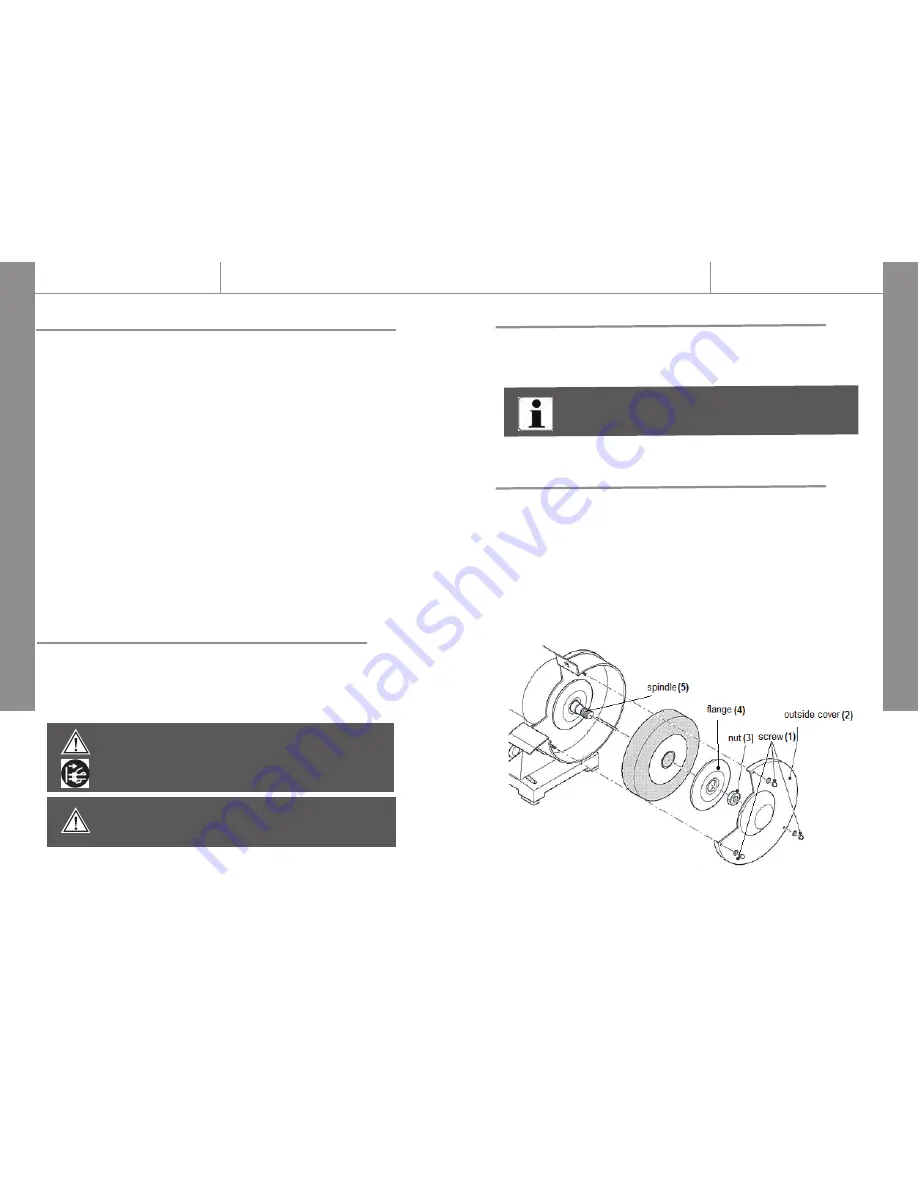
To renew or change the grinding wheels, follow these series of steps:
1. Switch off the unit and disconnected from the mains supply.
2. Remove the fixing screws(1) on the outside cover(2) and then pull out the
outside cover(2).
3. Remove the nut (3) from the spindle (5) using spanner supplied. The nut on the
right spindle has a right thread; the nut on the left spindle has a left thread.
4. Take out the outer flange (4) from the spindle (5).
5. Place the new wheel onto the spindle. once secured rotate the grinding wheel by
hand to confirm that the wheel moves freely and doesn't contact any surfaces.
6. Reassemble the flange, nut, and outside cover.
7. Switch on the machine and let the wheel run with no load for one minute to
check for cracks.


