background image

ENEO Admin User’s Manual


64 


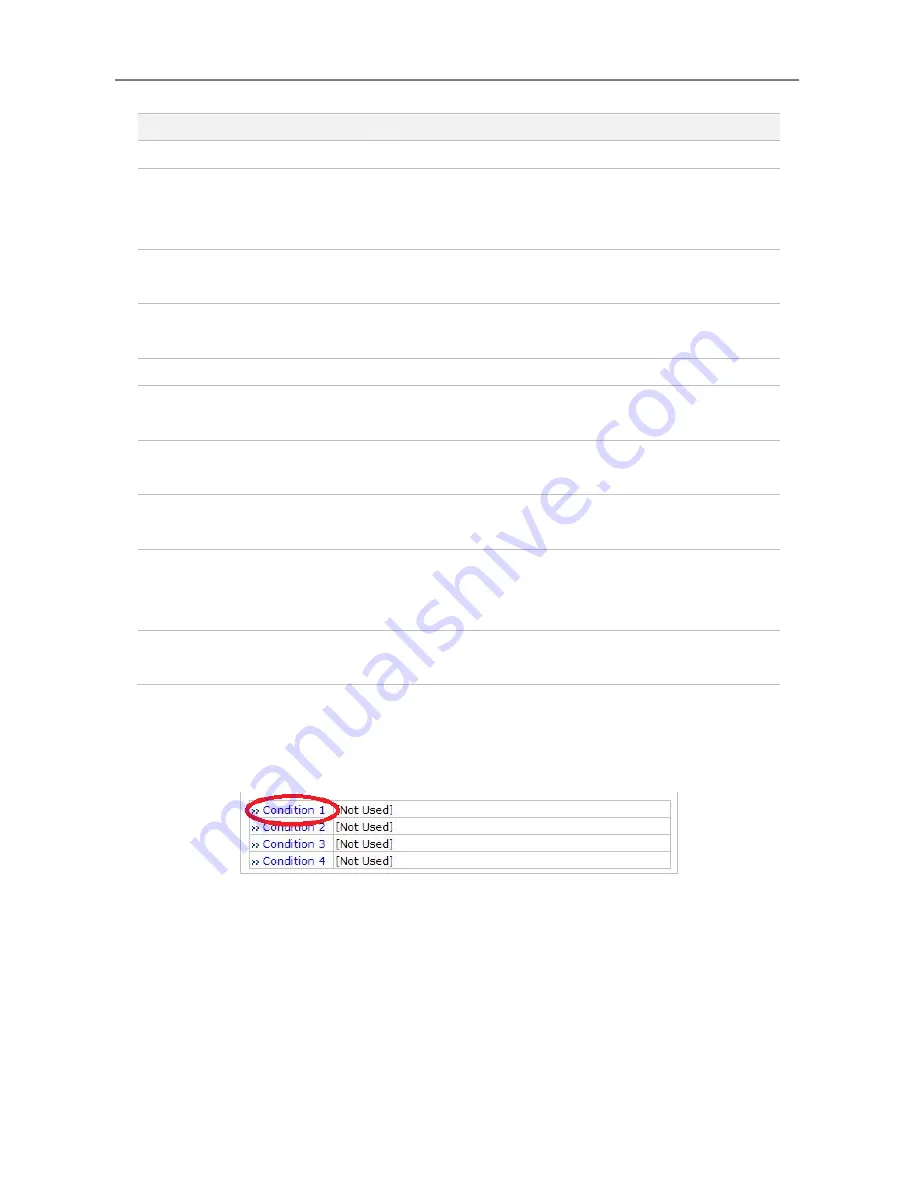
Up to 4 different recording conditions can be set per camera. All the conditions are checked by 

OR

 logic, so it will start recording when at least one of the conditions is met. To set a condition, 

click 

Condition 1

, then Condition setup screen will be displayed. 


Item 

Description 

Condition 1~4 

Set the conditions for recording 

Graphs for Time, Day of week, 
Alarm, Motion, Camera 
Connection 

Graphic displays of conditions for recording 

Recording Service 

Click 

Enable

 to record the video. Click 

Disable


otherwise. 

Server Module ID 

Server ID number of the added VS Module ID (IP 
Devices). 

Camera Number 

Camera number to select. 

Camera Name 

The name of the camera selected. Use up to 31 
alphanumeric or 15 Unicode characters. 

Pre-Recording Speed 

Recording speed before Event. Valid only when 
Recording condition is set to 

Always

 or 

Schedule

Pre-Alarm Count 

The number of frames stored before Event. Up to 5 
frames. Valid only for 

Event-Driven Recording

Post-Recording Speed 

Recording speed after Event. Valid only when 
Recording condition is set to 

Event-Driven 

Recording

Post-Alarm Count 

The number of frames stored after Event. Up to 5 
frames. Valid only for 

Event-Driven Recording

Содержание PXD-2080MIR C

Страница 1: ...Full Manual Mega Pixel Network Dome Camera PXD 2080MIR DE EN FR PL ...

Страница 2: ...nections 8 EMI Ferrite Core Connections 9 Setup Menu 9 In the menu 9 MAIN Menu 10 SYMBOL descriptions for joystick operation 10 EXPOSURE Menu 11 BLC Menu 12 HSBLC Menu 13 LENS Menu 14 FOCUS ADJ Menu 14 DAY NIGHT Menu 15 DAY NIGHT AUTO menu and IR SMART menu 15 NR menu 16 PICT ADJ Menu 17 SPECIAL Menu 18 D ZOOM menu 18 CAM TITLE menu 19 MOTION menu 20 PRIVACY menu 20 PIXEL COMP menu 21 Dimensional ...

Страница 3: ...3 Specifications 23 Smart Viewer User s Manual Appendix A Web Admin User s Manual Appendix B ...

Страница 4: ...ivity about 10x at night time Can accepts the infrared light With 24VAC 12VDC dual power PoE Power Over Ethernet design Offers the flexibility of installation Ensures the reliability Main features are 1 3 Panasonic Progressive Scan CMOS imager 1280x720 30p 25p 1920x1080 30p 25p with 1 3MP 2MP Sensor 16 9 Video format for most popular commercial HDTV monitors Switchable HDTV standard for EU and US ...

Страница 5: ...ase ⓖ OSD control joy stick ⓗ Video Sub output ⓘ Clear bubble ⓙ Ring cover fixing screws x3 ⓚ Ring cover ⓐ Zoom Focus ⓑ Lens hood ⓒ Light sensor for IR LEDs ⓓ IR LED ⓛ Pipe hole ⓜ Dome base fixing screw taps x3 ⓝ Surface mount holes x4 ⓐ ⓑ ⓒ ⓓ ⓔ ⓕ ⓖ ⓗ ⓘ ⓙ ⓚ ⓛ ⓜ ⓝ ...

Страница 6: ... dome base to mount base by using wrench bolts And tighten wrench bolts 5 Route the power video cable to the connecting place CAUTION Care should be taken the cable is NOT to be damaged kinked or exposed in the hazardous area 6 Set the camera s angle Pan Tilt inclination 7 Adjust Zoom Focus ⓐ by using focus adjust driver 8 Put bubble over dome base and tighten ring cover fixing screws ⓙ 3x by usin...

Страница 7: ...crews x3 by using L shape hex wrench CAUTION Tighten enough ⓙRing cover fixing screws x3 so that there should be NO gap between ⓑLens hood and ⓘClear bubble to avoid the light inflow from IR LEDs Ceiling or wall Mount screws Dome base Bubble L Wrench Flush Mount Setup of the Zoom and FOCUS Remove the dome bubble assembly and power up the camera Adjust ⓐZoom setting using focus adjust driver Adjust...

Страница 8: ...alignment Inclination limited to 60 max 3 Adjust ⓐZoom Focus 4 Enter SETUP menu again 5 Restore FACTORY DEFAULT by MAIN menu 2 CAMERA RESET See 7 15 CAMERA RESET 6 Save the restored parameters by moving cursor to SAVE ALL and pressing button 7 Set all other functions if necessary 8 Save the changes by moving cursor to SAVE ALL and pressing button 9 Exit SETUP menu Limit of Pan and Tilt Camera can ...

Страница 9: ... EMI Ferrite Core as shown below EMI Ferrite Core Connections Setup Menu In the menu Setup menu can be accessed and controlled by OSD control joy stick on the side of camera Five commands are available with the joy stick The design of OSD could be different according to the Model SD Card Slot VIDEO SUB OUT connector IP Reset Joystick 50mm 50mm ...

Страница 10: ...enses can be set in the menu FOCUS ADJ Helps adjust the exact needle focus by simulating DAY NIGHT and avoids from out of focus at night DAY NIGHT AUTO Sets DAY NIGHT to EXT AUTO COLOR and B W EXT Used when DAY or NIGHT is determined by the external light sensor Camera with IR LED must be set to EXT AUTO Used when DAY or NIGHT is determined by the light level through the lens and DAY from to NIGHT...

Страница 11: ...25s 30s 1 50000s for 2MP 3 Color rolling or Video level hunting under Fluorescent or similar lighting may occur in this configu ration 4 Any other fixed shutter settings are not recommended with a fixed iris lens AGC 20 AGC default is 20 and can be set between 1 32 When AGC is equal to or lower than 13 DAY NIGHT function becomes disabled and changes to COLOR mode forcibly if DAY NIGHT was AUTO mod...

Страница 12: ... brightness of the object in the BLC window regardless of other area s saturation BLC Factory Default Descriptions GAIN MIDDLE GAIN is the value how much the object s brightness compensates Higher GAIN compensates the object brighter but other area becomes saturated and noise increases BLC may not be perfect if the background is varying continuously in bright and dark AREA Sets the location and si...

Страница 13: ...ON ON enables the selected window Window position and size can be set by pressing at EXPOSURE BACKLIGHT HSBLC WINDOW ON LEVEL 50 LEVEL determines the video level that starts cutting out Lower setting starts the cut out at lower level The cut out area is masked with black colour MODE ALL DAY Sets ALL DAY or NIGHT ALL DAY enables HSBLC regardless of DAY or NIGHT mode NIGHT enables HSBLC only when ca...

Страница 14: ...ature that prevents from the wrong focus and helps the EXACT NEEDLE focus by simu lating DAY NIGHT conditions Set zoom first and adjust focus to get NEEDLE FOCUS while swit ching AT DAY AND NIGHT Horizontal wave or bar noises may be seen during FOCUS Adj mode when the camera is working under the fluorescent or similar lights but it is a temporary problem caused by simulating DAT NIGHT FOCUS ADJ Fa...

Страница 15: ...IGHT feature and works as a regular B W camera and IR CUT FILTER is removed to pass the infrared spectrum from the light In EXT camera follows the decision for DAY or NIGHT by the light sensor built in the camera A camera with IR leds must be set to EXT DAY NIGHT AUTO menu and IR SMART menu DAY NIGHT is usually set to AUTO for cameras without IR LEDs while it must be set to EXT for a camera with I...

Страница 16: ...all between D N THRES and N D THRES LEVEL to avoid the switch repeating N D THRES 80 N D LEVEL is a threshold level to switch from NIGHT to DAY Higher value makes camera exited NIGHT at brighter light level TO EXIT NIGHT MODE AT BRIGHTER ILLUMINATION INCREASE it and vice versa Try NOT to make the gap too small between D N THRES and N D THRES LEVEL to avoid the switch repeating CAUTION 1 DAY NIGHT ...

Страница 17: ...ly monitors motion on the screen When NO motion is detected 3DNR is automatically activated for the maximum reduction of noise at low light This will save more HDD in DVR 3DNR becomes immediately deactivated for the smooth motion capture for the moving target without the tail effect of a comet at low light if the motion is detected PICT ADJ Menu In PICT ADJUST menu WHITE BAL SHARPNESS MONITOR OSD ...

Страница 18: ... is adjustable for the best view with LCD monitor Low GAMMA compensates the dark area a little but contrast becomes less a little High GAMMA increases contrast but looses the visibility at dark area For CRT BLACK LEVEL BLUE GAIN or RED GAIN is adjustable OSD COLOR OSD color can be set out of 8 colours Selected colour is applied to menu text and camera title OUTLINE of OSD is displayed if ON BACK T...

Страница 19: ...ith this feature See PIXEL COMP TV SYSTEM EU 50HZ or US 60HZ Sets US 60HZ for US HDTV standard or EU 50HZ for EU HDTV standard CAM TITLE menu To enter CAM TITLE menu press at MAIN SPECIAL CAM TITLE ON Up to 15 characters from the character table can be input Use to move cursor Blink character is on the cursor position in the character table Press to select and the selected character will be input ...

Страница 20: ...ssing when WINDOW is ON POSITION to SIZE change can be done by pressing SENSITIVITY 40 Sets the sensitivity how sensitively motion will be detected for the window selected by AREA SELECT Low value is the most sensitive detection for motion MOSAIC VIEW ON MOSAIC VIEW setting is applied for all areas ON enables the mosaic display for the motion area and MOTION warning on the bottom of monitor OFF di...

Страница 21: ...ng the amplitude defined by LEVEL However lens cap is strongly recommended for closing lens be cause some lenses are not closed perfectly by its iris DEFECT Factory Default Descriptions LIVE DPC AUTO LIVE DPC compensates the defective pixels at real time for whose pixel amplitude exceeds the threshold AUTO Enables LIVE DPC and dynamically compensates the defect pixels whose amplitude ex ceeds the ...

Страница 22: ...t pixels exceeding LEVEL will be compensated and cleared Lower setting in LEVEL compensates more pixels up to 1024 pixels but too low setting can t com pensate the entire image because most of regular noise are detected as a defect pixels at the top area of image and the number of defect pixels are filled with them up to 1024 PIXEL BOOST X4 It is easier to detect with PIXEL BOOST High PIXEL BOOST ...

Страница 23: ...UAL Electronic shutter 1 25 1 30 1 50 000s Function 3DNR SMART IR D WDR MOTION DETECT PRIVACY MASK MIRROR BLC HLC Digital ZOOM Anti Fog OSD Language ENGLISH GERMAN FRENCH ITALIAN POLISH SPANISH CHINESE I II JAPANESE Video Encoding H 264 MJPEG dual streaming Video Format max 1920x1080 Frame Rate 30fps max Exact FOCUS Setting Aid Patented Day Night simulation Magnification on Aux video Connectivity ...

Страница 24: ...Smart Viewer User s Manual 1 eneo Smart Viewer User s Manual Version 1 1 0 4 eneo ...

Страница 25: ...ware of how to install and use the network equipment such as LAN Hub router and having basic knowledge of network terminologies If you have any questions regarding network installations please contact your network equipment vendor or network administrator or Internet service providers For updated contents detailed features and other applications from eneo please refer to the user s manual in CD RO...

Страница 26: ...nfiguration 9 4 1 Channel Control Bar NVS or Network Camera only 9 5 Video Control 9 5 1 Display method 9 5 2 OSD Channels Buttons 9 5 2 1 Saving as Image File 9 5 2 2 Saving as Video File 10 5 2 3 Manual Recording 12 5 2 4 Instant Playback 12 5 3 Extended Features 13 5 3 1 Pausing Live Video 13 5 3 2 FPS Control 14 5 3 3 Image Rotation 14 5 3 4 Navigate on Mini Window 14 6 I O control 15 6 1 Audi...

Страница 27: ...Smart Viewer User s Manual 4 eneo 8 2 Server 19 8 3 Video 19 8 4 Audio 20 8 5 PTZ Function 21 8 6 Relay Output 21 8 7 Others 21 ...

Страница 28: ... live video streams transmitted from eneo Servers Plays audio transmitted from eneo Servers Transmits audio from PC with Smart Viewer to eneo Servers Stores live video screen as image files Stores live video streams as video files Controls Relay Output of eneo servers and cameras Controls the PTZ function of supported cameras Displays live videos in full screen mode Supports Flexible Extra System ...

Страница 29: ...nection is not available it s possible to manually install the program file in advance and connect to the eneo Server later 2 1 1 Installing on Web Browser Click Live View after access to eneo Server on Internet Explorer If you re using Windows XP Service Pack 2 or later the Information message will show up just as below Click the Information message If the Information message doesn t come out due...

Страница 30: ... Viewer window will be displayed 2 1 2 Manual Installation When the Internet connection is not available or having some difficulties you can manually download and install the Smart Viewer program file Execute the downloaded file and you will see the Smart Viewer Setup Wizard window as shown above Click the Install button to start installing The following window will be displayed during the install...

Страница 31: ...isplayed Click the Finish button 2 2 Uninstalling Smart Viewer There are two ways to uninstall Smart Viewer program from your computer Before uninstalling close all the Internet Explorer windows 2 2 1 Uninstalling with Program Menu Click the Uninstall and the following window will be shown Click the Yes button ...

Страница 32: ...r User s Manual 5 eneo If the uninstalling is successful the following window will be displayed Click OK to finish 2 2 2 Uninstalling on Control Panel Click Start button on the screen then select the Control Panel ...

Страница 33: ...eneo In the Control Panel window double click the Add or Remove Programs icon You will see the Currently installed programs list Click Smart Viewer button and then click Change Remove button It will start uninstalling process then ...

Страница 34: ... Server on Internet Explorer and select Live View on the main menu The appearance of Smart Viewer window varies depending on what type of eneo Server is connected to Network Video Server Network Camera Server or Network Video Recorder Each Smart Viewer window is shown below respectively Smart Viewer window for Network Video Server or Network Camera ...

Страница 35: ...ate video pause storing images or video Relay Output control audio mute FES data indication Audio Control Bar Adjust audio control of eneo Server and volume of MIC and Speaker PTZ Control Bar Control PTZ function Live View screen Display live view video of eneo Server OSD Channel Buttons Snapshot AVI saving force recording NVR only instant playback ...

Страница 36: ...splayed as the original resolution Use the scroll wheel of mouse for zooming in and out If the video becomes larger than the window size a small screen is displayed to show location of the window in the video Pressing the middle button of the mouse scroll wheel will display the video in actual size You can also use keys for zoom in zoom out and original size If video is smaller than the screen it ...

Страница 37: ...iewer Live video currently displayed can be captured and recorded as a video file in AVI format Select a live view you want to save and click Rec Avi button on OSD Channel Buttons Clicking it again will finish recording Max duration is 10 minutes and recording will be stopped after 10 min Note If live view video is in MJPEG format the image will be saved as a JPEG file If the video is in MPEG 4 or...

Страница 38: ... file will be generated in SMI subtitle format which puts time stamp every second When you play back the recorded video the time stamp will be displayed as a subtitle on the video screen as shown the picture below Note When you play back videos recorded from MPEG 4 or H 264 proper CODEC s may be required ...

Страница 39: ...nnel Buttons or by running SmartPlayer program To finish push the button again Max duration is 1 minute and recording will be stopped after 1 minute 5 2 4 Instant Playback For the Products with local storage such as NVR or NVS NC with Micro SD the Instant Playback is supported Clicking the Instant Playback button from OSD menu will open below window Instant playback will scan the video data up to ...

Страница 40: ...nu will appear for extended features as shown below 5 3 1 Pausing Live Video Click the Pause button to stop and resume live view video Set the beginning of video data Instant playback will scan 1 min after this Se the playback speed Begin searching data Playback Reverse playback 1 frame playback 1 frame reverse playback Pause Stop ...

Страница 41: ...supported 5 3 3 Image Rotation By using this feature you can make mirrored horizontal or flipped vertical image from the original 5 3 4 Navigate on Mini Window Mini window helps users to find which portion of entire live view is being displayed Mini window can be displayed or hidden Click the right mouse button on the Live View Screen and select the Navigation ...

Страница 42: ...it will start sending the audio from PC s audio input port To disconnect the audio connection click the Disconnected button You can use volume control slider to adjust the audio level 6 1 3 Mute Audio Select the Mute Audio from the pop up menu on the Live View screen Click it again will restore it to previous condition 6 2 Relay Output Control By using Relay Output control you can control external...

Страница 43: ...ed to it you can control them on Smart Viewer You will also be able to use a Joystick to control PTZ device if your computer has a Joystick connected to it Connect a PTZ enabled camera to the eneo Server go to the Admin menu of the Web page and then set up the PTZ parameters as described in eneo Server User s manual On Smart Viewer select a channel connected to a PTZ device and use PTZ Control bar...

Страница 44: ...odes Step and Continuous modes Step mode Camera moves as much as previously defined each time This mode is effective for remote cameras with slow network condition Continuous mode Camera keeps moving while direction control buttons is pressed This mode is effective for local camera with fast responsiveness Provides an extended use of PTZ Works only with registered Groups and Tours It can be used f...

Страница 45: ...ull screen mode Press ESC key to return to normal mode Display image size as it is Zoom in out through mouse scroll is available Clicking wheel button will show original image size keys such as can be used Fit the live view size to window size Zoom in out will not be supported in this mode Full screen mode Zoom in out will not be supported in this mode Redraw the live video after median calculatio...

Страница 46: ...is cause by deleting any part of Smart Viewer Uninstall and reinstall Smart Viewer 8 2 Server Q It shows a message saying that Failed to retrieve server information from Smart Viewer or unauthorized user access A Make sure the followings The access to eneo Server is good on Internet Explorer At least one camera is authorized for video viewing At least one remote server is registered if you re runn...

Страница 47: ...ou have enough space in hard drive Q Video recording stopped by itself A Video can be saved up to 10 minutes It automatically stops recording if it exceed the 10 minutes It also stops recording when image size is modified video codec is changed or video input is removed For network video recorders video input is removed when it is moved to other group For network video servers or cameras video inp...

Страница 48: ...d features 8 6 Relay Output Q Relay Output button won t be activated A The second channel of Dual Stream can be controlled only after Primary channel is set up for Relay Output control Also make sure that eneo Server is connected to the network Q Relay Output button won t work A Make sure that eneo Server is connected to the network 8 7 Others Q An error occurs if Internet Explorer is closed while...

Страница 49: ...Web Admin User s Manual Version 4 15 ...

Страница 50: ...ep 2 Time Setup 11 2 3 Step 3 Network Setup 11 2 4 Step 4 IP CCTV DNS 11 2 5 Step 5 Recording Configuration for eneoNVR series 11 2 6 Finish 11 3 System Configuration Menu 12 3 1 Server Name Setup 12 3 2 Date Time 13 3 3 Admin Password 13 3 4 Access Control 14 3 5 User Registration 15 3 5 1 Add 15 3 5 2 Edit 16 3 5 3 Delete 17 4 Network Configuration 17 4 1 Network Configuration 18 ...

Страница 51: ...Status 21 4 5 Network Status Notify 22 4 6 IP CCTV DNS Setup 24 4 7 Port Forwarding UPnP 25 4 8 RTP RTSP Setup 26 4 9 SNMP Setup for Cameras 26 5 Device Configuration 29 5 1 Serial Ports 29 5 1 1 Serial Input Mode 29 5 1 2 Serial Output Mode 32 5 1 3 Transparent Mode 32 5 2 Privacy Zone 33 5 3 Camera Motion 34 5 4 DI Sensor Input DO Alarm Output 40 6 Advanced Configuration 42 6 1 Advanced Services...

Страница 52: ...ach Input 48 6 1 6 Alarm Output Service Configuration 49 6 1 7 Alarm Output Service Configuration for each Output 49 7 Recording Configuration 58 7 1 SD Configuration 58 7 2 Recording Configuration 58 7 3 View Recording Profile 70 7 4 Recording Mode 71 7 5 SD Status Report 72 7 6 Clear Recording Configuration 74 7 7 Delete Recorded Data 74 8 Utilities 75 8 1 System Log 75 8 2 Save Configuration 76...

Страница 53: ... users are familiar with network equipment such as LAN Hub router and having basic knowledge of network terminologies If you have any questions regarding network installations please contact your network equipment vendor or network administrator or Internet service providers For updated contents detailed features and other applications from eneo please refer to the user s manual in CD ROM provided...

Страница 54: ... Menu of eneo Servers After connecting to a eneo server on the web browser you ll find the web page as shown below The rightmost item of the menu is Admin where you can set up the most of features in the eneo Server you re connecting to ...

Страница 55: ...d in you can change the password to a new one Now the Admin Menu will be displayed as shown below This will guide you to the top level menu items which are Quick System Network Device Advanced Recording and Utilities Clicking any of these top level menu items will display submenu items and brief descriptions 1 2 Admin Menu Structure The following table shows the hierarchy of the Admin menu structu...

Страница 56: ...Date Time Admin Password Access Control User Registration Network Configuration Network Configuration n a n a Network Ports Bandwidth Control View Network Status Network Status Notify IP CCTV DNS Port Forwarding UPnP RTP RTSP SNMP Device Configuration Serial ports Serial Input Mode n a Serial Output Mode Transparent Mode Privacy Zone n a n a Camera Motion Camera Control n a Motion Detection ...

Страница 57: ... FTP Periodic Camera 1 Camera 2 Sensor Notification Camera 1 Camera 2 Alarm Output Camera 1 Camera 2 Sensor Notification Camera 1 Camera 2 Camera 3 Camera 4 Alarm Output Camera 1 Camera 2 Camera 3 Camera 4 Recording Configuration SD Configuration SD Status Format SD Information n a Recording Configuration Built in Module 0 Camera 1 Camera 2 Camera 3 Camera 4 Built in Module 1 registered cam Camera...

Страница 58: ... you will be able to set up many of the essential parts of the configuration in a simple manner without going into details Selecting Quick Configuration gives you the menu as below You can perform each setup by clicking the one you would like to configure 2 1 Step 1 Changing Server Name Click Server Name on System Configuration menu then Server Name Setup windows will be displayed See the section ...

Страница 59: ... DNS When eneo Server is used in a Dynamic IP environment it is required to utilize IP CCTV DNS feature See the section 4 6 IP CCTV DNS Setup in page 24 to see how to set up 2 5 Step 5 Recording Configuration for eneo Each camera can be configured for recording option in this section 2 6 Finish Save configuration You need to save all the changes to the Flash Memory after finishing the configuratio...

Страница 60: ...ion such as model number of the eneo Server server name MAC address serial number firmware version and Web image version As an administrator you can change the name of the server name but other values are not allowed to change To change the server name enter a new server name in the Server Name filed You may use up to 21 alphanumeric or up to 10 Unicode characters Tab or any other special characte...

Страница 61: ...ged Date and Time setting simply click Apply button to take it into effect immediately If you want to retrieve the exact current time from NTP server on the network click Get NTP Server Time button Clicking Refresh button will display the date and time retrieved from eneo Server Then click Apply button to save it 3 3 Admin Password To change the password for the administrator click Admin Password ...

Страница 62: ...assword with a new one the existing network connection made with old password to eneo Server is lost now You will have to reconnect to the eneo server using new password 3 4 Access Control Click Access Control on System Configuration menu The following windows will be displayed From the Access Permission window select either one you would like to use Click Apply button to save the change Full Acce...

Страница 63: ...ers In both Password and Confirm Password fields enter the identical password respectively The password must be between 4 and 23 alphanumeric characters In Name filed enter the user s name that must be up to 31 alphanumeric or 15 Unicode characters Now select one of the four items from System Resource Access Permission which defines the permission level for registered users to the eneo server All ...

Страница 64: ...o set up between 1 and 4 Alarm Control Determine if Alarm control is to be allowed PTZ Control Determine if PTZ Control is to be allowed Audio Control Determine if Audio Control is to be allowed Playback Determine if searching can be done by recording conditions After finishing the registration process click Apply button to add the user 3 5 2 Edit To edit a user account select Edit In this part yo...

Страница 65: ...ronment which is static IP dynamic IP DHCP or PPPoE For wireless LAN additional configuration is necessary to have a connection with wireless AP In the case of wireless models users have to choose between wired or wireless connection In other words both connections can t be used at the same time The way how to choose one of them is whether wired LAN cable is plugged into the product When LAN cable...

Страница 66: ...figuration 4 1 1 Static IP Configuration Selecting Network Configuration under Network configuration will show variables Below picture is for products without wireless LAN For static IP select static IP and input values for IP address NetMask Gateway DNS1 DNS2 and click apply for saving settings After apply program will ask closing web brower for updates which will take 20 30 seconds If Back butto...

Страница 67: ...guration PPPoE is used to connect eneo products to PPPoE modem provided by ISP Since PPPoE needs verification ID and password are necessary to access network Type ID and PW 4 2 Network Ports In this configuration you set up the HTTP port for eneo Server to communicate with the Client PC HTTP Port is the network port that is used when a Client PC connects to the eneo Server s Web page It can be ...

Страница 68: ...ed data is exceeded part of data will be randomly lost If multiple users try to access a eneo product which bandwidth control is enabled users connected to the eneo product will share network bandwidth limit Note If the HTTP port number is changed to other value than default 80 make sure the new HTTP port number goes together with the eneo Server s Internet address For example when eneo s IP addre...

Страница 69: ...ell in M JPEG video transmission But for MPEG 4 and H 264 dropping data packets may cause low quality of video so it is recommended to utilize CBR and frame rate control instead of bandwidth control for MPEG 4 and H 264 video Note Network Bandwidth control is managed by eneo Server and it drops any data packets if required thus you may experience slow connection to the server when the feature is e...

Страница 70: ...s network status will be emailed to a specific person in case of the following events When it is set to Dynamic IP on Network Configuration menu and the eneo server has been given a new dynamic IP address and connected to the network Or When it is set to PPP Client on WAN Modem menu and the eneo server has been connected to the network with ISP or PPP server To configure click Network Status Notif...

Страница 71: ...ill show the message was sent from the eneo server as a notification Now enter the email addresses of the recipients in the Recipient fields up to 3 persons In the User Defined Message box you may put a message to explain why the message was sent After finishing the setup click Apply to save settings Mail Notification Enable Send email Disable Do not send email SMTP Server SMTP Server address for ...

Страница 72: ... CCTV DNS server http www ipcctvdns com and register eneo products with MAC address and Product Key Those information can be found from IP CCTV DNS Setup menu Enable service and click Apply If it is configured properly you can check the result by clicking Confirm button Password Password for SMTP server Sender Email address of Sender 1st 2nd 3rd Recipient Email Addresses of the Recipients up to 3 ...

Страница 73: ...cts to IPCCTVDNS server and IP CCTV DNS service should be enabled There are 3 options in UPNP Port Forwarding Manual User Assigned Port is used when users can access network router hub and manually assign available network port to eneo products In this case users have to type already assigned network port under User Assigned port UPnP User Assigned Port is used when users want eneo products to con...

Страница 74: ...me Player or VLC program can be used for this but it may not be supported in the environment within firewall There are two types of usages one for Unicast address condition and the other for Multicast address condition For Unicast Address Use rtsp network video server ip address cam0_0 If there are multiple channels use cam0_x x 0 3 with each number applied If there are multiple modules use camx_0...

Страница 75: ...each module number applied Service Enable Start RTSP service Disable Stop RTSP service RTSP Port In normal case use default port number 554 to connect to RTSP service If not using port 554 enter the port number you want to use e g port number 445 rtsp network video server ip address 445 cam0_0 RTP Start Port The starting number of the port for video transfer Each time video transfer connection is ...

Страница 76: ...nd configure network status of a network device SNMP V1 and V2 are supported over MIB2 standard and few functions are not supported SNMP Trap can function when SNMP V1 V2 is enabled SNMP V1 V2 Enable Start SNMP service Disable Stop SNMP service Trap Enable Start SNMP Trap service Disable Stop SNMP Trap service Destination IP Address IP Address to receive SNMP Trap messages Trap Community Key value...

Страница 77: ...l Input Mode When serial ports are in Serial Input Mode eneo Server can be triggered by the external sensors to send images from the camera by email or FTP It can also activate Alarm Output by input from sensors inputs For example in a real life if a dam s water level comes to a pre defined value the server can send the images of the dam s water level meter from cameras Another example is when a c...

Страница 78: ...yed as shown below Current Port This shows the name of the port currently configured Current Protocol This shows the protocol being used only RS 232 can be displayed Serial Input Model You can select the sensor s model number to use for Serial Input The following example is when a speed sensor is selected Note If additional sensors need to be added it will require installation of the device driver...

Страница 79: ...tring from sensor Initial String Data The initial string from sensor Speed Delay select Enable if sensor input needs delay Internal process delay The amount of delay for sensor input Sensor Aiming Position The position for sensor to aim Camera Aiming Position The position for camera to aim Add Vehicle length to calculate delay time The length of vehicle for applying delay time ...

Страница 80: ...col by RS 232 or RS 485 422 communication In the picture below serial output mode can be selected among By Pass X10 or Z256 5 1 3 Transparent Mode When there are two eneo Servers present on the network they can act like a transparent interface between two different UART devices so that the communication between the UART devices can be made transparently without a flaw Line Mode The type of communi...

Страница 81: ... used to send data Peer IP IP address of other eneo server Network Port Network port number of the server Data Start Pattern Data start pattern Not used if unchecked Data Size Data size in single transfer Not used if unchecked 5 2 Privacy Zone Users can set a privacy zone if a certain part of the screen needs to be unmonitored To set the region click Privacy Zone from Device Configuration category...

Страница 82: ...menu is used to set up the selection of video format data added to video data encoding speed audio control image resolution video quality motion detection and etc Click Camera Motion on Device Configuration menu The configuration menu will be displayed and it may be different between eneo models H 264 In this format each frame data is related to other nearby frames For this reason it provides much...

Страница 83: ...deo 5 3 1 Camera Motion You can configure the video data format and other information to be contained in it Video with Flexible Extra System data If Enabled video data will contain Flexible Extra Data from COM port Video with user defined message If Enabled video data will contain the user defined data Reserved Field Note For Dual Stream products the most of parameters are dependent on primary str...

Страница 84: ...med audio on PC speakers Frame Rate For Primary Stream this is the number of frames compressed in every second You can control the network traffic with this parameter For Secondary Stream it can be set to manner of 1 2 1 4 1 8 of the primary stream Image Size Select the resolution of each channel s video Encoding Standard Select the compression method of each video either M JPEG or H 264 format It...

Страница 85: ...ENEO Admin User s Manual 37 Camera Name Enter the name of the channel in up to 21 alphanumeric or up to 10 Unicode letters Image Quality Setup ...

Страница 86: ...OP Encoded frames have different data size from each other Image Quality one of 6 quality levels Low Compression Highest High Normal Low Lowest GOP Structure Distance between I Frames That is filled with P frames Rate Control Mode CBR Constant Bit Rate Video frames are encoded with selected image quality and GOP Encoded frames have the same data size as other frames Due to the constant bit rate it...

Страница 87: ...ENEO Admin User s Manual 39 Motion Detection Click Motion Detection on the bottom of Camera Motion Configuration menu ...

Страница 88: ...t of the camera image the Motion Detection does functioning Primary Stream only After configuration is finished click Apply button to save the setting If you click Default button the entire configuration will be reset to the original values 5 4 DI Sensor Input DO Alarm Output Select DI DO from Device Configuration menu to configure Sensor Input and Alarm Output After the setting up select DI Statu...

Страница 89: ...mal Close Type Normal is CLOSED and goes OPEN when triggered by an event DI DO Setup You can define Sensor Input Name and Alarm Output Name as you want which should be up to 31 alphanumeric or up to 15 Unicode characters DI DO Control Note Make sure the type of the sensor and use it correctly to the type If a Sensor Input is not used it must be set to Normal Open Type to avoid a false input ...

Страница 90: ...n be configured to start and stop certain pre defined services by scheduling event or conditions It also has ISENS feature which is a way of integrating eneo with CMS software You can set up the advanced services in Advanced Configuration menu There are two types of advanced service one is Buffered Service and the other is Periodic Service In Buffering Service a series of images are continuously b...

Страница 91: ...Manual 43 In Periodic Service only the image alarm sensor status after an event schedule is reported to you upon the server is triggered 6 1 Advanced Services Pre Alarm buffer size and buffering speed can be defined here ...

Страница 92: ...rver will store images as fast as it can Each cannel can be set with different values This configuration applies to E mail and FTP Buffered and click Save button to apply changes E mail Set up Email Service configuration FTP Buffered Set up FTP Buffered Service configuration FTP Periodic Set up FTP Periodic Service configuration Sensor Notification Set up configuration such as CGI by notification ...

Страница 93: ...Select Enable if SMTP server requires ID and password User ID Enter User ID to log in to SMTP server Password Enter Password to log in to SMTP server Sender Enter email address of the sender 1st Recipient Enter the email address of the first recipient 2nd Recipient Enter the email address of the second recipient 3rd Recipient Enter the email address of the third recipient Click Save button to appl...

Страница 94: ...rvice Setup for Each Channel For each channel the following items can be configured for email service Condition Post Alarm Buffer Size and Post Alarm speed The content of text message and display style of DI value can be configured as well ...

Страница 95: ...e Alarm Post Alarm Images The number of image frames to store after Alarm Pre Alarm Speed This field shows the speed of Pre Alarm Configuration can be done in Advances Services page Post Alarm Speed Select the speed of Post Alarm Fastest is the highest value Subject Subject of the E mail message to send 1 Content of the first line in the email message 2 Content of the second line in the email mess...

Страница 96: ...for Module ID Module ID for current setup Camera ID Channel ID for current setup Enable Disable Select Enable to use Condition otherwise select Disable Always This Condition applies all the time Schedule or Event is not usable Schedule Only Use Week Time and Date in Condition parameter If none of weekdays is set it is activated every day Event Only It is activated only when any of the following ev...

Страница 97: ...service Otherwise select Disable Server Address FTP Server Address Base Directory Name The directory in FTP server where the data will be uploaded You should make the directory in the FTP server before using the service Base File Name The base file name of the data to be uploaded in FTP server User ID Enter a User ID to log in to FTP server Password Enter the Password for the user ID to log in to ...

Страница 98: ...cked new file name is created with day Hour If Directory Name is checked new directory name is created with hour If File Name is checked new file name is created with hour Minute If checked new file name is created with minute Sec If checked new file name is created with second Sequence If checked new files are created starting from 0 with increment of 1 Camera Number If Directory Name is checked ...

Страница 99: ... go to Advanced Services for video buffer setup Pre Alarm Images The number of image frames to store before Alarm Post Alarm Images The number of image frames to store after Alarm Pre Alarm Speed This field shows the speed of Pre Alarm Configuration can be done in Advances Services page Post Alarm Speed Select the speed of Post Alarm Fastest is the highest value After finishing setup click Save bu...

Страница 100: ...ess Base Directory Name The directory in FTP server where the data will be uploaded You should make the directory in the FTP server before using the service Base File Name The base file name of the data to be uploaded in FTP server User ID Enter a User ID to log in to FTP server Password Enter the Password for the user ID to log in to FTP server Sequence Modulo Maximum number used in sequential fi...

Страница 101: ...ked new directory name is created with day If File Name is checked new file name is created with day Hour If Directory Name is checked new directory name is created with hour If File Name is checked new file name is created with hour Minute If checked new file name is created with minute Sec If checked new file name is created with second Sequence If checked new files are created starting from 0 w...

Страница 102: ...on Condition 1 Condition 3 Select a condition for FTP Periodic service to be activated Up to 3 conditions can be set respectively Alarm Speed Select the speed of images to send in FTP Periodic service After finishing setup click Save button to apply If you don t want to change click Back button ...

Страница 103: ...ervice Mode Select network mode for CGI Select one among HTTP TCP or UDP Main IP address Enter IP address to use in CGI or other functions Aux1 Aux 3 IP address Enter 3 more addresses to use in CGI or other functions if needed Port Enter port number for CGI or other functions Default is 80 CGI Path or Alarm Common Message Enter CGI Path for CGI or other functions User ID Enter User ID to log in Pa...

Страница 104: ...he changes and go back to the previous page 6 1 5 Sensor Notification Service Configuration for Each Input Item Description CGI Name or Alarm Port Message Enter the contents of CGI when it is used Click Save button to save the change Clicking Back button will cancel the change and go back to previous page 6 1 6 Alarm Output Service Configuration Category Contents ...

Страница 105: ...utton to apply the change and continue to the next page Clicking Back button will cancel the changes and go back to the previous page 6 1 7 Alarm Output Service Configuration for each Output Item Description Condition 1 Condition 3 Select a condition to configure Alarm Output Service Up to 3 conditions can be set respectively Alarm Output Duration Select how long the Alarm Output signal is maintai...

Страница 106: ...in and run Recording Configuration Enter Recording Configuration menu then click the SD Information to find out the SD card s format information If entire SD Information is shown as None that means the SD card is not formatted In that case click the Back button followed by clicking SD Status Format Note Be sure to turn off the device before installing a SD card Otherwise the SD card may become def...

Страница 107: ...ormatted or not To perform formatting the unformatted one click the SD card Then the following window will be displayed Click the Partition and Format button then a pop up window will be shown to confirm the formatting Click the OK button to proceed or click the Cancel button to abort the formatting ...

Страница 108: ...formatting SD card is finished click the Reboot button to restart the system After about 30 seconds the system will be rebooted You will be able to see the following information when you log in to the Admin web page of the eneo server Note If the program is terminated during the format process the SD card may be damaged To avoid this problem make sure to close the program in the right manner and c...

Страница 109: ...on items include motion detection recording 24 hour continuous recording event driven recording and etc It displays the information of the recording capable servers such as VS Module ID IP Devices Server Name Server IP Address Service Port Number Vendor Camera Name and Record ability To configure select a camera according to your need ...

Страница 110: ...ual 62 Click on Camera 1 and it will display the screen for detailed configuration such as recording speed camera name Pre and Post alarm image speed After configuring them properly click the Save button to save the change ...

Страница 111: ...ENEO Admin User s Manual 63 ...

Страница 112: ...rd the video Click Disable otherwise Server Module ID Server ID number of the added VS Module ID IP Devices Camera Number Camera number to select Camera Name The name of the camera selected Use up to 31 alphanumeric or 15 Unicode characters Pre Recording Speed Recording speed before Event Valid only when Recording condition is set to Always or Schedule Pre Alarm Count The number of frames stored b...

Страница 113: ...ENEO Admin User s Manual 65 ...

Страница 114: ...trolled by configured event Schedule and Event Recording is controlled by both schedule and event Schedule Week Set day of week Time Set time Date Set date Event Alarm Sensor Each of 1 2 3 4 refers to the sensor number and checked when Event Driven Recording is selected If all the four sensors are checked together recording is enabled only when all four sensor are activated Motion Detection Each o...

Страница 115: ...ct Enable on Recording Service field for recording to be made by recording condition setup If you want to prevent recording from starting even though recording conditions are configure select it as Disable It is possible to set the number of video frames to be recorded by setting up a recording condition You can configure it as shown below ...

Страница 116: ...re Recording Speed 1 fps Pre Alarm Count 5 Post Recording Speed 10 fps Post Alarm Count 5 Post Recording Speed is in effect So the recording speed is 10 fps when Motion is detected Also Pre Recording Speed is in effect so image is stored by Pre Alarm Count setting So 5 images will be recorded before Motion is detected speed 1 image per second After Motion Detection or Sensor is over Post Recording...

Страница 117: ...t one condition is valid After configuration is finished click the Save button to apply the change and return to previous screen Now you will notice that the Recording Configuration is made If the video is already being recorded the status will display Recording You need to click the Apply button in this case If ...

Страница 118: ...orded to the HDD 7 3 View Recording Profile When it s needed to check recording configurations which have been made to each camera it may take quite some time to go through the menu tree In this case you can get the overview of the recording configuration by clicking View Recording Profile on the menu To view the recording profile click Recording Profile It will display a pop up window that shows ...

Страница 119: ... the menu The following will be displayed Now you are to choose the action between two options If you want the eneo Server to keep recording without interruption select Circulation In this setting the oldest file in SD will be deleted first to make space for new video If you want the eneo Server to stop recording and let you to replace the SD click Pause at full and then select Pause at Full ...

Страница 120: ...e by putting a check on Restrict Duration If chosen to use a time setting menu will be enabled to enter in days The default is 90 days and it can be changed between 1 and 3650 For instance if it s set to 3 days only the video since the 3 days ago will be kept 7 5 SD Status Report If it is configured here the capacity information of SD can be sent by email This feature is very useful when Recording...

Страница 121: ...ure Periodic Notification Select Enable if you want to receive the SD capacity information on specific Day of week and Time Day Time Set the Day of week and Time you want to receive email notification Above Example Receiving SD capacity information at 3 pm every Monday and Wednesday SD Error Notification Select Enable if you want to receive a notification upon SD Error ...

Страница 122: ...uration This feature is useful when there are configurations for multiple cameras and you want to clear them all It d take quite a time to delete them one by one You can clear all the contents of Recording Configuration in a single step Click Clear Recording Config on Recording Configuration menu Click Clear button and a confirmation window will be displayed as below Click OK button then all the R...

Страница 123: ...file save the changed value during the configuration reboot restore the factory default condition and update the system 8 1 System Log System log file provides you the information about when and who access the contents of eneo Server such as HTTP file or CGI programs In each line log data consists of date time category so eneo IP address user ID logged in Day of Week Month Day Hour Minute Second Y...

Страница 124: ...s and saving the configuration To reboot click Reboot on Utilities menu A confirmation screen will be displayed as shown Click Save Configuration button otherwise click Back button to cancel the rebooting The second confirmation screen will be shown This is only to confirm closing of web browser that eneo Server is on Click OK button to close the web browser and reboot right away If you ...

Страница 125: ...y default condition you can do it here Network configuration is not affected by this action Click Factory Default on Utilities menu A confirmation screen will be displayed as shown Click Factory Default button otherwise click Back button to cancel it The second confirmation screen will appear Click OK button to restore the factory default condition right away If you click Cancel web browser will g...

Страница 126: ...should have proper image files ready in your PC Click System Update on Utilities menu then the following window will be displayed From the Start buttons displayed choose the one that meets your needs All Firmware RAM disk System Web Update Update all four system images System and Web Update Only System and Web images are to be updated Web Only Update Only Web image is to be updated Sensor Device D...

Страница 127: ...r Click OK button to proceed the update otherwise click Cancel In the next window enter the location of the Firmware Image file to update with You can use the Browse button to navigate the directories in your PC to find the file Once the image file is selected click Next button to proceed You can cancel the update by clicking Skip button Note If your web browser s pop up blocker is enabled your PC...

Страница 128: ...Cancel button The next window is for locating the RAM Disk Update file Go through the same steps as in Firmware Update and do the same in update process for System and Web Update files After all the update processes pare finished the window for Factory Default is displayed If there was no problem in the entire update processes and you want to continue click Next button If you re not sure about the...

Страница 129: ...eb Only Update Click the Start button next to Web Only Update item on the menu and a confirmation window will appear Click OK button to proceed the update otherwise click Cancel The rest of the process is the same as in All Update part After update is done click Reboot to start the system over 8 5 4 Sensor Device Driver Update When adding a new Sensor device that doesn t have a proper driver found...

Страница 130: ...tem on the menu and a confirmation window will appear Click OK button to proceed the update otherwise click Cancel In the next window enter the location of the System Image file to update with You can use the Browse button to navigate the directories in your PC to find the file Once a System image file is selected click Next button to proceed If you click Skip you will skip this step and move to t...

Страница 131: ...ep If Skip button is clicked it will go to the next step without updating the file Check the file name and the size of Config Image file If Previous button is clicked it ll go back to start of file locating stage If Next button is clicked the update process will be done and go back to the next stage If you want to stop the update click Cancel button After finishing all the update process it displa...

Страница 132: ...ig file after clicking Edit button which is found on the right of the file name Click Save button to save the Config file Click Close button to close the editing window If you click Next button a window for rebooting is displayed Click Reboot button and the system will start over ...

Страница 133: ...distribution through specialised trade chan nels only Videor E Hartig GmbH Carl Zeiss Straße 8 63322 Rödermark Germany Tel 49 0 6074 888 0 Fax 49 0 6074 888 100 www videor com www eneo security com Technical changes reserved Copyright by Videor E Hartig GmbH 08 2012 ...

Отзывы: