background image


Operation Guide 

4 OSD Setting 


21 


4.7.4 PRIVACY 

Press the 

UP 

or 

DOWN 

button to select

 PRIVACY

, and press the 

LEFT 

or 

RIGHT 

button 

to set this parameter to 

ON 

or 

OFF

Set 

PRIVACY 

to 

ON

 and press the 

OK 

button to open the 

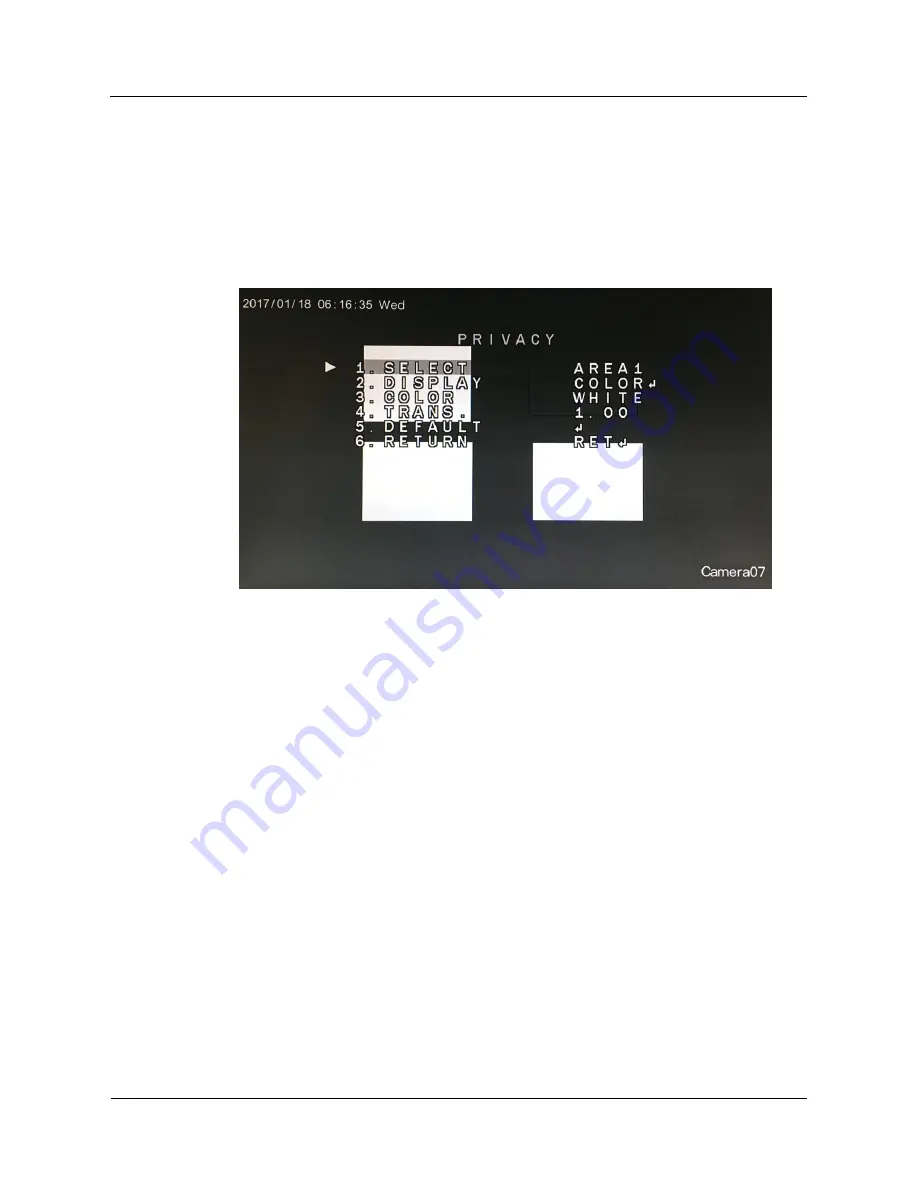
PRIVACY

 interface, as shown in 

Figure 2-20. 

Figure 4-20


PRIVACY

 interface 


Procedure 

Step 1


Press the UP or DOWN button to select SELECT, and press the LEFT or RIGHT button to 
select the desired area. 

Step 2


Press the UP or DOWN button to select DISPLAY, and press the LEFT or RIGHT button to 
set this parameter. The options are COLOR, MOSAIC, INV.3, and OFF. The default value is 
COLOR. 

Set 

DISPLAY 

to a value other than 

OFF 

and press the 

OK

 button to open the area setup area, 

as shown in Figure 2-21. 

Содержание MEB-52F0036M0A

Страница 1: ...EN User Manual 1 2 9 HD Camera Multisignal Day Night 1920x1080 Infrared 12VDC IP66 MEB 62V2812M0A MEB 52F0036M0A MED 52F0036MBA MEB 62V2812MBA...

Страница 2: ...in death or serious injury Indicates a potentially hazardous situation which if not avoided may result in minor or moderate injury Indicates a potentially hazardous situation which if not avoided cou...

Страница 3: ...Operation Guide Contents iii Contents About This Document ii 1 MEB 62V2812M0A MEB 52F0036M0A iv 2 MED 52F0036MBA MED 62V2812MBA vi 3 OSD Main Menu 1 4 OSD Setting 3...

Страница 4: ...Operation Guide Contents iv 1 MEB 62V2812M0A MEB 52F0036M0A 1 1 Parts supplied...

Страница 5: ...d you can now connect power check device working 4 Using the C L Hex tool you position left right up down and lock into place The rear position rotation allows turning of angle turn anti clockwise to...

Страница 6: ...Operation Guide Contents vi 2 MED 52F0036MBA MED 62V2812MBA 2 1 Parts supplied...

Страница 7: ...camera then lock cover screws with L Key 5 Adjust the zoom focus using flat blade tool Vari Focal models only 6 Wipe clean the front glass to stop potential IR Led smear at night 7 Connect power feedi...

Страница 8: ...o open the OSD main menu or end setup UP DOWN Press the two buttons to select the upper or lower menu LEFT RIGHT Press the two buttons to select different modes Press and hold the LEFT button for 5s t...

Страница 9: ...3 OSD Main Menu 2 End 3 2 OSD Main Menu Interface The OSD main menu interface includes LENS EXPOSURE BACKLIGHT WHITE BAL DAY NIGHT NR SPECIAL and ADJUST as shown in Figure 1 3 Figure 3 2 OSD main men...

Страница 10: ...LENS to MANUAL or DC The default value is MANUAL End 4 2 EXPOSURE Exposure is intended to adjust image brightness by setting parameters such as aperture shutter and gain The EXPOSURE interface include...

Страница 11: ...emain unchanged Setting method Press the LEFT or RIGHT button Default value AUTO AGC This parameter is used to adjust image brightness and noise two factors that affect image quality The greater the g...

Страница 12: ...environments Setting method Press the LEFT or RIGHT button Default value OFF Step 2 Press the UP or DOWN button to select RETURN Step 3 Press the LEFT or RIGHT button to select RETURN The OSD setup in...

Страница 13: ...LECT and press the LEFT or RIGHT button to select the desired area Step 2 Press the UP or DOWN button to select DISPLAY and press the LEFT or RIGHT button to set this parameter to ON or OFF Set DISPLA...

Страница 14: ...ess the LEFT or RIGHT button to set this parameter to ON or OFF Step 4 Press the UP or DOWN button to select LEVEL and press the LEFT or RIGHT button to set this parameter Step 5 Press the UP or DOWN...

Страница 15: ...K button to open the BLC interface as shown in Figure 2 5 Figure 4 5 BLC interface Procedure Step 1 Press the UP or DOWN button to select LEVEL and press the LEFT or RIGHT button to set this parameter...

Страница 16: ...ce and color temperature of the target object are changed You can set WHITEBAL to ATW AWG MANUAL WB OUTDOOR INDOOR or AWC SET Procedure Step 1 Press the UP or DOWN button to select WHITE BAL Step 2 Pr...

Страница 17: ...to set this parameter 3 Press the UP or DOWN button to select RETURN and press the OK button to return to the OSD setup interface 4 5 Day Night You can set Day Night to COLOR D N EXT B W or D N AUTO P...

Страница 18: ...ton to set this parameter Step 2 Press the UP or DOWN button to select N D DELAY and press the LEFT or RIGHT button to set this parameter Step 3 Press the UP or DOWN button to select RETURN and press...

Страница 19: ...N button to select BURST and press the LEFT or RIGHT button to set this parameter to ON or OFF Step 2 Press the UP or DOWN button to select IR SMART and press the LEFT or RIGHT button to set this para...

Страница 20: ...re 4 11 Area setup interface IR SMART area setup is the same as HSBLC area setup For details see Step 2 of section 2 3 1 HSBLC 3 Press the UP or DOWN button to select RETURN and press the OK button to...

Страница 21: ...tton to select N D AGC and press the LEFT or RIGHT button to set this parameter Step 4 Press the UP or DOWN button to select N D DELAY and press the LEFT or RIGHT button to set this parameter Step 5 P...

Страница 22: ...rameter Step 2 Press the UP or DOWN button to select 3DNR and press the LEFT or RIGHT button to set this parameter Step 3 Press the UP or DOWN button to select RETURN and press the OK button to return...

Страница 23: ...he UP or DOWN button to select CAM TITLE and press the LEFT or RIGHT button to set this parameter to ON or OFF When CAM TITLE is set to ON you can set the camera title Press the OK button to open the...

Страница 24: ...to be modified select the correct character and press the OK button Then the original character is replaced by the selected character CLR Press the UP DOWN LEFT and RIGHT buttons to select CLR to cle...

Страница 25: ...re OFF ROTATE V FLIP and MIRROR The default value is OFF Step 3 Press the UP or DOWN button to select NEG IMAGE and press the LEFT or RIGHT button to set this parameter to ON or OFF The default value...

Страница 26: ...ECT and press the LEFT or RIGHT button to select the desired area Step 2 Press the UP or DOWN button to select DISPLAY and press the LEFT or RIGHT button to set this parameter to ON or OFF Set DISPLAY...

Страница 27: ...t ALARM and press the OK button to open the ALARM interface as shown in Figure 2 19 Figure 4 19 ALARM interface 1 Press the UP or DOWN button to select VIEW TYPE and press the LEFT or RIGHT button to...

Страница 28: ...2 20 Figure 4 20 PRIVACY interface Procedure Step 1 Press the UP or DOWN button to select SELECT and press the LEFT or RIGHT button to select the desired area Step 2 Press the UP or DOWN button to se...

Страница 29: ...on to select TRANS and press the LEFT or RIGHT button to set this parameter The options are 0 75 0 25 0 00 and 1 00 and the default value is 1 00 Step 5 Press the UP or DOWN button to select RETURN an...

Страница 30: ...C parameter indicates real time defect pixel compensation Only white defect pixels can be compensated whereas black defect pixels cannot be compensated Press the UP or DOWN button to select LIVE DPC a...

Страница 31: ...ton to select RETURN and press the OK button to return to the DEFECT interface End 4 7 6 2 WHITE DPC Press the UP or DOWN button to select WHITE DPC and press the LEFT or RIGHT button to set this para...

Страница 32: ...p 3 Press the UP or DOWN button to select RETURN and press the OK button to return to the DEFECT interface 4 7 6 3 BLACK DPC Press the UP or DOWN button to select BLACK DPC and press the LEFT or RIGHT...

Страница 33: ...Step 2 Press the UP or DOWN button to select START and press the OK button to open the START interface to set compensation as shown in Figure 2 28 Figure 4 28 START interface Step 3 Press the UP or DO...

Страница 34: ...EFT or RIGHT button to set this parameter Step 2 Press the UP or DOWN button to select ID DISPLAY and press the LEFT or RIGHT button to set this parameter to ON or OFF Step 3 Press the UP or DOWN butt...

Страница 35: ...UST and press the OK button to open the ADJUST interface as shown in Figure 2 30 Figure 4 30 ADJUST interface Procedure Step 1 Press the UP or DOWN button to select SHARPNESS and press the OK button t...

Страница 36: ...D interface 1 Press the UP or DOWN button to select GAMMA and press the LEFT or RIGHT button to set this parameter 2 Press the UP or DOWN button to select BLUE GAIN and press the LEFT or RIGHT button...

Страница 37: ...HT button to set this parameter SAVE END Save settings exit the OSD setup interface and return to the camera s real time video interface NOT SAVE Discard the OSD settings and return to the camera s re...

Страница 38: ...Operation Guide 4 OSD Setting 31...

Страница 39: ...Operation Guide 4 OSD Setting 32...

Страница 40: ...ibution through special ised trade channels only Videor E Hartig GmbH Carl Zeiss Stra e 8 63322 R dermark Germany Tel 49 0 6074 888 0 Fax 49 0 6074 888 100 www videor com www eneo security com Technic...

Отзывы: