


User’s Manual
68
Use the arrow buttons to highlight the bookmark point for which you would like to see video. The selected bookmark
will display on the screen by pressing the
button.
Clip-Copy
Video clips can be copied on an external USB hard disk or flash drive. The copied video clips can be viewed on computers
running Microsoft Windows 2000, XP, Vista or 7. Refer to the
Appendix – USB Hard Disk Drive Preparation
for
information on preparing the external drive for clip copy.
Selecting
A–B Clip-Copy
in the Search – Export menu or pressing the
BACK UP
button on the remote control during
playback will set the starting point of the video to be clip copied, and the icon displays at the bottom-left corner of
the screen. Selecting
A–B Clip-Copy
in the Search – Export menu or pressing the
BACK UP
button again will set the
ending point of the video to be clip copied by displaying the
Clip-Copy
screen.
Pressing and holding the
BACK UP
button on the remote control for more than three seconds while in the Search mode
or Live Monitoring mode initiates the One-Touch Clip Copy function. The last recorded image will be the ending point
of video to be clip copied, and the system will automatically begin to calculate the possible video data size that the
selected storage media can handle.
Select
Clip-Copy
in the Search – Export menu, press the
BACK UP
button on the remote control while in the Live
Monitoring mode or press and hold the
SEARCH
button on the front panel for more than three seconds while in the
Search mode, and the
Clip-Copy
screen appears to allow clip copy setup.
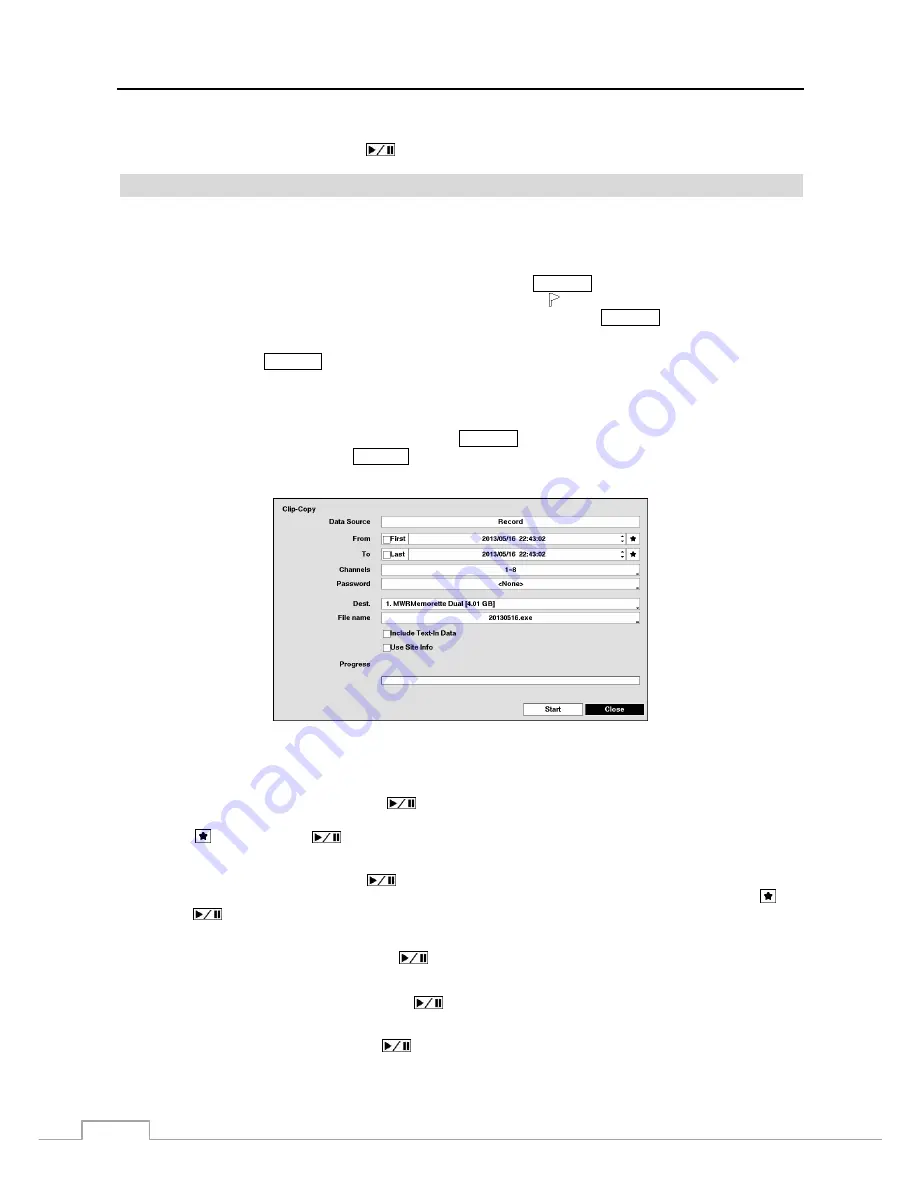
Figure 50: Clip-Copy screen.
You can search video from the first to last recorded images, or you can set the start and stop times and dates.
Highlight the box beside
From
and press the
(Play/Pause) button to toggle between On and Off. When set to
Off, you can enter a specific Date and Time. When set to On, the search will be from the first recorded image. When
highlighting and pressing the
button the bookmark list displays and the bookmark point you selected will be
the starting date and time.
Highlight the box beside
To
and press the
button to toggle between On and Off. When set to Off, you can enter
a specific Date and Time. When set to On, the search will be from the last recorded image. When highlighting and
pressing the
button the bookmark list displays and the bookmark point you selected will be the ending date and
time.
Highlight the box beside
Channels
and press the
button. You can select the cameras that you would like to include
in your video clip.
Highlight the box beside
Password
and press the
button. A virtual keyboard appears allowing you to enter the
password for reviewing the video clips.
Highlight the box beside
Dest.
and press the
button. You can select the storage device on which you would like
to record the video clip.
Содержание DLR-2104/1.0TBV
Страница 2: ......
Страница 14: ...User s Manual 6 ...


