32319-0-0713
Page 2
> ? # -
$ %
studs using four #10 x 1 1/4” screws provided with the wall
A % #"
BC#
!
" "# %
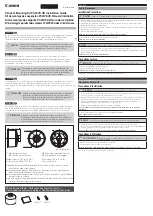
the four corners of the wall mount shroud as possible.
Figure 3
( F
installation instructions for venting.
6. Install condensation drain and gas lines to the wall furnace
following the instructions provided with the wall furnace.
7. Remove the four #10 x 1/2” hex-head screws securing the
standard rear shroud to the wall furnace and remove the
rear shroud. Discard the standard rear shroud and retain the
screws.
8. Remove the rear two leveling legs from the wall furnace and
retain for later use.
NOTE:
If the wall furnace is to be installed in a direct vent con-
<
mounting the wall furnace to the wall mount shroud.
9. Move the wall furnace into position on the wall mount shroud
and secure in position using the four #10 x 1/2” hex-head
%H>
Figure 4
10. Install the two leveling legs removed in step 8 through two
holes in the bottom of the wall mount shroud into the wall
(
Figure 5
&& J %
venting section of the wall furnace installation instructions
provided with the wall furnace.
EMPIRE
EMPIRE
Comfort Systems
Empire Comfort Systems Inc.
Q&4"?V$XYZ
If you have a general question about our products, please e-mail us at
[email protected].
If you have a service or repair question, please contact your dealer.
www.empirecomfort.com