40397-1-0719
Page 13
Gas supply system must be installed in accordance with the U.S.
National Fuel Gas Code.
This appliance and its individual shut off valve must be discon-
nected from the gas supply piping system during any system
pressure test in excess of 1/2 PSI (3.5 KPA).
Use a system manual shut off valve to shut off the gas supply to
this gas appliance before continuing with installation procedures.
DANGER
To avoid injury and property damage, DO NOT obstruct the
flow of combustion and ventilation air when installing or
operating the appliance.
IMPORTANT
Seal any fresh air vents or ash clean-out doors located on the
floor or wall of the fireplace. If this is not performed, drafting
may cause pilot outage or excessive sooting. Use a heat-
resistant sealant. DO NOT seal the chimney flue damper.
IMPORTANT
BEFORE YOU BEGIN - Check the gas pressure at the
fireplace stub to ensure proper minimum gas pressure (see the
specifications beginning on page 9 of this manual).
IMPORTANT
BEFORE YOU BEGIN - Ensure that the firebox meets the
minimum specifications of the appliance (see the specifications
beginning on page 9 of this manual).
IMPORTANT
This appliance when first installed and used may produce
odors. This is normal. Open a window when operating the
appliance for the first time.
IMPORTANT
This appliance must be installed only in a solid-fuel burning
fireplace, which contains a working flue and is constructed of
non-combustible materials.
IMPORTANT
Never carry the burner in such a way that causes the Control
Module or Battery Holder to dangle by their connecting wires.
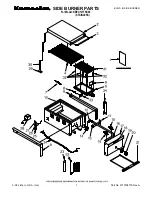
You must secure the gas burner to the fireplace floor. If not, the
entire unit may move when you adjust the controls. Movement
of unit may cause shifting of the gas logs which leads to
excessive sooting and improper burning. See Figure 5.
ASSEMBLY PROCEDURE:
1. Install AA Energizer Lithium batteries into Battery Holder using
small Phillips screw driver.
See Figure 00.
2. Feed Battery Holder connector through Module Cover grommet
as shown in
Figure 00
and connect to side of Control Module.
3. Place the burner in the fireplace or firebox. Make certain the
entire ember burner is inside the front edge of the fireplace
or firebox.
4. An anchor hole is provided in each burner leg. After cen-
tering the burner, mark the hole positions on the fireplace/
firebox floor. Drill two 5/32 inch diameter holes approximately
1-1/2 inches deep for masonry screws or 1/8 inch hole for
sheet metal screws.
5. Anchor to the fireplace/firebox floor using the screws provid
-
ed. Refer to
Figure 5.
Figure 5
Figure 6
Figure 7
INSTALLATION
ANCHOR SCREWS
NOTE:
Use only
Energizer Lithium AA
Batteries for replacement.
Standard alkaline batteries
will need to be replaced
more often.