background image

Easy DVD recording

Getting started

16

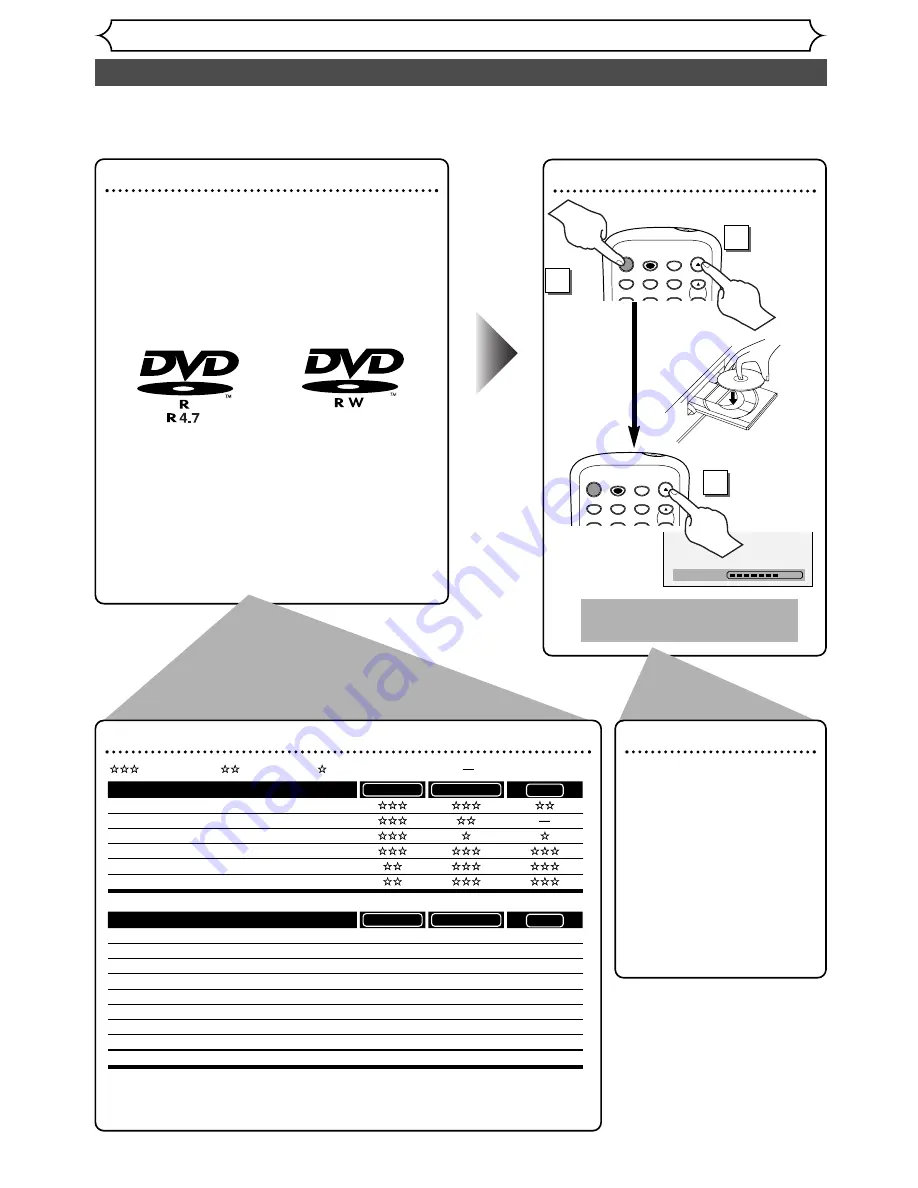
The following will help you to understand easily how to record to DVD discs.

Note:

Make sure batteries are in the remote control and you have connected this unit and the TV correctly.

Step 

1

: Choose a disc type

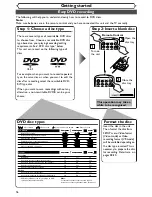
There are several types of recordable DVD discs
to choose from. Choose a recordable DVD disc
type based on your playing/recording/editing
requirements. See “DVD disc type” below.
This unit can record on the following type of
discs.

For example, when you want to record repeated-
ly on the same disc or when you want to edit the
disc after recording, select the rewritable DVD-
RW type disc.

When you want to save recordings without any
alteration, a non-rewritable DVD-R can be your
choice.

Step 2: Insert a blank disc

POWER

REC SPEED

AUDIO

OPEN/CLOSE

1

2

3

4

5

6

CH

.@/:

ABC

DEF

GHI

JKL

MNO

POWER

REC SPEED

AUDIO

OPEN/CLOSE

1

2

3

CH

.@/:

ABC

DEF

GHI

JKL

MNO

Remote Control

Open the
disc tray

Close the
disc tray

Format the disc

Insert the disc in the unit.
Then, format the disc from
SETUP menu.Video format
(Video mode) or Video
recording format (VR mode)
will be available depending on
the disc type inserted.This is
necessary to prepare the disc
for recording. Details are  on
pages 28-30.

DVD disc types

.

DVD-RW 

VR

DVD-RW 

Video

You want to

Record TV  programs

Reuse by deleting unwanted contents

Edit recorded contents

Edit/Record from connected equipment

Copy discs for distribution

Play on other DVD equipment

*1

*1

DVD-RW 

VR

DVD-RW 

Video

Features

Recording

Rewritable?

Yes

Yes

Can create chapters at fixed intervals (auto.)

Yes

Yes

Can create chapters wherever you like (manual)

Yes

No

Can record 16:9 size pictures

Yes

Yes

Can record Copy-Once programs

Yes

No

Editing

Can perform basic edit functions

Yes

Yes

Can perform advanced edit functions (Playlist edit)

Yes

No

No

Yes

No

Yes

No

Yes

No

*1

DVD-RW (VR mode) can only be played on DVD 
equipment that is VR compatible.

Note:

For details of the above functions and implied 
restrictions, see the explanations inside the manual.

DVD-R

DVD-R

: Most suitable.

: Can be used.

: Some functions are limited.

: Cannot be used.

2

Turn on
the unit

1

3

Loading

This operation may take a
while to be recognized.

Содержание EDVR95E

Страница 1: ...ections on pages 13 15 To record a program easily refer to Easy DVD recording on pages 16 17 after connections are completed You CANNOT record on any copyright protected DVD disc with this unit EDVR95E Owner s Manual DVD Recorder with Video Cassette Recorder Supplied Accessory Recording Playing discs Editing Connections Getting started Changing the SETUP menu VCR functions Others CHANNEL OUTPUT SE...

Страница 2: ...However there is no guarantee that interference will not occur in a particular installation If this equipment does cause harmful interference to radio or television reception which can be determined by turning the equipment off and on the user is encouraged to try to correct the interference by one or more of the following measures 1 Reorient or relocate the receiving antenna 2 Increase the separa...

Страница 3: ...nience receptacles and the point where they exit from the appliance 13 Outdoor Antenna Grounding If an outside antenna or cable system is connected to the product be sure the antenna or cable system is grounded so as to provide some protection against voltage surges and built up static charges Article 810 of the National Electrical Code ANSI NFPA No 70 provides infor mation with regard to proper g...

Страница 4: ...to relevant topics on the Troubleshooting Guide on pages 97 100 before returning the product If this unit becomes inoperative do not try to correct the problem by yourself There are no user serviceable parts inside Turn off unplug the power plug and please call our help line mentioned on the front page to locate an Authorized Service Center CLEANINGTHE CABINET Use a soft cloth slightly moistened w...

Страница 5: ...e code 102 Glossary 103 Specifications 104 Memo 105 Warranty Statement 106 Before you start 2 Precautions 2 Table of contents 5 Features 6 Functional overview 7 Installing batteries in the remote control 9 Using a remote control 9 VCR DVD recorder switching 9 SETUP DISC CD menu 9 DISPLAY menu 11 Connections 13 Connection to a TV 13 Connection to a cable box or satellite box 14 Connection to an Aud...

Страница 6: ... watch using the search func tion Search for a desired point on a disc by title chapter or time Quickly search for what you want to watch You can easily find the part you want to watch using the Index search Time search functions An index mark will be assigned at the beginning of each recording you make With the Time search function you can go to a specific point on a tape by entering the exact am...

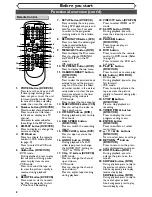
Страница 7: ... One Touch Recording 19 PLAY button VCR Press to start playback 20 STOP EJECT button VCR EJECTbutton Press to remove the tape from the unit STOP button Press to stop tape playback Press to stop the proceeding timer recording inVCR 21 F FWD button VCR Press to rapidly advance the tape or view the picture rapidly in forward during playback Forward Search 22 REW button VCR Press to rewind the tape or...

Страница 8: ... standby mode Press to cancel the timer standby mode then turn the unit on 2 Number buttons DVD VCR Press to select channel numbers Press to select a title chap ter track on display or a TV channel Also press to enter values for the settings in the SETUP menu 3 DISPLAY button DVD VCR Press to display or change the on screen display 4 VCR button Press to activate the remote control in VCR mode Refe...

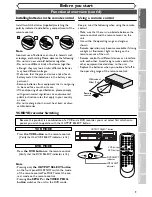
Страница 9: ...ds of batteries together although they may look similar different batteries may have different voltages Make sure that the plus and minus ends of each battery match the indications in the battery com partment Remove batteries from equipment that is not going to be used for a month or more When disposing of used batteries please comply with governmental regulations or environmental public instructi...

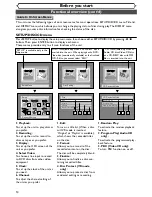
Страница 10: ... of the unit as you prefer 1 Edit Turns on a title list When a disc with VR mode is inserted Original or PlayList is available which shows the recorded titles on the disc 2 Format Allows you to erase all of the recorded content on the disc The disc will be completely blank 3 Finalize Allows you to finalize a disc con taining recorded titles 4 Disc Protect VR mode only Allows you to protect a disc ...

Страница 11: ...nly one disc type is indicated as an example 2 Indicates a recording mode and possible recording time 3 Indicates current channel number 4 Indicates title number chapter number and the time elapsed of disc play 5 Each icon means Search Audio Subtitle Angle exceptVR mode Repeat Marker Noise Reduction Zoom DVD RW SP 1 25 Rem CH 1 Video mode 1 1 00 00 00 1 2 4 3 5 DVD DVD mode First Press DISPLAY but...

Страница 12: ...ted in the disc tray Appears when aVCR timer recording is pro ceeding Appears whenVCR is in the timer recording stand by mode Appears duringVCR to DVD duplication process Appears during DVD toVCR duplication process Display message 1 2 5 3 4 3 Recording speed Indicates the recording speed of the disc 4 Title Track and Chapter mark Appears when indicating a title track number Appears when indicatin...

Страница 13: ...od 2 Method 3 Better picture Best picture S VIDEO OUT COMPONENT VIDEO OUT Audio cable supplied Component Video cables not supplied This unit Note Connect this unit directly to the TV If the A V cables are connected to a VCR pictures may be distorted due to the copy protection system Method 2 and method 3 are only useful in DVD mode Method 1 Good picture VIDEO OUT Video cable supplied S Video cable...

Страница 14: ...mote control If you use channel 4 you will need to change this unit s RF output to channel 4 Refer to RF converter output on page 101 2 On the TV select channel 3 or 4 the same channel as you have selected at step 1 3 On the cable box or satellite box select the channel you want to view or record DVD VCR ANTENNA IN OUT RF Cable supplied RF Cable Back of TV IN OUT Cable box or Satellite box E Cable...

Страница 15: ...igital decoder and set Dolby Digital to Stream for the Digital Out setting in the SETUP menu Refer to pages 90 91 The audio source on a disc in a Dolby Digital 5 1 channel surround format cannot be recorded as digital sound by an MD or DAT deck Unless connected to a Dolby Digital decoder set Dolby Digital to PCM for the Digital Out set ting in the SETUP menu Playing a DVD using incor rect settings...

Страница 16: ... the unit Then format the disc from SETUP menu Video format Video mode orVideo recording format VR mode will be available depending on the disc type inserted This is necessary to prepare the disc for recording Details are on pages 28 30 DVD disc types DVD RW VR DVD RW Video You want to Record TV programs Reuse by deleting unwanted contents Edit recorded contents Edit Record from connected equipmen...

Страница 17: ... on a disc the proce dure is really simple as you choose a title on a chapter from the menu screen What are titles and chap ters The contents of DVD disc are generally divided into titles Titles may be further subdivided into chapters Hint 2 Edit the recorded disc You will find editing discs is very easy and the unit offers convenient edit func tions which are possible only with DVD R RW discs You...

Страница 18: ...to Preset Manual Preset TV Audio Select Stereo VCR DVD Setup Playback Setting Note If the auto presetting is can celled during presetting some channels not yet preset may not be received The selection will depend on how you receive the TV chan nels To cancel the auto preset ting during scanning Press RETURN button or SETUP button to cancel To select a channel You can select a channel by directly e...

Страница 19: ...reset Manual Preset CH18 Add Delete CH2 Add Delete Setup Channel Preset Manual Preset Adding deleting channels The channels you no longer receive or seldom watch can be deleted from the memory You also may add channels into memory 1 Press SETUP button to dis play SETUP DISC menu SETUP DISC menu will appear Screen 2 Select SETUP using B buttons then press ENTER button SETUP menu will appear 3 Selec...

Страница 20: ...etup Menu 4 Select TV Audio Select using K L buttons then press ENTER button Option window will appear 5 Select Stereo or SAP using K L buttons then press ENTER button Stereo Outputs main audio SAP Secondary Audio Program Outputs sub audio Refer to the item in Glossary on page 103 for more informa tion 6 Press SETUP button to exit Setup Channel Preset Auto Preset Manual Preset TV Audio Select Ster...

Страница 21: ...lect Auto using K L buttons then press ENTER button If you know your PBS chan nel number select Manual using K L buttons then press ENTER button Enter your PBS channel number using Number or K L buttons then press ENTER button 6 Press SETUP button to exit 7 Press POWER button to turn off the unit This unit will search for the time only when the power is off Leave it off for several minutes to give...

Страница 22: ...uttons to move the cursor 6 Enter the time hour minute using K L buttons Press B buttons to move the cursor Setup Clock Clock Setting Auto Clock Setting Daylight Saving Time Auto JAN 12 2004 MON 09 24 AM ON VCR DVD Setup Clock Clock Setting Auto Clock Setting Auto Daylight Saving Time JAN 12 2004 MON 12 00AM ON VCR DVD Setup Clock Clock Setting Auto Clock Setting Daylight Saving Time Auto ON VCR D...

Страница 23: ...ETUP CM SKIP TIMER PROG RETURN 1 2 3 4 5 6 7 8 0 9 STOP PLAY CH VIDEO TV SLOW PAUSE ABC DEF GHI JKL MNO PQRS REC OTR REC MONITOR MENU LIST CLEAR C RESET SEARCH MODE ENTER DISPLAY TUV WXYZ DVD 8 7 4 ZOOM SKIP SKIP TOP MENU SETUP CM SKIP TIMER PROG RETURN STOP PLAY REC OTR REC MONITOR MENU LIST CLEAR C RESET SEARCH MODE ENTER 6 5 4 Select Auto Clock Setting using K L buttons then press ENTER button ...

Страница 24: ...n the first Sunday in April and move back one hour on the last Sunday in October 1 Press SETUP button to dis play SETUP DISC menu SETUP DISC menu will appear Screen 2 Select SETUP using B buttons then press ENTER button SETUP menu will appear 3 Select Clock using K L B buttons then press ENTER button Clock menu will appear Setup Clock Clock Setting Auto Clock Setting Daylight Saving Time Auto ON V...

Страница 25: ...ng K L buttons then press ENTER button 6 Press SETUP button to exit Setup Playback TV Aspect Parental Lock Disc Menu Language Audio Language Subtitle Language Digital Out Dynamic Range Control Fast Forward with Audio 16 9 Wide 8 English Original OFF ON OFF 4 3 Letter Box 4 3 Pan Scan 16 9 Wide DVD Setup Playback TV Aspect Parental Lock Disc Menu Language Audio Language Subtitle Language Digital Ou...

Страница 26: ...ictions on recording You cannot record copy protected video using this unit Copy protected video includes DVD Video discs and some satellite broadcasts If copy protected material is encountered during a recording the unit will pause or stop automatically and an error message will be displayed on screen Video that is copy once only can only be recorded using a DVD RW disc in VR mode with CPRM see b...

Страница 27: ...h the following condition Disc type Mode DVD RW ver 1 1 ver 1 1 CPRM compatible Video mode DVD R ver 2 0 Video mode Disc type format VR mode DVD RW ver 1 1 ver 1 1 CPRM compatible Video mode DVD RW ver 1 1 ver 1 1 CPRM compatible Video mode DVD R ver 2 0 Copy free Copy once Copy prohibited Recordable Not Recordable Note The audio and video quality gets poorer as the Recording time becomes longer T...

Страница 28: ... Video mode or VR mode using K L buttons then press ENTER button The recording mode will be set Setup Recording Auto Chapter Timer Programming Video mode DVD Player Compatibility mode VR mode Editing possibility mode DVD RW Recording Format VR mode 10 minutes Dubbing Mode VCR DVD DVD Video mode VR mode Setup Recording Auto Chapter Timer Programming Dubbing Mode Video mode VCR DVD DVD RW Recording ...

Страница 29: ... marks will be put as you specified 8 Press SETUP button to exit SETUP menu Setup Recording Auto Chapter Timer Programming DVD RW Recording Format VR mode 10 minutes Dubbing Mode VCR DVD DVD OFF 5 minutes 10 minutes 15 minutes 30 minutes 60 minutes 6 POWER REC SPEED AUDIO ZOOM SKIP SKIP OPEN CLOSE TOP MENU SPACE VCR SETUP CM SKIP TIMER PROG RETURN 1 2 3 4 5 6 7 8 0 9 STOP PLAY CH VIDEO TV SLOW PAU...

Страница 30: ...matting will start 6 Formatting is complete 100 will be indicated This operation may take a while to be completed Formatting 100 Formatting 58 Disc Edit Format Finalize Yes No Disc Protect OFF ON Are you sure Yes No Disc Edit Format Finalize Yes No Disc Protect OFF ON Disc Edit Format Finalize Disc Protect OFF ON Setup Menu DVD RW DVD RW VR DVD RW DVD RW Video Reformatting a disc Note When you ref...

Страница 31: ... that the recording format is set to the desired mode Refer to Formatting a disc on pages 28 30 When a DVD RW disc is loaded You can choose Video mode or VR mode from SETUP menu Video mode has been selected as the default Refer to Choosing the recording format of a blank disc on pages 28 29 When a DVD R disc is loaded DVD R discs will always be in Video mode 4 Select a desired channel to record us...

Страница 32: ... want to change the recording speed press REC SPEED button repeatedly The recording speed will be changed as you press the button as shown Refer to Recording speed on page 26 You cannot change the record ing speed during recording 2 Press REC MONITOR button again to exit XP SP LP EP SLP SEP CH 18 Rec Monitor XP DVD DVD RW DVD RW VR DVD RW DVD RW Video DVD R DVD R Checking the recording picture qua...

Страница 33: ...ges 28 30 When a DVD RW disc is loaded You can choose Video mode or VR mode from SETUP menu Video mode has been selected as the default Refer to pages 28 29 Choosing the recording for mat of a blank disc When a DVD R disc is loaded DVD R discs will always be in Video mode 4 Select a desired channel to record using CH K L but tons or number buttons 5 Press REC OTR button then press REC OTR button r...

Страница 34: ...31 L MON FRI L SAT L FRI L SUN L L Setup Recording Timer Programming Date Start End CH Speed JAN 01 AM AM CH8 DVD DVD VCR Setup Recording Timer Programming Date Start End CH Speed DVD VCR Setup Recording Auto Chapter Timer Programming Dubbing Mode Video mode VCR DVD DVD RW Recording Format 10 minutes DVD Setup Playback Setting Setup Menu VCR VCR DVD RW DVD RW VR DVD RW DVD RW Video DVD R DVD R POW...

Страница 35: ...play 2 Press TIMER PROG button Timer Programming list will appear 3 Check the information on the list you will need 4 To clear the timer programming select your desired program using K L buttons then press CLEAR C RESET button To correct the timer program ming select your desired pro gram using K L buttons then press ENTER button Next correct the timer programming using K L B buttons Finally press...

Страница 36: ... according to priority if timer programmings are overlapping The timer programming set previously has priority A timer recording of lower priority will be canceled start from the middle or stop on the way Check the overlapping timer programmings and change the priority if necessary The priority of overlapped settings 36 Timer recording cont d Recording PROG 1 ex 1 PROG 2 Actual recording PROG 1 PR...

Страница 37: ...s ENTER button 5 Select the input jack type to connect using K Lbuttons then press ENTER button If you want to use S VIDEO INPUT select S Video In If you want to use VIDEO INPUT Composite select Video In Setup Select Video L1 Rear L2 Front Video In S Video In DVD Setup Select Video L1 Rear L2 Front Video In Video In Video In S Video In DVD Setup Select Video L1 Rear L2 Front Video In Video In DVD ...

Страница 38: ...the remote control or the CH K L buttons To use the input jacks on the front of this unit select L2 position by pressing 0 0 2 on the remote control or the CH K L but tons 4 Select a recording speed using REC SPEED button Refer to Recording speed on page 26 for DVD or page 94 forVCR 5 Press REC OTR button on the unit to start recording 6 Press PLAY button on the external source to record from 7 Fo...

Страница 39: ...tons then press ENTER button Recording menu will appear 4 Select Dubbing Mode using K L buttons then press ENTER button Option window will appear Setup Recording Auto Chapter Timer Programming Dubbing Mode Video mode VCR DVD DVD RW Recording Format OFF VCR DVD Setup Recording Auto Chapter Timer Programming Dubbing Mode Video mode VCR DVD DVD RW Recording Format 10 minutes DVD Setup Playback Settin...

Страница 40: ...DVD VCR Setup Recording Auto Chapter Timer Programming Dubbing Mode Video mode VCR DVD DVD RW Recording Format OFF VCR DVD VCR DVD VCR DVD DVD to VCR VCR Setup Recording Auto Chapter Timer Programming Dubbing Mode Video mode VCR DVD DVD RW Recording Format OFF VCR DVD VCR DVD VCR DVD VCR to DVD POWER REC SPEED AUDIO ZOOM SKIP SKIP OPEN CLOSE TOP MENU SPACE VCR SETUP CM SKIP TIMER PROG RETURN 1 2 3...

Страница 41: ...ode automatically creates title menus 1 Press SETUP button to dis play SETUP DISC menu SETUP DISC menu will appear Screen 2 Select DISC using B buttons then press ENTER button DISC menu will appear Video mode VR mode only 3 Select Finalize using K L buttons then press ENTER button Option window will appear VR mode only 4 Select Yes using B but tons then press ENTER but ton Finalizing will start To...

Страница 42: ...iting to Disc 58 Disc Edit Format Finalize Disc Protect OFF ON Yes No Disc Edit Format Finalize Disc Protect OFF ON Setup Menu DVD RW DVD RW VR POWER REC SPEED AUDIO ZOOM SKIP SKIP OPEN CLOSE TOP MENU SPACE VCR SETUP CM SKIP TIMER PROG RETURN 1 2 3 4 5 6 7 8 0 9 STOP PLAY CH VIDEO TV SLOW PAUSE ABC DEF GHI JKL MNO PQRS REC OTR REC MONITOR MENU LIST CLEAR C RESET SEARCH MODE ENTER DISPLAY TUV WXYZ ...

Страница 43: ...hese region symbols do not appear on your DVD you cannot play that DVD in this unit The number inside the globe refers to region of the world Region 1 represents the United States Canada Bermuda the U S Virgin Islands and small regions near Australia A DVD labeled for a specific region can only play on the unit with the same region code Hint for DVD playback The contents of a DVD disc are generall...

Страница 44: ...on Video mode VR mode MENU LIST button 5 Select a desired title using K L B buttons then press ENTER button Playback will start 6 Press STOP C button to stop playback To eject the disc press OPEN CLOSE A button to open the disc tray then remove the disc before turning the unit off Playlist 5 4 1 1 3 2 JAN 1 12 00AM JAN 1 3 00AM JAN 1 1 00AM JAN 1 2 00AM JAN 1 4 00AM Original 1 1 3 2 5 4 JAN 1 12 0...

Страница 45: ...Connections Getting started Changing the SETUP menu VCR functions Others 1 Press POWER button then press DVD button When you are playing a DVD or an audio CD turn the TV on and be sure to select the input to which the unit is connected 2 Press OPEN CLOSE A but ton to open the disc tray The disc tray will open 3 Place the disc onto the disc tray with its label facing up and make sure to align the d...

Страница 46: ...V screen 2 Select an item using K L B buttons then press ENTER button to confirm Continue this step to set up all the features you want or to start playing the disc from the menu MENU LIST button Displays a DVD disc menu which varies with the disc and may be the same as the Title menu K L B buttons Moves the cursor around screen Enter button Selects the currently highlighted menu option Number but...

Страница 47: ...er 2 0 of Video CD standard with PBC function Ver 1 1 without PBC function You can enjoy playback picture as well as music CD Ver 2 0 with PBC function While using a Video CD with PBC func tion PBC appears on the screen and the display NOTE When playing Video CDs with PBC function only pbc is displayed instead of the playing time and current track indications on the front panel display Also some o...

Страница 48: ...rse speeds are x2 x8 x16 For MP3 files approximate speed is fixed at x8 To return to the normal playback press PLAY Bbutton x20 Normal speed playback x2 x20 x5 x40 x40 g h g h g h g h g h g h MP3 MP3 VCD VCD CD CD DVD RW DVD RW VR DVD RW DVD RW Video DVD R DVD R DVD V DVD V Note Forward reverse speed will be indicated with icons as fol lows Forward Approx Speed x2 x20 x40 Reverse Approx Speed x5 x...

Страница 49: ...CM SKIP button once forwarding 30 seconds Playback will restart automatically B CM Skip 30 sec DVD RW DVD RW VR DVD RW DVD RW Video DVD R DVD R Pause 1 During playback press PAUSE F button Playback will pause and sound will be muted 2 Press PLAY B button to resume play MP3 MP3 CD CD DVD RW DVD RW VR DVD RW DVD RW Video DVD R DVD R DVD V DVD V ZOOM SKIP SKIP TOP MENU SPACE VCR SETUP CM SKIP TIMER P...

Страница 50: ...anged as follows To return to the normal playback press PLAY B button x1 8 Pause x1 16 x1 8 x1 16 x1 2 x1 4 g h g h g h g h g h g h VCD VCD DVD RW DVD RW VR DVD RW DVD RW Video DVD R DVD R DVD V DVD V Note Only Slow forward is available when playing Video CDs Forward reverse speed will be indicated with icons as fol lows Forward Approx Speed x1 16 x1 8 x1 2 Reverse Approx Speed x1 16 x1 8 x1 4 ZOO...

Страница 51: ...NTER 1 2 3 Marker Setup This feature allows you to assign a specific point on a disc to be called back later 1 During playback press DIS PLAY button The display menu will appear Screen 2 Select icon using B buttons then press ENTER button Marker setup menu will appear Screen 3 Select a desired marker num ber using B buttons When it reaches the desired point press ENTER button 4 To return to the ma...

Страница 52: ...on T for title will be highlighted Title Enter a desired title number to search using K L buttons or number buttons then press ENTER button Title search will start Chapter To move to C for chapter press B button Enter a desired chapter num ber to search using K L but tons or number buttons then press ENTER button Chapter search will start 1 1 01 23 45 DVD Video DVD RW DVD RW VR DVD RW DVD RW Video...

Страница 53: ...V SLOW PAUSE ABC DEF GHI JKL MNO PQRS REC OTR REC MONITOR MENU LIST CLEAR C RESET SEARCH MODE ENTER DISPLAY TUV WXYZ DVD 3 1 2 1 ZOOM SKIP SKIP TOP MENU SPACE VCR SETUP CM SKIP TIMER PROG RETURN 7 8 0 9 STOP PLAY VIDEO TV SLOW PAUSE PQRS REC OTR REC MONITOR MENU LIST CLEAR C RESET SEARCH MODE ENTER DISPLAY TUV WXYZ DVD Time search 1 During playback press DIS PLAY button The display menu will appea...

Страница 54: ... repeatedly MP3 only OFF Title Chapter A B 1 1 01 23 45 DVD Video 1 1 01 23 45 DVD Video MP3 MP3 VCD VCD CD CD DVD RW DVD RW VR DVD RW DVD RW Video DVD R DVD R DVD V DVD V POWER REC SPEED AUDIO ZOOM SKIP SKIP OPEN CLOSE TOP MENU SPACE VCR SETUP CM SKIP TIMER PROG RETURN 1 2 3 4 5 6 7 8 0 9 STOP PLAY CH VIDEO TV SLOW PAUSE ABC DEF GHI JKL MNO PQRS REC OTR REC MONITOR MENU LIST CLEAR C RESET SEARCH ...

Страница 55: ...2 Select CD using B but tons then press ENTER but ton CD Playback Mode menu will appear 3 Select Program Play using K L buttons then press ENTER button Program play list will appear 4 Select a desired track using K L buttons then press ENTER button or B button A cursor will move to the next 5 Press PLAY B button to start program playback Program playback will start CD Playback Mode Program Play To...

Страница 56: ...dio R or a mix of both L R 1 During playback press DIS PLAY button The display menu will appear Screen 2 Select icon using B buttons then press ENTER button Audio menu will appear DVD Video DVD RW VR mode 3 Select a desired audio sound track using K L buttons then press ENTER button DVD Video Audio soundtrack will switch DVD RW VR mode 4 Select a desired audio chan nel using K L buttons then press...

Страница 57: ...ually tells you which subtitle languages are available You can switch subtitle languages anytime during playback 1 During playback press DIS PLAY button The display menu will appear Screen 2 Select icon using B buttons then press ENTER button Subtitle menu will appear 3 Select a desired subtitle lan guage using K L buttons then press ENTER button Subtitle will be displayed in the selected language...

Страница 58: ...TER button Your setting will be activated This function reduces noise in the playback picture When playing back discs recorded in long time mode such as SLP or SEP mode select Type 1 or Type 2 Type 2 is more effective When playing back discs with lit tle noise such as DVD Video discs select OFF 1 1 00 00 00 OFF Type 1 Type 2 DVD Video 1 1 01 23 45 DVD Video VCD VCD DVD RW DVD RW VR DVD RW DVD RW V...

Страница 59: ... Time status bar of the title 7 The arrow icon which means the title list includes a next or a previous page Press Bor button by following direction of the icon 8 Playback status of the current disc Editing discs in Video mode You can edit discs inVideo mode for the following items Note that once you edit titles they will not remain as recorded originally Deleting titles Refer to page 61 Putting n...

Страница 60: ...you can edit as you prefer without losing original titles The following items you can edit with a playlist Deleting titles Refer to page 74 Deleting parts of titles Refer to pages 75 76 Naming Titles Refer to pages 76 77 Setting or clearing chapter markers Refer to pages 78 79 Setting pictures for thumbnails Refer to pages 79 80 Adding titles to a playlist Refer to page 81 Deleting a playlist Refe...

Страница 61: ... L buttons then press ENTER button Option window will appear 5 Select Yes using B but tons then press ENTER but ton Title will be deleted 6 After writing to disc is com pleted press SETUP button to exit DISC menu This operation may take a while to be completed Disc Edit 1 Title Delete Edit Title Name Chapter Mark Yes No Writing to Disc JAN 1 1 00AM CH12 XP Disc Edit 1 0 01 25 Title Delete Edit Tit...

Страница 62: ... Disc Edit 1 Title Delete Edit Title Name Chapter Mark 0 01 25 JAN 1 1 00AM CH12 XP Disc Edit 1 1 3 2 5 4 JAN 1 1 00AM JAN 1 4 00AM JAN 1 2 00AM JAN 1 3 00AM JAN 1 5 00AM Disc Edit Format Finalize DVD DVD RW DVD RW Video Putting names on titles Press ABC DEF GHI JKL MNO PQRS TUV WXYZ space abc def ghi jkl mno pqrs tuv wxyz space space _ 2 3 4 5 6 7 8 9 0 1 ABC abc Select 123 1 1 2 3 4 5 6 7 8 9 0 ...

Страница 63: ...or the title 7 After writing to disc is com pleted press SETUP button to exit DISC menu This operation may take a while to be completed Disc Edit Edit Title Name 1 A B C a b c 1 2 3 abc Yes No Writing to Disc POWER REC SPEED AUDIO ZOOM SKIP SKIP OPEN CLOSE TOP MENU SPACE VCR SETUP CM SKIP TIMER PROG RETURN 1 2 3 4 5 6 7 8 0 9 STOP PLAY CH VIDEO TV SLOW PAUSE ABC DEF GHI JKL MNO PQRS REC OTR REC MO...

Страница 64: ...d time using K L buttons then press ENTER button Option window will appear 6 Select Yes using B but tons then press ENTER but ton A chapter marker will be added 7 After writing to disc is com pleted press SETUP button to exit DISC menu 1 0 01 25 Title Delete Edit Title Name Chapter Mark OFF 5 minutes 10 minutes 15 minutes 30 minutes 60 minutes Yes No Disc Edit JAN 1 1 00AM CH12 XP 1 0 01 25 Title ...

Страница 65: ... press ENTER but ton Title will be deleted 7 After writing to disc is com pleted press SETUP button to exit DISC menu This operation may take a while to be completed 1 Title Delete Scene Delete Edit Title Name Chapter Mark Index Picture Protect OFF Yes No Writing to Disc JAN 1 1 00AM CH12 XP ON Disc Edit Original 1 0 01 25 Title Delete Scene Delete Edit Title Name Chapter Mark Index Picture Protec...

Страница 66: ...nal PlayList menu will appear Screen 3 Select Original using B buttons then press ENTER button Original list will appear 4 Select a desired title using K L B buttons then press ENTER button Original menu will appear 5 Select Scene Delete using K L buttons then press ENTER button Option window will appear 6 Press ENTER button to decide a start point then press ENTER button to decide an end point A ...

Страница 67: ...n titles and change the title names from this menu The names you put on the titles will be displayed on a titlelist First 1 Press SETUP button Select DISC using B buttons then press ENTER button DISC menu will appear 2 Select Edit using K L but tons then press ENTER but ton Original PlayList menu will appear Screen Disc Edit Original Disc Edit Format Finalize Disc Protect OFF ON DVD DVD RW DVD RW ...

Страница 68: ...Name 1 0 01 25 A B C a b c 1 2 3 JAN 1 1 00AM CH12 XP Disc Edit Original 1 Title Delete Scene Delete Edit Title Name Chapter Mark Index Picture Set Protect OFF JAN 1 1 00AM CH12 XP 0 01 25 ON Disc Edit Original 1 1 3 2 5 4 JAN 1 1 00AM JAN 1 4 00AM JAN 1 2 00AM JAN 1 3 00AM JAN 1 5 00AM Press ABC DEF GHI JKL MNO PQRS TUV WXYZ space abc def ghi jkl mno pqrs tuv wxyz space space _ 2 3 4 5 6 7 8 9 0 ...

Страница 69: ... Chapter Mark using K L buttons then press ENTER button Option window will appear 6 Select Add or Delete using K L buttons then press ENTER button Option window will appear Add 1 0 01 25 Title Delete Scene Delete Edit Title Name Chapter Mark Index Picture Protect OFF Yes No JAN 1 1 00AM CH12 XP ON Add Delete Disc Edit Original Chapter 1 1 F Disc Edit Original 1 0 01 25 Title Delete Scene Delete Ed...

Страница 70: ...u delete part of a title the picture you chose to be the thumbnail for that part is deleted A default picture will then be used by the unit instead You can use a picture for each title as a thumbnail It helps you remem ber the contents of the title you are playing The beginning picture has been selected as the default First 1 Press SETUP button Select DISC using B buttons then press ENTER button D...

Страница 71: ... may take a while to be completed Disc Edit Original 1 Yes No Title Delete Scene Delete Edit Title Name Chapter Mark Index Picture Set Protect OFF ON Writing to Disc JAN 1 1 00AM CH12 XP Disc Edit Original 1 0 01 25 Yes No Title Delete Scene Delete Edit Title Name Chapter Mark Index Picture Set Protect OFF ON JAN 1 1 00AM CH12 XP F Disc Edit Original 1 Title Delete Scene Delete Edit Title Name Cha...

Страница 72: ...ct Disc Protect from Disc menu then select Yes This operation may take a while to be completed Disc Edit Original 1 Yes No Writing to Disc JAN 1 1 00AM CH12 XP ON Title Delete Scene Delete Edit Title Name Chapter Mark Index Picture Set Protect OFF Disc Edit Original 1 0 01 25 Title Delete Scene Delete Edit Title Name Chapter Mark Index Picture Set Protect OFF Yes No JAN 1 1 00AM CH12 XP ON Disc Ed...

Страница 73: ...ted press SETUP button to exit DISC menu This operation may take a while to be completed Disc Edit Original 2 Yes No Writing to Disc JAN 1 2 00AM CH12 XP OFF Title Delete Scene Delete Edit Title Name Chapter Mark Index Picture Set Protect ON Disc Edit Original 2 0 01 25 Title Delete Scene Delete Edit Title Name Chapter Mark Index Picture Set Protect ON Yes No JAN 1 2 00AM CH12 XP OFF B Disc Edit O...

Страница 74: ...com pleted press SETUP button to exit DISC menu This operation may take a while to be completed Disc Edit Playlist 1 Title Delete Scene Delete Edit Title Name Chapter Mark Index Picture Set Yes No Writing to Disc JAN 1 1 00AM CH12 XP Disc Edit Playlist 1 0 01 25 Title Delete Scene Delete Edit Title Name Chapter Mark Index Picture Set Yes No JAN 1 1 00AM CH12 XP Disc Edit Playlist 1 Title Delete Sc...

Страница 75: ... will appear 5 Select Scene Delete using K L buttons then press ENTER button Option window will appear 6 Press ENTER button to decide a start point then press ENTER button to decide an end point A cursor will move to Preview You can check a preview Disc Edit Playlist 1 0 00 55 Title Delete Scene Delete Edit Title Name Chapter Mark Index Picture Start End Preview Delete JAN 1 1 00AM CH12 XP Disc Ed...

Страница 76: ...button DISC menu will appear 2 Select Edit using K L but tons then press ENTER button Original PlayList menu will appear Screen 3 Select PlayList using B buttons then press ENTER button Playlist will appear Disc Edit Playlist 1 1 3 2 5 4 Add New Title Delete Playlist JAN 1 1 00AM JAN 1 4 00AM JAN 1 2 00AM JAN 1 3 00AM JAN 1 5 00AM Disc Edit Original Disc Edit Format Finalize Disc Protect OFF ON DV...

Страница 77: ... 25 A B C a b c 1 2 3 JAN 1 1 00AM CH12 XP Disc Edit Playlist Edit Title Name 1 0 01 25 A B C a b c 1 2 3 JAN 1 1 00AM CH12 XP Disc Edit Playlist 1 Title Delete Scene Delete Edit Title Name Chapter Mark Index Picture Set 0 01 25 JAN 1 1 00AM CH12 XP Press ABC DEF GHI JKL MNO PQRS TUV WXYZ space abc def ghi jkl mno pqrs tuv wxyz space space _ 2 3 4 5 6 7 8 9 0 1 ABC abc Select 123 1 1 2 3 4 5 6 7 8...

Страница 78: ...or Delete using K L buttons then press ENTER button Option window will appear Add 1 0 01 25 Title Delete Scene Delete Edit Title Name Chapter Mark Index Picture Set Add Delete Yes No JAN 1 1 00AM CH12 XP Disc Edit Playlist Chapter 1 1 F Disc Edit Playlist 1 0 01 25 Title Delete Scene Delete Edit Title Name Chapter Mark Index Picture Set Add Delete JAN 1 1 00AM CH12 XP Chapter 1 1 Disc Edit Playlis...

Страница 79: ...12 XP Disc Edit Playlist Chapter 2 2 F Note When you delete part of a title the picture you chose to be the thumbnail for that part is deleted A default picture will then be used by the unit instead Setting pictures for thumbnails You can use a picture for each title as a thumbnail It helps you remember the contents of the title you are playing The begin ning picture has been selected as the defau...

Страница 80: ...Scene Delete Edit Title Name Chapter Mark Index Picture Set Writing to Disc JAN 1 1 00AM CH12 XP Disc Edit Playlist Disc Edit Playlist 1 0 01 25 Yes No Title Delete Scene Delete Edit Title Name Chapter Mark Index Picture Set JAN 1 1 00AM CH12 XP F Disc Edit Playlist 1 Title Delete Scene Delete Edit Title Name Chapter Mark Index Picture Set 0 01 25 JAN 1 1 00AM CH12 XP Disc Edit Playlist 1 1 3 2 5 ...

Страница 81: ...disc is com pleted press SETUP button to exit DISC menu To delete a title from Playlist refer to Deleting titles on page 74 To delete a Playlist refer to Deleting a Playlist on page 82 Disc Edit Playlist 6 1 1 3 2 5 4 JAN 1 1 00AM JAN 1 4 00AM JAN 1 2 00AM JAN 1 5 00AM JAN 1 3 00AM JAN 12 8 00PM Disc Edit Playlist Add New Title Writing to Disc 58 Disc Edit Playlist Add New Title 1 1 3 2 JAN 12 5 0...

Страница 82: ... ENTER but ton A Playlist will be erased 6 After writing to disc is com pleted press SETUP button to exit DISC menu Disc Edit Playlist Add New Title Delete Playlist 1 1 3 2 5 4 JAN 1 2 00AM JAN 1 3 00AM JAN 1 5 00AM JAN 1 1 00AM JAN 1 4 00AM Add New Title Delete Playlist Yes No Disc Edit Playlist Disc Edit Playlist 1 1 3 2 5 4 Add New Title Delete Playlist JAN 1 1 00AM JAN 1 4 00AM JAN 1 2 00AM JA...

Страница 83: ...n Option window will appear 5 Select Yes using B but tons then press ENTER but ton Title will be deleted 6 After writing to disc is com pleted press SETUP button to exit DISC menu This operation may take a while to be completed Disc Edit 1 Title Delete Edit Title Name Chapter Mark Yes No Writing to Disc JAN 1 1 00AM CH12 XP Disc Edit 1 0 01 25 Title Delete Edit Title Name Chapter Mark Yes No JAN 1...

Страница 84: ... 0 01 25 A B C a b c 1 2 3 JAN 1 1 00AM CH12 XP Disc Edit Edit Title Name 1 0 01 25 A B C a b c 1 2 3 JAN 1 1 00AM CH12 XP Disc Edit 1 Title Delete Edit Title Name Chapter Mark 0 01 25 JAN 1 1 00AM CH12 XP Disc Edit 1 1 3 2 5 4 JAN 1 1 00AM JAN 1 4 00AM JAN 1 2 00AM JAN 1 3 00AM JAN 1 5 00AM Disc Edit Format Finalize DVD DVD R DVD R Naming Titles Press ABC DEF GHI JKL MNO PQRS TUV WXYZ space abc d...

Страница 85: ...he screen saver turns on Set the type of sound signal which outputs from the digital audio output jack Set whether the sound recorded in 96kHz will be down sampled to 48kHz Compressing the range of sound volume Outputting sound during playback in fast forward Set the parental level of your DVD discs Set and change the password Audio Language Subtitle Language OSD Background Transparency OSD Backgr...

Страница 86: ...mic Range Control Fast Forward with Audio 4 3 Letter Box All English Original OFF ON OFF DVD Setup Playback Setting Setup Menu Note Only the languages supported by the disc can be selected Audio Language setting may not be available on some discs You can change or switch off the subtitles on a DVD disc also from the disc menu if it is available POWER REC SPEED AUDIO ZOOM SKIP SKIP OPEN CLOSE TOP M...

Страница 87: ...tup Playback TV Aspect Parental Lock Disc Menu Language Audio Language Subtitle Language Digital Out Dynamic Range Control Fast Forward with Audio 4 3 Letter Box All English Original OFF ON OFF DVD Original English French Spanish Other Setup Playback TV Aspect Parental Lock Disc Menu Language Audio Language Subtitle Language Digital Out Dynamic Range Control Fast Forward with Audio 4 3 Letter Box ...

Страница 88: ...m using K L buttons then press ENTER button Setup Display OSD Background Transparency OSD Background Color OSD Language Screen Saver 10 minutes 1 English 35 DVD Setup Playback Setting Setup Menu POWER REC SPEED AUDIO ZOOM SKIP SKIP OPEN CLOSE TOP MENU SPACE VCR SETUP CM SKIP TIMER PROG RETURN 1 2 3 4 5 6 7 8 0 9 STOP PLAY CH VIDEO TV SLOW PAUSE ABC DEF GHI JKL MNO PQRS REC OTR REC MONITOR MENU LIS...

Страница 89: ...utes English Français Español OSD Background Transparency Default 35 Set the background transparency of OSD screen You can choose one among 0 through 100 Select a setting using K L buttons then press ENTER button Your setting will be activated Select a setting using K L buttons then press ENTER button Your setting will be activated Select a setting using K L buttons then press ENTER button Your se...

Страница 90: ...mic Range Control Fast Forward with Audio 4 3 Letter Box All English Original OFF ON OFF DVD Setup Playback Setting Setup Menu POWER REC SPEED AUDIO ZOOM SKIP SKIP OPEN CLOSE TOP MENU SPACE VCR SETUP CM SKIP TIMER PROG RETURN 1 2 3 4 5 6 7 8 0 9 STOP PLAY CH VIDEO TV SLOW PAUSE ABC DEF GHI JKL MNO PQRS REC OTR REC MONITOR MENU LIST CLEAR C RESET SEARCH MODE ENTER DISPLAY TUV WXYZ DVD 1 2 Press STO...

Страница 91: ...pear Proceed to steps A or B Select a setting using K L buttons then press ENTER button Your setting will be activated Select a setting using K L buttons then press ENTER button Your setting will be activated Dynamic Range Control Default ON Set to ON to compress the range between soft and loud sounds Fast Forward with Audio Default OFF Set to ON to output sound during playback in x2 fast forward ...

Страница 92: ...SKIP OPEN CLOSE TOP MENU SPACE VCR SETUP CM SKIP TIMER PROG RETURN 1 2 3 4 5 6 7 8 0 9 STOP PLAY CH VIDEO TV SLOW PAUSE ABC DEF GHI JKL MNO PQRS REC OTR REC MONITOR MENU LIST CLEAR C RESET SEARCH MODE ENTER DISPLAY TUV WXYZ DVD 1 2 Press STOP button if you are playing a disc 3 4 5 Some DVD Video discs feature Parental Control setting Playback will stop if the ratings exceed the levels you set it w...

Страница 93: ...to exit SETUP menu A password has been set already Setup Playback TV Aspect Parental Lock Disc Menu Language Audio Language Subtitle Language Digital Out Dynamic Range Control Fast Forward with Audio 4 3 Letter Box All English Original OFF ON OFF DVD All 8 7 6 5 4 3 2 1 Change Password Yes No Setup Playback TV Aspect Parental Lock Disc Menu Language Audio Language Subtitle Language Digital Out Dyn...

Страница 94: ...Recording and One touch timer recording Before recording make sure The desired channel is selected by pressing the number buttons on the remote control or CHANNEL K L buttons on the front panel of the unit There is a tape with a recording tab in the unit The desired recording speed can be selected SP standard play or SLP super long play by pressing REC SPEED button on the remote control Recording ...

Страница 95: ...NITOR MENU LIST CLEAR C RESET SEARCH MODE ENTER DISPLAY TUV WXYZ DVD 1 One touch timer recording 0 30 1 00 Normal recording 7 30 8 00 Search 1 1 1 An index mark will be assigned at the beginning of each recording you make You may skip to a specif ic marked point by following the steps below First 1 Press SEARCH MODE button so that the index search menu appears 2 Enter the number of record ings you...

Страница 96: ...ture Search Still Slow mode press PLAY button VCR functions Search cont d Hi Fi Your Selection Type of recorded tape non Hi Fi tapes Hi Fi tapes recorded in Hi Fi stereo Hi Fi tapes recorded second audio program Hi Fi tapes recorded main audio program MONO Monaural L R Main audio program Second audio program Monaural R channel L channel R Main audio program Second audio program Monaural L Main aud...

Страница 97: ...Adjust tracking control for better picture by pressing CHANNEL o p buttons on this unit or CH o p buttons while you are playing a video tape TV program pictures are distorted Adjust TV antenna Adjust the picture see the TV s instruction manual Place the unit and TV farther apart Place the TV and any bunched antenna cables farther apart TV program reception does not fill the screen Try to set the c...

Страница 98: ...s 22 23 Disconnect the AC power cord from the AC outlet and connect it again The program contains copy protection signals that restricts copying The timer setting overlapped with another setting that was set later or has priority The subtitle language cannot be changed or turned off Multilingual subtitle are not recorded on the DVDVIDEO The DVDVIDEO prohibits changing of the subtitles Try changing...

Страница 99: ...nto a DVD RW disc which is not compatible with CPRM You are trying to record on to the protected disc which is set in the Disc Setting Menu Insert the DVD Video disc with region codes 1 or ALL Check the Parental Lock setting pages 92 93 You cannot record copy prohibited programs Set DVD RW Recording Format to VR mode page 28 Release the disc protect setting in the Disc Setting menu page 42 Insert ...

Страница 100: ...tles comes up to the maximum 99 You are trying to record onto a VR mode DVD RW disc on which the number of recording chapters comes up to the maximum 999 This disc has no space to write the Control Information onto when recording or deleting contents When editing has been repeatedly performed the control Information area may become full even if recording area has enough space This disc s working a...

Страница 101: ...ut channel of the unit to CH 4 by pressing VIDEO TV button for 3 seconds The RF output channel will alternate between CH3 and CH4 as follows Changing the RF output channel is available only when the unit is in DVD mode RF ON CH4 3 seconds RF ON CH3 RF ON CH4 3 seconds 3 seconds 3 seconds SPACE VCR 1 2 3 4 5 6 7 8 0 9 CH VIDEO TV SLOW PAUSE GHI JKL MNO PQRS DISPLAY TUV WXYZ DVD RF converter output ...

Страница 102: ...lese 6555 Siswat 6565 Slovak 6557 Slovenian 6558 Somali 6561 Spanish 5165 Sundanese 6567 Swahili 6569 Swedish 6568 Tagalog 6658 Tajik 6653 Tamil 6647 Tatar 6666 Telugu 6651 Thai 6654 Tibetan 4861 Tigrinya 6655 Tonga 6661 Tsonga 6665 Turkish 6664 Turkmen 6657 Twi 6669 Ukrainian 6757 Urdu 6764 Uzbek 6772 Vietnamese 6855 Volapuk 6861 Welsh 4971 Wolof 6961 Xhosa 7054 Yiddish 5655 Yoruba 7161 Zulu 7267...

Страница 103: ...es on this unit Finalize To make DVD discs which have been recorded on possible to play in DVD players With this unit it is possible to finalize DVD R DVD RW discs PBC VCD only Playback Control This function allows you to play interactive software using menu screen See also Title in the Glossary PCM Pulse Code Modulation The most common system of encoding digital audio found on CDs and DAT Excelle...

Страница 104: ...3 CD R RW Video Cassette Tape Four heads AC120V 60 Hz 37 W standby 4 3 W 9 5 lbs 4 3 kg 17 1 8 x 3 15 16 x 10 1 4 435 x 100 x 261 mm 41Fº to 104Fº 5ºC to 40ºC 5 to 85 no condensation NTSC General Receivable channels VHF UHF CATV RF Converter Converter output 2 13ch 14 69ch C1 C125ch Built inVHF converter VHF channel 3 or 4 Tuner Note The specifications and design of this product are subject to cha...

Страница 105: ...105 Recording Playing discs Editing Before you start Connections Getting started Changing the SETUP menu VCR functions Others MEMO ...

Страница 106: ...s batteries connecting cables cassette tapes compact discs This warranty shall in addition not apply to damages due to handling transportation unpacking set up installation customer adjustments that are covered in the instruction book repair or replacement of parts supplied by other than the EMERSON authorized service depot any malfunction or failure caused by or resulting from abnormal environmen...

Страница 107: ...strer facilement une programmation se reporter à Enregistrement simple de disques DVD aux pages 16 17 après avoir terminé les raccords L enregistrement sur un disque DVD protégé par des droits d auteur est IMPOSSIBLE avec cet appareil EDVR95E GUIDE D UTILISATION Enregistreur de DVD avec magnétoscope Accessoires fournis Enregistrement Lecture d un disque Édition Raccords Démarrage Changement du men...

Страница 108: ...nces préjudiciables aux communications radio Il n est cependant pas garanti que des interférences ne seront pas pro duites dans une installation particulière Si cet appareil cause des interférences préjudiciables à la réception de la radio ou de la télévision ce qui peut être déterminé en le mettant hors puis à nouveau sous tension il est recommandé à l utilisateur de corriger ces interférences en...

Страница 109: ...ent attention aux fiches prises de courant et autres points où ils sortent de l appareil 13 Mise à la terre de l antenne extérieure Si une antenne extérieure ou un système de câble est raccordé au produit véri fier que l antenne ou le système de câble est mis à la terre de manière à assurer une certaine protection contre les surten sions et les charges statiques accumulées L Article 810 du Code na...

Страница 110: ...nts dans le Guide de dépan nage aux pages 97 100 avant de retourner le produit Si cet appareil devient inopérant ne pas essayer de corriger le problème soi même Il ne contient pas de pièces réparables par l utilisateur Mettre hors tension débrancher la fiche d alimentation et appeler la ligne d aide indiquée à la première page pour localiser le Centre de service agréé NETTOYAGE DU BOÎTIER Utiliser...

Страница 111: ...écifications 104 Mémo 105 Déclaration de garantie 106 Avant le démarrage 2 Précautions 2 Table des matières 5 Caractéristiques 6 Aperçu des fonctions 7 Insertion des piles dans la télécommande 9 Utilisation de la télécommande 9 Commutateur magnétoscope d enregisreur de DVD 9 Menu CONFIGURER DISQUE CD 10 Menu d affichage 11 Raccords 13 Raccord à un téléviseur 13 Raccord à un câblosélecteur et un ré...

Страница 112: ...regarder est facile à trouver avec la fonction de recherche Rechercher le point souhaité sur un disque par titre chapitre ou heure Recherche rapide de ce qu on veut voir Il est facile de trouver la partie qu on veut regarder en utilisant la fonction de recherche d index recherche horaire Une marque index sera assignée au début de chaque enregistrement effectué La fonction de recherche horaire elle...

Страница 113: ...Y VCR Appuyer pour démarrer la lecture 20 Touche STOP EJECT VCR Touche EJECT Appuyer pour retirer la cassette de l appareil Touche STOP Appuyer pour arrêter la lecture de la bande Appuyer pour arrêter l enregistrement programmé en cours dans le magnétoscope 21 Touche F FWD VCR Appuyer pour faire avancer rapidement la bande ou pour visualiser l image rapidement en avant pendant la lecture Recherche...

Страница 114: ... régler l appareil au mode d attente de minuterie Appuyer pour annuler le mode d attente de minuterie puis mettre l appareil sous tension 2 Touches numériques DVD VCR Appuyer pour sélectionner les numéros de chaîne Appuyer pour sélectionner un titre chapitre piste sur l affichage ou une chaîne de télévision Egalement appuyer pour entrer des valeurs pour les réglages au menu Configurer 3 Touche DIS...

Страница 115: ...des piles de types différents bien qu elles semblent simlaires des piles différentes ont des tensions différentes Vérifier que les extrémités plus et moins de chaque pile correspondent aux indications dans le logement piles Retirer les piles de l appareil s il doit rester inutilisé un mois ou plus À la mise au rebut des piles usées respecter la régle mentation nationale ou les règles environnement...

Страница 116: ...e la liste de titres quand un disque en mode VR est inséré Original ou Playlist est disponible qui indique les titres enregistrés sur le disque 2 Format Permet d effacer tous les matériaux enregistrés sur le disque Le disque sera totalement vide 3 Fermeture Permet de finaliser un disque con tenant des titres enregistrés 4 Protection de disque mode VR seulement Permet de protéger un disque contre l...

Страница 117: ...eul type de disque est donné en exemple 2 Indique un mode d enregistrement et un temps d enregistrement possible 3 Indique le numéro de la chaîne actuelle 4 Indique le numéro du titre le numéro du chapitre et le temps de lecture écoulé du disque 5 Chaque icône signifie Recherche Audio Sous titres Angle sauf modeVR Répétition Marque Réduction du bruit Zoom DVD RW SP 1 25 Rem CH 1 Mode vidéo 1 1 00 ...

Страница 118: ...tiroir à disque Apparaît quand enreg istrement avec minuterie VCR est en cours Apparaît quand unVCR est en mode d attente d enreg istrement avec minuterie Apparaît pendant le processus de copie du magnétoscope au DVD Apparaît pendant le processus de copie du DVD au magnétoscope Message affiché 1 2 5 3 4 3 Vitesse d enregistrement Indique la vitesse d enregistrement du disque 4 Marque de titre pist...

Страница 119: ...éthode 3 Meilleure image La meilleure image S VIDEO OUT COMPONENT VIDEO OUT Câble audio fourni Câbles vidéo à composants non fournis Cette unité Remarque Raccorder cet appareil directement au téléviseur Si des câbles A V sont raccordés à un magnétoscope les images peuvent être déformées à cause du système de protection contre la copie Les méthodes 2 et 3 sont utiles seulement en mode DVD Méthode 1...

Страница 120: ...mmande Pour l emploi de la chaîne 4 il faudra changer la sortie RF de l appareil à la chaîne 4 Voir Sortie du convertisseur RF à la page 101 2 Au téléviseur sélectionner la chaîne 3 ou 4 la même chaîne que celle sélectionnée à l étape 1 3 Au convertisseur ou à l antenne parabolique sélectionner la chaîne à visualiser ou enregistrer DVD VCR ANTENNA IN OUT Câble RF fourni Câble RF Arrière du télévis...

Страница 121: ...igital et régler Dolby Digital à Flux pour le réglage Sortie numérique au menu CONFIGURER Voir les pages 90 91 La source audio sur un disque en format ambiophonique 5 1 canaux Dolby Digital ne peut pas être enregistrée comme son numérique par une platine MD ou DAT Sauf connexion à un décodeur Dolby Digital régler Dolby Digital à PCM pour le réglage Sortie numérique au menu CONFIGURER La lecture d ...

Страница 122: ...mater le disque au menu CONFIGURER Le format Vidéo mode Vidéo ou le format d enregistrement vidéo mode VR sera disponible selon le type de disque inséré Cela est nécessaire pour préparer le disque pour l enreg istrement Voir les détails aux pages 28 30 Types de disques DVD DVD RW VR DVD RW Video Pour Enregistrer des programmes de télévision Réutiliser en supprimant des matériaux indésirables Monte...

Страница 123: ...si on choisissait un titre de chapitre à l écran de menu Qu est ce que titres et chapitres Les matériaux du disque DVD sont généralement divisés en plusieurs titres Les titres peuvent encore être subdivisés en chapitres Conseil 2 Monter le disque enregistré Le montage des disques est très simple cet appareil offre des fonctions de montage pratiques utilisables seulement avec les disques DVD R RW C...

Страница 124: ...ge auto Préréglage manuel Sélection audio TV Stéréo VCR DVD Configurer Configuration de lecture Remarques Si le préréglage automatique est annulé pendant le préréglage certaines chaînes non encore préréglées peuvent ne pas être reçues La sélection dépendra de la manière dont les chaînes de télévision sont reçues Pour annuler le préréglage automatique pendant le balayage Appuyer sur la touche RETUR...

Страница 125: ...age manuel CH18 Ajouter Effacer CH2 Ajouter Effacer Configurer Préréglage canal Préréglage manuel Ajout suppression de chaînes Les chaînes qui ne sont plus reçues ou rarement regardées peuvent être supprimées de la mémoire Des chaînes peuvent aussi être ajoutées dans la mémoire 1 Appuyer sur la touche SETUP pour afficher le menu CONFIGURER DISQUE Le menu CONFIGURER DISQUE s affiche Écran 2 Sélecti...

Страница 126: ...ture Menu de configuration 4 Sélectionner Sélection audio TV avec les touches K L puis appuyer sur la touche ENTER La fenêtre d options s affichera 5 Sélectionner Stéréo ou SAP avec les touches K L puis appuyer sur la touche ENTER Stéréo Fournit l audio principale SAP Secondary Audio Program Seconde piste audio Fournit l audio secondaire Consulter cet article dans le Glossaire à la page 103 pour l...

Страница 127: ... affichera 5 Si le numéro de la station PBS est inconnu sélectionner Auto avec les touches K L puis appuyer sur la touche ENTER Si le numéro de la station PBS est connu sélectionner Manual avec les touches K L puis appuyer sur la touche ENTER Entrer le numéro de la station PBS aux touches numériques ou K L puis appuyer sur la touche ENTER 6 Appuyer sur la touche SETUP pour quitter 7 Appuyer sur la...

Страница 128: ...a date mois jour année avec les touches K L Appuyer sur les touches B pour déplacer le curseur 6 Entrer l heure heures minutes avec les touches K L puis appuyer sur les touches B Un curseur passera à AM ou PM Configurer Horloge Réglage horloge Réglage horloge auto Heure d été Auto JAN 12 2004 LUN 09 24 AM EF VCR DVD Configurer Horloge Réglage horloge Réglage horloge auto Auto Heure d été JAN 12 20...

Страница 129: ...TV SLOW PAUSE ABC DEF GHI JKL MNO PQRS REC OTR REC MONITOR MENU LIST CLEAR C RESET SEARCH MODE ENTER DISPLAY TUV WXYZ DVD 8 7 4 POWER REC SPEED AUDIO ZOOM SKIP SKIP OPEN CLOSE TOP MENU SPACE VCR SETUP CM SKIP TIMER PROG RETURN 1 2 3 4 5 6 7 8 0 9 STOP PLAY CH VIDEO TV SLOW PAUSE ABC DEF GHI JKL MNO PQRS REC OTR REC MONITOR MENU LIST CLEAR C RESET SEARCH MODE ENTER DISPLAY TUV WXYZ DVD 6 5 4 Sélect...

Страница 130: ... d une heure le dernier dimanche d octobre 1 Appuyer sur la touche SETUP pour afficher le menu CONFIGURER DISQUE Le menu CONFIGURER DISQUE s affiche Écran 2 Sélectionner CONFIGURER avec les touches B puis appuyer sur la touche ENTER Le menu CONFIGURER s affiche 3 Sélectionner Horloge avec les touches K L B puis appuyer sur la touche ENTER Le menu Horloge s affichera Configurer Horloge Réglage horl...

Страница 131: ...Remarque sur cette page 5 Sélectionner l option souhaitée avec les touches K L puis appuyer sur la touche ENTER 6 Appuyer sur la touche SETUP pour quitter Configurer Lecture Aspect TV Blocage parental Langue du menu disque Langue audio Langue sous titre Sortie numérique Réglage dynamique Avance rapide audio 16 9 Wide 8 English Original HF EF HF 4 3 Letter Box 4 3 Pan Scan 16 9 Wide DVD Configurer ...

Страница 132: ...e vidéo protégée contre la copie ne peut pas être enregistrée sur cet appareil Les vidéos protégées contre la copie incluent les disques DVD Vidéo et certains programmes satellite En cas de rencontre de matériaux protégés contre la copie pendant l enregistrement l appareil passera automatiquement en pause ou s arrêtera et un message d erreur s affichera sur l écran Une vidéo copie une seule fois p...

Страница 133: ... enregistrés sur cet appareil dans les conditions suivantes Type de disque Mode DVD RW ver 1 1 Compatible ver 1 1 CPRM ModeVidéo DVD R ver 2 0 ModeVidéo Type format de disque ModeVR DVD RW ver 1 1 Compatible ver 1 1 CPRM ModeVidéo DVD RW ver 1 1 Compatible ver 1 1 CPRM ModeVidéo DVD R ver 2 0 Copie libre Copie une fois Copie interdite Enregistrable Non enregistrable Remarques La qualité audio et v...

Страница 134: ... été sélectionné par défaut 5 Sélectionner Mode vidéo ou ModeVR avec les touches K L puis appuyer sur la touche ENTER Le mode d enregistrement sera réglé Configurer Enregist Chapitre Auto Programmation Mode vidéo Mode de compatibilité du lecteur DVD Mode VR Mode de possibilité d édition Format d enregistrement DVD RW VR mode 10 minutes Mode sonorisation VCR DVD DVD Mode vidéo Mode VR Configurer En...

Страница 135: ... Des marques de chapitre seront placées comme spécifié 8 Appuyer sur la touche SETUP pour quitter le menu CONFIGURER Configurer Enregist Chapitre Auto Programmation Format d enregistrement DVD RW VR mode 10 minutes Mode sonorisation VCR DVD DVD HF 5 minutes 10 minutes 15 minutes 30 minutes 60 minutes 6 POWER REC SPEED AUDIO ZOOM SKIP SKIP OPEN CLOSE TOP MENU SPACE VCR SETUP CM SKIP TIMER PROG RETU...

Страница 136: ...uis appuyer sur la touche ENTER Le formatage démarrera 6 Le formatage est terminé 100 sera indiqué Cette opération peut prendre un certain temps Formatage 100 Formatage 58 Disque Edition Format Fermeture Oui Non Etes vous sur Oui Non EF Protection de disque HF Disque Edition Format Fermeture Oui Non Protection de disque HF EF Disque Edition Format Fermeture Protection de disque HF EF Menu de confi...

Страница 137: ...strement à la page 26 3 Vérifier que le format d enregistrement est réglé au mode souhaité Consulter Formatage d un disque aux pages 28 30 Quand un disque DVD RW est chargé ModeVidéo ou modeVR peut être choisi au menu CONFIGURER ModeVidéo est sélectionné par défaut Consulter Sélection du format d enregistrement d un disque vierge aux pages 28 29 Quand un disque DVD R est chargé Les disques DVD R s...

Страница 138: ... de vitesse d enregistrement appuyer plusieurs fois sur la touche REC SPEED La vitesse d enregistrement changera à la pression de la touche comme indiqué ci dessous Consulter Vitesse d enregistrement à la page 26 La vitesse d enregistrement ne peut pas être modifiée pendant l enregistrement 2 Appuyer à nouveau sur la touche REC MONITOR pour quitter XP SP LP EP SLP SEP CH 18 Moniteur enreg XP DVD D...

Страница 139: ...ter Formatage d un disque aux pages 28 30 Quand un disque DVD RW est chargé ModeVidéo ou modeVR peut être choisi au menu CONFIGURER ModeVidéo est sélectionné par défaut Consulter Sélection du format d enregistrement d un disque vierge aux pages 28 29 Quand un disque DVD R est chargé Les disques DVD R sont toujours en mode Vidéo 4 Sélectionner une chaîne à enregistrer avec les touches CH K L ou aux...

Страница 140: ...Vit AM 10 00PM CH8 DVD DVD VCR Quotid L L LUN SAM JAN 01 DÉC 31 L LUN VEN L SAM L VEN L DIM L L Configurer Enregist Programmation Date Début Fin CH Vit JAN 01 AM AM CH8 DVD DVD VCR Configurer Enregist Programmation Date Début Fin CH Vit DVD VCR Configurer Enregist Chapitre Auto Programmation Mode sonorisation Mode vidéo VCR DVD Format d enregistrement DVD RW 10 minutes DVD Configurer Configuration...

Страница 141: ...che TIMER PROG La liste de programmation de la minuterie s affichera 3 Vérifier les informations qui seront requises sur la liste 4 Pour annuler la programmation de la minuterie sélectionner le programme souhaité avec les touches K L puis appuyer sur la touche CLEAR C RESET Pour corriger la programmation de la minuterie sélectionner le programme souhaité avec les touches K L Puis appuyer sur la to...

Страница 142: ...ppareil enregsitre les programmes selon la priorité sur les programmations de minuterie se chevauchent La programmation de minuterie faite en premier a priorité Un enregistrement avec minuterie à faible priorité sera annulé commencera au milieu ou s arrêtera en cours Vérifier les programmations de minuterie se chevauchant et changer la priorité si nécessaire Priorité des réglages se chevauchant 36...

Страница 143: ...TER 4 Sélectionner L1 Arrière avec les touches K L puis appuyer sur la touche ENTER 5 Sélectionner le type de prise d entrée à raccorder avec les touches K L puis appuyer sur la touche ENTER Pour utiliser S VIDEO INPUT sélectionner Entrée S vidéo Pour utiliserVIDEO INPUT composite sélectionner Entrée vidéo DVD Configurer Sélect vidéo L1 Arrière L2 Avant Entrée S vidéo Entrée vidéo Video In Video I...

Страница 144: ... touches CH K L Pour utiliser les prises d entrée à l avant de cet appareil sélectionner la position L2 en appuyant sur 0 0 2 sur la télécommande ou sur les touches CH K L 4 Sélectionner une vitesse d enregistrement avec la touche REC SPEED Se rapporter à Vitesse d enregistrement à la page 26 pour DVD ou la page 94 pourVCR 5 Appuyer sur la touche REC OTR sur l appareil pour démarrer l enregistreme...

Страница 145: ... Le menu CONFIGURER apparaît 3 Sélectionner Enregist avec les touches K L B puis appuyer sur la touche ENTER Le menu Enregist apparaît 4 Sélectionner Mode sonorisation avec les touches K L puis appuyer sur la touche ENTER La fenêtre d options s affiche Configurer Enregist Chapitre Auto Programmation Mode sonorisation Mode vidéo VCR DVD Format d enregistrement DVD RW HF VCR DVD Configurer Enregist ...

Страница 146: ...ppareil ou la touche STOP C sur la télécommande pour arrêter l enregistrement DVD VCR Configurer Enregist Chapitre Auto Programmation Mode sonorisation Mode vidéo VCR DVD Format d enregistrement DVD RW HF VCR DVD VCR DVD VCR DVD DVD à VCR VCR Configurer Enregist Chapitre Auto Programmation Mode sonorisation Mode vidéo VCR DVD Format d enregistrement DVD RW HF VCR DVD VCR DVD VCR DVD VCR à DVD POWE...

Страница 147: ...ement des menus de titres 1 Appuyer sur la touche SETUP pour afficher le menu CONFIGURER DISQUE Le menu CONFIGURER DISQUE s affiche Écran 2 Sélectionner DISQUE avec les touches B puis appuyer sur la touche ENTER Le menu DISQUE s affichera Mode Vidéo Mode VR seulement 3 Sélectionner Fermeture avec les touches K L puis appuyer sur la touche ENTER La fenêtre d options s affichera Mode VR seulement 4 ...

Страница 148: ...prendre un certain temps 58 Ecriture infos Disque Edition Format Fermeture Oui Non Protection de disque HF EF Disque Edition Format Fermeture Protection de disque HF EF Menu de configuration DVD RW DVD RW VR POWER REC SPEED AUDIO ZOOM SKIP SKIP OPEN CLOSE TOP MENU SPACE VCR SETUP CM SKIP TIMER PROG RETURN 1 2 3 4 5 6 7 8 0 9 STOP PLAY CH VIDEO TV SLOW PAUSE ABC DEF GHI JKL MNO PQRS REC OTR REC MON...

Страница 149: ...e DVD Si ces symboles de région n apparaissent pas sur le DVD il n est pas lisible sur cet appareil Les numéros dans le globe indiquent la région du monde La Région 1 représente les États Unis le Canada les Bermudes les Iles Virgin américaines et de petites zones proches de l Australie Un DVD étiqueté pour une région spécifique peut seulement être lu sur un enregistreur de DVD portant le même code...

Страница 150: ...ec la touche MENU LIST Mode Vidéo Mode VR Touche MENU LIST 5 Sélectionner le titre souhaité avec les touches K L B puis appuyer sur la touche ENTER La lecture démarrera 6 Appuyer sur la touche STOP C pour arrêter la lecture Pour éjecter le disque appuyer sur la touche OPEN CLOSE A pour ouvrir le tiroir à disque puis retirer le disque avant de mettre l appareil hors tension Playlist 5 4 1 1 3 2 JAN...

Страница 151: ...Lecture d un disque Édition Avant le démarrage Raccords Démarrage Changement du menu CONFIGURER Fonctions du magnétoscope Autres 1 Appuyer sur la touche POWER puis sur la touche DVD Pour la lecture d un DVD ou d un CD audio allumer le téléviseur et bien sélectionner l entrée à laquelle l appareil est raccordé 2 Appuyer sur la touche OPEN CLOSE A pour ouvrir le tiroir à disque Le tiroir à disque s ...

Страница 152: ...seur 2 Sélectionner un article avec les touches K L B puis appuyer sur la touche ENTER pour confirmer Continuer ainsi pour configurer toutes les fonctions souhaitées ou démarrer la lecture du disque au menu Touche MENU LIST Affiche le menu du disque DVD variable selon les disques qui peut être identique au menu des titres Touches K L B Déplacent le curseur à l écran Touche ENTER Sélectionne l opti...

Страница 153: ...ec fonction PBC Ver 1 1 sans fonction PBC La lecture d image ainsi que les CD musicaux sont possibles Ver 2 0 avec fonction PBC À l emploi d un CD Vidéo avec fonction PBC PBC apparaît sur l écran et l affichage REMARQUE À la lecture de CD Vidéo avec fonction PBC seul PBC est affiché à la place des indications de temps de lecture et de piste actuelle sur l affichage du panneau avant De plus certain...

Страница 154: ...on Pour les CD Vidéo les vitesses en marche avant arrière sont de x2 x8 et x16 Pour ls fichiers MP3 la vitesse approximative est fixée à x8 Pour revenir à la lecture normale appuyer sur la touche PLAY B x20 x2 x20 x5 x40 x40 g h g h g h g h g h g h Lecture à vitesse normale MP3 MP3 VCD VCD CD CD DVD RW DVD RW VR DVD RW DVD RW Video DVD R DVD R DVD V DVD V Remarque La vitesse en marche avant arrièr...

Страница 155: ...e 6 fois 180 secondes Par ex appuyer une fois sur la touche CM SKIP avance de 30 secondes La lecture reprend automatiquement B Non pub 30 sec DVD RW DVD RW VR DVD RW DVD RW Video DVD R DVD R Pause 1 Pendant la lecture appuyer sur la touche PAUSE F La lecture passera en pause et le son sera assourdi 2 Appuyer sur la touche PLAY B pour reprendre la lecture MP3 MP3 CD CD DVD RW DVD RW VR DVD RW DVD R...

Страница 156: ...ive changera comme suit Pour revenir en lecture normale appuyer sur la touche PLAY B x1 8 Pause x1 16 x1 8 x1 16 x1 2 x1 4 g h g h g h g h g h g h VCD VCD DVD RW DVD RW VR DVD RW DVD RW Video DVD R DVD R DVD V DVD V Remarque Seule la lecture lente en avant est disponible à la lecture de CD Vidéo La vitesse en avant arrière sera indiquée par des icônes comme suit En avant vitesse approx x1 16 x1 8 ...

Страница 157: ... 1 2 3 Configuration de marques Cette fonction permet d assigner un point spécifique sur un disque à rappeler ultérieurement 1 Pendant la lecture appuyer sur la touche DISPLAY Le menu Affichage s affichera Écran 2 Sélectionner l icône avec les touches B puis appuyer sur la touche ENTER Le menu de configuration de marques s affichera Écran 3 Sélectionner le numéro de marque souhaité avec les touche...

Страница 158: ...uche ENTER T pour titre sera mis en évidence Titre Entrer le numéro de titre à chercher avec les touches K L ou aux touches numériques puis appuyer sur la touche ENTER La recherche de titre commencera Chapitre Pour passer à C pour chapitre appuyer sur la touche B Entrer le numéro de chapitre à rechercher avec les touches K L ou aux touches numériques puis appuyer sur la touche ENTER La recherche d...

Страница 159: ... 0 9 STOP PLAY CH VIDEO TV SLOW PAUSE ABC DEF GHI JKL MNO PQRS REC OTR REC MONITOR MENU LIST CLEAR C RESET SEARCH MODE ENTER DISPLAY TUV WXYZ DVD 3 1 2 1 ZOOM SKIP SKIP TOP MENU SPACE VCR SETUP CM SKIP TIMER PROG RETURN 7 8 0 9 STOP PLAY VIDEO TV SLOW PAUSE PQRS REC OTR REC MONITOR MENU LIST CLEAR C RESET SEARCH MODE ENTER DISPLAY TUV WXYZ DVD Recherche horaire 1 Pendant la lecture appuyer sur la ...

Страница 160: ...i tion MP3 seulement HF Titre Chapitre A B 1 1 01 23 45 DVD Video 1 1 01 23 45 DVD Video MP3 MP3 VCD VCD CD CD DVD RW DVD RW VR DVD RW DVD RW Video DVD R DVD R DVD V DVD V POWER REC SPEED AUDIO ZOOM SKIP SKIP OPEN CLOSE TOP MENU SPACE VCR SETUP CM SKIP TIMER PROG RETURN 1 2 3 4 5 6 7 8 0 9 STOP PLAY CH VIDEO TV SLOW PAUSE ABC DEF GHI JKL MNO PQRS REC OTR REC MONITOR MENU LIST CLEAR C RESET SEARCH ...

Страница 161: ...Écran 2 Sélectionner CD avec les touches B puis appuyer sur la touche ENTER Le menu Mode lecture CD s affichera 3 Sélectionner Lecture pro grammée avec les touches K L puis appuyer sur la touche ENTER La liste de lecture programmée s affichera 4 Sélectionner la piste souhaitée avec les touches K L puis appuyer sur la touche ENTER ou la touche B Le curseur passera à la suivante 5 Appuyer sur la tou...

Страница 162: ... L audio secondaire R ou un mélange des deux L R 1 Pendant la Lecture appuyer sur la touche DISPLAY Le menu Affichage s affiche Écran 2 Sélectionner l icône avec les touches B puis appuyer sur la touche ENTER Le menu audio s affichera DVD Vidéo DVD RW mode VR 3 Sélectionner la prise son audio désirée avec les touch es K L puis appuyer sur la touche ENTER DVD Vidéo La piste audio sera commutée DVD ...

Страница 163: ...rs langues la boîte indique généralement les langues de sous titres disponibles Il est possible de changer de langue de sous titres à tout moment pendant la lecture 1 Pendant la lecture appuyer sur la touche DISPLAY Le menu Affichage s affiche Écran 2 Sélectionner l icône avec les touches B puis appuyer sur la touche ENTER Le menu Langue sous titre apparaîtra 3 Sélectionner la langue de sous titre...

Страница 164: ...ionner l option souhaitée avec les touches K L puis appuyer sur la touche ENTER Le réglage sera activé Cette fonction réduit le bruit sur l image lue À la lecture de mauvais disques enregistrés en mode longue durée comme SLP ou SEP sélectionner Type 1 ou Type 2 Le Type 2 est plus efficace Pour la lecture de disques avec peu de parasites comme les disques DVD Vidéo sélectionner HF 1 1 00 00 00 DVD ...

Страница 165: ...arre d état du temps du titre 7 Icône de flèche qui signifie que la liste de titres contient une page suivante ou prédécente Appuyez sur la touche B ou en suivant l indication de l icône 8 État de lecture du disque actuel Édition de disques avec mode Vidéo Les disques avec modeVidéo peuvent être montés pour les articles suivants Noter qu une fois montés les titres ne resteront pas comme originaux ...

Страница 166: ...tage selon ses préférences sans perdre les titres originaux Les éléments suivants peuvent être montés avec une liste de lecture Suppression de titres Voir la page 74 Suppression de parties de titres Voir les pages 75 76 Attribution des titres Voir les pages 76 77 Réglage ou suppression de marques de chapitre Voir les pages 78 79 Réglage d images pour les images miniatures Voir les pages 79 80 Ajou...

Страница 167: ...facer titre avec les touches K L puis appuyer sur la touche ENTER La fenêtre d options apparaîtra 5 Sélectionner Oui avec les touches B puis appuyer sur la touche ENTER Le titre sera supprimé 6 Après la fin de l écriture sur le disque appuyer sur la touche SETUP pour quitter le menu DISQUE L exécution de cette opération peut demander un certain temps 1 Ecriture infos JAN 1 1 00AM CH12 XP Oui Non E...

Страница 168: ... CH12 XP 1 Effacer titre Editer titre Repère chapitre 0 01 25 JAN 1 1 00AM CH12 XP Disque Edition Disque Edition 1 1 3 2 5 4 JAN 1 1 00AM JAN 1 4 00AM JAN 1 2 00AM JAN 1 3 00AM JAN 1 5 00AM Disque Edition Format Fermeture DVD DVD RW DVD RW Video Attribution des titres ABC DEF GHI JKL MNO PQRS TUV WXYZ abc def ghi jkl mno pqrs tuv wxyz _ 2 3 4 5 6 7 8 9 0 1 ABC abc 123 1 1 2 3 4 5 6 7 8 9 0 Pour su...

Страница 169: ... titre 7 Après la fin de l écriture sur le disque appuyer sur la touche SETUP pour quitter le menu DISQUE L exécution de cette opération peut demander un certain temps Disque Edition Editer titre 1 A B C a b c 1 2 3 abc Oui Non Ecriture infos POWER REC SPEED AUDIO ZOOM SKIP SKIP OPEN CLOSE TOP MENU SPACE VCR SETUP CM SKIP TIMER PROG RETURN 1 2 3 4 5 6 7 8 0 9 STOP PLAY CH VIDEO TV SLOW PAUSE ABC D...

Страница 170: ...a fenêtre d options apparaîtra 5 Sélectionner la durée désirée avec les touches K L puis appuyer sur la touche ENTER La fenêtre d options apparaîtra 6 Sélectionner Oui avec les touches B puis appuyer sur la touche ENTER Une marque de chapitre sera ajoutée 7 Après la fin de l écriture sur le disque appuyer sur la touche SETUP pour quitter le menu DISQUE 1 0 01 25 Effacer titre Editer titre Repère c...

Страница 171: ... avec les touches B puis appuyer sur la touche ENTER Le titre sera supprimé 7 Après la fin de l écriture sur le disque appuyer sur la touche SETUP pour quitter le menu DISQUE L exécution de cette opération peut demander un certain temps 1 Oui Non Ecriture infos JAN 1 1 00AM CH12 XP Disque Edition Original Effacer titre Effacer scene Editer titre Repère chapitre Indexer image Protection HF EF 1 0 0...

Страница 172: ...raîtra Écran 3 Sélectionner Original avec les touches B puis appuyer sur la touche ENTER La liste originale apparaîtra 4 Sélectionner le titre désiré avec les touches K L B puis appuyer sur la touche ENTER Le menu original apparaîtra 5 Sélectionner Effacer scene avec les touches K L puis appuyer sur la touche ENTER La fenêtre d options apparaîtra 6 Appuyer sur la touche ENTER pour fixer d un point...

Страница 173: ...titres Des noms peuvent être donnés aux titres et changés à ce menu Les noms donnés aux titres seront affichés sur la liste des titres D abord 1 Appuyer sur la touche SETUP Sélectionner DISQUE avec les touches B puis appuyer sur la touche ENTER Le menu DISQUE apparaîtra 2 Sélectionner Edition avec les touches K L puis appuyer sur la touche ENTER Le menu Original Playlist apparaîtra Écran Disque Ed...

Страница 174: ...inal Editer titre 1 0 01 25 A B C a b c 1 2 3 JAN 1 1 00AM CH12 XP Disque Edition Original 1 Effacer titre Effacer scene Editer titre Repère chapitre Indexer image Protection HF JAN 1 1 00AM CH12 XP 0 01 25 EF Disque Edition Original 1 1 3 2 5 4 JAN 1 1 00AM JAN 1 4 00AM JAN 1 2 00AM JAN 1 3 00AM JAN 1 5 00AM ABC DEF GHI JKL MNO PQRS TUV WXYZ abc def ghi jkl mno pqrs tuv wxyz _ 2 3 4 5 6 7 8 9 0 1...

Страница 175: ...e ENTER Le menu original apparaîtra 5 Sélectionner Repère chapitre avec les touches K L puis appuyer sur la touche ENTER La fenêtre d options apparaîtra 6 Sélectionner Ajouter ou Effacer avec les touches K L puis appuyer sur la touche ENTER La fenêtre d options apparaîtra Ajouter 1 0 01 25 Effacer titre Effacer scene Editer titre Repère chapitre Indexer image Protection HF Oui Non JAN 1 1 00AM CH1...

Страница 176: ...Chapitre 2 2 F Remarque Si une partie d un titre est supprimée l image sélectionnée comme image miniature de cette partie sera supprimée L appareil utilisera alors une image par défaut à la place Une image peut être utilisée pour chaque titre comme image miniature Cela aide à se rappeler le contenu du titre lu L image de début a été sélectionnée par défaut D abord 1 Appuyer sur la touche SETUP Sél...

Страница 177: ...he SETUP pour quitter le menu DISQUE L exécution de cette opération peut demander un certain temps Disque Edition Original 1 Oui Non Effacer titre Effacer scene Editer titre Repère chapitre Indexer image Protection HF EF Ecriture infos JAN 1 1 00AM CH12 XP Disque Edition Original 1 0 01 25 Oui Non Effacer titre Effacer scene Editer titre Repère chapitre Indexer image Protection HF EF JAN 1 1 00AM ...

Страница 178: ...E Pour protéger tout le disque modeVR de DVD RW seulement Sélectionner Protection de disque au menu Disc puis sélectionner Oui L exécution de cette opération peut demander un certain temps Disque Edition Original 1 Oui Non Ecriture infos JAN 1 1 00AM CH12 XP EF Effacer titre Effacer scene Editer titre Repère chapitre Indexer image Protection HF Disque Edition Original 1 0 01 25 Effacer titre Effac...

Страница 179: ... 7 Après la fin de l écriture sur le disque appuyer sur la touche SETUP pour quitter le menu DISQUE L exécution de cette opération peut demander un certain temps Disque Edition Original 2 Oui Non Ecriture infos JAN 1 2 00AM CH12 XP HF Effacer titre Effacer scene Editer titre Repère chapitre Indexer image Protection EF Disque Edition Original 2 0 01 25 Effacer titre Effacer scene Editer titre Repèr...

Страница 180: ...rimé 7 Après la fin de l écriture sur le disque appuyer sur la touche SETUP pour quitter le menu DISQUE L exécution de cette opération peut demander un certain temps Disque Edition Playlist 1 Effacer titre Effacer scene Editer titre Repère chapitre Indexer image Oui Non Ecriture infos JAN 1 1 00AM CH12 XP Disque Edition Playlist 1 0 01 25 Effacer titre Effacer scene Editer titre Repère chapitre In...

Страница 181: ...touche ENTER Le menu Playlist apparaîtra 5 Sélectionner Effacer scene avec les touches K L puis appuyer sur la touche ENTER La fenêtre d options apparaîtra 6 Appuyer sur la touche ENTER pour fixer d un point de départ ensuite appuyer sur la touche ENTER pour fixer un point de fin Le curseur passera à Aperçu Un prévisionnage peut être contrôlé Disque Edition Playlist 1 0 00 55 Effacer titre Effacer...

Страница 182: ...B puis appuyer sur la touche ENTER Le menu DISQUE apparaîtra 2 Sélectionner Edition avec les touches K L puis appuyer sur la touche ENTER Le menu Original Playlist apparaîtra Écran 3 Sélectionner PlayList avec les touches B puis appuyer sur la touche ENTER La Playlist apparaîtra Disque Edition Playlist 1 1 3 2 5 4 Ajouter titre Effacer Playlist JAN 1 1 00AM JAN 1 4 00AM JAN 1 2 00AM JAN 1 3 00AM J...

Страница 183: ...iter titre 1 0 01 25 A B C a b c 1 2 3 JAN 1 1 00AM CH12 XP Disque Edition Playlist Editer titre 1 0 01 25 A B C a b c 1 2 3 JAN 1 1 00AM CH12 XP Disque Edition Playlist 1 Effacer titre Effacer scene Editer titre Repère chapitre Indexer image 0 01 25 JAN 1 1 00AM CH12 XP ABC DEF GHI JKL MNO PQRS TUV WXYZ abc def ghi jkl mno pqrs tuv wxyz _ 2 3 4 5 6 7 8 9 0 1 ABC abc 123 1 1 2 3 4 5 6 7 8 9 0 Pour...

Страница 184: ...r sur la touche ENTER La fenêtre d options apparaîtra 6 Sélectionner Ajouter ou Effacer avec les touches K L puis appuyer sur la touche ENTER La fenêtre d options apparaîtra Ajouter 1 0 01 25 Effacer titre Effacer scene Editer titre Repère chapitre Indexer image Ajouter Effacer Oui Non JAN 1 1 00AM CH12 XP Disque Edition Playlist Chapitre 1 1 F Disque Edition Playlist 1 0 01 25 Effacer titre Effac...

Страница 185: ...JAN 1 1 00AM CH12 XP Disque Edition Playlist Chapitre 2 2 F Remarque Si une partie d un titre est supprimée l image sélectionnée comme image miniature de cette partie sera supprimée L appareil utilisera alors une image par défaut à la place Réglage d images pour les vignettes Une image peut être réglée comme vignettes pour chaque titre Cela aide à se rappeler le contenu du titre lu L image de comm...

Страница 186: ...n peut demander un certain temps 1 Oui Non Effacer titre Effacer scene Editer titre Repère chapitre Indexer image Ecriture infos JAN 1 1 00AM CH12 XP Disque Edition Playlist Disque Edition Playlist 1 0 01 25 Oui Non Effacer titre Effacer scene Editer titre Repère chapitre Indexer image JAN 1 1 00AM CH12 XP F Disque Edition Playlist 1 Effacer titre Effacer scene Editer titre Repère chapitre Indexer...

Страница 187: ...yer sur la touche ENTER 6 Après la fin de l écriture sur le disque appuyer sur la touche SETUP pour quitter le menu DISQUE Pour supprimer un titre de la Playlist consulter Suppression de titres à la page 74 Pour supprimer une Playlist consulter Suppression d une Playlist à la page 82 Disque Edition Playlist 6 1 1 3 2 5 4 JAN 1 1 00AM JAN 1 4 00AM JAN 1 2 00AM JAN 1 5 00AM JAN 1 3 00AM JAN 12 8 00P...

Страница 188: ...ui avec les touches B puis appuyer sur la touche ENTER La liste de lecture sera supprimée 6 Après la fin de l écriture sur le disque appuyer sur la touche SETUP pour quitter le menu DISQUE Disque Edition Playlist Ajouter titre Effacer Playlist 1 1 3 2 5 4 JAN 1 2 00AM JAN 1 3 00AM JAN 1 5 00AM JAN 1 1 00AM JAN 1 4 00AM Ajouter titre Effacer Playlist Oui Non Disque Edition Playlist Disque Edition P...

Страница 189: ...appuyer sur la touche ENTER La fenêtre d options apparaîtra 5 Sélectionner Oui avec les touches B puis appuyer sur la touche ENTER Le titre sera supprimé 6 Après la fin de l écriture sur le disque appuyer sur la touche SETUP pour quitter le menu DISQUE L exécution de cette opération peut demander un certain temps Disque Edition 1 Effacer titre Editer titre Repère chapitre Oui Non Ecriture infos JA...

Страница 190: ...i Non Ecriture infos Disque Edition Editer titre 1 0 01 25 A B C a b c 1 2 3 JAN 1 1 00AM CH12 XP Disque Edition Editer titre 1 0 01 25 A B C a b c 1 2 3 JAN 1 1 00AM CH12 XP Disque Edition 1 Effacer titre Editer titre Repère chapitre 0 01 25 JAN 1 1 00AM CH12 XP Disque Edition 1 1 3 2 5 4 JAN 1 1 00AM JAN 1 4 00AM JAN 1 2 00AM JAN 1 3 00AM JAN 1 5 00AM Disque Edition Format Fermeture DVD DVD R DV...

Страница 191: ... laquelle l économiseur d écran s active Régler le type de signal sonore qui sera sorti des prises de sortie audio numériques Régler si le son enregistré à 96 kHz sera sous échantillonné ou non à 48 kHz Compression de la plage du volume sonore Sortie du son pendant la lecture rapide en avant Régler le niveau parental de ses disques DVD Régler et changer le mot de passe Langue audio Langue sous tit...

Страница 192: ...rtie numérique Réglage dynamique Avance rapide audio 4 3 Letter Box Tout Anglais Original HF EF HF DVD Configurer Configuration de lecture Menu de configuration Remarques Seules les langues assistées par le disque sont sélectionnables Le réglage Langue audio peut ne pas être disponible sur certains disques Il est aussi possible de changer ou désactiver les sous titres d un disque DVD à partir du m...

Страница 193: ...e parental Langue du menu disque Langue audio Langue sous titre Sortie numérique Réglage dynamique Avance rapide audio 4 3 Letter Box Tout English Original OFF EF HF DVD Original Anglais Français Espagnol Autre Configurer Lecture Aspect TV Blocage parental Langue du menu disque Langue audio Langue sous titre Sortie numérique Réglage dynamique Avance rapide audio 4 3 Letter Box Tout English Origina...

Страница 194: ...ctionner le poste souhaité avec les touches K L puis appuyer sur la touche ENTER Configurer Affichage Transparence fond ASE Couleur fond ASE Langue ASE Economiseur d écran 10 minutes 1 Français 35 DVD Configurer Configuration de lecture Menu de configuration POWER REC SPEED AUDIO ZOOM SKIP SKIP OPEN CLOSE TOP MENU SPACE VCR SETUP CM SKIP TIMER PROG RETURN 1 2 3 4 5 6 7 8 0 9 STOP PLAY CH VIDEO TV ...

Страница 195: ... fond de l affichage OSD Défaut 35 Régler la transparence de l arrière plan de l affichage OSD Choix de 0 à 100 Sélectionner un réglage avec les touches K L puis appuyer sur la touche ENTER Ce réglage sera activé SSélectionner un réglage avec les touches K L puis appuyer sur la touche ENTER Ce réglage sera activé Sélectionner un réglage avec les touches K L puis appuyer sur la touche ENTER Ce régl...

Страница 196: ... sous titre Sortie numérique Réglage dynamique Avance rapide audio 4 3 Letter Box Tout Anglais Original HF EF HF DVD Configurer Configuration de lecture Menu de configuration POWER REC SPEED AUDIO ZOOM SKIP SKIP OPEN CLOSE TOP MENU SPACE VCR SETUP CM SKIP TIMER PROG RETURN 1 2 3 4 5 6 7 8 0 9 STOP PLAY CH VIDEO TV SLOW PAUSE ABC DEF GHI JKL MNO PQRS REC OTR REC MONITOR MENU LIST CLEAR C RESET SEAR...

Страница 197: ...onner un réglage avec les touches K L puis appuyer sur la touche ENTER Ce réglage sera activé Sélectionner un réglage avec les touches K L puis appuyer sur la touche ENTER Ce réglage sera activé Réglage dynamique Défaut EF Régler à EF pour comprimer la plage entre les sons doux et forts Avance rapide audio Défaut HF Régler à EF pour fournir le son pendant la lecture en avance rapide x2 5 Appuyer s...

Страница 198: ...uration POWER REC SPEED AUDIO ZOOM SKIP SKIP OPEN CLOSE TOP MENU SPACE VCR SETUP CM SKIP TIMER PROG RETURN 1 2 3 4 5 6 7 8 0 9 STOP PLAY CH VIDEO TV SLOW PAUSE ABC DEF GHI JKL MNO PQRS REC OTR REC MONITOR MENU LIST CLEAR C RESET SEARCH MODE ENTER DISPLAY TUV WXYZ DVD 1 2 Appuyer sur la touche STOP si un disque est en cours de lecture 3 4 5 Certains disques DVD Vidéo ont un réglage de Contrôle pare...

Страница 199: ...P pour quitter le menu CONFIGURER Un mot de passe est déjà réglé Configurer Lecture Aspect TV Blocage parental Langue du menu disque Langue audio Langue sous titre Sortie numérique Réglage dynamique Avance rapide audio 4 3 Letter Box Tout Anglais Original HF EF HF DVD Tout 8 7 6 5 4 3 2 1 Changer MP Oui Non Configurer Lecture Aspect TV Blocage parental Langue du menu disque Langue audio Langue sou...

Страница 200: ...de l appareil Il y a une cassette avec ergot d enregistrement dans l appareil La vitesse d enregistrement souhaitée SP lecture standard ou SLP lecture super longue peut être sélectionnée en appuyant sur la touche REC SPEED sur la télécommande Vitesse d enregistrement Stéréo ou SAP est sélectionné D abord 1 Appuyer sur la touche REC OTR pour démarrer l enregistrement Pour temporairement arrêter l e...

Страница 201: ...OW PAUSE ABC DEF GHI JKL MNO PQRS REC OTR REC MONITOR MENU LIST CLEAR C RESET SEARCH MODE ENTER DISPLAY TUV WXYZ DVD 1 Enregistrement avec minuterie par simple pression 0 30 1 00 Enregistrement normal 7 30 8 00 Recherche 1 1 1 Une marque index sera assignée au début de chaque enregistrement effectué Il est possible de sauter à un point spécifique marqué en procédant comme suit D abord 1 Appuyer su...

Страница 202: ...partir du mode recherche d image arrêt sur image lecture lente appuyer sur la touche PLAY Fonctions du magnétoscope Recherche suite Hi Fi Sélection Type de cassette enregistrée Cassette non Hi Fi Cassette Hi Fi enregistrée en stéréo Hi Fi Second programme audio enregistré sur cassette Hi Fi Programme audio principal enregistré sur cassette Hi Fi MONO Monaural L R Programme audio principal Second p...

Страница 203: ...lignement pour obtenir une meilleure image en appuyant sur les touches CHANNEL o p sur cet appareil ou les touches CH o p pendant la lecture d une cassette vidéo Les images du programme de télévision sont déformées Ajuster l antenne du téléviseur Ajuster l image voir le mode d emploi du téléviseur Eloigner davantage l appareil et le téléviseur Eloigner davantage le téléviseur et toute antenne grou...

Страница 204: ...r de la prise murale puis le reconnecter Le programme contient des signaux de protection contre la copie qui limitent la copie Le réglage de la minuterie a chevauché un autre réglage qui a été fait plus tard ou avait priorité La modification ou la désactivation de la langue des sous titres est impossible Des sous titres multilingues ne sont pas enregistrés sur le DVDVIDEO Le DVDVIDEO interdit le c...

Страница 205: ...u CONFIGURER interdit la lecture La fonction d enregistrement a rencontré un programme interdisant la copie L enregistrement d un programme copiable une fois a été tenté sur un disque DVD RW en modeVidéo ou un disque DVD R Un enregistrement sur un disque non enregistrable a été tenté ou bien l état du disque interdit l enregistrement L enregistrement d un programme copiable une fois a été tenté su...

Страница 206: ...ments sont effectués à répétition sur un disque instable cette zone peut devenir pleine Essai d enregistrement sur un disque déjà finalisé Supprimer des titres inutiles pages 61 65 74 Supprimer des marques de chapitre inutiles pages 69 78 Supprimer des titres inutiles pages 61 66 75 Formater le disque pages 28 29 ou insérer un nouveau disque Libérer l état de finalisation de ce disque page 41 Erre...

Страница 207: ...nde Si des parasites apparaissent changer la chaîne de sortie RF de l appareil à CH 4 en appuyant 3 secondes sur la toucheVIDEO TV La chaîne de sortie RF alternera entre CH3 et CH4 comme suit Le changement de la chaîne de sortie RF est possible seulement quand l appareil est en mode DVD RF ON CH4 3 secondes RF ON CH3 RF ON CH4 3 secondes 3 secondes 3 secondes SPACE VCR 1 2 3 4 5 6 7 8 0 9 CH VIDEO...

Страница 208: ...0 Sindhi 6550 Singhalais 6555 Siswat 6565 Slovaque 6557 Slovène 6558 Somalien 6561 Soudanais 6567 Suédois 6568 Swahili 6569 Tagalog 6658 Tajique 6653 Tamoul 6647 Tatare 6666 Tchèque 4965 Thaïlandais 6654 Tibétain 4861 Tigrinya 6655 Tongais 6661 Tsongais 6665 Turc 6664 Turkmène 6657 Twi 6669 Télugu 6651 Ukrainien 6757 Urdu 6764 Vietnamien 6855 Volapük 6861 Wolof 6961 Xhosa 7054 Yiddish 5655 Yoruba ...

Страница 209: ...r et de lire les fichiers sur cet appareil Finaliser Pour rendre des disques DVD sur lesquels des matériaux sont enregistrés lisibles sur des lecteurs de DVD Sur cet appareil il est possible de finaliser des disques DVD R DVD RW PBC VCD seulement Contrôle de la lecture Cette fonction permet de lire des logiciels interactifs en utilisant l écran de menus Voir également Titre dans le Glossaire PCM M...

Страница 210: ... cassettes vidéo Quatre têtes Secteur de 120V 60 Hz 37 W Attente 4 3 W 9 5 lbs 4 3 kg 435 x 100 x 261 mm 17 1 8 x 3 15 16 x 10 1 4 5 à 40 C 41 à 104 F 5 à 85 sans condensation NTSC Généralités Chaînes recevables VHF UHF CATV Convertisseur RF Sortie du convertisseur 2 13 chaînes 14 69 chaînes C1 C125 chaînes Intégré Chaîne 3 ou 4VHF Syntoniseur Remarque Les spécifications et la conception de ce pro...

Страница 211: ...105 Enregistrement Lecture d un disque Édition Avant le démarrage Raccords Démarrage Changement du menu CONFIGURER Fonctions du magnétoscope Autres MÉMO ...

Страница 212: ...s par un service non authorisé un entretien incorrect des réparations ou modifications effectuées par le client les mauvais traitements ou un fonctionnement non approprié la négligence un accident un incendie une inondation ou tout autre cas de force majeure ou le branchement à un circuit à tension incorrecte La garantie de cet appareil de divertissement ne s applique qu à l acheteur au détail ini...

Отзывы: